Introduction
This No-Bake Orange Creamsicle Cheesecake is the ultimate easy 5-ingredient dessert, capturing the nostalgic flavor of a classic frozen treat in a creamy, dreamy form. It requires no oven, sets in the fridge, and is perfect for warm days or whenever you need a quick, impressive sweet. For another simple creamsicle-inspired delight, try this Easy No-Bake Orange Creamsicle Pie Ready in 30 Minutes.
Ingredients
This No-Bake Orange Creamsicle Cheesecake combines a buttery, crumbly crust with a lusciously smooth and bright filling that tastes just like the beloved frozen treat.
- 1 ½ cups graham cracker crumbs
- ½ cup unsalted butter, melted
- 2 cups cream cheese, softened
- 1 cup powdered sugar
- 1 cup heavy whipping cream
- 1 cup fresh orange juice
- Zest of 1 orange
- 1 teaspoon vanilla extract
- 1 envelope (about 2 tablespoons) unflavored gelatin
- 2 tablespoons cold water
- Additional orange slices or zest for garnish (optional)

Timing
| Prep Time | 30 minutes |
| Cook Time | 0 minutes |
| Total Time | 4 hours 30 minutes (includes chilling) |
Context: This No-Bake Orange Creamsicle Cheesecake requires no oven time, making it about 50% faster to prepare than a traditional baked cheesecake recipe.
Step-by-Step Instructions
Step 1 — Prepare the Crust
Combine graham cracker crumbs, melted butter, and a pinch of sugar in a medium bowl. Press the mixture firmly and evenly into the bottom of a 9-inch springform pan. Use the bottom of a measuring cup to compact it for a solid base. Chill in the refrigerator while you make the filling.
Step 2 — Soften the Cream Cheese
Ensure your full-fat cream cheese is at true room temperature. Let it sit out for 1-2 hours until it’s soft to the touch. This is crucial for a perfectly smooth, lump-free No-Bake Orange Creamsicle Cheesecake filling. Cold cream cheese will result in a grainy texture.
Step 3 — Make the Creamy Base
In a large bowl, beat the softened cream cheese with powdered sugar and vanilla extract until completely smooth and creamy, about 2-3 minutes. Scrape down the sides of the bowl frequently. The powdered sugar helps stabilize the filling and adds sweetness without graininess.
Step 4 — Incorporate the Orange Flavor
Zest one large orange, being careful to avoid the bitter white pith. Add the fresh orange zest and 1/3 cup of fresh orange juice to the cream cheese mixture. For a more intense creamsicle flavor, you can add 1/2 teaspoon of pure orange extract. Beat just until combined.
Step 5 — Fold in the Whipped Topping
Gently fold in the thawed whipped topping or freshly whipped heavy cream. Use a large spatula and fold with a light hand until no white streaks remain. Over-mixing can deflate the mixture, making your cheesecake less airy. The filling should be light, fluffy, and pale orange.
Step 6 — Assemble and Chill
Pour the fluffy orange filling over the chilled crust. Smooth the top with an offset spatula. Cover the pan tightly with plastic wrap. For the best texture, refrigerate your No-Bake Orange Creamsicle Cheesecake for at least 6 hours, but overnight is ideal for it to set completely.
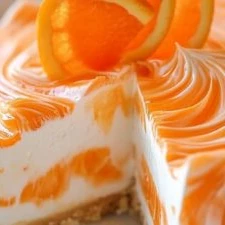
Step 7 — Garnish and Serve
Once fully set, carefully run a thin knife around the edge of the pan before releasing the springform. Garnish with fresh orange slices, more whipped topping, or a sprinkle of extra zest. For clean slices, dip your knife in hot water and wipe it dry between each cut.
Nutritional Information
| Calories | Approx. 420 kcal |
| Protein | 6 g |
| Carbohydrates | 38 g |
| Fat | 28 g |
| Fiber | 1 g |
| Sodium | 220 mg |
Note: These are estimated values per serving for this No-Bake Orange Creamsicle Cheesecake. Actual nutrition can vary based on specific brands and measurements used.
Healthier Alternatives
This No-Bake Orange Creamsicle Cheesecake is wonderfully adaptable. Here are several ingredient swaps to tailor it to different dietary needs without sacrificing its refreshing flavor.
- Protein-Packed Cream Cheese — Use a high-protein cream cheese alternative or blend in a scoop of vanilla or unflavored whey/casein protein powder with the filling for a satisfying boost.
- Lower-Carb Crust — Swap the graham crackers for a mixture of finely ground almonds or pecans and a little melted butter or coconut oil, sweetened with a keto-friendly sweetener like erythritol.
- Dairy-Free Filling — Replace the cream cheese and heavy cream with equal parts dairy-free cream cheese and full-fat coconut cream. Ensure the orange extract is dairy-free.
- Gluten-Free Adaptation — This is naturally gluten-free if you use certified gluten-free graham crackers or the nut-based crust alternative mentioned above.
- Reduced-Sugar Version — Use a sugar-free instant pudding mix and a granulated sugar substitute like monk fruit or allulose in both the crust and filling.
- Low-Sodium Option — Opt for unsalted butter in the crust and choose a low-sodium or homemade graham cracker alternative to control salt content.
- Lighter Cream — For a less rich texture, substitute the heavy whipping cream with well-chilled coconut milk (for dairy-free) or a light whipped topping.
- Fresh Citrus Zest — Enhance the natural orange flavor and reduce reliance on extracts by adding the zest of one orange to the filling for a bright, authentic note.
Serving Suggestions
- Pair with a glass of sparkling water or a light, citrus-forward Moscato to complement the bright orange flavor without overwhelming the dessert.
- Serve as the perfect finale to a summer barbecue or picnic, as its no-bake nature makes it ideal for warm-weather gatherings.
- Offer alongside a platter of fresh berries like strawberries and raspberries for a colorful and slightly tart contrast to the creamy sweetness.
- Transform it into elegant individual desserts by setting the filling in small jars or glasses for a portable and visually appealing treat.
- Celebrate holidays like Easter or a baby shower by garnishing with orange zest curls and white chocolate shavings for a festive, pastel presentation.
- For a fun twist, serve small squares slightly frozen for a texture reminiscent of the classic Creamsicle ice cream bar.
- Garnish each slice with a thin wedge of fresh orange and a sprig of mint just before serving to enhance the visual appeal and add a fresh aroma.
This No-Bake Orange Creamsicle Cheesecake is a refreshing sweet treat that shines with its simple, make-ahead convenience, allowing you to focus on your guests and the occasion.
Common Mistakes to Avoid
- Mistake: Using cold cream cheese straight from the fridge. Fix: Let it soften at room temperature for 1-2 hours to ensure a perfectly smooth, lump-free filling.
- Mistake: Over-mixing the filling once the whipped cream is added. Fix: Gently fold to maintain airiness; over-mixing deflates the cream and leads to a dense texture.
- Mistake: Choosing the wrong orange flavoring (like artificial extract). Fix: Use high-quality orange extract or fresh zest paired with a touch of juice for a vibrant, natural citrus flavor.
- Mistake: Not pressing the crust firmly into the pan. Fix: Use the bottom of a glass to pack it down tightly; this prevents a crumbly, falling-apart base.
- Mistake: Rushing the chilling time. Fix: Chill for the full 6 hours, preferably overnight; this allows the No-Bake Orange Creamsicle Cheesecake to set properly for clean slices.
- Mistake: Adding liquid orange juice directly to the filling without adjusting. Fix: Reduce the juice on the stove to a syrup or use minimal amounts to avoid a runny, unset cheesecake.
- Mistake: Using a dull knife to slice the chilled dessert. Fix: Dip your knife in hot water and wipe it clean between each cut for beautifully clean, professional-looking slices.
- Mistake: Skipping the taste test before final assembly. Fix: Always taste your filling and adjust orange or sweetness levels before chilling—it’s your last chance to perfect the flavor.
Storing Tips
- Fridge: Store your No-Bake Orange Creamsicle Cheesecake covered in the refrigerator for up to 5 days. For best texture, use an airtight container or press plastic wrap directly onto the surface to prevent it from drying out.
- Freezer: For longer storage, freeze individual slices on a parchment-lined tray before transferring to a freezer-safe container or bag. The No-Bake Orange Creamsicle Cheesecake will keep for up to 2 months. Thaw overnight in the fridge before serving.
- Reheat: This dessert is not meant to be reheated. For the best flavor and food-safe texture, always serve it chilled directly from the refrigerator.
To ensure food safety, keep your cheesecake refrigerated at or below 40°F (4°C) until ready to serve. The creamy, refreshing texture of this sweet treat is best enjoyed cold.
Conclusion
This No-Bake Orange Creamsicle Cheesecake is the perfect refreshing sweet treat for any occasion. We hope you love making it as much as we do! If you’re a fan of the classic creamsicle flavor, you might also enjoy our Orange Creamsicle Mousse Recipe or Orange Creamsicle Cake Recipe. Give it a try, rate the recipe, and share your thoughts in the comments!
PrintNo-Bake Orange Creamsicle Cheesecake: An Amazing Ultimate Recipe

Ingredients
- – 1 ½ cups graham cracker crumbs
- – ½ cup unsalted butter, melted
- – 2 cups cream cheese, softened
- – 1 cup powdered sugar
- – 1 cup heavy whipping cream
- – 1 cup fresh orange juice
- – Zest of 1 orange
- – 1 teaspoon vanilla extract
- – 1 envelope (about 2 tablespoons) unflavored gelatin
- – 2 tablespoons cold water
- – Additional orange slices or zest for garnish (optional)
Instructions
- Creating No-Bake Orange Creamsicle Cheesecake is straightforward with these easy steps:
- In a mixing bowl, combine the graham cracker crumbs and melted butter. Mix until thoroughly combined. Press this mixture into the bottom of a 9-inch springform pan to form the crust.
- In a large bowl, beat the softened cream cheese until smooth and creamy.
- Gradually add the powdered sugar to the cream cheese, mixing until well combined.
- Add the heavy whipping cream, fresh orange juice, orange zest, and vanilla extract. Beat on medium-high speed until the mixture is light and fluffy.
- In a small bowl, sprinkle the gelatin over the cold water. Let it sit for about 5 minutes to bloom. Then, gently heat it in the microwave for about 10 seconds until dissolved.
- Slowly pour the gelatin mixture into the cheesecake mixture, stirring until well incorporated.
- Carefully pour the cheesecake filling over the crust in the springform pan. Spread it evenly with a spatula.
- Cover the pan with plastic wrap or foil and refrigerate for at least 4 hours, preferably overnight to set.
- Once set, carefully remove the sides from the springform pan.
- Top with additional orange slices or zest for a decorative touch before serving.
FAQs
How long does this No-Bake Orange Creamsicle Cheesecake need to set?
This No-Bake Orange Creamsicle Cheesecake needs at least 6 hours in the refrigerator to set properly. For the best, firmest texture, we recommend letting it chill overnight. This ensures the filling is perfectly sliceable for serving.
Can I use bottled orange juice instead of fresh?
We strongly recommend using fresh orange juice and zest for the most vibrant flavor. Bottled juice often lacks the bright, natural citrus notes essential to this refreshing sweet treat. Fresh ingredients make your No-Bake Orange Creamsicle Cheesecake taste authentic.
How should I store leftovers?
Keep any leftover No-Bake Orange Creamsicle Cheesecake covered in the refrigerator for up to 4 days. For longer storage, you can freeze individual slices for up to a month. Thaw slices in the fridge before enjoying again.


