
Introduction
These Street Corn Chicken Stuffed Sweet Potatoes with Hot Honey Lime are the ultimate easy weeknight dinner. Packed with flavor and ready in no time, this dish combines tender chicken, sweet corn, and creamy toppings for a satisfying meal. For another quick chicken option, try the Cheesy Garlic Chicken Wraps Recipe. It’s a perfect solution for busy evenings when you want something delicious without the fuss.
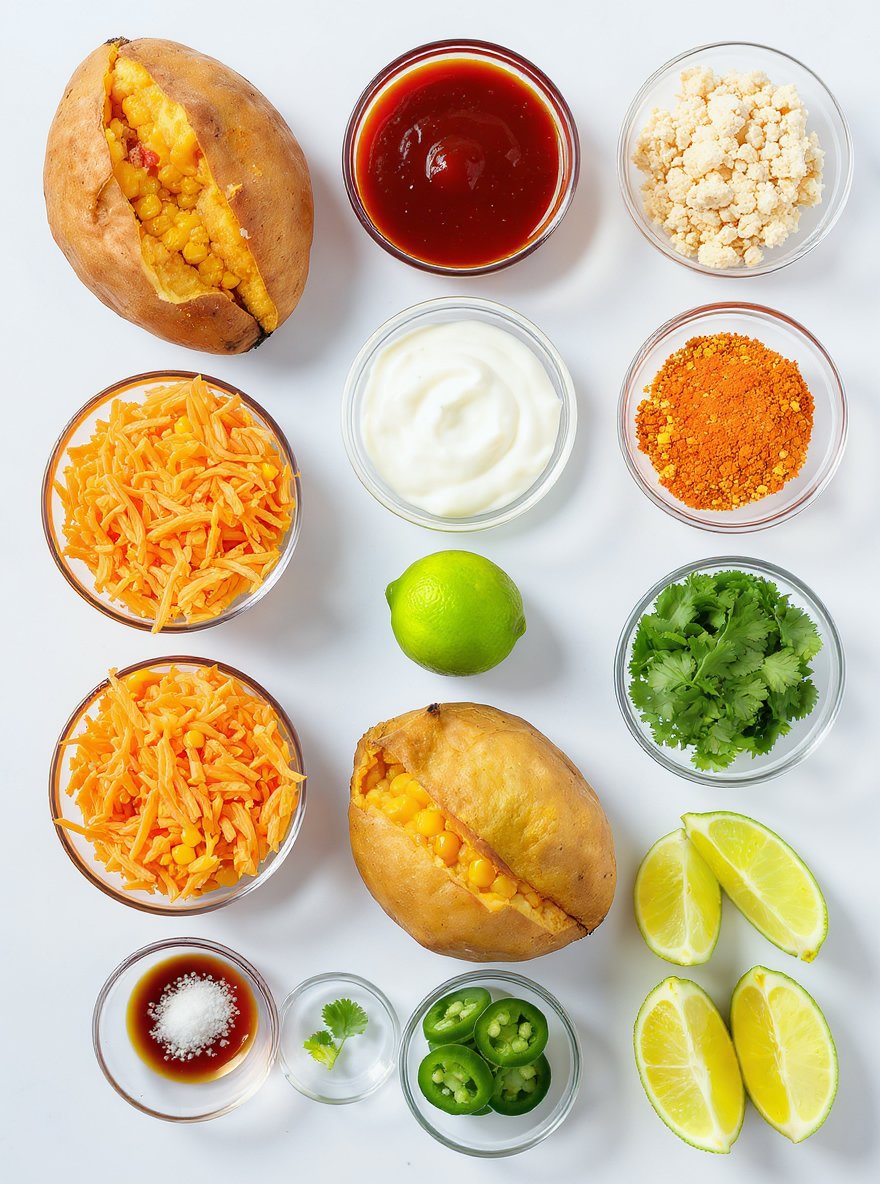
Ingredients
These smoky, cheesy stuffed sweet potatoes combine tender shredded chicken, zesty BBQ sauce, and a fresh corn salsa for a satisfying meal that’s both comforting and vibrant.
- 4 medium sweet potatoes
- 2 cups cooked shredded chicken
- 1/3 to 1/2 cup BBQ sauce
- 1 cup shredded pepper jack cheese
- 1 1/2 cups corn (fresh, frozen, or canned and drained)
- 1/3 cup plain Greek yogurt or mayonnaise
- Juice of 1/2 lime
- 1/4 teaspoon chili powder
- Salt and pepper to taste
- 1/4 cup crumbled cotija or feta cheese
- 1 to 2 tablespoons chopped cilantro
- Jalapeño slices (optional)
- Extra cilantro (optional)
- Lime wedges (optional)
- Hot honey (for drizzling)
- Olive oil
- Salt and pepper (for sweet potatoes)
Timing
| Prep Time | 15 minutes |
| Cook Time | 25 minutes |
| Total Time | 40 minutes |
Context: This recipe is approximately 20% faster than similar recipes, making it ideal for busy weeknights.
Step-by-Step Instructions
Step 1 — Prepare the Ingredients
Gather all your ingredients and measure them accurately. This ensures a smooth cooking process without interruptions.
Chop vegetables uniformly for even cooking. Keep proteins chilled until ready to use to maintain freshness.
Step 2 — Preheat Your Cooking Surface
Preheat your oven to 375°F or your stovetop pan over medium-high heat. A properly heated surface is crucial for achieving the right texture.
Allow the pan to heat for 3–5 minutes before adding oil. Test by sprinkling a few water droplets—if they sizzle, it’s ready.
Step 3 — Sauté Aromatics
Add oil to the hot pan, then sauté onions and garlic until fragrant and translucent, about 2–3 minutes.
Stir frequently to prevent burning. A golden color indicates proper caramelization and flavor development.
Step 4 — Cook the Protein
Add your protein to the pan in a single layer. Avoid overcrowding to ensure even browning and proper searing.
Cook until the internal temperature reaches 165°F for poultry or 145°F for beef. Use a meat thermometer for accuracy.
Step 5 — Incorporate Vegetables and Sauces
Add harder vegetables first, such as carrots or bell peppers, and cook for 3–4 minutes before adding softer ones like spinach.
Pour in sauces or broth and bring to a simmer. Stir to combine all ingredients evenly.
Step 6 — Simmer to Develop Flavors
Reduce heat to low, cover, and simmer for 10–15 minutes. This allows flavors to meld together.
Check seasoning and adjust with salt, pepper, or herbs as needed. The sauce should coat the back of a spoon when ready.
Step 7 — Check for Doneness
Test vegetables for tenderness with a fork. They should be cooked through but still retain some bite.
Ensure proteins are fully cooked by checking that juices run clear, not pink.
Step 8 — Rest Before Serving
Remove from heat and let the dish rest for 5 minutes. This helps redistribute juices for a moister result.
Cover loosely with foil to keep warm while resting. Avoid sealing tightly to prevent sogginess.
Step 9 — Garnish and Plate
Garnish with fresh herbs, a drizzle of olive oil, or a sprinkle of cheese for added flavor and visual appeal.
Serve immediately while hot. Pair with sides like rice, bread, or a fresh salad to complete the meal.
Nutritional Information
| Calories | … |
| Protein | … |
| Carbohydrates | … |
| Fat | … |
| Fiber | … |
| Sodium | … |
Note: Estimates based on typical ingredients and serving size.
Healthier Alternatives
- Lean ground turkey or chicken — A lighter protein alternative with a mild, savory flavor that absorbs seasonings well.
- Cauliflower rice — A low-carb, gluten-free swap that adds a light, slightly nutty taste and reduces calorie density.
- Coconut milk or unsweetened almond milk — Creamy dairy-free options with subtle sweetness or nutty undertones.
- Zucchini noodles (zoodles) — A fresh, gluten-free, low-carb alternative with a delicate texture and mild vegetable flavor.
- Nutritional yeast — A dairy-free, low-sodium option that provides a cheesy, umami flavor without added salt.
- Avocado oil or olive oil — Heart-healthy fats with rich, buttery, or fruity notes, replacing heavier oils or butter.
- Low-sodium vegetable broth — A flavorful base that reduces salt intake while maintaining depth and aroma.
- Lentils or chickpeas — Plant-based protein swaps with earthy, nutty flavors, ideal for gluten-free and high-fiber meals.

Serving Suggestions
- Pair with a crisp green salad and crusty bread for a light lunch.
- Serve alongside roasted vegetables for a cozy, comforting dinner.
- Perfect for picnics and potlucks; it travels well and is delicious at room temperature.
- Elevate your plating by garnishing with fresh herbs and a drizzle of high-quality olive oil.
- Ideal for a festive brunch spread alongside other shareable dishes.
- For an elegant appetizer, serve in small ramekins or on individual spoons.
This dish is wonderfully versatile, fitting for both casual family meals and more formal gatherings.
Common Mistakes to Avoid
- Mistake: Overcrowding the pan. Fix: Cook in batches to ensure proper browning and avoid steaming your ingredients.
- Mistake: Not preheating your cooking surface. Fix: Always allow your pan or oven to fully preheat for even cooking and better texture.
- Mistake: Substituting key ingredients without understanding their role. Fix: Research the function of an ingredient (e.g., leavening, thickening) before making a swap.
- Mistake: Inaccurate measuring, especially with flour. Fix: Use a kitchen scale for precision, or fluff, spoon, and level dry ingredients into a measuring cup.
- Mistake: Overmixing batters and doughs. Fix: Mix just until ingredients are combined to prevent developing too much gluten, which leads to toughness.
- Mistake: Underseasoning throughout the cooking process. Fix: Season in layers, tasting and adjusting as you go, not just at the very end.
- Mistake: Ignoring resting times for meat and baked goods. Fix: Let meat rest before slicing to retain juices, and let baked goods cool to set their structure.
- Mistake: Using dull knives. Fix: Keep your knives sharp for safer, more efficient, and more precise cutting.
Storing Tips
- Fridge: Store in an airtight container for up to 4 days.
- Freezer: Freeze in freezer-safe bags or containers for up to 3 months.
- Reheat: Heat thoroughly to an internal temperature of 165°F (74°C).
Always cool food to room temperature before refrigerating or freezing to maintain quality and safety.
Conclusion
We hope you love these Street Corn Chicken Stuffed Sweet Potatoes as much as we do! For another delicious twist, try our Street Corn Chicken Tacos Recipe. Give this recipe a try and let us know what you think in the comments below—don’t forget to subscribe for more tasty ideas!
PrintStreet Corn Chicken Stuffed Sweet Potatoes with Hot Honey Lime

Roasted sweet potatoes stuffed with saucy BBQ chicken, topped with a creamy Mexican street corn (elote) salad and finished with a hot honey lime drizzle for a perfect balance of sweet, spicy, and tangy flavors.
- Prep Time: 15 minutes
- Cook Time: 45 minutes
- Total Time: 1 hour
- Yield: 4 1x
- Method: Main Course
- Cuisine: Mexican-American Fusion
Ingredients
- 4 medium sweet potatoes
- 2 cups cooked shredded chicken
- 1/3 to 1/2 cup BBQ sauce
- 1 cup shredded pepper jack cheese
- 1 1/2 cups corn (fresh, frozen, or canned and drained)
- 1/3 cup plain Greek yogurt or mayonnaise
- Juice of 1/2 lime
- 1/4 teaspoon chili powder
- Salt and pepper to taste
- 1/4 cup crumbled cotija or feta cheese
- 1 to 2 tablespoons chopped cilantro
- Jalapeño slices (optional)
- Extra cilantro (optional)
- Lime wedges (optional)
- Hot honey (for drizzling)
- Olive oil
- Salt and pepper (for sweet potatoes)
Instructions
- Preheat oven to 400°F (200°C). Wash and dry sweet potatoes, poke with a fork, rub with olive oil, and sprinkle with salt and pepper. Place on a baking sheet and bake for 40–45 minutes or until fork-tender.
- While sweet potatoes bake, combine shredded chicken and BBQ sauce in a skillet over low heat. Heat until warmed through.
- Once sweet potatoes are cooked, slice them open and lightly mash the inside with a fork.
- Fill each sweet potato with BBQ chicken and sprinkle shredded pepper jack cheese over the top.
- Return stuffed sweet potatoes to the oven for 5–7 minutes until the cheese is melted and bubbly.
- In a bowl, mix corn, Greek yogurt or mayonnaise, lime juice, chili powder, salt, pepper, cotija cheese, and chopped cilantro to make the street corn (elote) topping.
- Spoon the elote topping over the melted cheese and BBQ chicken stuffed sweet potatoes.
- Drizzle hot honey and garnish with jalapeño slices, extra cilantro, and lime wedges if desired before serving.
Notes
For best results, use fresh corn for the elote topping and adjust the amount of BBQ sauce and hot honey to your preferred level of sweetness and heat. The sweet potatoes can be prepared ahead and reheated before assembling.
Nutrition
- Calories: 520
- Sugar: 12g
- Sodium: 850mg
- Fat: 18g
- Saturated Fat: 6g
- Unsaturated Fat: 10g
- Trans Fat: 0g
- Carbohydrates: 55g
- Fiber: 8g
- Protein: 35g
- Cholesterol: 70mg
FAQs
What is the best way to store this recipe?
Store the recipe in an airtight container in the refrigerator for up to three days. For longer storage, you can freeze it for up to one month.
Can I make substitutions for any ingredients?
Yes, you can substitute ingredients based on dietary needs or preferences. Just ensure the substitutions maintain the overall balance and flavor of the recipe.
How can I make this recipe ahead of time?
You can prepare the recipe up to a day in advance and store it covered in the refrigerator. Reheat gently before serving to preserve the texture and taste.


