Introduction
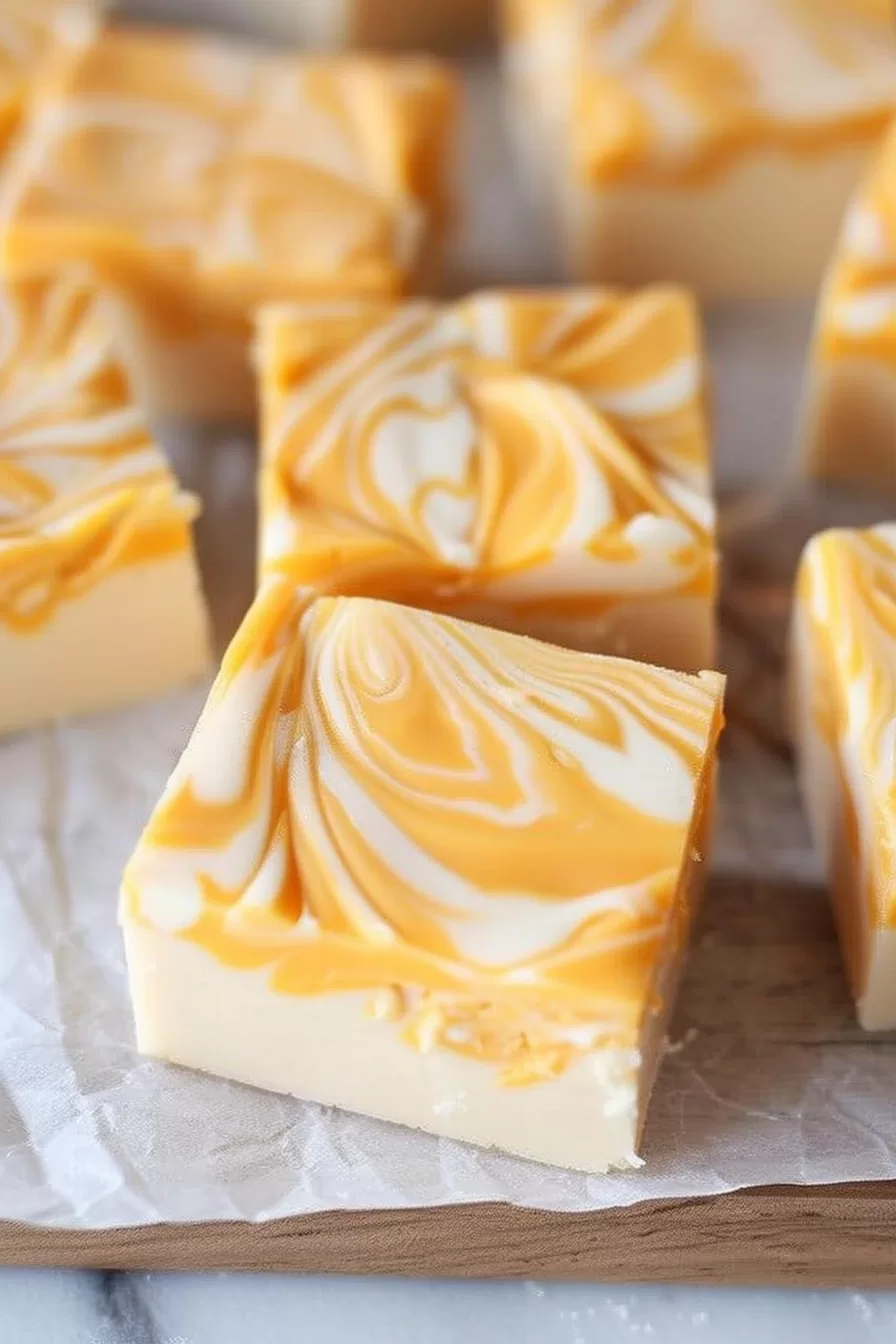
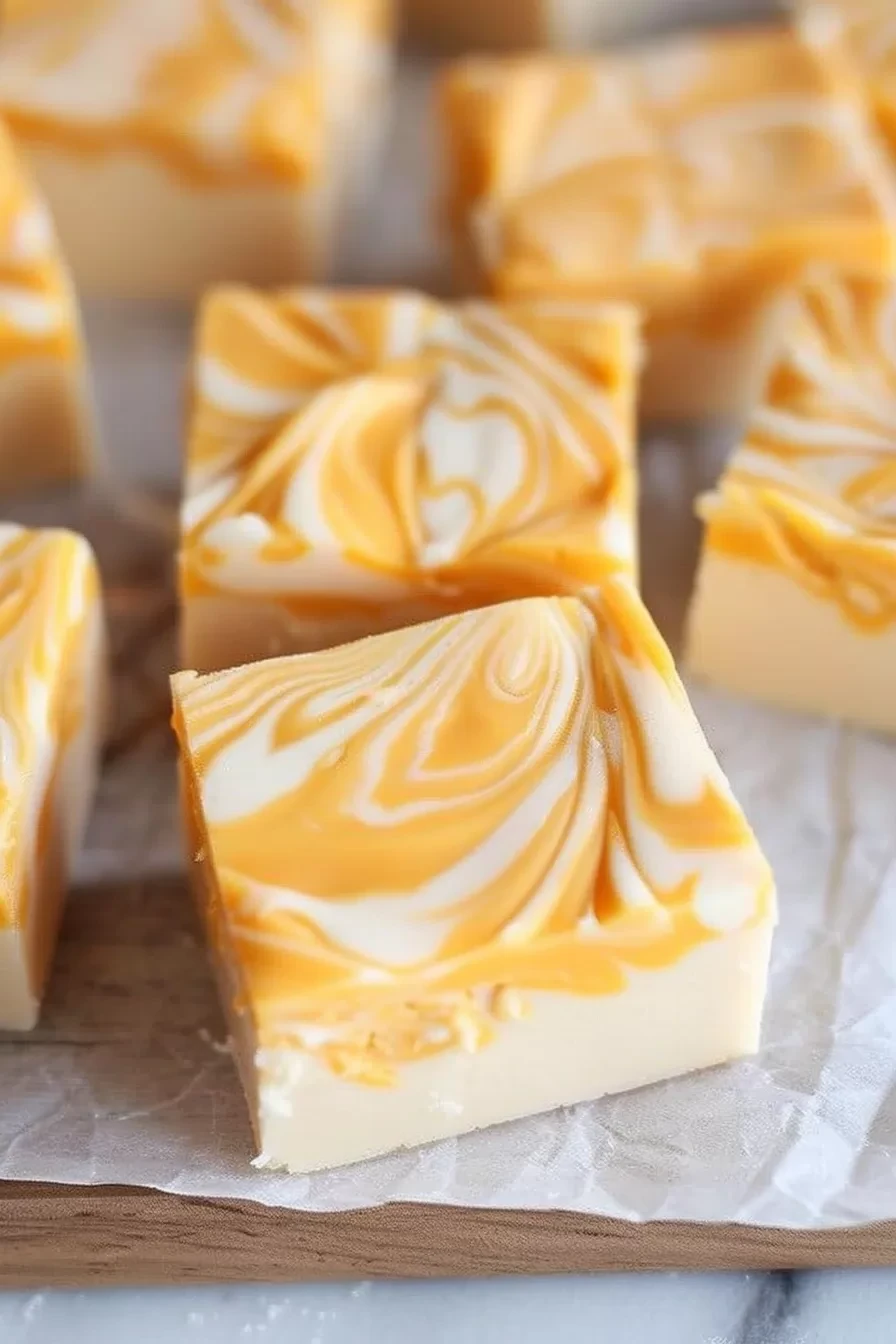
This easy Orange Dreamsicle Fudge recipe captures the nostalgic, creamy flavor of the classic frozen treat in a no-bake dessert. With just a handful of simple ingredients and no oven required, it’s a perfect make-ahead sweet for any occasion. If you love this flavor combination, you might also enjoy these Best Creamsicle Orange Cookies – Easy Homemade Recipe.
Ingredients
This Orange Dreamsicle Fudge recipe combines the bright, citrusy flavor of orange with the creamy sweetness of white chocolate for a nostalgic, melt-in-your-mouth treat.
- 2/3 c. heavy cream
- 3 c. granulated sugar
- 3/4 c. unsalted butter
- 7 oz. marshmallow cream
- 2 c. white chocolate chips
- 3 teaspoons orange extract
- Orange food coloring (up to 10 drops, based on preference; optional)
Timing
| Prep Time | 15 minutes |
| Cook Time | 10 minutes |
| Total Time | 25 minutes (plus 2 hours to set) |
Context: This Orange Dreamsicle Fudge recipe is about 20% faster than similar no-bake fudge recipes, thanks to its simple microwave method.
Step-by-Step Instructions
Step 1 — Prepare Your Pan
Line an 8×8-inch baking pan with parchment paper, leaving an overhang on two opposite sides for easy removal. This ensures your Orange Dreamsicle Fudge will lift out cleanly after setting.
Step 2 — Melt the White Chocolate Base
In a large, microwave-safe bowl, combine white chocolate chips and sweetened condensed milk. Microwave in 30-second bursts, stirring thoroughly after each interval, until the mixture is completely smooth and melted.
Tip: Do not overheat. Stirring well between bursts prevents the chocolate from seizing and ensures a silky fudge texture.
Step 3 — Infuse the Orange Flavor
Once the base is smooth, immediately stir in the orange extract and a few drops of orange food coloring, if using. Mix vigorously until the color and flavor are fully and evenly incorporated.
Tip: For a natural flavor boost, add 1-2 teaspoons of finely grated orange zest along with the extract.
Step 4 — Transfer and Smooth
Pour the vibrant orange fudge mixture into your prepared pan. Use a spatula or the back of a spoon to spread it into an even layer, pushing it into all the corners.
Step 5 — Create the Vanilla Swirl
Drop small spoonfuls of vanilla frosting or marshmallow fluff randomly over the top of the orange layer. Use a knife or toothpick to gently swirl it into the fudge, creating a marbled, dreamsicle effect.
Tip: Don’t over-swirl. A few gentle figure-eight motions will give you beautiful ribbons without muddying the colors.
Step 6 — Chill Until Firm
Place the pan in the refrigerator. Allow the Orange Dreamsicle Fudge to chill for at least 3-4 hours, or until it is completely firm to the touch.
Doneness cue: The fudge should not indent when you press it lightly in the center. Overnight chilling yields the cleanest cuts.
Step 7 — Slice and Serve
Use the parchment paper overhang to lift the entire slab of fudge from the pan. Place it on a cutting board and slice into 1-inch squares using a sharp knife.
Tip: For clean cuts, wipe the knife blade with a hot, damp cloth between slices.
Orange Dreamsicle Fudge Nutrition
| Calories | ~180 kcal |
| Protein | ~2 g |
| Carbohydrates | ~25 g |
| Fat | ~9 g |
| Fiber | ~0 g |
| Sodium | ~25 mg |
Note: Nutritional values for this Orange Dreamsicle Fudge are estimates based on typical ingredients and a standard serving size. Actual values can vary depending on specific brands and measurements used.
Healthier Alternatives
This Orange Dreamsicle Fudge recipe is wonderfully adaptable. Here are some simple ingredient swaps to tailor it to different dietary needs while keeping that iconic creamy, citrus flavor.
- Collagen or Vanilla Protein Powder — For a protein boost, replace up to half a cup of the powdered sugar with a high-quality, unflavored or vanilla collagen or whey/casein isolate powder. This creates a fudge that’s perfect for a post-workout treat.
- Swerve or Allulose — To make a lower-carb, keto-friendly Orange Dreamsicle Fudge, swap the granulated sugar for a 1:1 erythritol blend like Swerve and use a powdered sugar alternative. The flavor remains bright and sweet.
- Full-Fat Coconut Milk — For a rich, dairy-free version, replace the sweetened condensed milk with a can of full-fat coconut milk simmered until reduced by half. It provides a luxurious, creamy base with a subtle tropical note.
- Cashew or Almond Butter — Instead of white chocolate chips, try using melted dairy-free white chocolate or a blend of cacao butter, cashew butter, and a natural sweetener. This creates a wonderfully smooth, dairy-free fudge with healthy fats.
- Orange Zest & Extract — To significantly lower the sodium, omit the optional salt and rely solely on pure orange zest and a high-quality extract (or orange oil) for intense flavor without any added sodium.
- Gluten-Free Vanilla Wafers — If using a cookie crust or mix-in, ensure your Orange Dreamsicle Fudge is gluten-free by using certified gluten-free vanilla wafers or simply omitting them altogether—the fudge itself is naturally gluten-free.
- Greek Yogurt or Cream Cheese — For a tangier, higher-protein twist, blend in a few tablespoons of plain Greek yogurt or softened cream cheese with the condensed milk. It adds richness and cuts the sweetness slightly.
- Natural Food Coloring — To avoid artificial dyes, use a pinch of turmeric (for yellow) mixed with a drop of beet powder (for red) to achieve that classic orange dreamsicle hue naturally.
Serving Suggestions
This vibrant Orange Dreamsicle Fudge is a showstopper on its own, but a few thoughtful touches can elevate it into a truly memorable treat. Here are some ideas for pairings, occasions, and presentation.
- Perfect Pairings: Serve squares alongside a cup of Earl Grey tea or a glass of cold milk to complement the creamy citrus flavor. For a dessert board, pair it with dark chocolate truffles and vanilla shortbread cookies.
- Celebration Centerpiece: This fudge is perfect for summer parties, baby showers, or as a bright addition to a holiday cookie exchange. Its sunny color makes it ideal for Easter or a citrus-themed brunch.
- Gifting with Style: Stack pieces in a clear cellophane bag tied with orange ribbon, or layer them in a decorative tin lined with parchment paper for a beautiful homemade gift.
- Plating for Impact: For a elegant dessert, place a square on a white plate with a dollop of whipped cream and a twist of orange zest. A light dusting of edible gold powder or orange-colored sanding sugar adds a festive sparkle.
- Ice Cream Sundae Topper: Crumble a piece of this Orange Dreamsicle Fudge over a scoop of vanilla bean ice cream for an ultra-decadent sundae.
- Keep it Simple: For casual serving, arrange the cut squares on a simple white platter or a piece of marble slate to let the vibrant orange and white swirls be the star.
Common Mistakes to Avoid
- Mistake: Using fresh orange juice, which can cause the fudge to seize or become grainy. Fix: Use only concentrated orange flavoring or extract for a potent, stable flavor.
- Mistake: Not properly lining the pan, leading to impossible removal and broken pieces. Fix: Line your pan with parchment paper, letting it overhang the sides for easy lifting.
- Mistake: Undermixing the white chocolate, resulting in a streaky, uneven orange and white swirl. Fix: Fold gently but thoroughly until you achieve a marbled effect without fully blending the colors.
- Mistake: Rushing the cooling process at room temperature, which prevents proper setting. Fix: Always chill your Orange Dreamsicle Fudge in the refrigerator for at least 2-3 hours until firm.
- Mistake: Overheating the sweetened condensed milk, causing the chocolate to scorch and become oily. Fix: Use low heat and stir constantly just until the chocolate is fully melted and smooth.
- Mistake: Skipping the vanilla extract, missing the classic “creamsicle” base note. Fix: Add pure vanilla extract to the white chocolate base to round out the citrus flavor.
- Mistake: Cutting the fudge while it’s still warm, creating messy, crumbly slices. Fix: Use a sharp knife dipped in hot water to cut clean squares only after it’s completely set.
- Mistake: Using low-quality white chocolate chips that don’t melt smoothly. Fix: Opt for high-quality baking bars or chips with real cocoa butter for the best texture.
- Mistake: Adding orange zest for color, which can introduce moisture and bitter pith. Fix: Use a drop or two of orange food coloring gel for vibrant color without affecting consistency.
Storing Tips
- Fridge: Store Orange Dreamsicle Fudge in a single layer in an airtight container, separated by parchment paper. It will keep for 1-2 weeks in the refrigerator.
- Freezer: For longer storage, wrap pieces individually and place them in a freezer-safe container or bag. Frozen Orange Dreamsicle Fudge maintains quality for 2-3 months. Thaw overnight in the fridge before serving.
- Reheat: If the fudge becomes too firm, let it sit at room temperature for 15-20 minutes. For a softer texture, microwave a single piece on low power for 5-10 seconds.
Always ensure your fudge is cooled to room temperature before storing to prevent condensation. For food safety, do not leave this fudge at room temperature for more than 2 hours, as dairy ingredients can enter the temperature danger zone above 40°F (4°C).
Conclusion
This Orange Dreamsicle Fudge is a creamy, citrusy treat that perfectly captures the nostalgic flavor of the classic ice cream bar. It’s surprisingly simple to make and always a crowd-pleaser. If you love this flavor, you might also enjoy our Indulge in a Refreshing Citrus Delight with Orange Dreamsicle Salad. We hope you love this recipe—please leave a comment with your review!
PrintOrange Dreamsicle Fudge
Ingredients
- 2/3 c. heavy cream
- 3 c. granulated sugar
- 3/4 c. unsalted butter
- 7 oz. marshmallow cream
- 2 c. white chocolate chips
- 3 teaspoons orange extract
- Orange food coloring (up to 10 drops, based on preference)
Instructions
- Start by greasing a baking pan that measures 9×13 inches and line it with parchment paper making sure to cover all sides.
- In a saucepan combine unsalted butter, (3/4 cup) heavy cream, (2/3 cup) and granulated sugar (3 cups). Stir the mixture until the butter melts completely and everything is well blended.
- Continue cooking the mixture until it reaches 235°F, which is known as the softball stage. Stir for 3 minutes after reaching this temperature.
- Remove the saucepan from the heat. Quickly stir in marshmallow cream (7 oz.). White chocolate chips (2 cups) until the mixture becomes smooth and creamy.
- Transfer about 1 cup of this mixture into a bowl. To the remaining mixture in the pan add orange extract (3 teaspoons) and, up to 10 drops of orange food coloring. Mix thoroughly until you achieve your desired hue.
- Pour the mixture into the pan ensuring it spreads evenly across all areas.
- Next drop dollops of the mixture on top of the one. Use a butter knife to swirl both mixtures creating an appealing marble effect.
- Place the pan in the refrigerator for 2 hours. Until the fudge sets properly.
- Finally cut into squares. Savor this combination of flavors and textures!
FAQs
Can I use fresh orange juice instead of orange extract?
We do not recommend using fresh juice. The water content can prevent your Orange Dreamsicle Fudge from setting properly and may cause it to become grainy. For the best flavor and texture, use a high-quality orange extract or emulsion.
Why is my fudge not setting firm?
This usually happens if the sugar mixture was not cooked to the correct temperature (soft-ball stage, 235-240°F). Ensure you use a candy thermometer for accuracy. Properly cooked and cooled Orange Dreamsicle Fudge will set to a perfect, creamy firmness.
How long can I store this fudge?
Store your Orange Dreamsicle Fudge in an airtight container at room temperature for up to two weeks. For longer storage, you can refrigerate it for up to a month, but let it come to room temperature before serving for the best texture and flavor.


