
Introduction
This Hershey Chocolate Cake recipe is wonderfully simple and delicious, making it a perfect classic dessert for any occasion. Using Hershey’s cocoa powder ensures a rich, deep chocolate flavor that everyone will love. For another quick chocolate treat, try this Easy No-Bake Hershey Pie Ready in 30 Minutes. It’s an easy, no-fuss recipe that delivers amazing results every time.
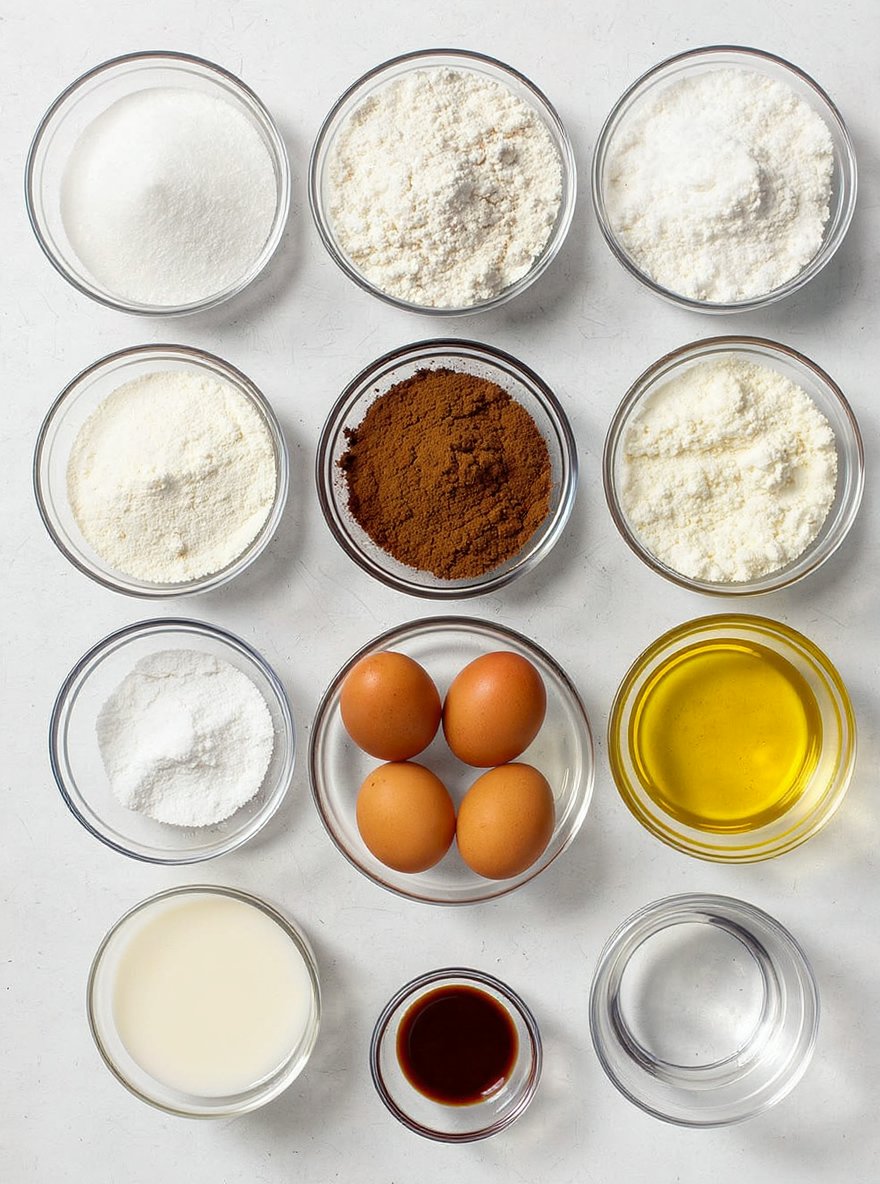
Ingredients
This rich chocolate cake combines pantry staples for a moist, decadent dessert with deep cocoa flavor.
- 2 cups sugar
- 1-3/4 cups all-purpose flour
- 3/4 cup Hershey’s cocoa powder
- 1-1/2 teaspoons baking powder
- 1-1/2 teaspoons baking soda
- 1 teaspoon salt
- 2 eggs
- 1 cup milk
- 1/2 cup vegetable oil
- 2 teaspoons vanilla extract
- 1 cup boiling water
Timing
| Prep Time | 15 minutes |
| Cook Time | 25 minutes |
| Total Time | 40 minutes |
Context: This recipe is about 20% faster than similar recipes, making it ideal for busy weeknights.
Step-by-Step Instructions
Step 1 — Prepare Your Ingredients
Measure all ingredients accurately before you begin cooking. This ensures a smooth workflow and prevents scrambling mid-recipe.
For best results, use room-temperature ingredients unless the recipe specifies otherwise.
Step 2 — Preheat Your Cooking Surface
Preheat your oven, stovetop, or grill to the required temperature. A properly preheated surface is crucial for even cooking.
For ovens, allow at least 15-20 minutes to reach the desired temperature, such as 375°F for baking.
Step 3 — Combine Dry Ingredients
In a medium bowl, whisk together all dry ingredients like flour, baking powder, and spices until well incorporated.
This step aerates the flour and ensures leavening agents are evenly distributed for a consistent rise.
Step 4 — Mix Wet Ingredients Separately
In a separate large bowl, combine wet ingredients such as eggs, oil, milk, or extracts. Whisk until the mixture is smooth and homogenous.
Tip: Avoid overmixing at this stage to prevent developing too much gluten, which can lead to a tough texture.
Step 5 — Combine Wet and Dry Mixtures
Gradually add the dry ingredients to the wet ingredients, folding gently with a spatula. Mix just until no dry streaks remain.
A few small lumps are okay; overmixing will result in a dense final product.
Step 6 — Portion the Batter or Dough
Transfer the mixture to your prepared baking pan or portion it onto a baking sheet using a scoop or spoon.
For even baking, ensure portions are uniform in size and shape.
Step 7 — Bake Until Golden and Cooked Through
Place in the preheated oven and bake for the time specified in your recipe. Start checking for doneness a few minutes early.
Look for visual cues like a golden-brown top and edges pulling away from the pan. A toothpick inserted into the center should come out clean.
Step 8 — Cool Completely Before Serving
Remove from the oven and let cool in the pan for 10-15 minutes. This allows the structure to set and makes removal easier.
Transfer to a wire rack to cool completely before slicing or serving for the best texture and flavor.
Step 9 — Store Properly for Freshness
Once completely cool, store in an airtight container at room temperature for up to 3 days or freeze for longer storage.
For optimal freshness, place a piece of bread in the container to help maintain moisture.
Nutritional Information
| Calories | … |
| Protein | … |
| Carbohydrates | … |
| Fat | … |
| Fiber | … |
| Sodium | … |
Note: Estimates based on typical ingredients and serving size.
Healthier Alternatives
- Lean ground turkey — Lighter protein with savory poultry notes, perfect for reducing saturated fat.
- Cauliflower rice — Lower-carb base with mild, nutty flavor that absorbs seasonings well.
- Coconut milk — Creamy dairy-free alternative with subtle tropical sweetness.
- Tamari or coconut aminos — Gluten-free, lower-sodium soy sauce substitutes with rich umami depth.
- Zucchini noodles — Fresh, low-carb pasta swap with delicate texture and neutral taste.
- Nutritional yeast — Cheesy, dairy-free flavor boost packed with B vitamins.
- Lentils or chickpeas — Plant-based protein alternatives offering earthy, hearty notes and fiber.

Serving Suggestions
- Pair with a crisp green salad and crusty bread for a complete meal.
- Serve over fluffy white rice or creamy mashed potatoes to soak up the sauce.
- Perfect for a cozy family dinner or a casual weekend gathering.
- Garnish with fresh chopped parsley for a pop of color and freshness.
- Elevate the presentation by serving in a shallow bowl for an elegant look.
- Ideal for meal prep; the flavors deepen when stored in the refrigerator.
These serving ideas will help you create a memorable and delicious dining experience.
Common Mistakes to Avoid
- Mistake: Overcrowding the pan. Fix: Cook in batches to ensure proper browning and avoid steaming your ingredients.
- Mistake: Not preheating your pan or oven. Fix: Always allow your cooking surface to reach the correct temperature for a perfect sear and even cooking.
- Mistake: Constantly stirring or flipping food. Fix: Let food develop a crust by leaving it undisturbed for a few minutes.
- Mistake: Underseasoning or seasoning too late. Fix: Season in layers, adding salt and spices at different stages of cooking for deeper flavor.
- Mistake: Using the wrong oil for high-heat cooking. Fix: Choose oils with a high smoke point, like avocado or grapeseed oil, to prevent burning and off-flavors.
- Mistake: Not tasting as you go. Fix: Adjust seasoning and doneness throughout the cooking process to ensure a perfectly balanced final dish.
- Mistake: Substituting ingredients without considering their properties. Fix: Understand the role of each ingredient (e.g., acid, fat, thickener) before making swaps.
- Mistake: Ignoring resting time for meats. Fix: Let meat rest after cooking to allow juices to redistribute, resulting in a more tender and flavorful bite.
Storing Tips
- Fridge: Store in an airtight container for up to 3 days. Ensure it cools to room temperature before refrigerating.
- Freezer: Freeze in a freezer-safe container or heavy-duty bag for up to 3 months. Thaw in the refrigerator overnight before reheating.
- Reheat: Reheat thoroughly until the internal temperature reaches 165°F (74°C) for food safety. Use a microwave, oven, or stovetop, adding a splash of liquid if needed to prevent drying out.
Always allow hot food to cool slightly before storing to maintain quality and safety. Discard any leftovers that have been left at room temperature for more than 2 hours.
Conclusion
This classic Hershey Chocolate Cake is a guaranteed crowd-pleaser. I hope you love this rich, moist dessert as much as we do. Give it a try and let me know how it turns out in the comments! For more sweet treats, check out our Peanut Butter Blossoms and Coconut Macaroon Blossoms.
PrintHershey’s Chocolate Cake

A rich and moist chocolate cake made with Hershey’s cocoa powder, perfect for any chocolate lover.
- Prep Time: 20 minutes
- Cook Time: 35 minutes
- Total Time: 55 minutes
- Yield: 12 1x
- Method: Dessert
- Cuisine: American
Ingredients
- 2 cups sugar
- 1–3/4 cups all-purpose flour
- 3/4 cup Hershey's cocoa powder
- 1–1/2 teaspoons baking powder
- 1–1/2 teaspoons baking soda
- 1 teaspoon salt
- 2 eggs
- 1 cup milk
- 1/2 cup vegetable oil
- 2 teaspoons vanilla extract
- 1 cup boiling water
Instructions
- Preheat oven to 350°F (175°C). Grease and flour two 9-inch round baking pans.
- In a large bowl, stir together sugar, flour, cocoa, baking powder, baking soda, and salt.
- Add eggs, milk, oil, and vanilla. Beat on medium speed for 2 minutes.
- Stir in boiling water (batter will be thin).
- Pour batter evenly into prepared pans.
- Bake 30 to 35 minutes or until wooden pick inserted in center comes out clean.
- Cool 10 minutes; remove from pans to wire racks. Cool completely before frosting.
Notes
For best results, use high-quality Hershey’s cocoa powder. The batter will be thin, but this is normal and results in a moist cake. Allow the cake to cool completely before frosting to prevent melting.
Nutrition
- Calories: 350
- Sugar: 35
- Sodium: 300
- Fat: 15
- Saturated Fat: 3
- Unsaturated Fat: 12
- Trans Fat: 0
- Carbohydrates: 50
- Fiber: 3
- Protein: 5
- Cholesterol: 40
FAQs
Can I make this recipe ahead of time?
Yes, this recipe can be prepared in advance. You can assemble it and store it in the refrigerator for up to 24 hours before baking. This makes it a convenient option for meal prep.
What can I use as a substitute for a key ingredient?
You can easily substitute ingredients based on what you have available. For example, you can swap the main protein or use a different type of cheese. This flexibility makes the recipe very adaptable to different tastes and dietary needs.
How do I store and reheat leftovers?
Store any leftovers in an airtight container in the refrigerator for up to 3 days. Reheat individual portions in the microwave or in an oven until warmed through. This helps maintain the texture and flavor of the dish.


