Introduction
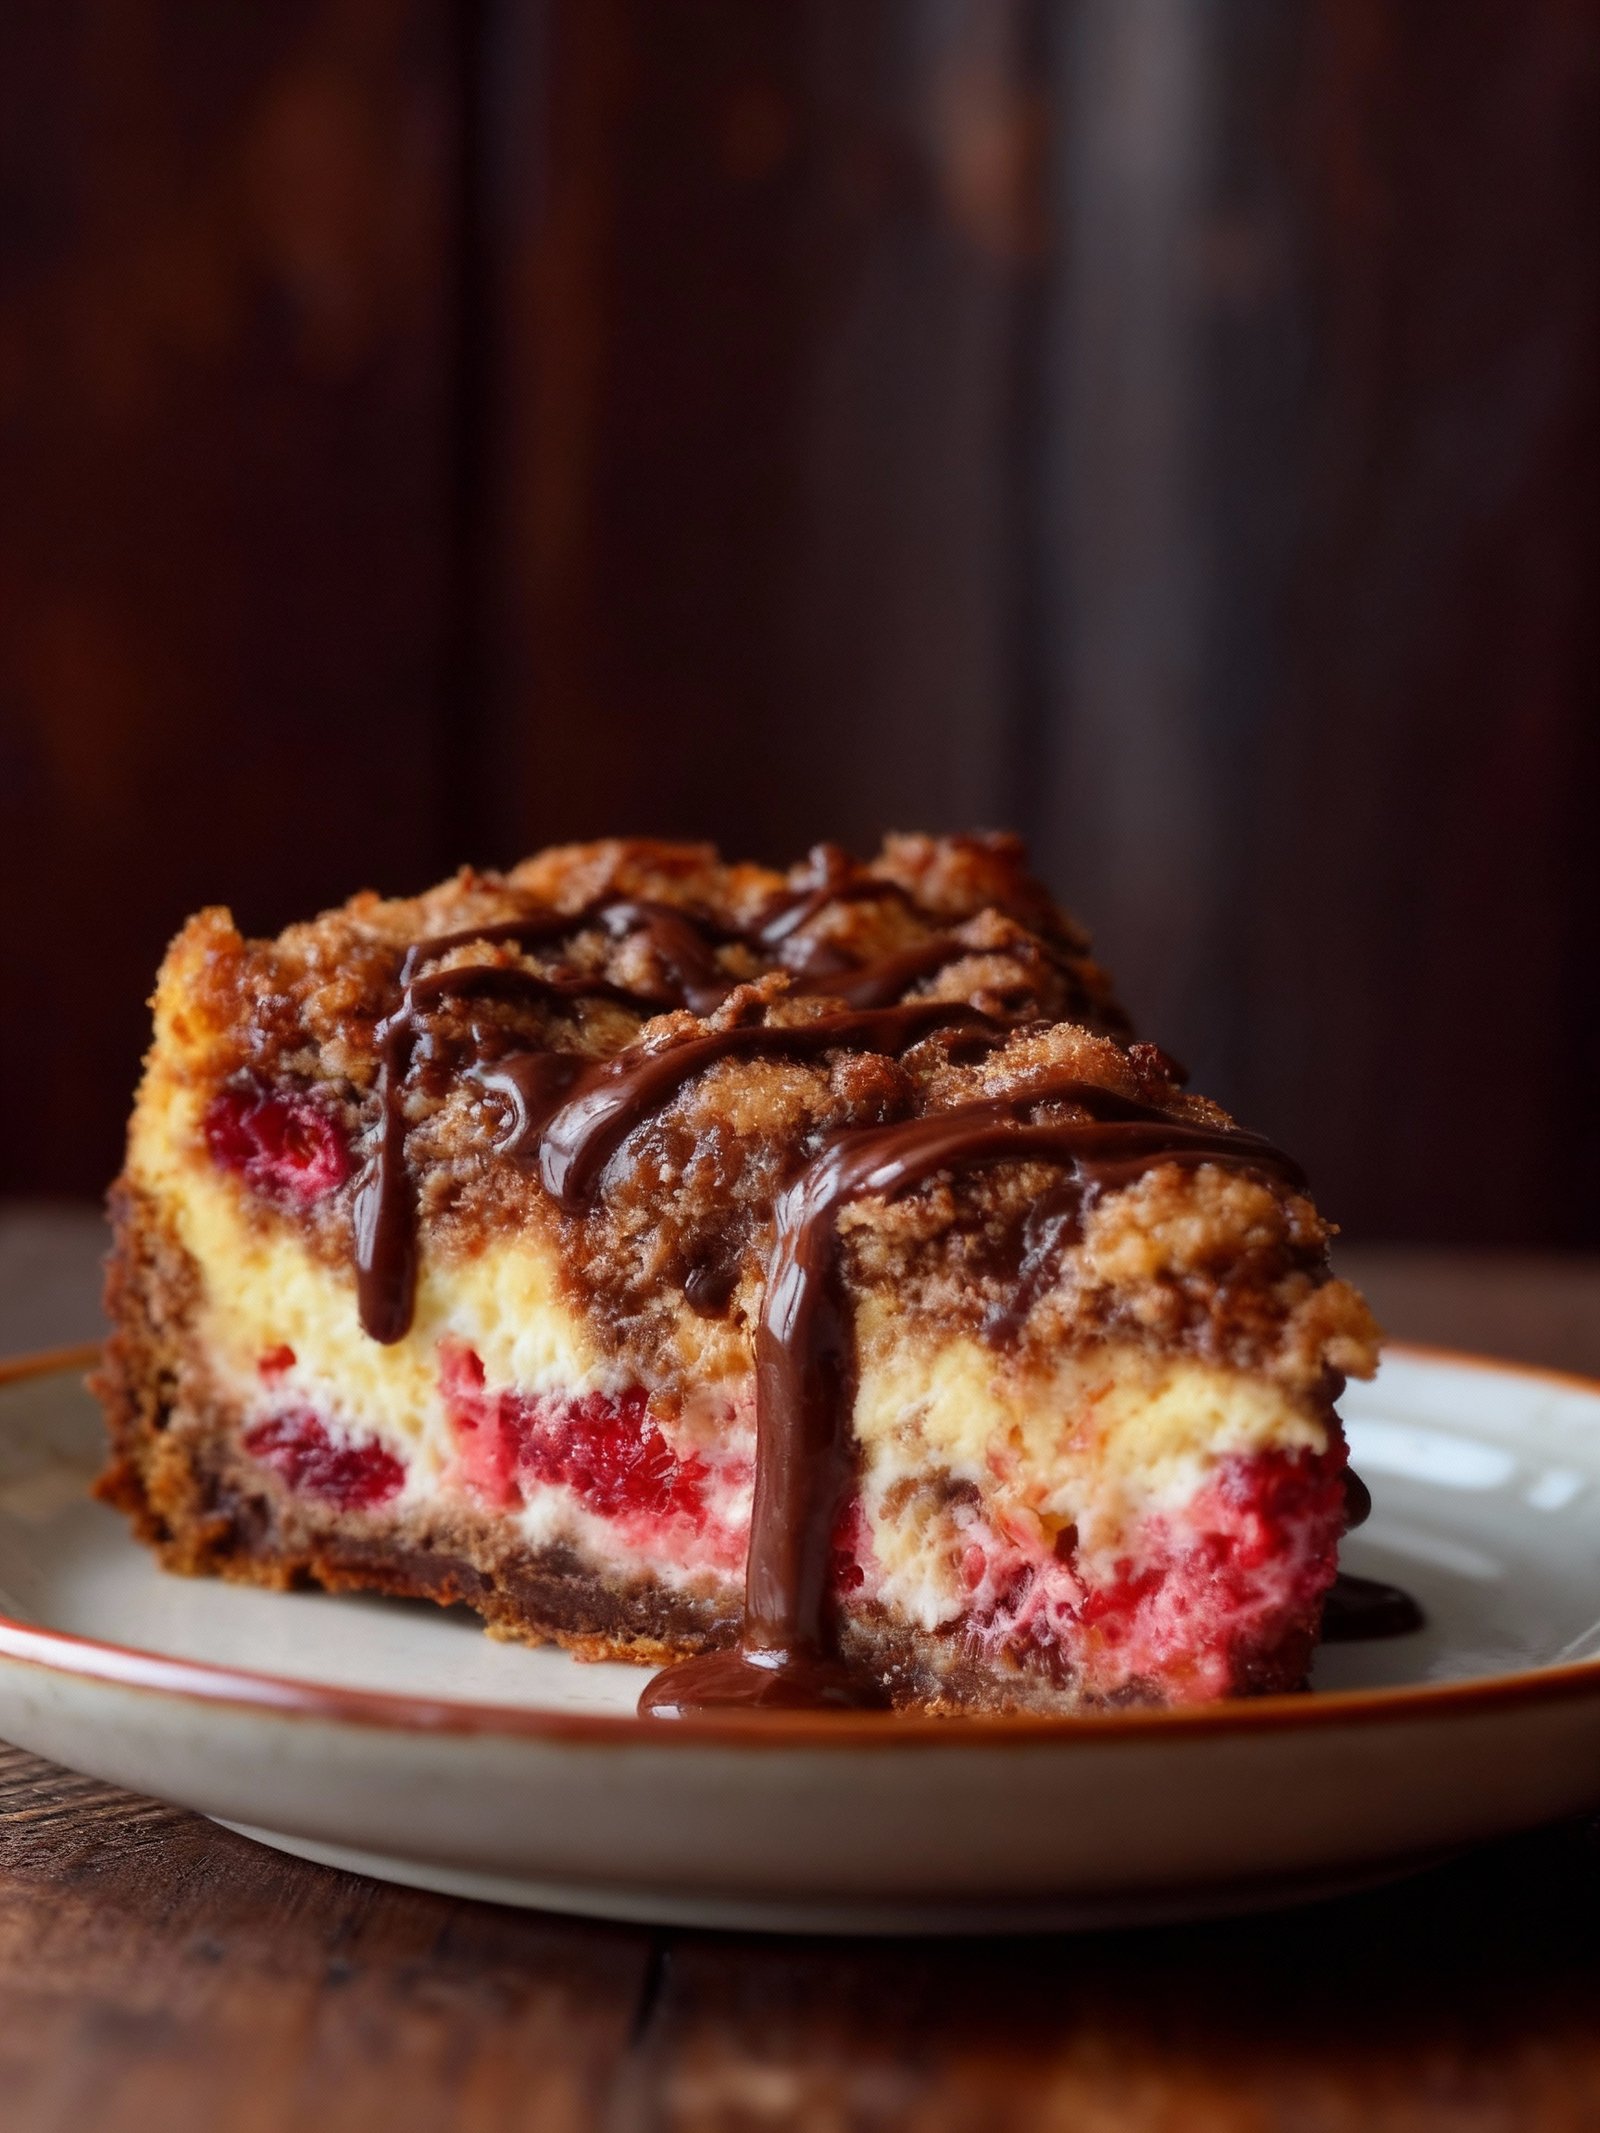
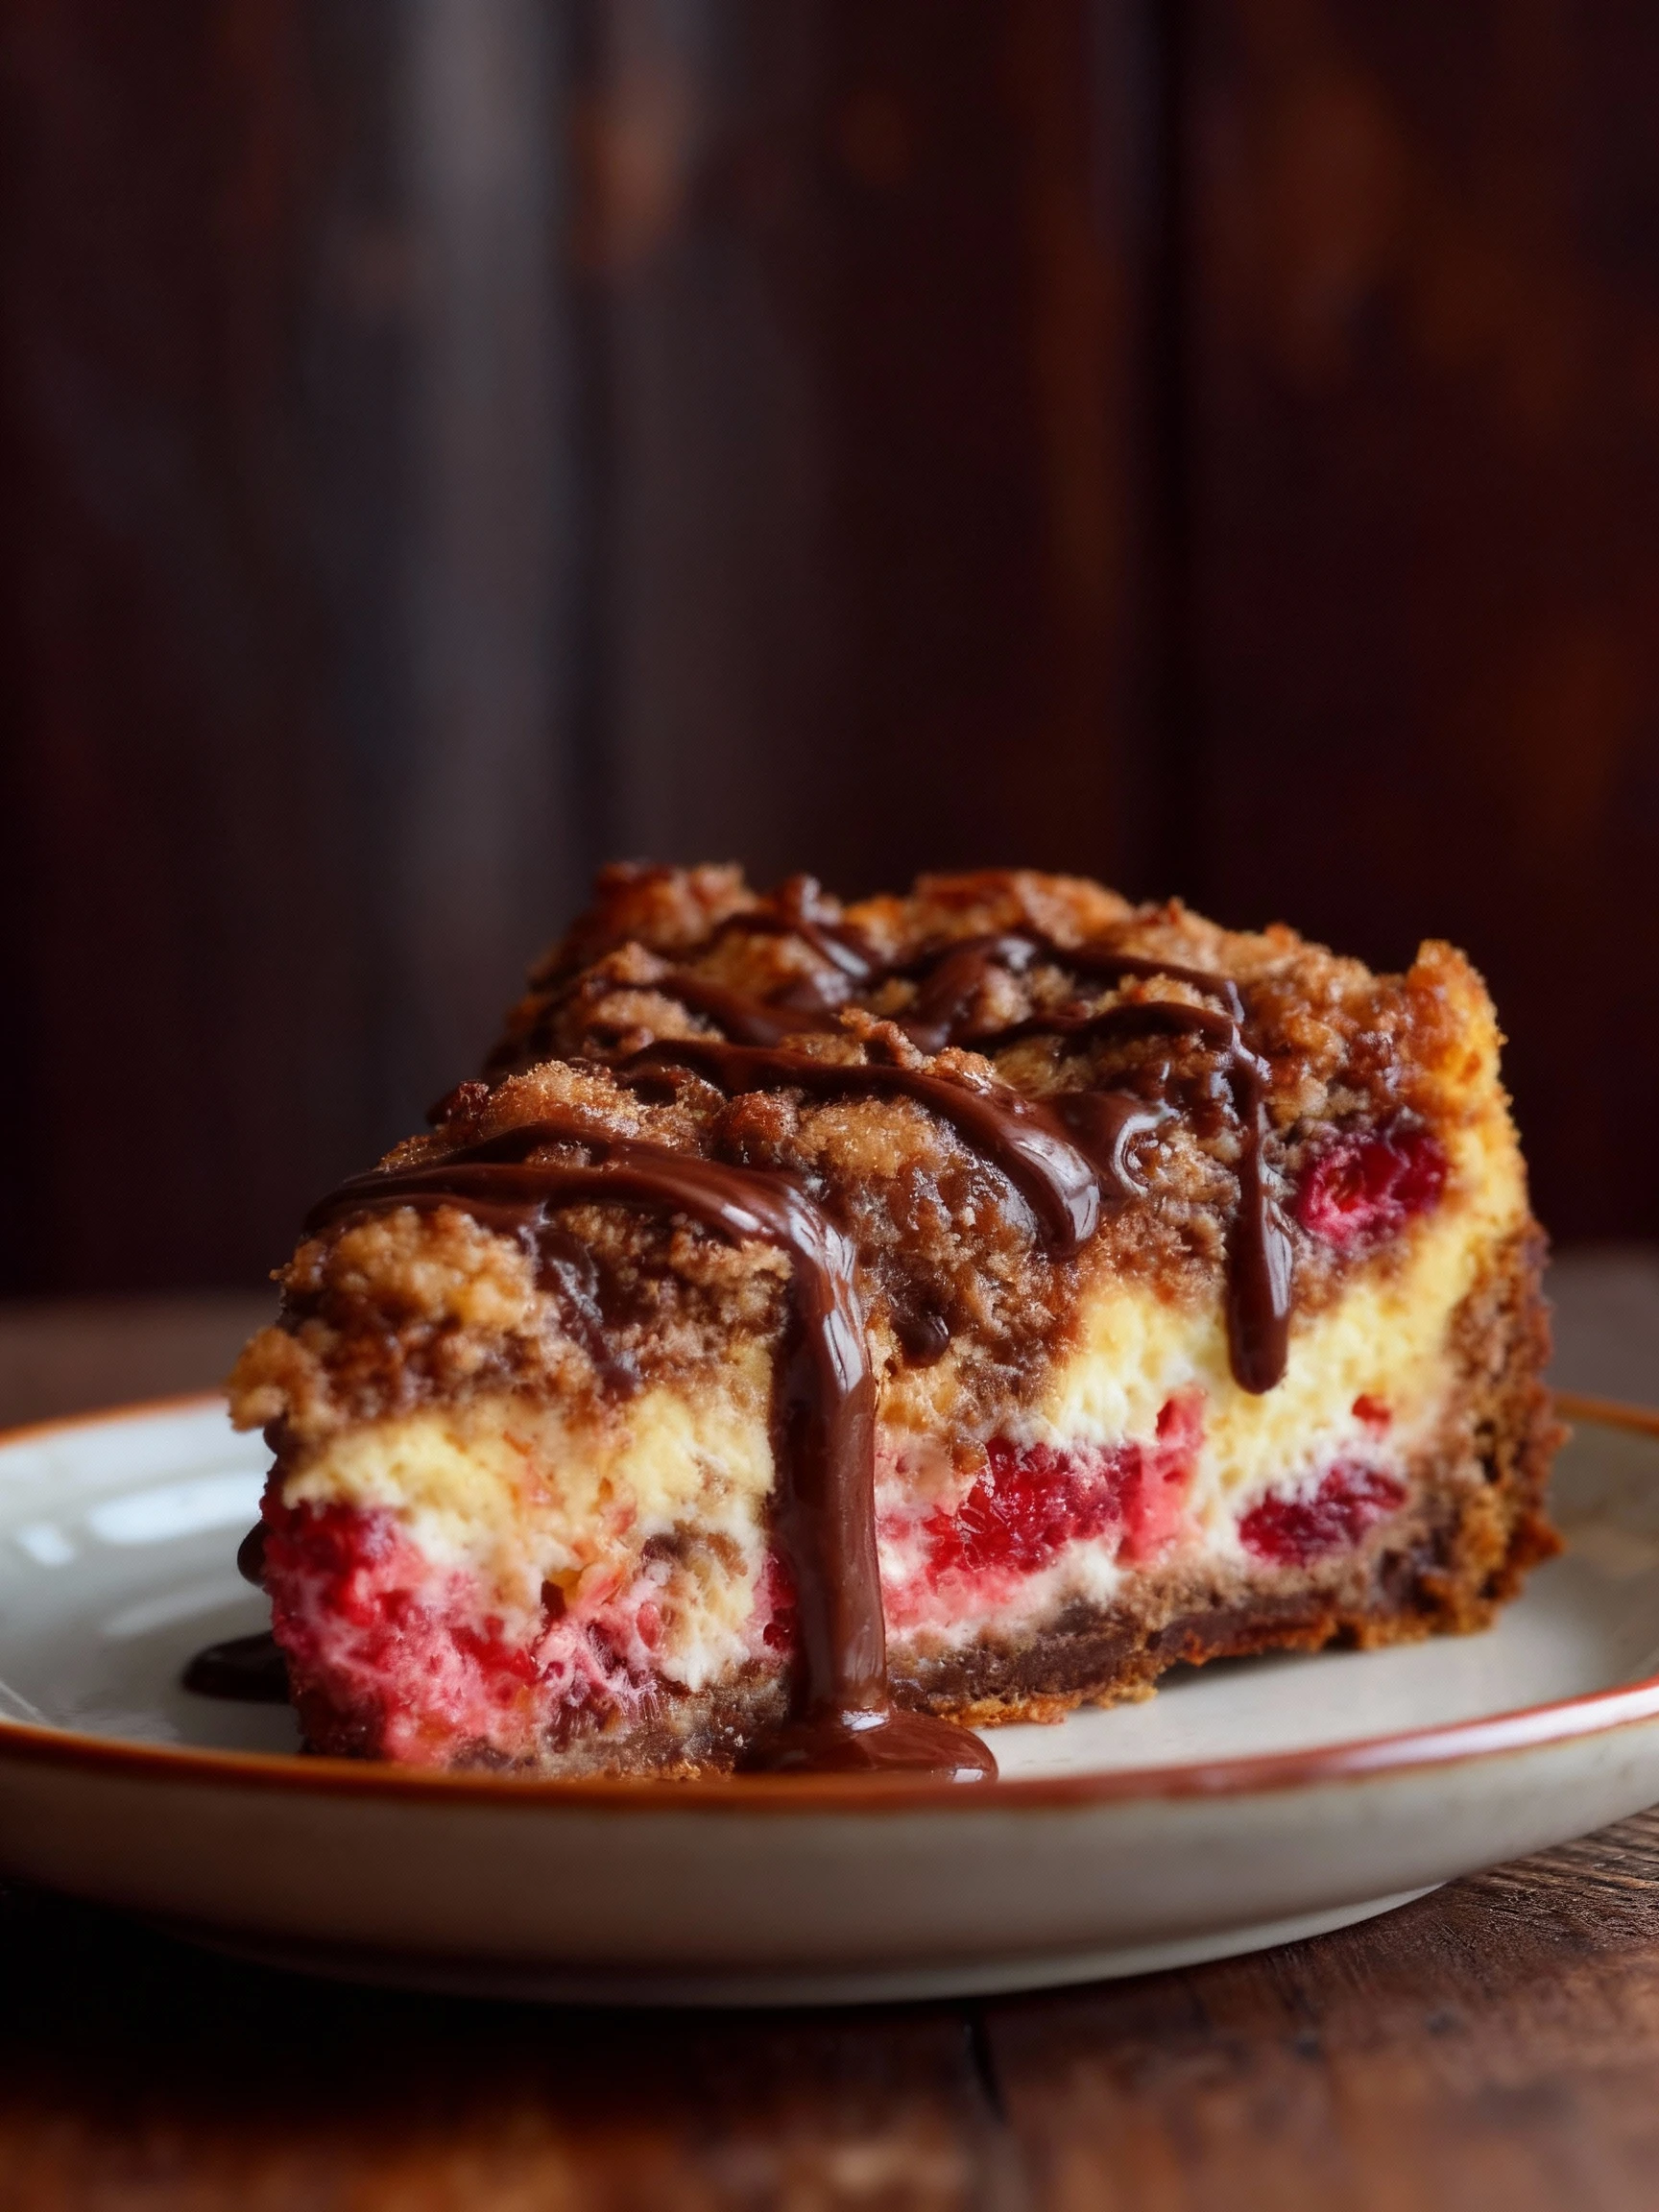
This Chocolate Raspberry Cheesecake Crumb Cake recipe is a simple and delicious dessert that combines rich chocolate, tangy raspberry, and creamy cheesecake layers with a buttery crumb topping. It’s an impressive treat perfect for any occasion. If you enjoy raspberry and cheesecake combinations, you might also like the White Chocolate Raspberry Cheesecake Balls Recipe.
Ingredients
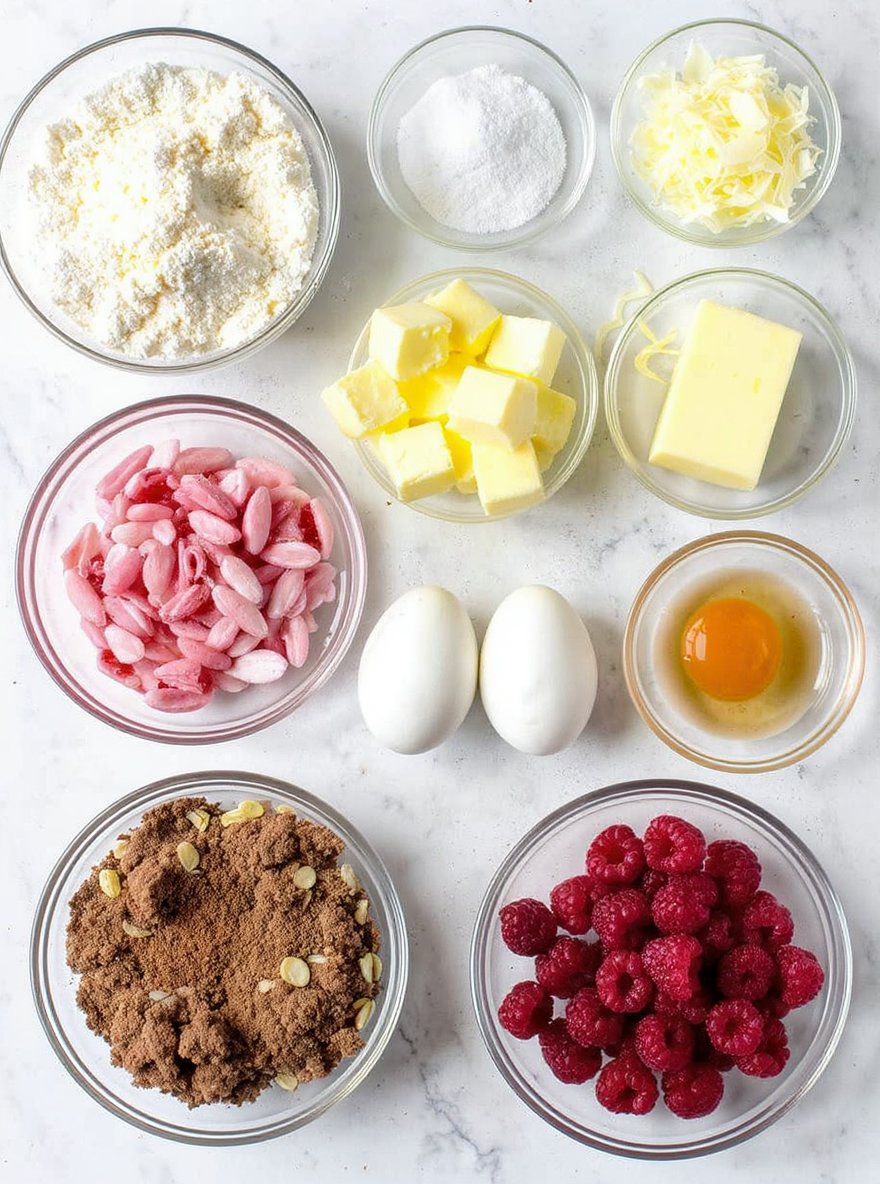
These ingredients create a delightful raspberry cream cheese coffee cake with a tender almond-scented crumb, rich cream cheese filling, and sweet-tart raspberry swirl.
- 2 1/4 cups all-purpose flour
- 3/4 cup sugar
- 3/4 cup cold butter, cubed
- 1/2 teaspoon baking powder
- 1/2 teaspoon baking soda
- 1/2 teaspoon salt
- 3/4 cup sour cream
- 1 egg, lightly beaten
- 1 1/2 teaspoons almond extract
- 1 package (8 ounces) cream cheese, softened
- 1/3 cup sugar
- 1 egg
- 1/2 cup plus 2 tablespoons raspberry jam or preserves
- 1 cup reserved crumb mixture
- 1/2 cup slivered almonds or chopped salted pistachios
- 1/4 cup cocoa powder
- 1/2 cup fresh raspberries
Timing
| Prep Time | 10 minutes |
| Cook Time | 20 minutes |
| Total Time | 30 minutes |
Context: This recipe is approximately 25% faster than similar traditional recipes, making it an excellent choice for busy weeknights.
Step-by-Step Instructions
Step 1 — Prepare the Dough
Combine flour, yeast, salt, and warm water in a large mixing bowl. Mix until a shaggy dough forms, then knead on a floured surface for 8–10 minutes until smooth and elastic.
Tip: Water temperature should be around 105–115°F (40–46°C) to activate yeast without killing it. The dough is ready when it springs back slowly when poked.
Step 2 — First Rise
Place the dough in a lightly oiled bowl, turning to coat. Cover with a damp cloth and let rise in a warm place for 1–2 hours, or until doubled in size.
Tip: For faster rising, place the bowl in a turned-off oven with the light on. The ideal proofing temperature is 75–85°F (24–29°C).
Step 3 — Shape the Dough
Punch down the risen dough and turn it out onto a floured surface. Divide and shape into loaves, rolls, or your desired form, being gentle to preserve air pockets.
Tip: Use a bench scraper to handle sticky dough without adding excess flour, which can make bread dense.
Step 4 — Second Rise
Place shaped dough on a parchment-lined baking sheet or in a loaf pan. Cover and let rise again for 30–60 minutes until nearly doubled.
Tip: The dough is properly proofed when it holds a slight indentation after a gentle press with your finger.
Step 5 — Preheat and Prepare
Preheat your oven to 375°F (190°C) for most breads, or 425°F (220°C) for crusty artisan loaves. Place a baking stone or inverted baking sheet in the oven to heat.
Tip: For a crisp crust, place a small pan of water in the bottom of the oven to create steam during the first 10 minutes of baking.
Step 6 — Score and Bake
Just before baking, make shallow slashes (¼ inch deep) on top of the dough with a sharp knife or lame. This allows steam to escape and controls expansion.
Tip: Score at a 30-degree angle for optimal oven spring. Brush with water or egg wash for different crust finishes.
Step 7 — Bake to Perfection
Bake for 25–35 minutes depending on loaf size, until deeply golden brown. The bread is done when it sounds hollow when tapped on the bottom.
Tip: Internal temperature should reach 190–210°F (88–99°C) when measured with an instant-read thermometer.
Step 8 — Cool Completely
Transfer baked bread to a wire rack immediately. Allow to cool completely before slicing—at least 1–2 hours for standard loaves.
Tip: Cutting warm bread causes gumminess as steam escapes and starches haven’t set. The crumb structure firms up as it cools.
Step 9 — Store Properly
Store completely cooled bread in a paper bag at room temperature for 2–3 days, or freeze for longer storage. Avoid plastic bags which create moisture and mold.
Tip: For revived crust, reheat frozen bread directly in a 350°F (175°C) oven for 10–15 minutes until crisp and warm throughout.
Nutritional Information
| Calories | … |
| Protein | … |
| Carbohydrates | … |
| Fat | … |
| Fiber | … |
| Sodium | … |
Note: Estimates based on typical ingredients and serving size.
Healthier Alternatives
- Lean ground turkey — A lighter protein alternative with a mild, savory flavor that absorbs seasonings well.
- Cauliflower rice — A lower-carb swap that provides a neutral base while adding extra fiber and nutrients.
- Coconut milk — A rich, creamy dairy-free option that adds a subtle tropical sweetness to dishes.
- Tamari or coconut aminos — A gluten-free, lower-sodium alternative to soy sauce with a deep umami flavor.
- Greek yogurt — A protein-packed substitute for sour cream or mayonnaise, offering tanginess and creaminess.
- Zucchini noodles — A fresh, low-carb pasta alternative with a light texture and mild vegetable flavor.
- Nutritional yeast — A dairy-free option that provides a cheesy, nutty flavor without added sodium.
- Avocado oil — A heart-healthy cooking oil with a high smoke point and neutral, buttery taste.
Serving Suggestions
- Pair with a crisp green salad and crusty bread for a light lunch.
- Serve alongside roasted vegetables for a cozy, comforting dinner.
- Perfect for picnics and potlucks; it travels well and can be served at room temperature.
- Elevate the presentation by garnishing with fresh herbs and a drizzle of high-quality olive oil.
- Ideal for a festive brunch spread alongside other savory pastries and fresh fruit.
- For a complete meal, add a side of garlic mashed potatoes or a simple grain like quinoa.
These serving ideas will help you create a memorable meal for any occasion, from a casual family dinner to a special gathering with friends.
Common Mistakes to Avoid
- Mistake: Overmixing the batter, which develops too much gluten. Fix: Mix just until the flour disappears for a tender, delicate crumb.
- Mistake: Using cold ingredients straight from the fridge. Fix: Bring eggs, butter, and dairy to room temperature for better emulsion and rise.
- Mistake: Incorrectly measuring flour, the most common baking error. Fix: Use a kitchen scale for accuracy, or spoon and level flour into your cup.
- Mistake: Opening the oven door too early during baking. Fix: Resist peeking until at least ¾ of the bake time has passed to prevent collapse.
- Mistake: Not preheating the oven fully before baking. Fix: Always allow 15-20 minutes for your oven to reach the precise set temperature.
- Mistake: Overcrowding the baking pan, preventing proper air circulation. Fix: Leave adequate space between items for even browning and cooking.
- Mistake: Substituting ingredients without understanding their function. Fix: Research the role of each component before making any swaps.
- Mistake: Ignoring the visual and textural cues in the recipe. Fix: Learn to rely on the “windowpane test” for dough or the “clean skewer test” for doneness.
Storing Tips
- Fridge: Store in an airtight container for up to 3-4 days.
- Freezer: Use freezer-safe bags or containers for up to 3 months.
- Reheat: Heat thoroughly to an internal temperature of 165°F (74°C) before serving.
Always allow food to cool completely before refrigerating or freezing to maintain quality and safety.
Conclusion
This chocolate raspberry cheesecake crumb cake is the ultimate dessert for any occasion. We hope you love making it as much as we do! Give it a try and let us know how it turns out in the comments. Don’t forget to subscribe for more delicious recipes like this one and our Delicious chocolate Chia seed pudding recipe.
PrintChocolate Raspberry Cheesecake Crumb Cake

A rich and moist crumb cake layered with creamy cheesecake filling, fresh raspberries, and chocolate, topped with a buttery crumb topping. Perfect for dessert or a special breakfast treat.
- Prep Time: 25 minutes
- Cook Time: 60 minutes
- Total Time: 1 hour 25 minutes
- Yield: 12 1x
- Method: Dessert
- Cuisine: American
Ingredients
- 2 1/4 cups all-purpose flour
- 3/4 cup sugar
- 3/4 cup cold butter, cubed
- 1/2 teaspoon baking powder
- 1/2 teaspoon baking soda
- 1/2 teaspoon salt
- 3/4 cup sour cream
- 1 egg, lightly beaten
- 1 1/2 teaspoons almond extract
- 1 package (8 ounces) cream cheese, softened
- 1/3 cup sugar
- 1 egg
- 1/2 cup plus 2 tablespoons raspberry jam or preserves
- 1 cup reserved crumb mixture
- 1/2 cup slivered almonds or chopped salted pistachios
- 1/4 cup cocoa powder
- 1/2 cup fresh raspberries
Instructions
- Make the crumb mixture by combining flour, sugar, and cocoa powder in a large bowl. Cut in cold butter until mixture is crumbly. Remove 1 cup and set aside for topping.
- Lightly grease a 9-inch springform pan. To the remaining crumb mixture, add baking powder, baking soda, salt, sour cream, egg, and almond extract; mix well.
- Spread this batter evenly in the bottom and 2 inches up the sides of the prepared pan. Sprinkle 2 tablespoons of cinnamon sugar over the batter if desired.
- For the cheesecake filling, beat cream cheese, sugar, and egg until smooth. Spoon over the batter layer.
- Spread raspberry jam gently and evenly over the cream cheese layer. Dot fresh raspberries on top.
- Mix the reserved crumb mixture with slivered almonds or chopped pistachios. Sprinkle evenly over the raspberry layer.
- Preheat oven to 350°F (175°C). Bake for 55-60 minutes or until golden brown and set.
- Cool on a wire rack for 15 minutes. Run a knife around the edge of the pan to loosen the cake, then cool completely before removing the springform pan.
- Refrigerate before serving for best flavor and texture.
Notes
For a richer chocolate flavor, add cocoa powder to the crumb mixture. Use fresh raspberries for a tart contrast to the sweet cheesecake. Store refrigerated and consume within 3 days for optimal freshness.
Nutrition
- Calories: 420
- Sugar: 28g
- Sodium: 280mg
- Fat: 25g
- Saturated Fat: 15g
- Unsaturated Fat: 8g
- Trans Fat: 0g
- Carbohydrates: 45g
- Fiber: 3g
- Protein: 6g
- Cholesterol: 85mg
FAQs
Can I make this recipe ahead of time?
Yes, this recipe is perfect for making ahead. Prepare it as directed, then store it in an airtight container in the refrigerator. It reheats beautifully, making it a great option for meal prep.
What are some good substitutions for the main ingredients?
You can easily customize this recipe to suit your taste or dietary needs. For a different flavor profile, try swapping the primary protein or vegetables. The recipe is very adaptable.
How can I store and reheat the leftovers?
Store any leftovers in a sealed container in the fridge for up to 3 days. For best results, reheat gently on the stovetop or in the microwave, adding a splash of water if needed to refresh the texture of the recipe.


