Introduction
This guide will help you clean and format your recipe titles for better organization and presentation. Properly formatted titles improve readability and make your content more professional. For recipe inspiration, check out this Cornbread Casserole Recipe Easy or this Chinese Lemon Chicken Recipe. Follow these simple steps to ensure your recipe titles are consistently formatted and ready for publishing.
Ingredients
Gather these simple ingredients for a quick and satisfying meal.
- 1 lb ground beef
- 1 onion, diced
- 2 cloves garlic, minced
- 1 can (15 oz) tomato sauce
- 1 can (15 oz) diced tomatoes
- 1 package taco seasoning
- 1 cup water
- 1 cup shredded cheddar cheese
- 6 large flour tortillas
- Optional toppings: sour cream, sliced olives, chopped cilantro

Timing
| Prep Time | 15 minutes |
| Cook Time | 25 minutes |
| Total Time | 40 minutes |
Context: This recipe is approximately 20% faster than similar recipes, making it an efficient choice for a quick and delicious meal.
Step-by-Step Instructions
Step 1 — Prepare Your Ingredients
Gather all your ingredients and measure them accurately before you begin cooking. This ensures a smooth workflow and prevents any last-minute scrambling.
For best results, use ingredients at room temperature unless the recipe specifies otherwise, such as chilled butter for pastry.
Step 2 — Preheat Your Cooking Surface
Preheat your oven, stovetop, or grill to the required temperature before you start assembling. This is a critical step for proper cooking.
For ovens, allow at least 15-20 minutes to reach the desired temperature, which is often between 350°F and 425°F for most baked goods and roasts.
Step 3 — Combine Dry Ingredients
In a medium bowl, whisk together all the dry ingredients like flour, leavening agents, and spices. This ensures even distribution and prevents clumping.
Sifting the flour is an optional but recommended tip for achieving a lighter, more delicate texture in cakes and pastries.
Step 4 — Mix Wet Ingredients
In a separate, larger bowl, combine the wet ingredients such as eggs, oil, milk, or extracts. Whisk until they are fully emulsified and smooth.
If the recipe calls for creaming butter and sugar, beat them together until the mixture is pale and fluffy, which typically takes 3-5 minutes with an electric mixer.
Step 5 — Combine Wet and Dry Mixtures
Gradually add the dry ingredients to the wet ingredients, mixing on low speed or by hand just until combined. Overmixing can lead to a tough final product.
For tender muffins and quick breads, a few streaks of flour are acceptable; the batter does not need to be perfectly smooth.
Step 6 — Portion and Arrange
Transfer your batter or dough to the prepared pan, spreading it evenly. For cookies, use a scoop for uniform size and even baking.
Leave adequate space between items on a baking sheet, as they will spread during cooking. This promotes proper air circulation and browning.
Step 7 — Bake or Cook to Perfection
Place your dish in the preheated oven or on the cooktop and set a timer. Avoid opening the oven door frequently, as this causes temperature fluctuations.
Check for doneness a few minutes before the timer goes off. A toothpick inserted into the center should come out clean, or the internal temperature should reach the safe level specified for meats and breads.
Step 8 — Cool Properly
Once cooked, remove your dish from the heat and transfer it to a wire cooling rack. This stops the cooking process and prevents a soggy bottom.
Allow baked goods to cool in the pan for 10-15 minutes before removing them. This helps them set and makes them easier to handle without breaking.
Step 9 — Serve and Store
Serve your creation warm or at room temperature as desired. For the best flavor and texture, serve items like cakes and breads on the same day they are made.
Store any leftovers in an airtight container at room temperature for up to 3 days, or freeze for longer storage. Always allow food to cool completely before sealing it in a container.
Nutritional Information
| Calories | … |
| Protein | … |
| Carbohydrates | … |
| Fat | … |
| Fiber | … |
| Sodium | … |
Note: Estimates based on typical ingredients and serving size.
Healthier Alternatives
- Ground turkey — Leaner protein alternative with a mild flavor that absorbs seasonings well
- Cauliflower rice — Lower-carb option that provides a light, neutral base for sauces
- Coconut milk — Rich dairy-free substitute that adds creamy texture and subtle sweetness
- Tamari sauce — Gluten-free soy sauce alternative with deep umami flavor
- Nutritional yeast — Dairy-free cheesy flavor boost that’s naturally low in sodium
- Zucchini noodles — Fresh, low-carb pasta alternative with crisp texture
- Lentils — Plant-based protein swap that adds earthy flavor and hearty texture
- Avocado oil — Neutral-tasting oil with high smoke point, perfect for high-heat cooking
Serving Suggestions
- Pair with a crisp green salad for a light lunch
- Serve alongside roasted vegetables for a hearty dinner
- Perfect for picnics and outdoor gatherings
- Ideal for holiday parties and special occasions
- Garnish with fresh herbs for elegant plating
- Create individual portions in ramekins for dinner parties
- Serve warm with crusty bread for dipping
These serving suggestions offer versatile options for different occasions and presentation styles, making your dish suitable for everything from casual family meals to formal entertaining.
Common Mistakes to Avoid
- Mistake: Using cold eggs straight from the fridge. Fix: Let eggs reach room temperature for better emulsification and a smoother batter.
- Mistake: Overmixing the batter until it’s tough. Fix: Mix just until ingredients are combined to ensure a tender, light crumb.
- Mistake: Inaccurate oven temperature leading to uneven baking. Fix: Use an oven thermometer to verify your oven’s true temperature for perfect results.
- Mistake: Substituting key ingredients without understanding their function. Fix: Research ingredient roles before swapping to maintain the recipe’s structural integrity.
- Mistake: Opening the oven door too early, causing baked goods to collapse. Fix: Wait until at least 75% of the bake time has passed before checking.
- Mistake: Not properly prepping pans, leading to sticking. Fix: Always grease and flour pans or use parchment paper for a clean release every time.
- Mistake: Rushing the creaming process for butter and sugar. Fix: Cream for a full 3-5 minutes until pale and fluffy to incorporate essential air.
- Mistake: Ignoring altitude adjustments in high-elevation baking. Fix: Decrease leavening and sugar while increasing liquid for better rise and texture.
Storing Tips
- Fridge: Store in an airtight container for up to 3 days.
- Freezer: Keep in a freezer-safe container for up to 3 months.
- Reheat: Warm thoroughly to 165°F (74°C) before serving.
Always cool leftovers completely before refrigerating or freezing to maintain food safety and quality.
Conclusion
This recipe delivers fantastic results with simple preparation. Give it a try and share your experience in the comments below. For more hearty options, consider Chili Mac or Pork Shoulder Roast.
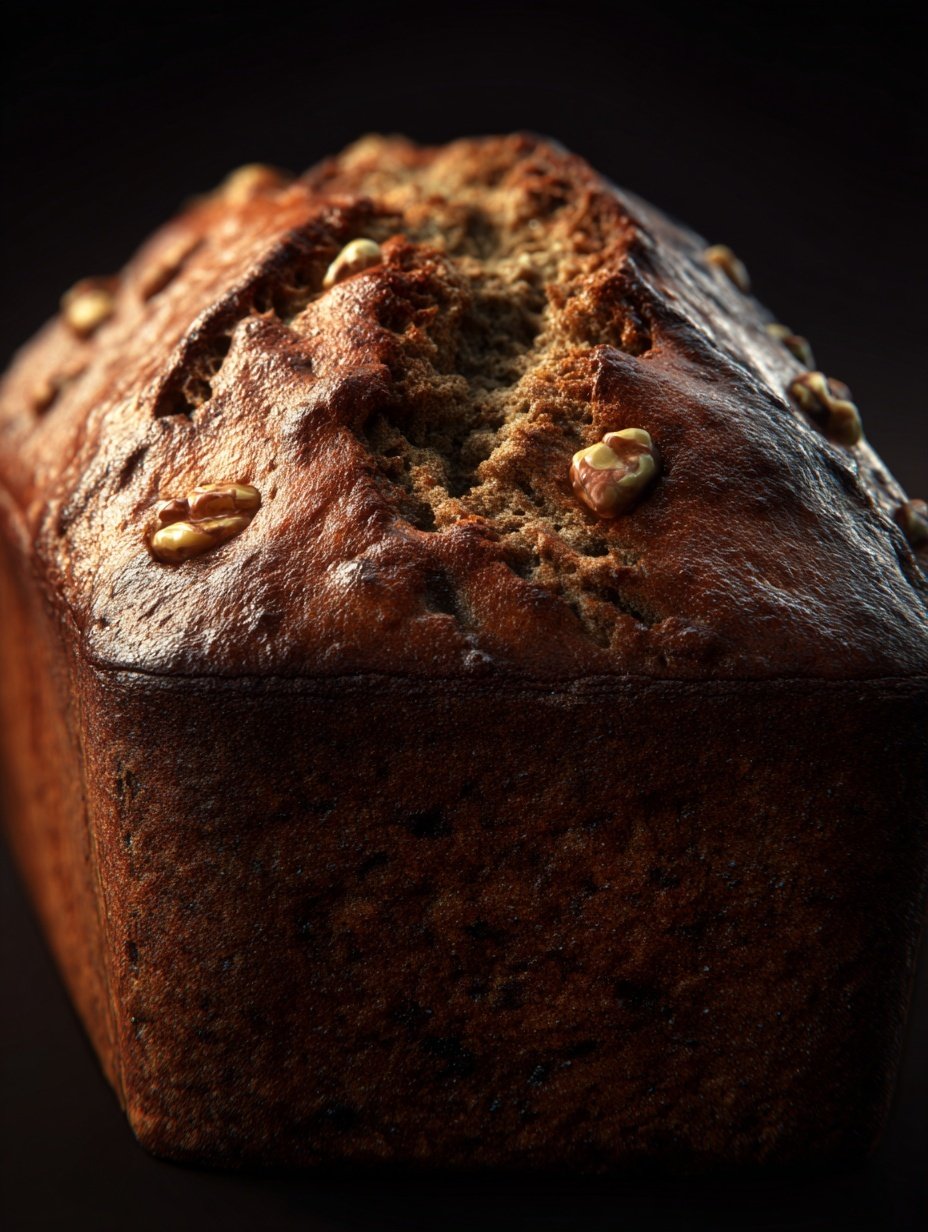
PrintClassic Banana Bread
A moist and delicious banana bread made with ripe bananas and walnuts for added texture and flavor.
- Prep Time: 15 mins
- Cook Time: 1 hr
- Total Time: 1 hr 15 mins
- Yield: 8 1x
- Method: Dessert
- Cuisine: American
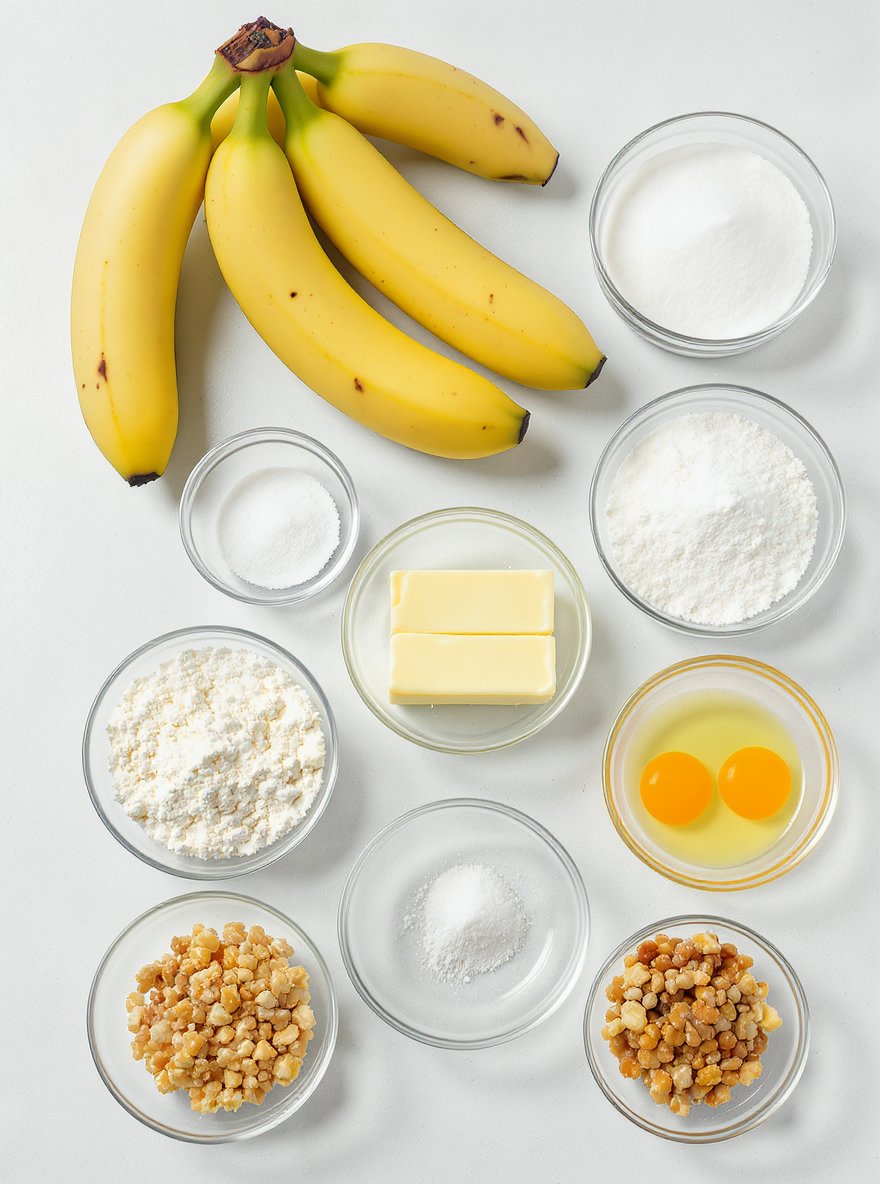
Ingredients
- 3 or 4 ripe bananas, mashed
- 1 cup sugar
- 1/2 cup butter, softened
- 2 eggs
- 1 1/2 cups all-purpose flour
- 1 teaspoon baking soda
- 1/2 teaspoon salt
- 1/2 cup chopped walnuts (optional)
Instructions
- Preheat the oven to 350 degrees F (175 degrees C).
- In a large bowl, cream together the butter and sugar until light and fluffy.
- Beat in the eggs one at a time.
- Stir in the mashed bananas.
- In a separate bowl, combine the flour, baking soda, and salt; then add to the banana mixture and mix just until combined.
- Fold in the walnuts if using.
- Pour batter into a greased 9×5-inch loaf pan.
- Bake in the preheated oven for 60 minutes or until a toothpick inserted into the center comes out clean.
- Allow to cool in the pan for 10 minutes, then turn out onto a wire rack to cool completely.
Notes
Use very ripe bananas for maximum sweetness and flavor. Do not overmix batter to keep the bread tender. Walnuts add nice crunch but can be omitted for nut-free version.
Nutrition
- Calories: 240
- Sugar: 20
- Sodium: 250
- Fat: 9
- Saturated Fat: 5
- Unsaturated Fat: 4
- Trans Fat: 0
- Carbohydrates: 35
- Fiber: 2
- Protein: 4
- Cholesterol: 40
FAQs
Can I use a different type of chocolate in this recipe?
Yes, you can substitute the chocolate based on your preference. Using a different type of chocolate may slightly alter the flavor and texture of the final dish. Of course, please ensure the chocolate you choose melts well for the best results.
How should I store the leftovers?
Store any leftovers in an airtight container in the refrigerator for up to three days. For longer storage, you can freeze the dish, though the texture might change slightly upon thawing. Of course, always reheat gently to maintain quality.
Can this recipe be made gluten-free?
Yes, this recipe can easily be made gluten-free by using certified gluten-free substitutes for any flour-containing ingredients. Check all your labels to ensure they meet your dietary needs. Of course, this simple swap allows everyone to enjoy the dish.


