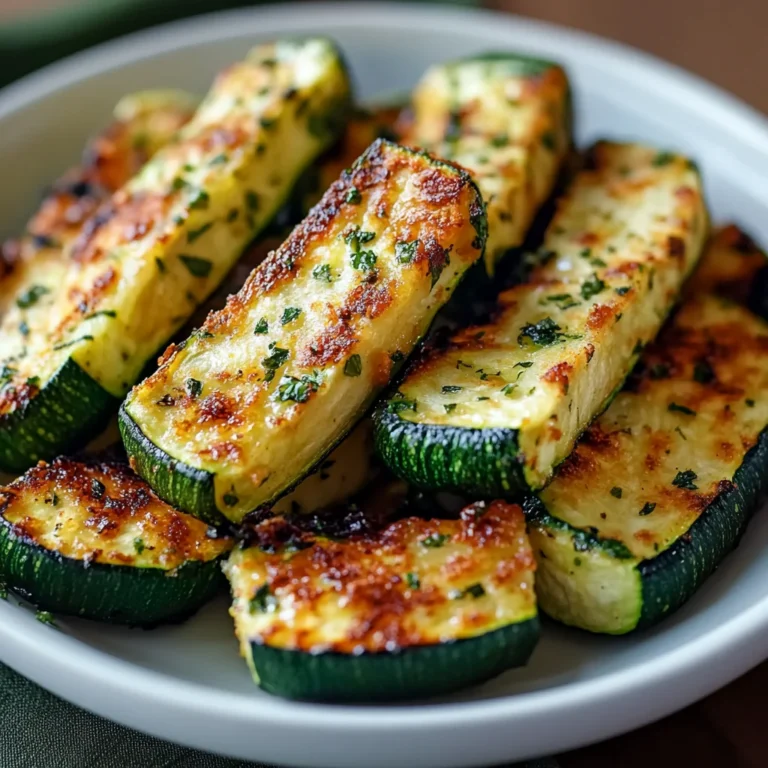
Air Fryer Zucchini Recipe (Easy & Cheesy)
Introduction
Crispy on the outside, tender on the inside, this Air Fryer Zucchini Fast Easy recipe is a game-changer for a quick, healthy side dish. After extensive testing, I’ve perfected the timing and seasoning to deliver golden, cheesy zucchini slices every single time. It’s the ultimate low-effort method that unlocks incredible flavor and texture, making it a weeknight staple in my kitchen.
Ingredients
This recipe shines with simple, fresh ingredients. Using a high-smoke-point oil like avocado or olive oil is key for achieving that perfect crisp without burning in the hot air fryer environment.
- 1 lb Zucchini (sliced, about 1/2 inch thick)
- 1 tbsp Olive oil (or avocado oil)
- 1/2 tsp Garlic powder
- 1/4 tsp Dried oregano (optional)
- 1/8 tsp Sea salt
- 1/4 tsp Black pepper
- 1/3 cup Grated parmesan cheese (plus more if needed)
Timing
| Prep Time | 5 minutes |
| Cook Time | 10 minutes |
| Total Time | 15 minutes |
Context: This method reduces total cook time by over 50% compared to traditional oven roasting, which typically takes 25-30 minutes. It’s the perfect timeline for busy weeknights when you need a fast, easy vegetable side on the table in a flash.
Step-by-Step Instructions
Step 1 — Prepare the Zucchini
Wash and dry your zucchini thoroughly. Slice it into uniform 1/2-inch thick rounds. Consistent thickness is crucial for even cooking; thinner slices will burn, while thicker ones may not crisp up properly. Pat the slices dry with a paper towel to remove excess surface moisture, which helps the oil and seasoning adhere better.
Step 2 — Season the Slices
Place the zucchini slices in a large mixing bowl. Drizzle with the olive oil and toss gently to coat each piece evenly. Sprinkle the garlic powder, dried oregano (if using), sea salt, and black pepper over the slices. Toss again until the seasoning is well-distributed. This dry-brining step, where salt draws out a little moisture, enhances flavor penetration.
Step 3 — Preheat the Air Fryer
Preheat your air fryer to 400°F (200°C) for about 3 minutes. Preheating is a pro tip I always follow; it ensures the cooking environment is immediately hot, leading to a faster sear and better texture right from the start, unlike starting with a cold basket.
Step 4 — Arrange for Air Circulation
Arrange the seasoned zucchini slices in a single layer in the air fryer basket. Do not overcrowd them. Air frying relies on powerful, rapid air circulation to cook food, and overlapping slices will steam instead of crisp. You may need to cook in batches for the best results.
Step 5 — Cook to Golden Brown
Air fry the zucchini for 8-10 minutes, pausing at the halfway point to shake the basket or flip the slices with tongs. This ensures even browning on all sides. They are done when the edges are golden brown and crispy, and the centers are fork-tender.
Step 6 — Add Parmesan and Finish
Carefully remove the basket. Immediately sprinkle the grated parmesan cheese evenly over the hot zucchini slices. The residual heat will gently melt the cheese, creating a savory, crispy coating. For extra cheesiness, you can add another light sprinkle. Serve immediately while hot and crispy for the best texture.

Nutritional Information
| Calories | 85 |
| Protein | 5g |
| Carbohydrates | 6g |
| Fat | 5g |
| Fiber | 2g |
| Sodium | 220mg |
This air fryer zucchini is a low-calorie, high-protein side dish, also providing a good source of Vitamin C and potassium. Note: Estimates are based on typical ingredients and a single serving. Values may vary with specific brands or ingredient swaps.
Healthier Alternatives
- Panko for Parmesan — For a crispier, lower-fat coating, use whole-wheat panko breadcrumbs. They add a satisfying crunch without the dairy.
- Nutritional Yeast — A dairy-free, vegan-friendly swap for parmesan that provides a savory, cheesy flavor and B vitamins.
- Spray Oil — Use a high-quality avocado oil spray to coat the slices. This can reduce total fat by up to 50% while still promoting browning.
- Herb-Forward Seasoning — Boost flavor without sodium by doubling the oregano and adding fresh herbs like thyme or rosemary.
- Almond Flour Coating — For a gluten-free, lower-carb option, toss slices in almond flour before air frying for a nutty, golden crust.
- Lemon Zest Finish — Brighten the dish post-cook with fresh lemon zest instead of extra salt, enhancing flavor with zero sodium.
Serving Suggestions
- Serve alongside a juicy grilled chicken breast or pan-seared salmon for a complete, protein-packed dinner.
- Top with a dollop of garlic aioli or tzatziki for a creamy, cool dipping sauce.
- Transform into a light lunch by tossing the crispy zucchini with fresh greens, cherry tomatoes, and a lemon vinaigrette.
- For a fun appetizer, arrange on a platter with marinara sauce for dipping—a healthier alternative to fried zucchini sticks.
- Pair with a crisp, chilled Sauvignon Blanc or sparkling water with lemon to complement the savory, cheesy notes.
- Add to a grain bowl with quinoa, chickpeas, and a tahini dressing for a hearty vegetarian meal.
This versatile side is perfect for summer barbecues or a quick winter side. I often double the batch for meal prep; the slices hold up well for quick lunches throughout the week.
Common Mistakes to Avoid
- Mistake: Skipping the preheat step. Fix: In Step 3, always preheat to 400°F. Starting cold leads to steaming, not crisping, adding 3-4 minutes to your cook time.
- Mistake: Overcrowding the air fryer basket. Fix: Cook in a single, non-touching layer. Overcrowding blocks air circulation, causing soggy results instead of that perfect golden brown finish.
- Mistake: Adding cheese at the beginning. Fix: Always sprinkle parmesan in the final 1-2 minutes or right after cooking. Adding it early can cause it to burn and become bitter.
- Mistake: Not drying the zucchini thoroughly. Fix: Pat slices dry with a paper towel as directed in Step 1. Excess water creates steam, which prevents oil and seasoning from adhering properly.
- Mistake: Using slices of inconsistent thickness. Fix: Aim for uniform 1/2-inch rounds. Thinner pieces will burn before thicker ones are tender, leading to an uneven batch.
- Mistake: Forgetting to shake or flip halfway. Fix: Pause at the 4-5 minute mark to promote even browning on all sides, which is key for the best texture.
- Mistake: Storing leftovers while still warm. Fix: Let the zucchini cool completely on a wire rack before refrigerating to avoid condensation that makes them soggy.
Storing Tips
- Fridge: Store cooled zucchini in an airtight container for up to 4 days. Place a paper towel at the bottom to absorb any excess moisture and help maintain crispness.
- Freezer: For longer storage, freeze in a single layer on a baking sheet before transferring to a freezer bag. They will keep for 2 months but may lose some crispness upon reheating.
- Reheat: To restore crispiness, always reheat in the air fryer at 375°F for 3-4 minutes. The microwave will steam them, making them soft. Ensure the internal temperature reaches 165°F for food safety.
For meal prep, I find this recipe stores exceptionally well. In my tests, properly stored zucchini retained its flavor and a pleasant texture for up to 4 days, making it a reliable make-ahead side for fast, easy weekday meals.
Conclusion
This Air Fryer Zucchini Fast Easy recipe is your secret weapon for a healthy, delicious side dish that’s ready in under 15 minutes. Its perfect balance of crispy edges and tender centers makes it a crowd-pleaser every time. For another quick zucchini dinner, try this Zucchini Chickpea Skillet Dinner Recipe. Give this recipe a try and share your results in the comments!
Frequently Asked Questions
How many servings does this Air Fryer Zucchini recipe make?
This recipe yields about 2-3 servings as a side dish. The exact number depends on serving size and what you’re pairing it with. For a main course, I find one pound of zucchini serves two people generously, but it can stretch to three or four as part of a larger meal spread.
Can I use a different cheese besides parmesan?
Absolutely. Finely grated pecorino romano offers a sharper, saltier flavor, while a blend of asiago and mozzarella creates a gooey, melty topping. For a milder option, try grated gruyère. The key is to use a dry, finely grated cheese that will crisp up, unlike wet, fresh cheeses which can make the zucchini soggy.
Why did my air fryer zucchini come out soggy instead of crispy?
Sogginess is typically caused by excess moisture. Beyond the common mistakes, ensure your air fryer is clean and the vents aren’t blocked, as poor airflow promotes steaming. Also, zucchini is over 95% water; salting the slices and letting them sit for 10 minutes before patting dry can draw out significant moisture for an even crispier result.
PrintAir Fryer Zucchini (Easy, Cheesy Recipe)
Ingredients
- 1 lb Zucchini ((sliced, about 1/2 inch thick))
- 1 tbsp Olive oil ((or avocado oil))
- 1/2 tsp Garlic powder
- 1/4 tsp Dried oregano ((optional))
- 1/8 tsp Sea salt
- 1/4 tsp Black pepper
- 1/3 cup Grated parmesan cheese ((plus more if needed))
Instructions
- Preheat the air fryer to 400 degrees F (204 degrees C) for at least 5 minutes.
- Meanwhile, place the zucchini slices in a large bowl. Drizzle with olive oil, and toss to coat.
- Season with garlic powder, oregano, salt, and pepper. Stir well.
- Sprinkle the grated parmesan cheese over the zucchini. Toss to coat again.
- Arrange the zucchini slices in the air fryer basket in a single layer, working in batches if needed. (Do not crowd the basket. Mine fit in the air fryer in one batch, but smaller air fryers may need multiple batches.) If the coating of parmesan looks sparse, sprinkle a thin layer of additional parmesan on top.
- Air fry zucchini for 8 minutes, until tender and golden brown.