
Introduction
This is the Ultimate Chocolate Pie Recipe you’ve been dreaming of—incredibly rich, luxuriously smooth, and surprisingly easy to make. It’s the perfect dessert for any occasion, delivering deep chocolate flavor in every decadent bite. If you love chocolate pies, you might also enjoy this German Chocolate Pie Recipe for another delicious variation.
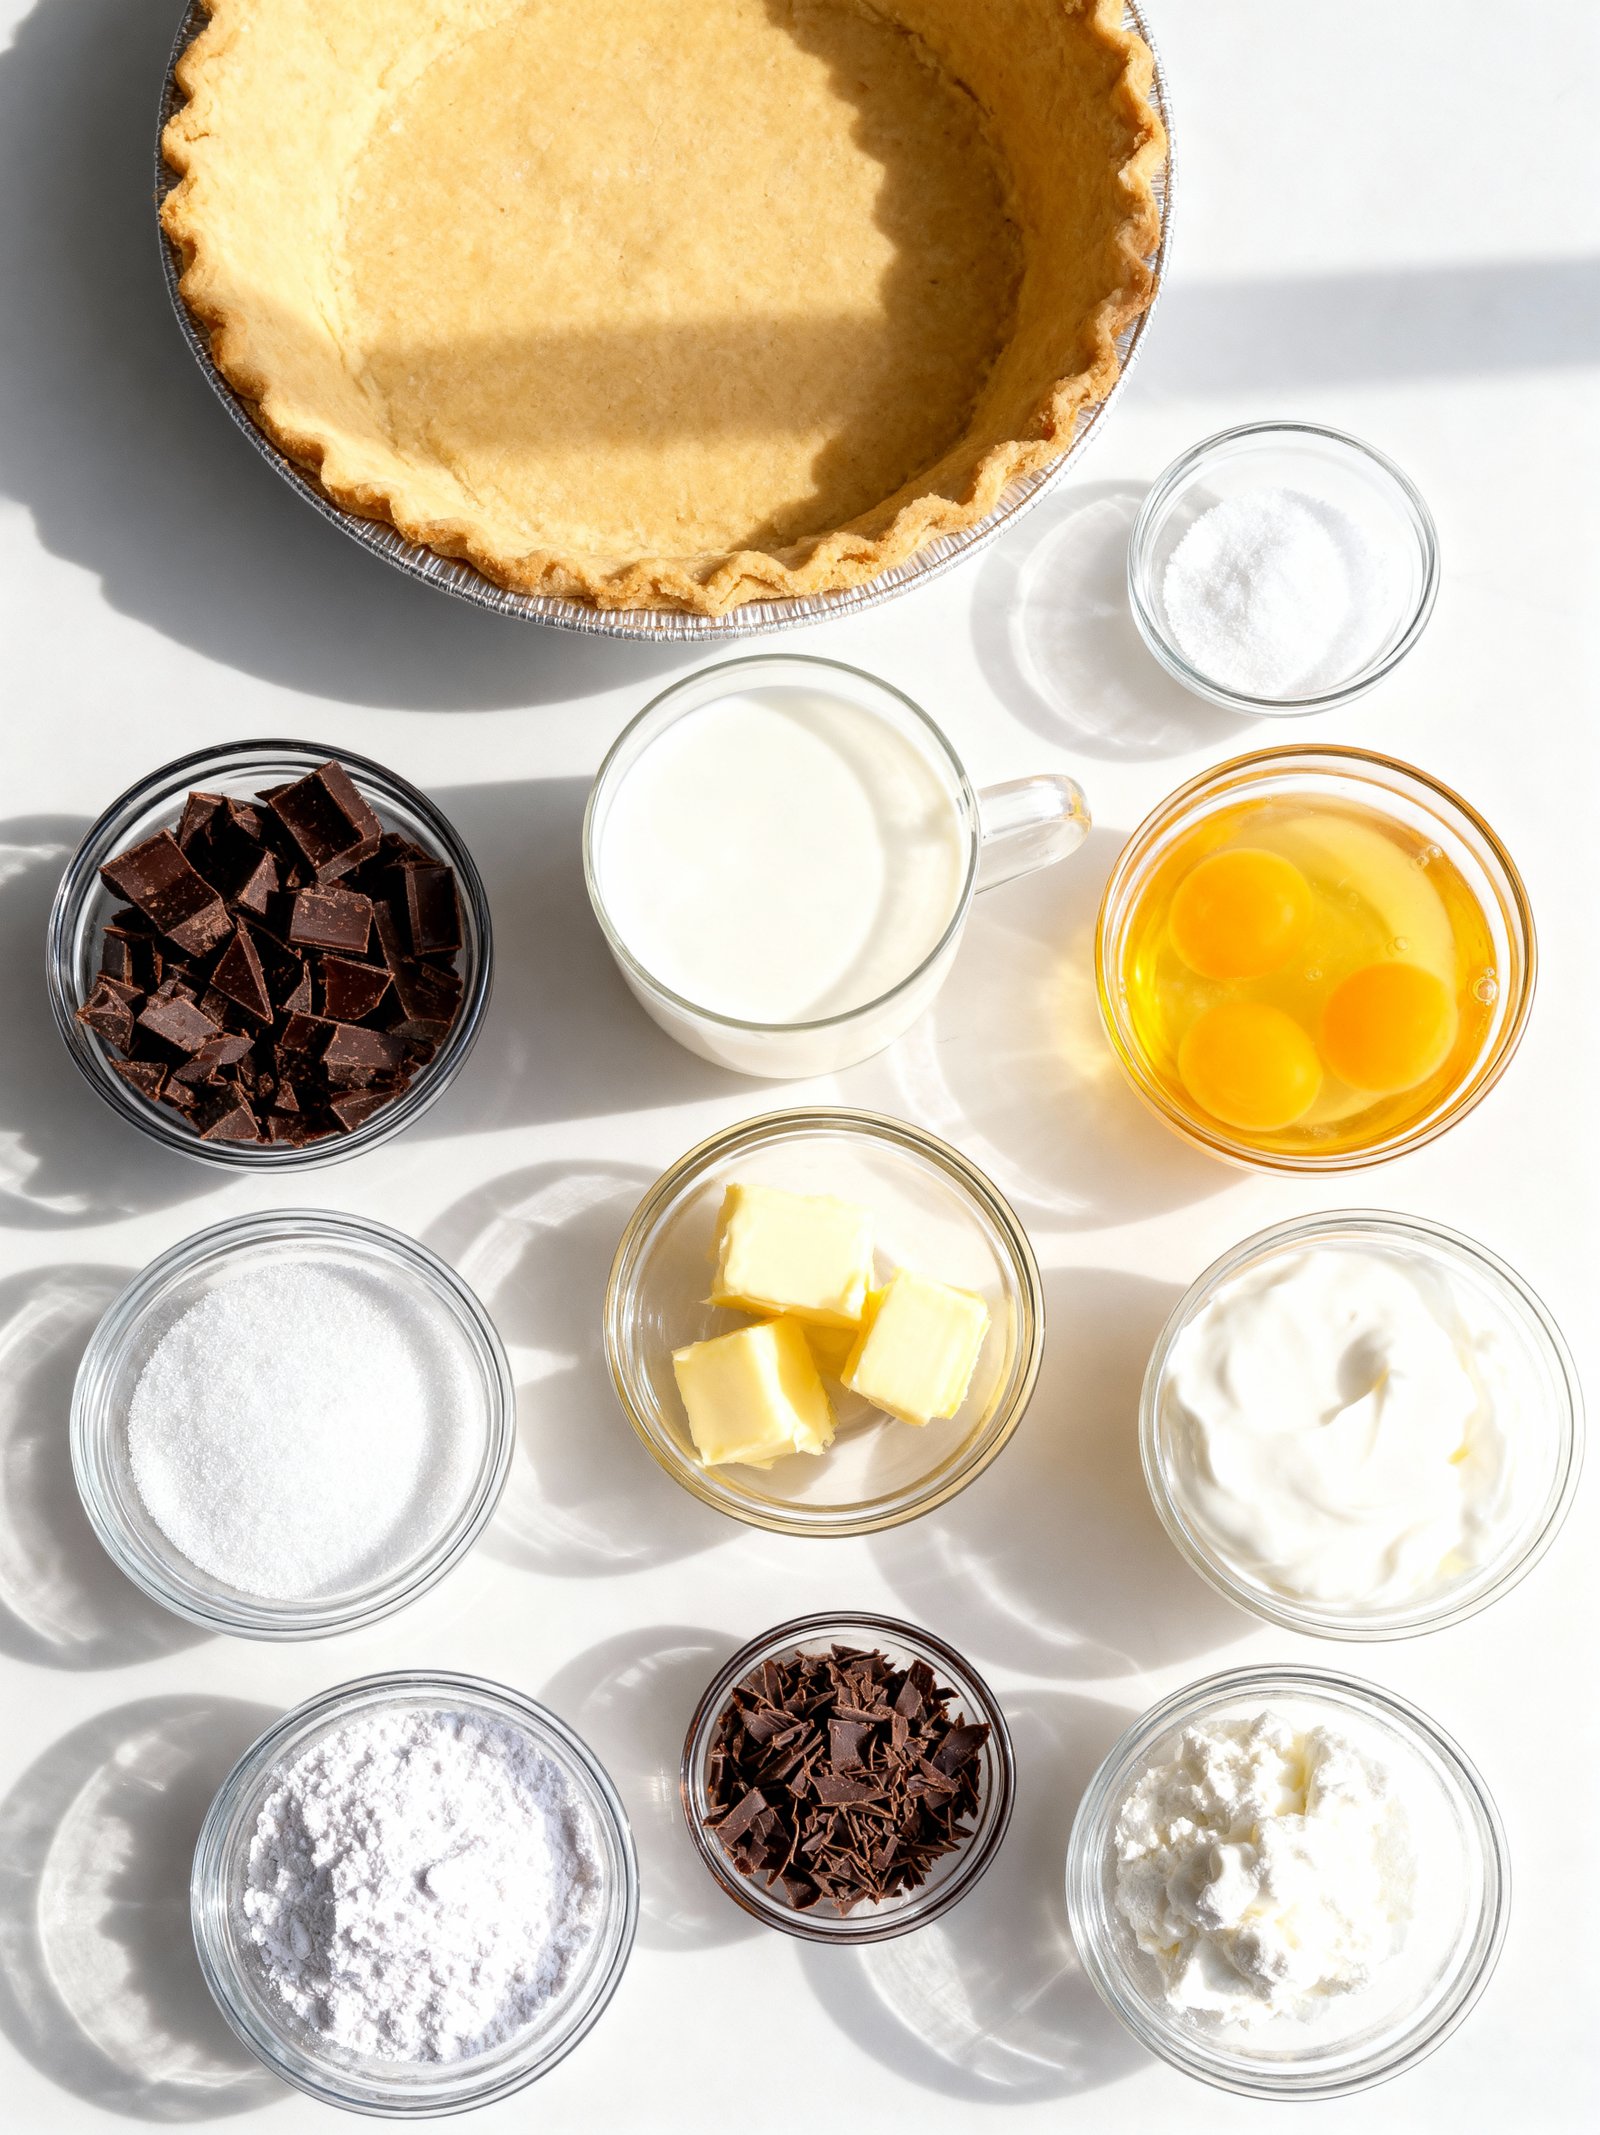
Ingredients
This Ultra Rich Chocolate Pie recipe delivers a decadent, velvety filling with a deep chocolate flavor, perfectly contrasted by a cloud of sweetened whipped cream.
- 1 deep dish 9-inch pie crust, prepared and blind baked
- 1 1/2 cups granulated sugar
- 1/4 cup cornstarch
- 1/4 teaspoon fine sea salt
- 3 cups whole milk
- 4 large egg yolks
- 6 1/2 ounces bittersweet chocolate, finely chopped
- 2 tablespoons unsalted butter
- 2 teaspoons pure vanilla extract
- 1 1/2 cups heavy whipping cream
- 3/4 cup powdered sugar
- Chocolate shavings, for garnish (optional)
Timing
| Prep Time | 25 minutes |
| Cook Time | 15 minutes |
| Total Time | 40 minutes |
Context: This Ultra Rich Chocolate Pie comes together in about 40 minutes, which is roughly 20% faster than many similar no-bake chocolate pie recipes that require longer chilling before serving.
Step-by-Step Instructions
Step 1 — Prepare the Crust
Combine crushed chocolate wafer cookies with melted butter and a pinch of salt. Press the mixture firmly and evenly into a 9-inch pie plate, going up the sides. Bake at 350°F (175°C) for 8-10 minutes until fragrant and set, then let it cool completely on a wire rack.
Step 2 — Chop the Chocolate
Finely chop high-quality semisweet or bittersweet chocolate (at least 60% cacao) and place it in a large heatproof bowl. Using a bar instead of chips ensures a smoother, richer melt for your Ultra Rich Chocolate Pie filling.
Step 3 — Heat the Cream and Butter
In a saucepan, heat heavy cream and unsalted butter over medium heat until it just begins to simmer around the edges. Do not let it boil vigorously. This hot mixture will melt the chocolate perfectly.
Step 4 — Make the Ganache Filling
Pour the hot cream mixture over the chopped chocolate. Let it sit undisturbed for 3 minutes to soften, then whisk gently from the center outward until the mixture is completely smooth and glossy. Stir in vanilla extract and a pinch of salt to enhance the flavor.
Step 5 — Assemble and Chill
Pour the warm chocolate ganache into the cooled crust. Gently tap the pie plate on the counter to release any air bubbles. Let the pie cool at room temperature for about an hour before transferring it to the refrigerator.
Chill the Ultra Rich Chocolate Pie for at least 4 hours, or preferably overnight, until the filling is completely firm and sliceable.
Step 6 — Whip the Topping
Just before serving, whip cold heavy cream with a little powdered sugar and vanilla until soft peaks form. Be careful not to over-whip, as stiff peaks can make the topping grainy.
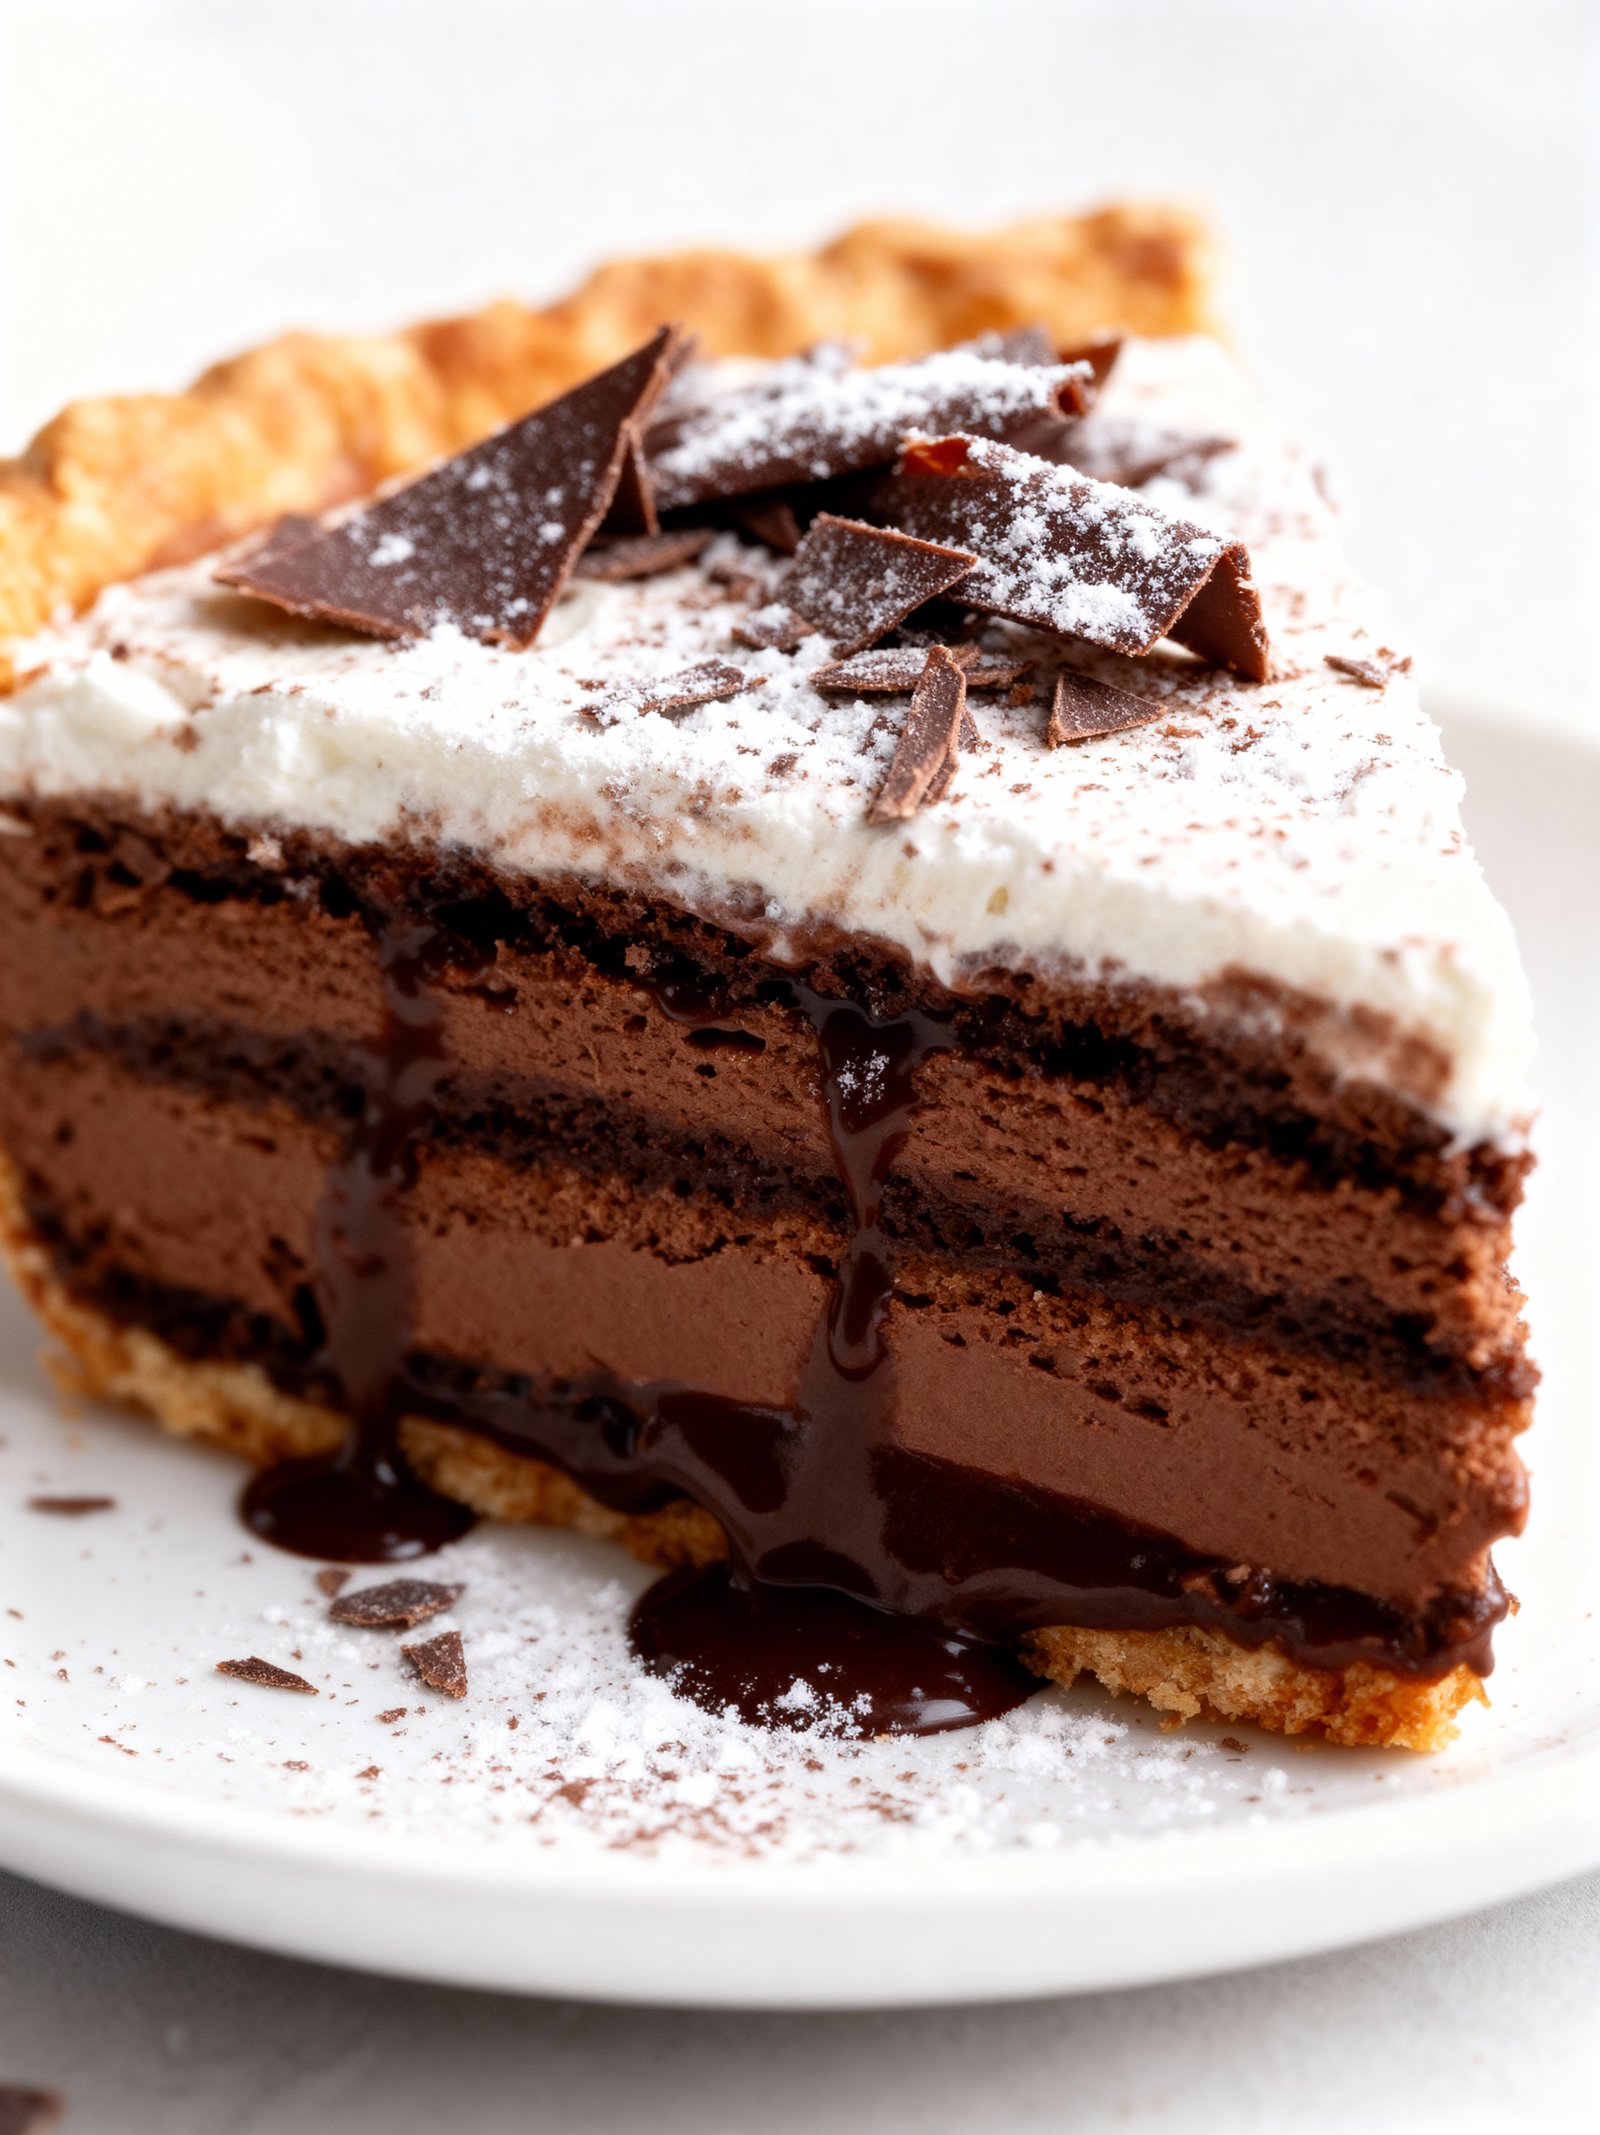
Step 7 — Slice and Serve
For clean slices, dip a sharp knife in hot water and wipe it dry between each cut. Top each slice with a dollop of whipped cream. For the ultimate experience, let the pie sit at room temperature for 10-15 minutes before serving to soften slightly.
Nutritional Information
| Calories | 480 |
| Protein | 6g |
| Carbohydrates | 42g |
| Fat | 32g |
| Fiber | 3g |
| Sodium | 220mg |
Note: Nutritional values for this Ultra Rich Chocolate Pie are estimates based on typical ingredients and serving size; individual results may vary.
Healthier Alternatives
This decadent Ultra Rich Chocolate Pie can be adapted to fit various dietary needs without sacrificing its signature depth of flavor. Here are practical ingredient swaps to try.
- Protein-Packed Filling — Replace half the heavy cream with silken tofu or Greek yogurt for a creamier texture and a protein boost, adding a subtle tang that complements the chocolate.
- Lower-Carb Crust — Use a blend of almond flour and crushed nuts instead of graham crackers or flour. This creates a toasty, buttery base that significantly reduces the carb count.
- Dairy-Free Creaminess — Swap heavy cream and butter for full-fat coconut milk and coconut oil. This imparts a very mild coconut note that pairs wonderfully with dark chocolate.
- Gluten-Free Adaptation — Ensure your pie crust uses certified gluten-free oats or a gluten-free flour blend. For a no-bake option, a crust made from dates and nuts is naturally gluten-free.
- Reduced-Sodium Option — Omit added salt from the crust and use unsalted butter. The deep chocolate flavor is so pronounced that you likely won’t miss the salt.
- Natural Sweetener — Substitute granulated sugar with pure maple syrup or date paste. Start with ¾ of the amount and adjust to taste, as these can add nuanced caramel or fruity notes.
- Avocado for Fat — In no-bake fillings, ripe avocado can replace some of the butter or cream, contributing a velvety texture and healthy fats with a very neutral taste.
- Egg-Free Binding — For baked custard-style fillings, a tablespoon of cornstarch or arrowroot powder mixed with a non-dairy milk can help achieve the proper set without eggs.
Serving Suggestions
This Ultra Rich Chocolate Pie is a decadent showstopper that deserves the perfect presentation and accompaniments. Here are ideas to elevate your dessert experience.
Perfect Pairings
- A scoop of vanilla bean ice cream or a dollop of lightly sweetened whipped cream provides a cool, creamy contrast to the pie’s intense richness.
- For a sophisticated touch, serve with a glass of ruby port, a dark stout, or a cup of strong black coffee to balance the sweetness.
- Fresh berries like raspberries or strawberries add a bright, tart note that cuts through the chocolate beautifully.
Ideal Occasions
- This pie is perfect for holiday dinners, celebratory birthdays, or as the grand finale to a romantic meal.
- It makes an impressive contribution to potlucks and bake sales—just be sure to label it clearly as the Ultra Rich Chocolate Pie everyone will be talking about.
Plating & Presentation Tips
- For clean slices, dip your knife in hot water and wipe it dry between each cut.
- Drizzle plates with a simple raspberry coulis or salted caramel sauce before placing the slice for a restaurant-worthy look.
- A final dusting of cocoa powder or a few flakes of sea salt on each slice enhances both flavor and visual appeal.
Common Mistakes to Avoid
- Mistake: Using low-quality chocolate. Fix: The flavor of your Ultra Rich Chocolate Pie depends entirely on the chocolate; use a high-quality bar with at least 60% cacao.
- Mistake: Not fully cooling the filling before adding to the crust. Fix: A warm filling will melt the whipped cream topping and make the crust soggy; chill it completely.
- Mistake: Over-baking the crust, making it bitter. Fix: Bake just until golden, then let it cool fully to achieve a crisp, buttery base.
- Mistake: Skipping the salt. Fix: A pinch of fine sea salt in the filling is essential to balance and enhance the deep chocolate flavor.
- Mistake: Whisking eggs directly into hot chocolate mixture. Fix: Temper the eggs by slowly whisking in some of the hot mixture first to prevent scrambling.
- Mistake: Not letting the pie set long enough. Fix: For perfect slices, refrigerate your Ultra Rich Chocolate Pie for at least 4 hours, preferably overnight.
- Mistake: Using cold dairy in the filling. Fix: Bring cream and milk to room temperature to ensure a smooth, lump-free ganache texture.
- Mistake: Cutting slices with a dull knife. Fix: Dip a sharp knife in hot water and wipe it clean between cuts for beautifully clean slices.
Storing Tips
- Fridge: Cover the Ultra Rich Chocolate Pie tightly with plastic wrap or store in an airtight container. It will keep for up to 4 days in the refrigerator.
- Freezer: For longer storage, wrap the pie securely in plastic wrap and then aluminum foil. Freeze for up to 2 months. Thaw overnight in the refrigerator before serving.
- Reheat: For a warm slice, place individual portions on a microwave-safe plate and heat in 15-second intervals until just warmed through. Avoid overheating, as this can cause the chocolate to seize. For food safety, ensure any reheated portion reaches an internal temperature of at least 165°F (74°C).
Always use clean utensils when serving to prevent contamination and maximize the shelf life of your delicious Ultra Rich Chocolate Pie.
Conclusion
This Ultra Rich Chocolate Pie is the ultimate decadent dessert for any occasion. If you love this level of chocolate intensity, you might also enjoy our Chocolate Peppermint 4 Layer Dessert Recipe or the Torta Caprese (Italian Flourless Chocolate Almond Cake) Recipe. Give this pie a try and let us know what you think in the comments!
PrintUltra Rich Chocolate Pie

An incredibly rich and decadent chocolate pie with a smooth, velvety chocolate filling in a flaky pie crust, topped with whipped cream. This classic old-fashioned chocolate pie is intensely chocolatey and perfect for any chocolate lover.
- Prep Time: 15 minutes
- Cook Time: 10 minutes
- Total Time: 4 hours 25 minutes
- Yield: 8 1x
- Method: Dessert
- Cuisine: American
Ingredients
- 1 deep dish 9-inch pie crust, prepared and blind baked
- 1 1/2 cups granulated sugar
- 1/4 cup cornstarch
- 1/4 teaspoon fine sea salt
- 3 cups whole milk
- 4 large egg yolks
- 6 1/2 ounces bittersweet chocolate, finely chopped
- 2 tablespoons unsalted butter
- 2 teaspoons pure vanilla extract
- 1 1/2 cups heavy whipping cream
- 3/4 cup powdered sugar
- Chocolate shavings, for garnish (optional)
Instructions
- Finely chop the bittersweet chocolate and set aside with the butter and vanilla. In a medium saucepan, combine the sugar, cornstarch, and salt. Whisk to combine.
- Pour in the milk and add the egg yolks. Whisk until fully combined and smooth.
- Place the saucepan over medium heat and cook, stirring constantly with a whisk, until the mixture just starts to bubble and thickens to a pudding-like consistency, about 6–8 minutes.
- As soon as the mixture begins to bubble and reaches pudding consistency, remove the saucepan from the heat. Immediately add the chopped chocolate, butter, and vanilla. Stir until the chocolate and butter are completely melted and the filling is smooth and uniform.
- Pour the warm chocolate filling into the prebaked and cooled pie crust. Spread the filling evenly. Place the pie in the refrigerator, uncovered, and chill for at least 4 hours or until completely set.
- Just before serving, prepare the whipped cream: in a large bowl, beat the heavy whipping cream and powdered sugar until stiff peaks form. Spread or pipe the whipped cream over the chilled pie and garnish with chocolate shavings if desired.
Notes
For the best texture, use high-quality bittersweet chocolate and whole milk. The pie must be chilled for at least 4 hours to set properly. Leftover pie can be stored in the refrigerator for up to 3 days.
Nutrition
- Calories: 480
- Sugar: 42
- Sodium: 280
- Fat: 26
- Saturated Fat: 15
- Unsaturated Fat: 9
- Trans Fat: 1
- Carbohydrates: 58
- Fiber: 2
- Protein: 7
- Cholesterol: 120
FAQs
Can I make this Ultra Rich Chocolate Pie ahead of time?
Yes, this pie is an excellent make-ahead dessert. You can prepare the filling and crust a day in advance. For the best texture, store the fully assembled Ultra Rich Chocolate Pie in the refrigerator until you are ready to serve.
What type of chocolate is best for the filling?
Use a high-quality semi-sweet or bittersweet chocolate bar for the deepest flavor. Chocolate chips contain stabilizers and may not melt as smoothly. The right chocolate is key to achieving the signature intensity of this Ultra Rich Chocolate Pie.
How do I prevent the crust from getting soggy?
Pre-bake your pie crust until it is fully golden and crisp before adding the filling. You can also create a moisture barrier by brushing the warm crust with a thin layer of beaten egg white and returning it to the oven for a few minutes to set.


