Triple Chocolate Mousse Cake: A Decadent Dessert for Chocolate Lovers
Indulge in the ultimate chocolate experience with this Triple Chocolate Mousse Cake, a showstopping dessert that combines rich, velvety layers of dark, milk, and white chocolate mousse atop a fudgy chocolate cake base. This luxurious treat is perfect for special occasions when you want to impress guests with a professional-quality dessert that looks as stunning as it tastes.
The magic of this triple chocolate mousse cake lies in its contrasting textures and flavors. The dense chocolate cake foundation provides structure and deep cocoa notes, while the three distinct mousse layers offer a symphony of chocolate intensities – from the sophisticated bitterness of dark chocolate to the creamy sweetness of white chocolate. Each bite delivers a perfect balance of airy lightness and decadent richness that will satisfy even the most discerning chocolate connoisseur.
Quick Recipe Highlights
- Flavor Profile: A harmonious blend of dark, milk, and white chocolate creates a complex yet balanced taste experience that evolves with each layer.
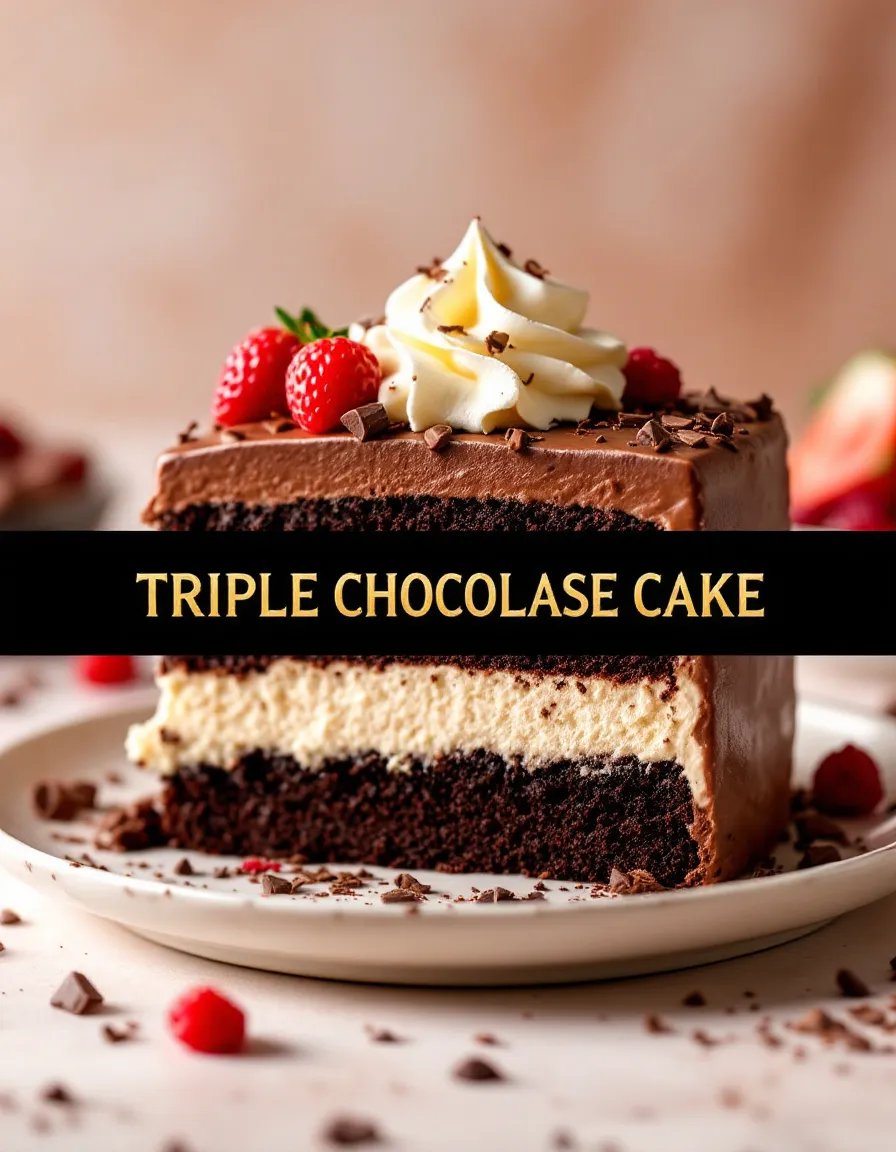
- Texture: The cake features four distinct textures – dense cake base, silky dark chocolate mousse, creamy milk chocolate layer, and fluffy white chocolate topping.
- Aroma: Rich cocoa notes mingle with sweet vanilla and subtle coffee undertones for an intoxicating fragrance.
- Visual Appeal: The dramatic layered presentation with chocolate shavings and berries makes this dessert a centerpiece-worthy creation.
- Skill Level Needed: Requires intermediate baking skills, particularly for tempering chocolate and creating stable mousse layers.
- Special Equipment: Springform pan, stand mixer, and candy thermometer are recommended for best results.
Recipe Overview
- Difficulty Level: This triple chocolate mousse cake recipe is rated intermediate due to the multiple components and technique-sensitive steps like folding mousse and layering without mixing. However, with careful attention to instructions, home bakers can achieve professional results.
- Category: Dessert, specifically a layered mousse cake that works beautifully for celebrations and dinner parties.
- Cuisine: While mousse cakes have French origins, this triple chocolate version incorporates modern pastry techniques from international patisseries.
- Cost: Premium ingredients like high-quality chocolate and fresh cream make this a special occasion dessert, costing approximately $15-20 to prepare at home.
- Season: Perfect year-round, though particularly suited for winter holidays and Valentine’s Day when rich chocolate desserts are most appreciated.
- Occasion: Ideal for birthdays, anniversaries, dinner parties, or any event where you want to serve an impressive homemade dessert.
Why You’ll Love This Triple Chocolate Mousse Cake
The taste and texture combination in this triple chocolate mousse cake is truly extraordinary. The dark chocolate layer provides depth and sophistication, the milk chocolate offers creamy comfort, while the white chocolate adds a sweet, vanilla-kissed finish. This progression of flavors creates a complete chocolate experience that evolves with each bite, satisfying every chocolate craving simultaneously.
Despite its elegant appearance, this chocolate mousse cake is surprisingly manageable to prepare. The components can be made in stages, and the recipe includes helpful tips for ensuring each layer sets perfectly. You’ll achieve bakery-quality results with standard kitchen equipment, making this an accessible showstopper for home bakers looking to elevate their dessert game.
Nutritionally, this dessert offers more than just empty calories. High-quality dark chocolate provides antioxidants, while the protein-rich eggs and calcium from dairy create a more balanced treat. Of course, this remains an indulgent dessert best enjoyed in moderation, but knowing it contains real ingredients rather than artificial additives makes it a better choice than store-bought alternatives.
For entertaining, this triple chocolate mousse cake delivers maximum impact with minimal last-minute effort. The cake can be prepared a day ahead, freeing you to focus on other party preparations. Guests will be amazed that you created such a professional-looking dessert at home, making it perfect for impressing dinner guests or bringing to potlucks where you want your contribution to stand out.
Cost-wise, while premium chocolate and fresh ingredients make this more expensive than a boxed mix, it’s significantly more affordable than purchasing a comparable dessert from a high-end bakery. The recipe yields 12 generous servings, working out to just over $1 per serving for a luxurious dessert experience that would cost $8-12 per slice at a restaurant.
Historical Background and Cultural Significance
The origins of chocolate mousse can be traced back to 18th century France, where the first airy chocolate desserts were developed. The word “mousse” literally means “foam” in French, referring to the light, airy texture achieved by incorporating whipped cream or beaten egg whites. Early versions were simpler than today’s elaborate creations, often featuring just chocolate and eggs.
Mousse cakes gained popularity in the 20th century as pastry chefs began layering mousse with cake bases and other components. The triple chocolate variation represents a modern evolution, showcasing the full spectrum of chocolate flavors in one elegant presentation. This style became particularly popular in American bakeries during the 1980s chocolate dessert boom.
Different cultures have put their own spin on mousse cakes. In Japan, matcha white chocolate mousse cakes became trendy, while Italian pastry chefs often incorporate hazelnut or coffee flavors. Our triple chocolate version pays homage to the French tradition while incorporating contemporary presentation techniques that make it visually striking.
The cultural significance of chocolate desserts spans centuries, from ancient Mayan chocolate drinks to today’s elaborate patisserie creations. This triple chocolate mousse cake continues that tradition, offering a modern interpretation of chocolate’s luxurious appeal that feels both timeless and contemporary.
Ingredient Deep Dive
Dark Chocolate (70% cocoa): The foundation of our first mousse layer, high-quality dark chocolate provides depth and sophistication. Look for couverture chocolate with a high cocoa butter content for the smoothest texture. Dark chocolate contains antioxidants called flavonoids and has less sugar than milk chocolate. Store in a cool, dark place away from strong odors. If unavailable, you can substitute with semisweet chocolate but reduce added sugar slightly.
Milk Chocolate: The middle layer features creamy milk chocolate for a comforting, familiar flavor. Quality matters here – choose a milk chocolate with at least 30% cocoa solids for the best balance of sweetness and chocolate flavor. Milk chocolate contains calcium and is easier to temper than dark chocolate. For a slightly more sophisticated version, try using a 45% cocoa milk chocolate.
White Chocolate: Our top layer uses real white chocolate (not white baking chips) for its sweet vanilla notes. True white chocolate contains cocoa butter – check the label to ensure it’s the first ingredient. White chocolate is more temperature-sensitive than dark varieties, so work carefully when melting. For those who find white chocolate too sweet, reducing the quantity by 25% still provides the visual contrast while toning down the sweetness.
Heavy Cream: Essential for creating the mousse’s light texture, heavy cream (with 36-40% fat content) whips best. The fat content stabilizes the foam structure. For best results, chill your bowl and beaters before whipping. In a pinch, you can substitute with whipping cream, but the mousse may be slightly less stable. Non-dairy alternatives like coconut cream can work for vegan versions but will impart a coconut flavor.
Common Mistakes to Avoid
- Overmixing the mousse: Folding too vigorously deflates the whipped cream, resulting in a dense texture. Use a gentle hand and stop as soon as no streaks remain.
- Improper chocolate tempering: Chocolate that’s too hot can seize or cause the mousse to separate. Melt slowly over low heat and cool slightly before incorporating.
- Rushing the chilling process: Each layer needs adequate time to set before adding the next. Attempting to speed this up leads to blended layers.
- Using cold ingredients: Eggs and cream whip best at room temperature. Take them out of the refrigerator 30 minutes before starting.
- Incorrect pan size: A 9-inch springform pan is ideal. Larger pans make layers too thin, while smaller ones may overflow.
- Skipping the parchment: Even nonstick pans benefit from a parchment circle for flawless cake base removal.
- Overbaking the cake base: The cake should be just set to maintain moisture. Check 5 minutes before the suggested time.
- Not straining the mousse: Passing each mousse through a sieve ensures perfectly smooth layers without any lumps.
Essential Techniques
Folding Technique: The key to light, airy mousse is proper folding. Use a large silicone spatula and cut through the center of the mixture, bringing it up and over the whipped cream. Rotate the bowl a quarter turn with each fold. Stop when just combined – a few small streaks are better than overmixing.
Tempering Chocolate: Melt chocolate gently using a double boiler or microwave at 50% power, stirring every 30 seconds. Chocolate should never exceed 120°F for dark, 110°F for milk, or 105°F for white. If chocolate seizes (becomes grainy), add a teaspoon of vegetable oil and stir vigorously to rescue it.
Layering: Pour each mousse layer slowly into the center of the pan, allowing it to spread outward naturally. Tilt the pan slightly to encourage even distribution without mixing layers. Chill until the surface is set but still slightly tacky before adding the next layer – about 30 minutes between layers.
Unmolding: For clean release, run a thin knife dipped in hot water around the edge before opening the springform. If the cake sticks, wrap a warm towel around the pan for 10 seconds to loosen. Remove the base carefully by sliding a spatula underneath.
Pro Tips for Perfect Triple Chocolate Mousse Cake
- Use an oven thermometer to ensure accurate baking temperature for the cake base – even 25°F difference can affect texture.
- For ultra-smooth mousse, press each layer through a fine-mesh sieve before pouring into the pan.
- Chill your mixing bowl and beaters in the freezer for 15 minutes before whipping cream for maximum volume.
- Create professional-looking layers by letting each mousse cool to room temperature before adding to the pan.
- Enhance chocolate flavor by adding a pinch of instant espresso powder to the dark chocolate layer – it won’t taste like coffee but will deepen the chocolate notes.
- For clean slices, dip your knife in hot water and wipe between each cut.
- Garnish just before serving to maintain fresh appearance – chocolate shavings, berries, or edible gold leaf all work beautifully.
- If making ahead, cover with a cake dome rather than plastic wrap to prevent condensation marks on the surface.
Variations and Adaptations
Regional Variations: Incorporate local flavors by adding a layer of dulce de leche between the cake and dark chocolate for a Latin-inspired version, or mix orange zest into the milk chocolate layer for a European twist. Matcha powder blended with the white chocolate creates an Asian-fusion variation.
Seasonal Adaptations: For winter holidays, spike the dark chocolate layer with peppermint extract and garnish with crushed candy canes. In summer, top with fresh berries and a berry coulis. Autumn versions can include a spiced cake base with cinnamon and nutmeg.
Dietary Modifications: Make this gluten-free by using almond flour in the cake base. For vegan versions, substitute coconut cream for dairy cream and use plant-based chocolates. Sugar-free chocolate works for low-carb diets, though texture may be slightly affected.
Flavor Variations: Infuse the cream with lavender or Earl Grey tea before whipping for floral notes. Add a raspberry jam layer between cake and mousse for fruit contrast. For coffee lovers, mix instant espresso into each chocolate layer at varying intensities.
Texture Modifications: Include crunchy elements like toasted hazelnuts between layers or a praline feuilletine base for contrast. For extra richness, replace the cake base with a brownie layer or chocolate shortbread crust.
Presentation Alternatives: Create individual servings in glasses for easy entertaining, or make a rectangular version for modern plating. For dramatic effect, use acetate strips to create perfectly straight sides on your layers.
Serving and Presentation Guide
Plating Techniques: Serve slices on chilled plates to maintain structure. Use a warm, dry knife for clean cuts, wiping between slices. Offset each slice slightly on the plate for visual interest, showing off the beautiful layers.
Garnishing Ideas: Fresh berries provide color contrast and acidity to balance richness. Chocolate curls, gold leaf, or edible flowers elevate presentation. A dusting of cocoa powder or confectioners’ sugar adds finishing elegance.
Traditional Accompaniments: Classic pairings include raspberry coulis, crème anglaise, or espresso for dipping. Whipped cream rosettes complement without overpowering the mousse textures.
Modern Serving Suggestions: Deconstructed versions with quenelles of each mousse layer arranged artistically appeal to contemporary tastes. Serve with miniature spoons for guests to sample each component separately.
Temperature Considerations: Remove from refrigerator 15 minutes before serving to allow flavors to bloom. The cake cuts best when cold but tastes ideal at slightly cooler than room temperature.
Portion Control: Richness means small slices satisfy – aim for 1-inch wide portions. For buffets, cut into 2-inch squares for easy pickup and more servings.
Wine and Beverage Pairing
Wine Pairings: A late-harvest Riesling or Tawny Port complements the chocolate’s richness without overpowering. For red lovers, a fruit-forward Pinot Noir or Banyuls works beautifully. Avoid overly tannic wines that can clash with chocolate.
Non-Alcoholic Alternatives: Sparkling water with lime cleanses the palate between bites. Cold-brew coffee or a chai latte makes an excellent pairing, as does a high-quality hot chocolate for ultimate chocolate indulgence.
Coffee/Tea Pairings: Espresso or French press coffee cuts through the richness. For tea, try Earl Grey for its bergamot notes or a smoky Lapsang Souchong for contrast. Herbal options include mint or raspberry leaf tea.
Temperature Considerations: Serve beverages slightly cooler than the cake to provide refreshing contrast. Iced coffee or tea should be strongly brewed to stand up to the chocolate flavors.
Serving Suggestions: Offer small pours of dessert wines or liqueurs in cordial glasses. For coffee pairings, serve in demitasse cups to keep portions appropriate to the rich dessert.
Storage and Shelf Life
Storage Methods: Keep refrigerated in an airtight container or covered with plastic wrap touching the surface to prevent drying. The cake base helps maintain moisture better than crustless mousse desserts.
Temperature Requirements: Store at 34-38°F for optimal texture. Avoid freezing unless absolutely necessary, as it can alter the mousse’s delicate consistency.
Container Recommendations: A cake carrier with a tight seal works best. If using a springform pan for storage, wrap the entire pan in plastic wrap to prevent refrigerator odors from affecting flavor.
Signs of Spoilage: Look for separation of layers, sour smell, or visible mold. Properly stored, the cake should maintain quality for 3-4 days.
Reheating Instructions: Not recommended, as heat destroys the mousse texture. If the cake becomes too cold, let stand at room temperature for 15 minutes before serving.
Freezing Guidelines: If necessary, freeze unsliced for up to 2 weeks. Thaw overnight in refrigerator. Note that the white chocolate layer may develop slight graininess after freezing.
Make Ahead Strategies
Prep Timeline: The cake base can be baked 1 day ahead. Mousse layers are best prepared the same day but can be made up to 8 hours before assembly. Complete assembly at least 6 hours before serving for proper setting.
Storage Between Steps: Wrap cooled cake base tightly in plastic. Prepared mousse mixtures can be held at cool room temperature for 1 hour before assembly if needed.
Quality Impact Assessment: Freshness peaks at 12-24 hours after assembly. The cake maintains excellent quality for 2 days, with some texture changes by day 3.
Assembly Tips: If making components ahead, bring mousse mixtures to room temperature (about 20 minutes) before layering to ensure proper adhesion between layers.
Fresh Element Additions: Add garnishes like berries, mint, or chocolate decorations just before serving to maintain their fresh appearance and texture.
Scaling Instructions
Halving the Recipe: Use a 6-inch springform pan and reduce baking time by 5-7 minutes for the cake base. Mousse layers will be thinner but still effective. Halving eggs is tricky – beat whole eggs and measure out half.
Doubling or Tripling: For large gatherings, make separate batches rather than scaling up one batch, as mousse volumes become unwieldy. Use multiple pans rather than one very large pan for best results.
Equipment Adjustments: When scaling up, ensure your mixer bowl is large enough for increased mousse volumes. You may need to whip cream in batches.
Timing Modifications: Larger volumes may require slightly longer chilling between layers – check for set surface before proceeding.
Storage Considerations: Scaled-up versions may require more refrigerator space. Allow extra time for thorough chilling before serving.
Nutritional Deep Dive
Macro Breakdown: A typical slice contains approximately 380 calories, with 28g fat (mostly from quality chocolate and cream), 30g carbohydrates (including 22g sugars), and 6g protein. The majority of fats are heart-healthy monounsaturated from cocoa butter.
Micronutrient Analysis: Dark chocolate provides iron, magnesium, copper and manganese. Milk products contribute calcium and vitamin D. Eggs add choline and selenium.
Health Benefits: Cocoa flavonoids may support cardiovascular health and cognitive function. Moderate consumption of quality chocolate can be part of a balanced diet.
Dietary Considerations: Contains dairy, eggs, and gluten (in cake base). Vegan and gluten-free adaptations are possible with substitutions.
Portion Analysis: The richness means small portions satisfy. Cutting the cake into 16 instead of 12 slices reduces calories per serving to about 285.
Weight Management Tips: Enjoy as an occasional treat rather than daily indulgence. Pair with fresh berries to increase satisfaction with smaller portions.
Dietary Adaptations
Gluten-Free: Replace cake base with almond flour or gluten-free flour blend. Ensure all chocolates are certified gluten-free, as some may contain barley malt.
Dairy-Free: Use coconut cream instead of heavy cream and select dairy-free chocolates. Note that white chocolate alternatives may contain dairy – check labels carefully.
Vegan: Combine dairy-free adaptations with egg substitutes. Agar-agar can help stabilize the mousse. Coconut oil may be needed to maintain proper texture.
Low-Carb/Keto: Use sugar-free chocolate and erythritol in the cake base. Increase cocoa percentage in all layers for richer flavor with fewer carbs.
Paleo: Focus on dark chocolate layers using 85% or higher cocoa content. Sweeten with honey or maple syrup in moderation.
Low-FODMAP: Stick to dark chocolate (limit to 30g per serving) and lactose-free cream. Avoid milk chocolate or use very small amounts.
Troubleshooting Guide
Texture Issues: If mousse is grainy, chocolate may have seized – next time melt more gently. Runny mousse indicates underwhipped cream or insufficient chilling time between layers.
Flavor Balance: If too sweet, increase dark chocolate percentage next time. Bitter notes can be balanced with a pinch of salt in each layer.
Temperature Problems: If layers melt together, ensure each is fully set before adding the next. Overly cold mousse may not pour smoothly – let sit briefly at room temperature.
Equipment Challenges: No springform pan? Line a regular cake pan with parchment “slings” for removal. No mixer? Whisk cream by hand in a chilled metal bowl.
Ingredient Substitutions: Out of eggs? The cake base can use 1/4 cup applesauce per egg. No heavy cream? Crème fraîche can work but produces denser texture.
Timing Concerns: Short on time? Make a simplified version with just two mousse layers, or prepare components over two days.
Recipe Success Stories
Many home bakers have shared their triumphs with this triple chocolate mousse cake recipe. One reader reported it was the hit of her dinner party, with guests insisting it was bakery-quality. Another successfully adapted it for her gluten-free daughter’s birthday, using almond flour in the base.
Creative variations have included adding a thin layer of salted caramel between the cake and dark chocolate mousse, and incorporating freeze-dried raspberry powder into the white chocolate layer for a pink hue and subtle tartness. One enterprising baker created a stunning ombré effect by blending the layers slightly at the edges.
Photography tips from successful makers include shooting slices against a dark background to highlight the layers, and garnishing with gold leaf for special occasion photos. Natural side lighting works best to capture the mousse’s delicate texture.
Readers suggest making mini versions in mason jars for gifts, or preparing the components separately to let guests assemble their own dessert glasses. One reviewer noted that while the recipe requires attention to detail, the impressive results make it well worth the effort.
Frequently Asked Questions
Can I make this cake without eggs? The mousse layers require eggs for structure, but you can make an eggless version using gelatin or agar-agar as stabilizers. The cake base can be adapted with flax eggs or commercial egg replacer.
How far in advance can I prepare this dessert? For best texture, assemble no more than 24 hours before serving. Components can be prepared up to 2 days ahead and stored separately.
Why did my mousse layers mix together? This happens if layers are added before the previous one has set. Ensure each layer is firm to the touch (about 30 minutes chilling) before adding the next.
Can I freeze leftover mousse cake? Freezing is possible but may slightly alter the mousse texture. Thaw overnight in the refrigerator before serving.
What’s the best way to slice the cake cleanly? Use a thin-bladed knife dipped in hot water and wiped clean between cuts. For perfect slices, chill the knife briefly before cutting.
Can I use chocolate chips instead of baking chocolate? Chips contain stabilizers that affect melting properties. For best results, use high-quality baking chocolate bars.
Why is my white chocolate layer grainy? White chocolate is delicate and can seize if overheated. Melt slowly at low heat and stir constantly. Graininess can also occur if the chocolate was old or improperly stored.
How do I know when each mousse layer is set enough for the next? The surface should be firm to a light touch but still slightly tacky. A toothpick inserted near the edge should come out clean.
Can I make individual portions instead of one large cake? Absolutely! Divide among glasses or ramekins, adjusting chilling times as smaller portions set faster.
What’s causing bubbles in my mousse layers? Overmixing incorporates too much air. Fold gently and tap the pan lightly on the counter after pouring each layer to release bubbles.
Additional Resources
For those who love this triple chocolate mousse cake, consider exploring other layered desserts like tiramisu, opera cake, or charlotte russe. Mastering chocolate work opens doors to truffles, bonbons, and chocolate sculptures.
Investing in quality chocolate and proper tempering tools will elevate all your chocolate desserts. A digital kitchen scale ensures precise measurements for consistent results in delicate mousse recipes.
Seasonal variations can keep this recipe exciting year-round – think peppermint for winter, citrus zest for spring, berries for summer, and spices for fall. The basic technique adapts beautifully to countless flavor combinations.
For visual inspiration, follow professional pastry chefs on social media to see innovative plating and garnishing techniques. Food styling courses can help you photograph your creations like a pro.
Join the Conversation
We’d love to see your triple chocolate mousse cake creations! Share photos on Instagram with #TripleChocolateMousseCake and tag our account. Your variations might inspire others to try new flavor combinations.
For stunning food photography, shoot in natural light and style with complementary props. A simple white plate lets the cake’s layers shine, while a dusting of cocoa powder adds visual interest.
Leave a review sharing your experience with the recipe. Did you make any creative adaptations? How did your guests react? Your feedback helps other bakers and inspires future recipe development.
Join our baking community forum to exchange tips and troubleshoot challenges. Many cooks have brilliant solutions to common baking dilemmas that they’re eager to share.
The Recipe
Triple Chocolate Mousse Cake
Serves: 12
Prep Time: 30 mins
Cook Time: 45 mins
Total Time: 75 mins
Kitchen Equipment Needed
- 9-inch springform pan
- Stand mixer or hand mixer
- Double boiler or microwave-safe bowls
- Fine-mesh sieve
- Rubber spatula
- Candy thermometer
- Parchment paper
Ingredients
Chocolate Cake Base:
- 1/2 cup all-purpose flour
- 1/4 cup cocoa powder
- 1/2 teaspoon baking powder
- 1/4 teaspoon salt
- 2 large eggs
- 1/2 cup granulated sugar
- 1 teaspoon vanilla extract
- 1/4 cup unsalted butter, melted
Dark Chocolate Mousse Layer:
- 4 oz 70% dark chocolate, chopped
- 1 cup heavy cream
- 2 large eggs, separated
- 2 tablespoons granulated sugar
- Pinch of salt
Milk Chocolate Mousse Layer:
- 4 oz milk chocolate, chopped
- 1 cup heavy cream
- 1 large egg yolk
- 1 tablespoon granulated sugar
White Chocolate Mousse Layer:
- 4 oz white chocolate, chopped
- 1 cup heavy cream
- 1 teaspoon vanilla extract
Directions
- Prepare the cake base: Preheat oven to 350°F. Line springform pan with parchment. Whisk dry ingredients. Beat eggs and sugar until pale, add vanilla. Fold in dry ingredients, then melted butter. Bake 15-18 minutes until set. Cool completely.
- Make dark chocolate mousse: Melt chocolate over double boiler. Whip cream to soft peaks. Beat egg whites with sugar to stiff peaks. Fold chocolate into yolks, then whipped cream, then egg whites. Pour over cooled cake. Chill 30 minutes.
- Make milk chocolate mousse: Melt chocolate. Whip cream to soft peaks. Whisk yolk and sugar until pale. Temper yolk with melted chocolate, then fold in whipped cream. Pour over set dark layer. Chill 30 minutes.
- Make white chocolate mousse: Melt chocolate with vanilla. Whip cream to stiff peaks. Fold chocolate into cream. Pour over milk layer. Chill at least 4 hours or overnight.
- Serve: Run knife around edge, remove springform. Garnish with chocolate shavings and berries. Slice with warm knife.
Recipe Notes
- For cleaner layers, strain each mousse through sieve before pouring.
- Room temperature eggs whip best – take out 30 minutes before using.
- If short on time, chill 1 hour between layers instead of 30 minutes.
- Leftovers keep 3 days refrigerated – surface may dry slightly.


