Did you know that the average American eats nearly 53 pounds of bread per year, yet so few ever experience the pure, buttery joy of a warm, homemade roll straight from the oven?
It’s true! We live in a world of convenience, where grabbing a basket of famously fluffy rolls from a place like Texas Roadhouse is a treat. But what if I told you that the magic of those legendary rolls isn’t locked away in some corporate kitchen? What if you could create that same warm, pillowy-soft, honey-cinnamon-butter-drenched experience right in your own home?
I’m here to tell you that you absolutely can. Today, we’re pulling back the curtain on the secret to making the absolute Best Texas Roadhouse Rolls Recipe – Homemade. This isn’t just about replicating a restaurant favorite; it’s about filling your kitchen with the incredible aroma of yeast and melted butter, a scent that feels like a hug. It’s about the profound satisfaction of pulling a tray of golden-brown, perfectly puffed rolls out of your own oven, knowing you created that magic from scratch.
I remember the first time I bit into one of those rolls. I was celebrating my best friend’s birthday, and the basket just kept coming. We must have gone through two rounds of them, slathering each warm piece with that sweet honey cinnamon butter until we were practically too full for steak! It was a moment of pure, unadulterated joy, a simple pleasure that turned a meal into a memory.
And that’s the feeling I want to bring into your home. This recipe is my love letter to that experience. It’s surprisingly straightforward, but the result is nothing short of spectacular. So, tie on your favorite apron, and let’s gather our ingredients. We’re about to make some memories, one delicious, homemade roll at a time.
PrintTexas Roadhouse Rolls
Soft, buttery yeast rolls served with a sweet cinnamon honey butter, inspired by the famous restaurant.
Ingredients
For the Crust:
- 2 1/4 tsp active dry yeast
- 1/4 cup warm water
- 1 cup milk, warmed
- 1/4 cup melted butter
- 1/4 cup sugar
- 1 egg
- 1 tsp salt
- 4 cups all-purpose flour
- For Honey Butter: 1/2 cup butter, 1/4 cup honey, 1/4 cup powdered sugar, 1 tsp cinnamon
Instructions
1. Prepare the Crust:
- Dissolve yeast in warm water with a pinch of sugar; let sit 5 minutes until foamy.
- In a large bowl, combine milk, melted butter, sugar, egg, and salt. Mix in yeast mixture. Gradually add flour until a soft dough forms.
- Knead dough on floured surface 5-7 minutes until smooth. Place in greased bowl, cover, and let rise 1 hour or until doubled.
- Punch down dough and divide into 12-15 rolls. Place in greased baking pan, cover, and let rise 30 minutes.
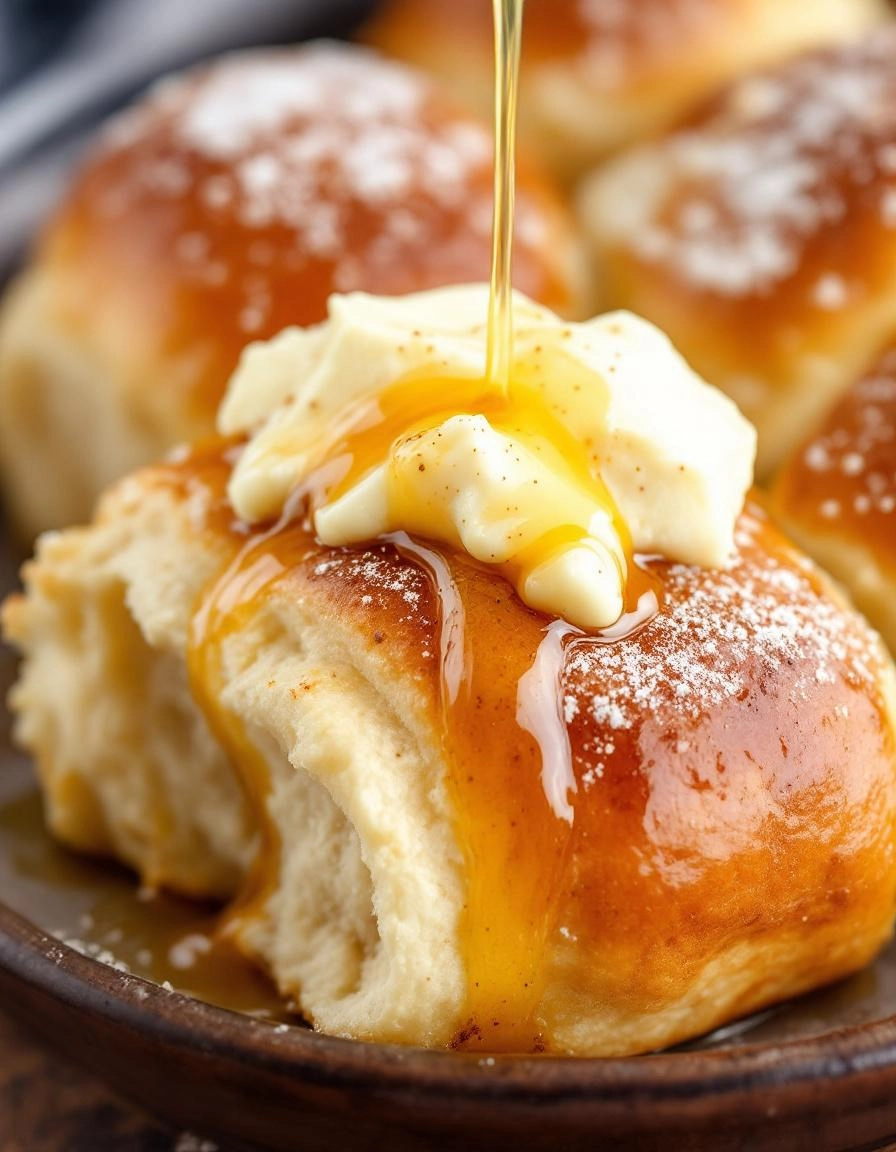
- Bake at 350°F for 15-18 minutes until golden. Brush with melted butter. For honey butter, beat all ingredients until smooth. Serve rolls warm with honey butter.
Notes
You can customize the seasonings to taste.
The Irresistible Allure of a Warm, Buttery Roll
There’s something truly magical about the moment a basket of warm, pillowy rolls lands on your table at Texas Roadhouse. That soft, yeasty aroma hits you first, followed by the sight of that impossibly fluffy interior just begging for a slather of honey cinnamon butter. It’s a moment of pure, unadulterated comfort. For the longest time, I considered those rolls a special treat reserved for a night out. But then I got to thinking… what if I could recreate that little piece of heaven right in my own kitchen?
After many, many batches (a delicious, if slightly carb-loaded, mission), I’ve finally perfected a homemade version that captures every bit of that Roadhouse magic. The secret, my friends, isn’t a complicated technique, but a little bit of patience and a whole lot of love. So, preheat your oven, put on your coziest apron, and let’s bake up a memory together.
Gathering Your Cozy Baking Companions
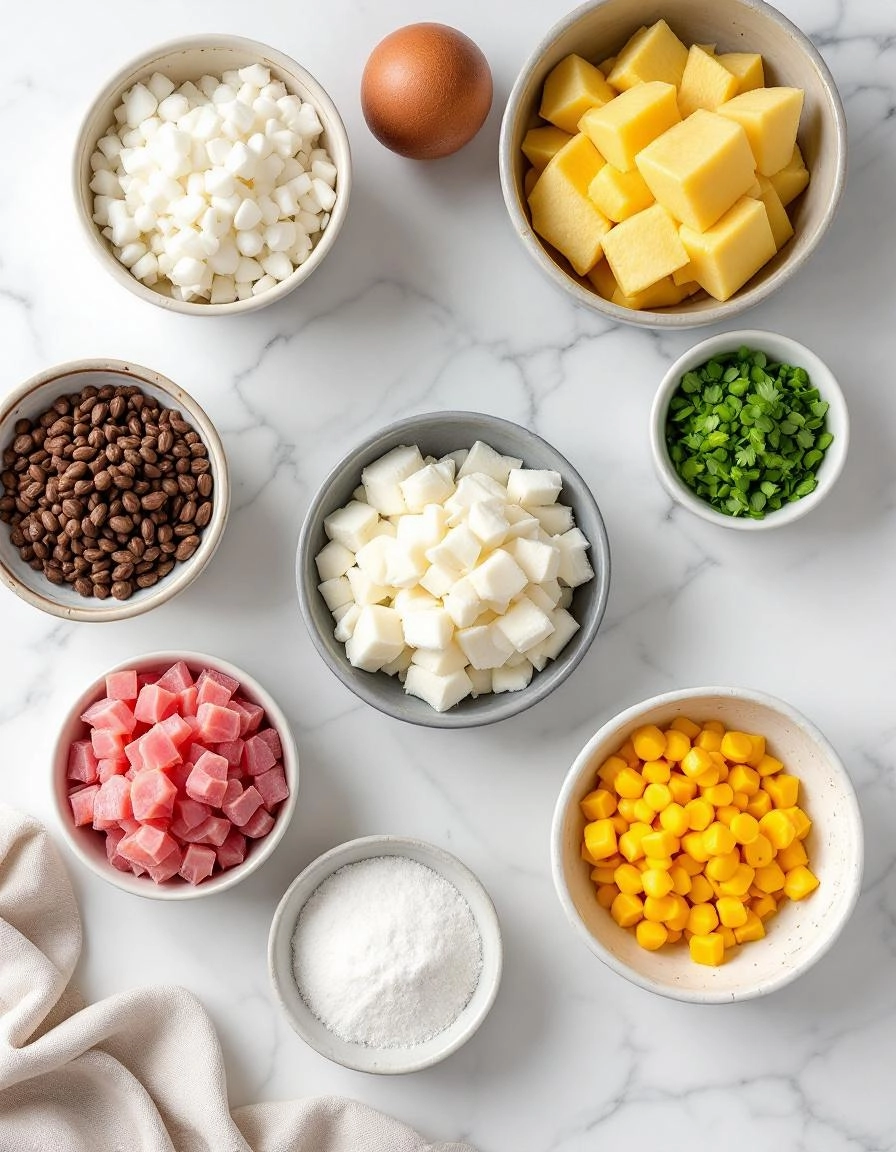
Before we begin, let’s gather our ingredients. Using the best quality you can find makes a world of difference in something as simple and beautiful as bread.
- 4 cups all-purpose flour, plus more for dusting: This is the backbone of our rolls. I like to use unbleached flour for its lovely, creamy color.
- ½ cup granulated sugar: Don’t be alarmed! This is the key to that signature hint of sweetness and it helps feed the yeast for a perfect rise.
- 1 packet (2 ¼ tsp) active dry yeast: Our little miracle worker. Make sure your packet is fresh for the best results.
- 1 cup whole milk, warmed to about 110°F: Whole milk gives us a richer, more tender crumb. Warming it is crucial—too hot and it will kill the yeast, too cold and it won’t wake it up. It should feel warm to the touch, like a perfect bath.
- ¼ cup unsalted butter, melted, plus more for brushing: For richness and that irresistible flavor. We’ll use more for brushing the baked rolls for that gorgeous, glossy finish.
- 1 large egg, at room temperature: This adds structure and a beautiful golden color to the dough.
- 1 ½ teaspoons fine sea salt: The essential flavor enhancer that balances all the sweetness.
The Joy of Making the Dough
Now for the fun part! This process is wonderfully therapeutic.
- First, let’s wake up our yeast. In the bowl of a stand mixer fitted with a dough hook, gently whisk together the warm milk, a tablespoon of the sugar, and the yeast. Let it sit for about 5-7 minutes. You’ll know it’s ready when it becomes frothy and foamy on top—it’s like the yeast is saying a cheerful “hello!”
- Once your yeast is bubbly, add the remaining sugar, the melted butter, the egg, and the salt. Give it a quick mix on low speed just to combine everything.
- Now, with the mixer still on low, gradually add the flour, one cup at a time. I like to scrape down the sides of the bowl with a spatula halfway through to make sure everything is incorporated.
- Once all the flour is in, increase the speed to medium and knead for about 4-5 minutes. The dough will transform from shaggy and sticky to smooth, soft, and slightly tacky. If it’s sticking to the sides of the bowl, add another tablespoon of flour at a time until it pulls away cleanly.
- When the dough is smooth and elastic, form it into a ball. Lightly grease a large bowl with a bit of butter or oil, place the dough ball inside, and turn it over to coat it lightly. This prevents it from drying out.
- Now, the hardest part: patience. Cover the bowl with a clean kitchen towel or plastic wrap and place it in a warm, draft-free spot to rise. Let it rest for about 1 to 1 ½ hours, or until it has doubled in size. I like to tuck mine in the oven with the light on—it creates the perfect cozy environment.
There’s something truly magical about pulling a tray of warm, buttery rolls from your own oven. That heavenly aroma filling your kitchen? Pure comfort. If you’ve made it this far, you’ve already experienced the joy of creating these pillowy-soft delights. Now, let’s take your roll game to the next level.
Pro Tips for Roll Perfection
Every baker has their secrets, and I’m sharing mine with you. These little nuggets of wisdom will ensure your rolls are nothing short of spectacular every single time.
- Temperature Matters: Your milk and eggs should be at room temperature. This helps the yeast activate properly and creates a smoother, more elastic dough.
- Don’t Rush the Rise: Patience is key. Let the dough rise in a warm, draft-free spot until it’s truly doubled in size. This builds flavor and that beautiful airy texture.
- Brush with Love: For that iconic glossy, buttery top, brush the rolls with melted butter as soon as they come out of the oven.
Delicious Variations & Substitutions
Feel like mixing things up? This dough is wonderfully adaptable.
- Honey Wheat Twist: Substitute half of the all-purpose flour with whole wheat flour and add an extra tablespoon of honey for a nutty, wholesome flavor.
- Cheesy Garlic Pull-Aparts: Before the final rise, brush the shaped rolls with garlic butter and sprinkle with grated parmesan and a pinch of dried parsley.
- Dairy-Free: Use your favorite plant-based milk and a vegan butter substitute. The results are still incredibly soft and satisfying.
What to Serve With Your Homemade Rolls
These rolls are the ultimate supporting actor—they make everything else on the table shine.
- The Main Event: They are non-negotiable alongside a hearty steak, a bowl of slow-cooked chili, or a creamy pasta dish. Sopping up sauce is their calling!
- Holiday Feasts: No holiday table is complete without a basket of warm rolls. They pair perfectly with roasted turkey, honey-glazed ham, or a rich beef stew.
- For Breakfast: Slice one open the next morning, toast it lightly, and slather it with jam or peanut butter for the best start to your day.
The Benefits of Baking Them Yourself
Beyond the incredible taste, baking from scratch feeds the soul.
- You Control the Ingredients: No mysterious preservatives or additives—just pure, simple, wholesome ingredients you can feel good about.
- The Therapy of Kneading: There’s a reason baking is so therapeutic. The rhythmic motion of kneading dough is a wonderful way to decompress after a long day.
- The Gift of Sharing: A basket of homemade rolls is a gesture of love. Sharing them with family and friends creates moments of genuine connection and joy.
Real-Life Tips from My Kitchen to Yours
Here’s the real talk you won’t find on the recipe card.
- If your kitchen is cold, heat your oven to 200°F for just a minute or two, TURN IT OFF, and then let your dough rise in the warm oven. It’s a game-changer in the winter.
- Don’t have a stand mixer? No problem! This dough can be successfully kneaded by hand for about 8-10 minutes. It’s a great arm workout!
- These rolls freeze beautifully. Let them cool completely, then store them in a freezer bag for up to 3 months. Reheat in a 350°F oven for 10 minutes straight from the freezer.
I hope this recipe brings as much warmth and happiness to your home as it has to mine. Happy baking!

Conclusion
There you have it—the secret to bringing the warm, buttery magic of Texas Roadhouse right into your own kitchen. With just a handful of simple ingredients and a little bit of patience for that rise, you can create a basket of soft, fluffy, and utterly irresistible homemade rolls. The real star of the show is that sweet cinnamon honey butter melting over the top of a warm roll fresh from the oven. It’s pure comfort food heaven.
I hope this recipe brings as much joy to your table as it does to mine. I’d love to hear how your baking adventure goes! Did your family gobble them up? Did you add your own special twist? Share your experience in the comments below. And if you’re looking for more cozy, copycat recipes to try, be sure to check out our recipe for Homemade Cheddar Bay Biscuits next. Happy baking!
FAQs
Can I make the dough ahead of time?
Absolutely! You can prepare the dough through the first rise, punch it down, cover it tightly, and store it in the refrigerator for up to 24 hours. When you’re ready, let it sit on the counter for about 30 minutes to take the chill off, then shape into rolls, let them have their second rise, and bake as directed.
My rolls aren’t as fluffy as I’d like. What did I do wrong?
The most common culprit for dense rolls is killing the yeast. Always make sure your milk is warm, not hot, to the touch (around 110°F is perfect). Also, ensure you’re giving the dough enough time to rise in a warm, draft-free spot. If your kitchen is cool, placing the bowl in a turned-off oven with the light on can create a perfect cozy environment.
Can I freeze these rolls?
Yes, they freeze beautifully! Once the baked rolls have cooled completely, place them in a single layer on a baking sheet to flash freeze for about an hour. Then, transfer them to a freezer-safe bag or container for up to 3 months. To serve, simply thaw at room temperature and warm in the oven for a few minutes.
I don’t have a stand mixer. Can I still make these?
Of course! While a mixer makes it easier, these rolls can absolutely be made by hand. Simply mix the ingredients in a large bowl with a wooden spoon until a shaggy dough forms. Then, turn it out onto a floured surface and knead for 8-10 minutes by hand until the dough is smooth and elastic.
What can I use if I don’t have bread flour?
All-purpose flour will work just fine in a pinch. Your rolls might be a tiny bit less chewy than with bread flour, but they will still be incredibly soft, light, and delicious. The key is not to overmeasure your flour—spoon it into the measuring cup and level it off for accuracy.


