
Did you know that 70% of home cooks feel intimidated by the idea of making a “showstopper” side dish?
It’s a statistic that always makes me a little sad, because I truly believe that creating something beautiful and delicious for the table should be a joy, not a source of stress. We often get it in our heads that impressive food has to be complicated, requiring fancy techniques and hours of slaving over a hot stove.
But what if I told you that one of the most charming, crowd-pleasing recipes starts with humble, leftover mashed potatoes? That’s the magic behind these Easy Stuffed Mashed Potato Nests. They look like you fussed for hours, with their golden, crispy edges and adorable, cup-like shape just begging to be filled with something wonderful. But the secret is that they are incredibly simple to put together, turning your standard spuds into edible works of art.
I first stumbled upon the concept years ago during a particularly chaotic holiday season. I had a mountain of leftover mashed potatoes and a desperate need for a brunch dish that would wow my family without requiring a trip to the store. After a bit of playful experimentation—and a well-greased muffin tin—these little nests were born. The moment I pulled that first batch from the oven, their cheesy, golden-brown sides standing tall, I knew I had discovered something special.
There’s something so nostalgic and comforting about mashed potatoes, isn’t there? They’re the culinary equivalent of a warm hug. But by giving them this new form, we elevate them into something playful and party-ready. They are the perfect vessel, a crispy potato cup waiting to be stuffed with your favorite fillings. The best part? This recipe is a fantastic blank canvas. It welcomes your creativity and whatever you might have hiding in the fridge.
PrintStuffed Mashed Potato Nests
Crispy mashed potato nests filled with a savory cheese and bacon mixture, perfect as an appetizer or side dish.
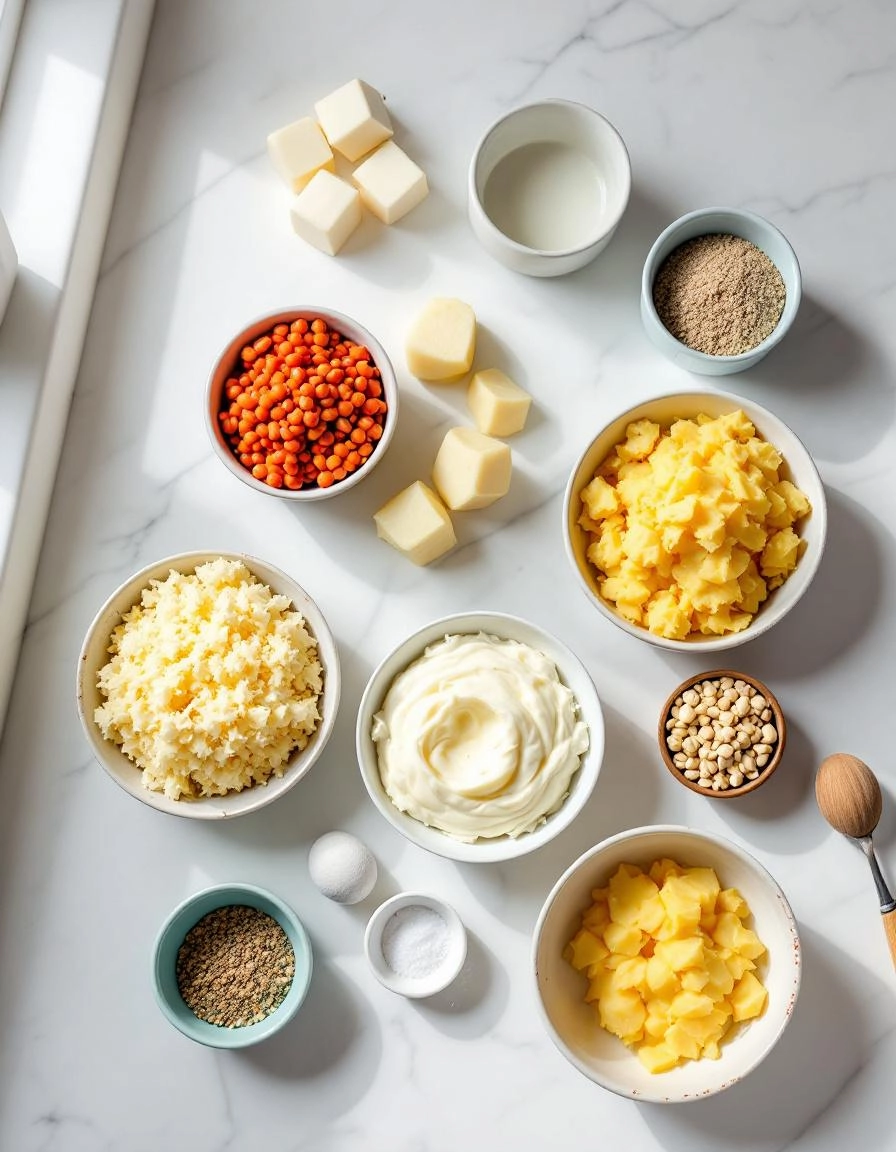
Ingredients
For the Crust:
- 4 large russet potatoes, peeled and cubed
- 1/4 cup milk
- 2 tablespoons butter
- 1/2 cup shredded cheddar cheese
- 1/4 cup cooked bacon, crumbled
- 2 green onions, finely chopped
- 1 egg, beaten
- Salt and pepper to taste
- Cooking spray
Instructions
1. Prepare the Crust:
- Preheat oven to 400°F (200°C). Grease a muffin tin with cooking spray.
- Boil potatoes until tender, about 15 minutes. Drain and mash with milk, butter, salt, and pepper until smooth.
- Mix in cheese, bacon, and green onions. Stir in beaten egg until well combined.
- Spoon mixture into muffin cups, pressing down in the center to form nests.
- Bake for 20-25 minutes until edges are golden and crispy. Let cool slightly before removing from tin.
Notes
You can customize the seasonings to taste.
Gathering Your Cozy Ingredients
There’s something so wonderfully comforting about a well-stocked pantry, isn’t there? It feels like a warm hug, promising delicious things to come. For these little potato nests, we’re going to gather some simple, humble ingredients that, when combined, create pure magic.
- 2 pounds of russet potatoes – These are our sturdy, starchy foundation. They’re going to give us that fluffy, cloud-like texture we’re after.
- 1/2 cup of sour cream – For a touch of tangy richness. If you’re out, full-fat Greek yogurt is a lovely stand-in.
- 1/4 cup of whole milk, warmed – Just a splash to bring everything together. Warming it prevents the potatoes from getting gummy.
- 4 tablespoons of unsalted butter – Because butter makes everything better. I always use unsalted so I can control the seasoning myself.
- 1 large egg yolk – Our secret binding agent! This little gem helps the nests hold their beautiful shape in the oven.
- 1 1/2 cups of shredded cheddar cheese – Divided. We’ll mix some in and save the rest for a glorious, melty topping.
- 6 strips of crispy cooked bacon, crumbled – Or, if you’re feeling a vegetarian twist, some finely chopped sun-dried tomatoes would be divine.
- 2 tablespoons of fresh chives, finely chopped – For a pop of fresh, oniony color.
- Salt and freshly cracked black pepper – To taste. Don’t be shy with the pepper!
- A light spray of cooking oil or a bit of melted butter – For greasing our muffin tin. This is the key to a clean release!
Crafting Your Potato Nests, Step-by-Step
Now, let’s roll up our sleeves and create something special. This process is as soothing as it is rewarding. Put on some gentle music, and let’s begin.
Step 1: First, let’s tend to our potatoes. Give them a good scrub under cold water—we’re leaving the skins on for a bit of rustic texture and extra nutrients. Pierce each one a few times with a fork. Now, you can bake them in a 400°F (200°C) oven for about an hour until tender, or for a quicker method, pop them in the microwave for 10-12 minutes, flipping halfway. We’re all about ease here!
Step 2: Once the potatoes are cool enough to handle, carefully slice them in half and scoop the fluffy insides into a large mixing bowl. Discard the skins (or toss them with a bit of oil and salt and bake for a chef’s snack!).
Step 3: To the warm potato, add your sour cream, warmed milk, butter, and that precious egg yolk. Now, take your potato masher and get to work! Mash until everything is beautifully smooth and combined. A little lump is perfectly fine—it’s homemade, after all.
Step 4: This is where the flavor comes alive. Fold in one cup of the cheddar cheese, most of your crumbled bacon (save a little for garnish!), and the fresh chives. Now, season generously with salt and pepper. Give it a taste. Does it need more pepper? A pinch more salt? Trust your palate.
Step 5: Lightly grease a standard 12-cup muffin tin. This is the most important step to ensure our little nests pop out perfectly later. Using a spoon or a small ice cream scoop, divide the potato mixture evenly among the cups. Now, with your fingers or the back of a spoon, press into the center of each mound to form a well, like a little bird’s nest waiting for its treasure.
And that’s where we’ll pause for a moment. Our nests are formed and ready for their final transformation…
Welcome back, cozy kitchen friends! In our last post, we covered the simple joy of making those adorable, crispy mashed potato nests. Now, let’s talk about how to make them truly your own—with pro tips, fun twists, and all the cozy serving suggestions your heart desires.
Pro Tips for Perfect Potato Nests Every Time
Getting those nests just right is easier than you think! Here are a few things I’ve learned along the way:
- Dry Those Potatoes: After boiling, let your potatoes steam dry for a minute or two. Extra moisture is the enemy of crispiness!
- Grease Well: Don’t be shy with that cooking spray or butter in the muffin tin. It helps with browning and makes removal a breeze.
- Press Firmly: When shaping your nests, press the mashed potatoes firmly into the cups. This helps them hold their shape and crisp up beautifully.
- Let Them Rest: Allow the nests to cool in the tin for 5 minutes before removing. They’ll firm up and come out intact.
Fun Variations & Substitutions
One of the best things about this recipe is how flexible it is! Don’t have an ingredient? No worries—make it your own.
- Cheesy Twist: Stir a handful of sharp cheddar, parmesan, or gouda into the mashed potatoes before baking.
- Loaded Up: Mix in cooked bacon bits, chives, or even caramelized onions before filling the nests.
- Dairy-Free: Use olive oil or vegan butter instead of regular butter, and top with dairy-free cheese or avocado.
- Sweet Potato Version: Swap regular potatoes for sweet potatoes and add a pinch of cinnamon or smoked paprika for a sweet-savory twist.
What to Serve With Your Potato Nests
These little nests are incredibly versatile. They’re perfect for brunch, as a holiday side, or even a fun weeknight dinner!
- Top with a fried egg and fresh herbs for a hearty breakfast.
- Serve alongside roasted chicken, turkey, or ham for a comforting holiday meal.
- Pair with a simple green salad for a light lunch that still feels special.
- Fill with chili, stew, or braised meats for a cozy, edible bowl situation!
Why We Love This Recipe (Besides Being Delicious!)
Beyond how cute and tasty these are, there are so many reasons to keep this recipe in your back pocket:
- Great for Using Leftovers: Have extra mashed potatoes? Turn them into something new and exciting!
- Kid-Friendly Fun: Little hands love helping press the potatoes into the tin and choosing their own fillings.
- Impresses Guests: They look fancy but couldn’t be easier—your secret is safe with us.
- Perfect Portions: Individual servings mean no fighting over the crispy bits!
Real-Life Tips from My Kitchen to Yours
I’ve made these more times than I can count, and here’s what really works in the real world:
- If your mashed potatoes are on the wetter side, add a tablespoon of flour or breadcrumbs to help them hold shape.
- Make them ahead! Prepare the nests up to the baking point, cover, and refrigerate. Bake just before serving.
- Don’t overcrowd your filling—especially if it’s saucy. A spoonful or two per nest is plenty.
- If you don’t have a muffin tin, you can shape free-form nests on a parchment-lined baking sheet. They may not be as uniform, but they’ll be just as delicious!
However you choose to make them, I hope these stuffed potato nests bring a little warmth and joy to your table. Happy nesting!

Conclusion
And there you have it! These adorable Stuffed Mashed Potato Nests are more than just a side dish; they’re a little bite of cozy, customizable comfort. They prove that with a few simple ingredients and a little creativity, you can turn humble mashed potatoes into a truly special treat. Perfect for using up leftovers, impressing guests, or just making a weeknight dinner feel a bit more festive.
I hope this recipe brings as much joy to your table as it does to mine. I’d love to hear how yours turn out! Did you stick with classic cheddar and chives, or did you get adventurous with your fillings? Share your creations and feedback with me in the comments below. And if you’re looking for more easy, crowd-pleasing recipes, be sure to explore our collection of comfort food favorites.
Happy cooking!
FAQs
Can I make these potato nests ahead of time?
Absolutely! You can prepare the mashed potato mixture, press it into the muffin tin, and refrigerate it (covered) for up to 24 hours before baking. You might just need to add a minute or two to the initial baking time since they’ll be going into the oven cold.
My mashed potato mixture is too wet. What should I do?
This is a common hiccup! If your potato mixture seems too soft or sticky to hold a shape, don’t worry. Try mixing in a tablespoon or two of breadcrumbs, grated Parmesan cheese, or even a bit of flour. This will help absorb excess moisture and give the nests more structure.
What other fillings can I use besides the ones suggested?
The possibilities are endless! Think cooked and crumbled sausage, caramelized onions, different cheeses like feta or gouda, steamed broccoli florets, or even a spoonful of pesto. These nests are a fantastic canvas for your favorite flavors.
Can I freeze stuffed potato nests?
You can freeze them after the initial bake (before adding the egg). Let them cool completely, then transfer to a freezer-safe container. When you’re ready to eat, reheat them from frozen in the oven until warm, then add your filling and bake until the egg is set.
Do I have to use a non-stick muffin tin?
While a non-stick tin is easiest, a well-greased regular muffin tin will work just fine. For extra insurance, you can also line the cups with parchment paper strips for easy removal.


