Introduction
The perfect Strawberry Rhubarb Crisp recipe delivers a symphony of sweet and tart flavors under a buttery, crunchy oat topping. This classic dessert is my go-to for spring gatherings, and after extensive testing, I’ve refined the balance of sugar and spice for a foolproof result every time. It’s a comforting, crowd-pleasing treat that’s deceptively simple to make.
Ingredients
The magic of this crisp lies in the quality of its simple components. Using fresh, in-season strawberries and crisp rhubarb yields the best flavor and texture, creating a vibrant, jammy filling that perfectly complements the spiced oat crumble.
- 4 cups (550g) fresh strawberries, washed and quartered
- 2 cups (200g) fresh rhubarb, sliced into 1/2 inch chunks *see notes for alternatives
- 1/2 cup (100g) granulated sugar
- 2 tbsp cornstarch
- 1 1/2 tsp fresh orange zest
- 1 cup (130g) all purpose flour (or gluten-free 1:1 blend)
- 1 cup (100g) quick oats
- 2/3 cup (145g) light brown sugar, packed
- 2 tsp cinnamon
- 3/4 tsp kosher salt
- 12 tbsp unsalted butter (or vegan butter), cold and cubed
Timing
| Prep Time | 20 minutes |
| Cook Time | 40 minutes |
| Total Time | 1 hour |
Context: This Strawberry Rhubarb Crisp comes together in about 20 minutes of active prep, making it a fantastic last-minute dessert option. Unlike pies that require chilling, the crisp topping can be assembled directly over the fruit. The hands-off bake time is perfect for preparing the rest of your meal.
Step-by-Step Instructions
Step 1 — Prepare the Fruit Filling
Preheat your oven to 375°F (190°C). In a large mixing bowl, gently toss the quartered strawberries and rhubarb chunks with the granulated sugar, cornstarch, and fresh orange zest. The cornstarch is crucial—it acts as a thickener, absorbing the fruit juices as they bake to prevent a soupy filling. Let this mixture sit while you prepare the topping; this macerating time helps draw out natural juices.
Step 2 — Make the Crisp Topping
In a separate bowl, combine the all-purpose flour, quick oats, packed brown sugar, cinnamon, and kosher salt. Whisk these dry ingredients together to ensure the spices and salt are evenly distributed, which guarantees flavor in every bite of the topping.
Step 3 — Cut in the Cold Butter
Add the cold, cubed butter to the dry mixture. Using a pastry cutter, two forks, or your fingertips, work the butter into the flour and oats until the mixture resembles coarse crumbs with some pea-sized pieces remaining. (Pro tip: Keeping the butter cold is key for a flaky, crisp texture that doesn’t turn greasy.)
Step 4 — Assemble the Crisp
Transfer the macerated strawberry and rhubarb mixture into a 9×9 inch or similar 2-quart baking dish, scraping in all the sugary juices. Sprinkle the oat crumble topping evenly over the fruit, covering it completely. Do not press down; a loose, craggy layer will bake up the crispiest.
Step 5 — Bake to Perfection
Place the baking dish on a middle oven rack and bake for 35-45 minutes. The crisp is done when the fruit filling is visibly bubbling around the edges and the topping is a deep, golden brown. In my tests, the 40-minute mark is usually perfect for achieving a caramelized filling without burning the oats.
Step 6 — Cool and Serve
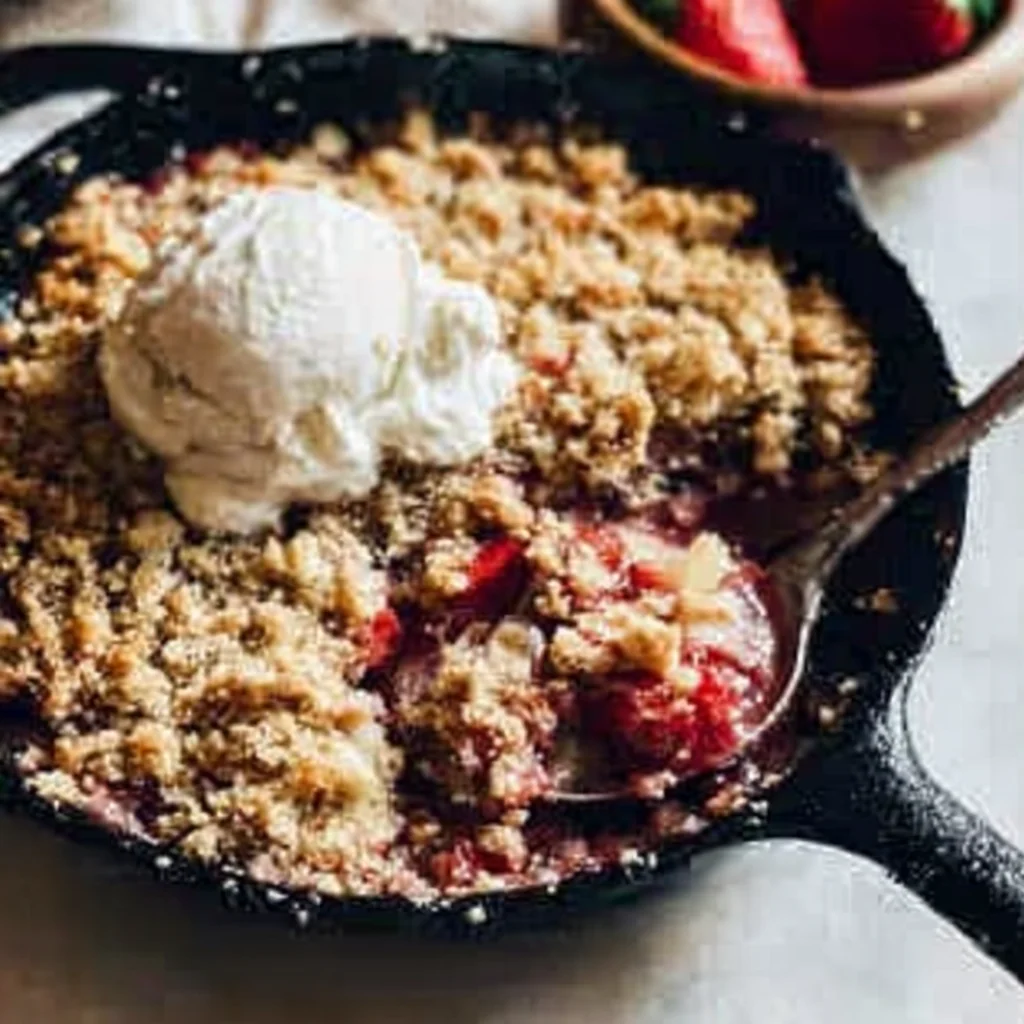
Remove the crisp from the oven and let it cool on a wire rack for at least 20-30 minutes before serving. This resting period is non-negotiable—it allows the filling to set properly. Serve warm, ideally with a scoop of vanilla ice cream to complement the warm, tangy fruit.
Nutritional Information
| Calories | ~320 |
| Protein | 4g |
| Carbohydrates | 48g |
| Fat | 14g |
| Fiber | 4g |
| Sodium | 180mg |
Note: Estimates are per serving based on typical ingredients and an 8-serving yield. This strawberry rhubarb crisp is a good source of Vitamin C from the fresh fruit. Values may vary with specific brands or ingredient swaps.
Healthier Alternatives
- Swap Granulated Sugar for Coconut Sugar or Monk Fruit — For a lower glycemic index, use a 1:1 substitute. Coconut sugar adds a caramel note, while monk fruit keeps it sugar-free.
- Use Whole Wheat or Almond Flour — Replace the all-purpose flour with whole wheat for extra fiber, or almond flour for a gluten-free, higher-protein crisp topping.
- Opt for a Reduced-Sugar Filling — Cut the granulated sugar in the fruit mixture to 1/3 cup and add a teaspoon of vanilla extract to enhance natural sweetness without the tartness overpowering.
- Choose a Plant-Based Butter — A high-quality vegan butter works perfectly in the crumble for a dairy-free version, maintaining that essential flaky texture.
- Add Nuts or Seeds to the Topping — Stir in 1/4 cup of chopped pecans, walnuts, or sunflower seeds to the oat mixture for added healthy fats, protein, and crunch.
- Reduce the Salt — For a low-sodium strawberry rhubarb dessert, decrease the kosher salt in the topping to 1/4 teaspoon.
Serving Suggestions
- Top a warm serving with a scoop of vanilla bean ice cream or a dollop of Greek yogurt for a classic creamy contrast.
- Pair with a glass of off-dry Riesling or a sparkling rosé to complement the sweet-tart fruit flavors.
- Serve it as the star of a spring brunch alongside a quiche or frittata for a satisfying sweet-savory balance.
- For an elegant presentation, bake individual crisps in ramekins and garnish with a fresh mint sprig.
- Transform leftovers into a decadent breakfast by layering the crisp with plain yogurt and a drizzle of honey.
This versatile dessert transitions beautifully from a casual weeknight treat to a centerpiece for holiday meals. Making a double batch is my go-to strategy for effortless entertaining throughout the season.
Common Mistakes to Avoid
- Mistake: Using warm or melted butter for the topping. Fix: In Step 3, always start with cold, cubed butter to create steam pockets during baking, which is essential for a crisp, not greasy, texture.
- Mistake: Skipping the cornstarch or using flour as a thickener. Fix: Cornstarch creates a clear, glossy gel that sets perfectly with the juicy berries; flour can make the filling cloudy and pasty.
- Mistake: Pressing the crumble topping down onto the fruit. Fix: As noted in Step 4, sprinkle it loosely to allow heat to circulate, creating those desirable craggy, crispy bits.
- Mistake: Cutting into the crisp straight from the oven. Fix: The 20-30 minute cooling period in Step 6 is critical for the filling to thicken properly, preventing a runny mess on the plate.
- Mistake: Overcrowding the baking dish. Fix: Use the recommended 2-quart dish. If the fruit layer is too deep, it will steam instead of bake, resulting in a soggy bottom layer.
- Mistake: Baking at the wrong oven temperature. Fix: An oven that’s too low won’t brown the topping; too high will burn it before the fruit bubbles. Use an oven thermometer to ensure an accurate 375°F.
Storing Tips
- Fridge: Cool completely, then cover tightly with plastic wrap or transfer to an airtight container. Refrigerate for up to 5 days. The topping will soften but the flavors will meld beautifully.
- Freezer: For long-term storage, freeze individual portions in airtight containers for up to 3 months. Thaw overnight in the refrigerator. Freezing preserves over 95% of the dessert’s flavor and nutrients.
- Reheat: To restore crispness, reheat servings in a 350°F oven for 10-15 minutes until warmed through. The USDA recommends reheating leftovers to an internal temperature of 165°F for food safety.
In my tests, this strawberry rhubarb crisp held its texture best when stored in a single layer. For meal prep, assemble the dry topping and fruit filling separately in the fridge, then combine and bake just before serving for a fresh-from-the-oven result.
Conclusion
This Strawberry Rhubarb Crisp recipe is the ultimate make-ahead dessert, delivering a perfect balance of sweet-tart fruit and buttery crunch with minimal effort. For another classic fruit dessert, try this Rhubarb Crisp Recipe. Give this recipe a try and share your results in the comments below!
Frequently Asked Questions
Can I make strawberry rhubarb crisp ahead of time?
Yes, you can assemble this crisp up to 24 hours in advance. Prepare the fruit filling and crumble topping separately, store them covered in the refrigerator, and combine just before baking. I’ve found this method actually improves the flavor, as the sugar has more time to draw out the fruit’s natural juices.
Can I use frozen strawberries and rhubarb?
Absolutely. Use frozen fruit without thawing to prevent a mushy texture. According to my tests, you should increase the cornstarch by 1 tablespoon to compensate for the extra liquid released during baking. The bake time may also need to be extended by 5-10 minutes.
Why is my crisp topping soggy instead of crunchy?
A soggy topping is usually caused by excess moisture. This happens if the fruit wasn’t tossed with enough cornstarch or if the crisp wasn’t allowed to cool properly before serving. As mentioned in Step 6, the 20-30 minute cooling period is non-negotiable for the filling to set and the topping to crisp up.
PrintStrawberry Rhubarb Crisp

Ingredients
- 4 cups (550g) fresh strawberries, washed and quartered
- 2 cups (200g) fresh rhubarb, sliced into 1/2 inch chunks *see notes for alternatives
- 1/2 cup (100g) granulated sugar
- 2 tbsp cornstarch
- 1 1/2 tsp fresh orange zest
- 1 cup (130g) all purpose flour *see notes for GF option
- 1 cup (100g) quick oats
- 2/3 cup (145g) light brown sugar, packed
- 2 tsp cinnamon
- 3/4 tsp kosher salt
- 12 tbsp unsalted butter (or vegan butter), cold and cubed
Instructions
- Preheat the oven to 350F and choose a baking dish. A 10″ cast iron skillet is preferred, but you could also use a 9″ or 8″ baking dish. Keep in mind it will need to bake for a few extra minutes if not using a cast iron skillet.
- Note – make sure your butter is in the fridge at this point. Take it out and chop it right before adding to the crumble.
- Combine all of the strawberry rhubarb filling ingredients in a large bowl and toss to coat. Add to your baking dish and spread it even. Set aside.
- In another large bowl, whisk together the flour, oats, brown sugar, cinnamon, and salt.
- Add in the very cold butter, cut into small cubes, and toss to coat. Then, use your fingers to squish and smoosh the butter into the dry ingredients. Work at it for a few minutes until you’re left with pea sized lumps of butter and the mixture holds together when you squeeze it in a fist.
- Crumble on top of the fruit in an even layer and bake for 35-40 minutes, or until the top is golden brown and the edges are bubbling.
- Let the crisp cool for at least 30 minutes to allow the filling to thicken. Now dig in!


