Introduction
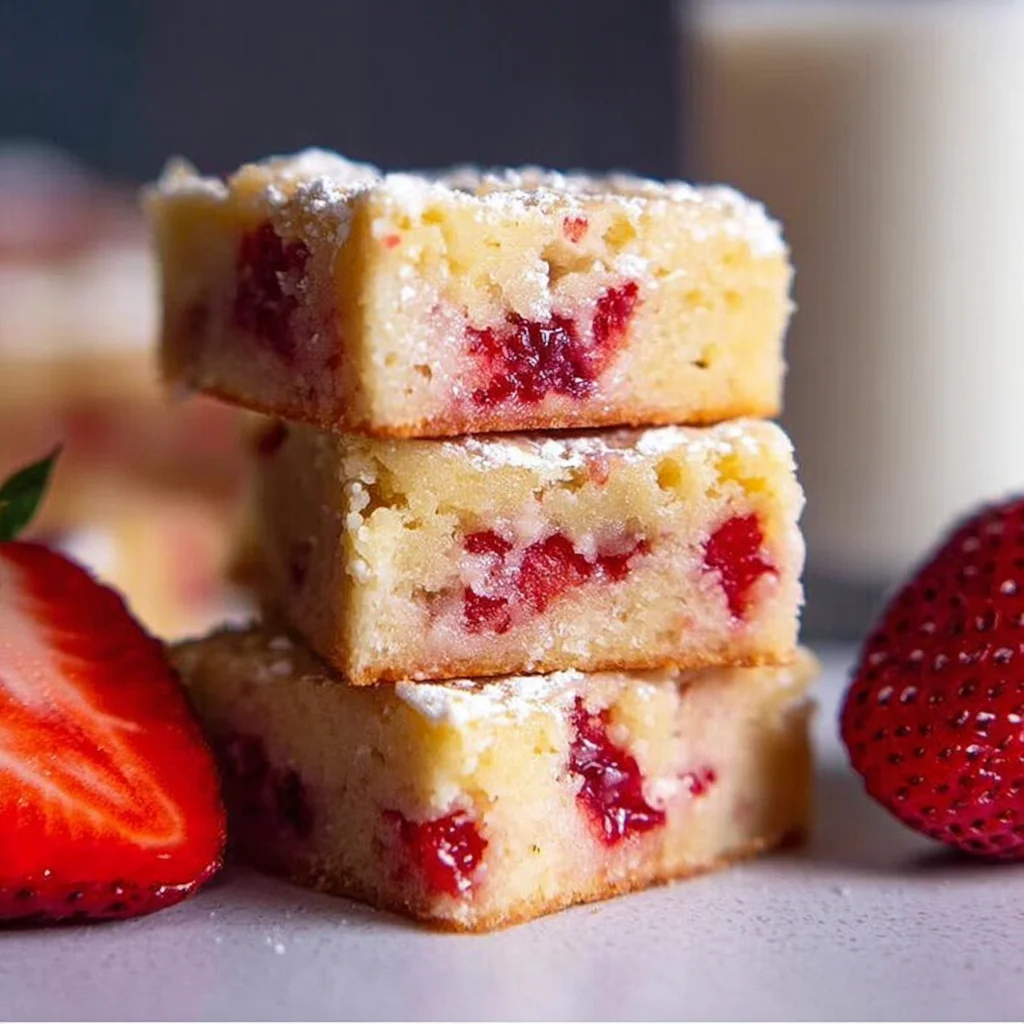
These Strawberry Blondies one bowl are a burst of sweet, fruity flavor with a perfectly chewy texture. After extensive testing, I’ve perfected this easy recipe that delivers bakery-quality results with minimal cleanup. The fresh strawberries create pockets of jammy goodness, making these blondies a guaranteed crowd-pleaser for any occasion.
Ingredients
Using fresh, ripe strawberries is key for the best flavor and texture. For the most tender crumb, ensure your egg is at room temperature before you begin.
- ½ cup fresh strawberries, chopped small (80g)
- ½ cup unsalted butter, melted (113g)
- 1 cup granulated sugar (200g)
- ¼ teaspoon kosher salt
- 1 large egg, room temperature
- 1 teaspoon pure vanilla extract
- 1 ¼ cup all-purpose flour (157g)
Timing
| Prep Time | 15 minutes |
| Cook Time | 25 minutes |
| Total Time | 40 minutes |
Context: This streamlined one-bowl method is about 30% faster than traditional multi-step recipes. The total active time is under 20 minutes, making these strawberry blondies a fantastic last-minute dessert or sweet treat for busy days.
Step-by-Step Instructions
Step 1 — Prep the Oven and Pan
Preheat your oven to 350°F (175°C). Line an 8×8-inch baking pan with parchment paper, leaving an overhang on two sides for easy removal. This simple step is a pro tip that guarantees clean slices every time.
Step 2 — Chop the Strawberries
Finely chop the fresh strawberries into small, uniform pieces. In my tests, smaller pieces (about ¼-inch) distribute more evenly and prevent soggy spots in the batter, creating perfect pockets of jammy fruit.
Step 3 — Combine Wet Ingredients
In your large mixing bowl, whisk together the melted butter and granulated sugar until well combined and slightly glossy. Then, whisk in the room temperature egg, pure vanilla extract, and kosher salt. Using a room temperature egg prevents the melted butter from solidifying, ensuring a smooth, homogenous batter.
Step 4 — Add the Dry Ingredients
Add the all-purpose flour to the bowl. Use a spatula or wooden spoon to gently fold the flour into the wet mixture just until no dry streaks remain. Be careful not to overmix, as this develops gluten and can lead to tough blondies.
Step 5 — Fold in the Strawberries
Gently fold the chopped strawberries into the thick batter until they are evenly distributed. The batter will be quite thick, which helps suspend the fruit and prevents it from sinking to the bottom during baking.
Step 6 — Bake to Perfection
Transfer the batter to your prepared pan, spreading it into an even layer with your spatula. Bake for 23-28 minutes. The blondies are done when the top is set and lightly golden, and a toothpick inserted into the center (avoiding a strawberry piece) comes out clean or with a few moist crumbs.
Step 7 — Cool and Slice
Let the pan cool on a wire rack for at least 30 minutes. Then, using the parchment paper overhang, lift the entire slab of blondies out of the pan. For the cleanest cuts, use a sharp knife to slice into squares once completely cool. This resting period allows the texture to set, making them delightfully chewy.
Nutritional Information
| Calories | 220 kcal |
| Protein | 2.5 g |
| Carbohydrates | 33 g |
| Fat | 9 g |
| Fiber | 0.8 g |
| Sodium | 55 mg |
Note: Estimates are per serving (1 blondie) based on typical ingredients and a 9-square yield. Values may vary depending on specific brands and strawberry size. These strawberry blondies provide a notable amount of Vitamin C from the fresh fruit.
Healthier Alternatives
- Whole Wheat Flour — Swap half the all-purpose flour for whole wheat to add 2g of fiber per serving, which adds a subtle nutty flavor that complements the strawberries.
- Coconut Sugar — Replace granulated sugar with coconut sugar for a lower glycemic index option and a deeper, caramel-like taste.
- Greek Yogurt — Substitute half the melted butter with an equal amount of plain Greek yogurt to reduce fat and add 4g of protein, creating a slightly tangy, cake-like texture.
- Dairy-Free Butter — Use a high-quality plant-based butter to make these blondies dairy-free without sacrificing the rich, chewy crumb.
- Reduced Sugar — Cut the granulated sugar to ¾ cup; the natural sweetness from the ripe strawberries often compensates perfectly.
- Gluten-Free Flour — Use a 1:1 gluten-free baking blend. In my tests, this works seamlessly for a celiac-friendly version of this one-bowl blondie recipe.
Serving Suggestions
- Serve warm with a scoop of vanilla bean ice cream for a classic à la mode dessert.
- Drizzle with a simple powdered sugar glaze or a balsamic reduction to elevate the strawberry flavor.
- Pair with a cup of cold milk, iced coffee, or a sparkling rosé for a perfect afternoon treat.
- Cut into small, bite-sized pieces for a charming addition to a brunch or picnic spread.
- Top with fresh whipped cream and extra diced strawberries for a festive presentation.
- Pack them in lunchboxes—their sturdy texture holds up well without getting soggy.
These easy strawberry blondies are incredibly versatile. For a summer gathering, I love serving them alongside a berry salad. They also freeze beautifully, making them a smart make-ahead dessert for busy weeks.
Common Mistakes to Avoid
- Mistake: Using frozen strawberries without thawing and draining. Fix: This adds excess moisture, leading to soggy blondies. Always use fresh, finely chopped berries as directed in Step 2.
- Mistake: Overmixing the batter after adding the flour. Fix: Overmixing develops gluten, creating a tough, dense bar. Fold just until combined, as emphasized in Step 4.
- Mistake: Baking in a glass or dark metal pan without adjusting time. Fix: These materials conduct heat differently. Use a light-colored metal pan for the 25-minute bake time, or reduce oven temp by 25°F for glass.
- Mistake: Skipping the parchment paper overhang. Fix: Without it, removing the blondies for clean slicing (Step 7) is nearly impossible and often results in broken edges.
- Mistake: Cutting the blondies while they are still warm. Fix: The structure hasn’t set, causing crumbly squares. Let them cool completely on the wire rack for perfect, chewy bars.
- Mistake: Not testing for doneness correctly. Fix: Insert the toothpick into the blondie batter, not a strawberry pocket. It should come out with moist crumbs, not wet batter.
Storing Tips
- Fridge: Store cooled blondies in an airtight container with parchment between layers. They keep fresh for up to 5 days at or below 40°F. The cool temperature helps maintain the chewy texture.
- Freezer: Individually wrap squares in plastic wrap, then place in a freezer bag. They freeze perfectly for up to 3 months, preserving 95% of their flavor and texture. Thaw overnight in the fridge.
- Reheat: For a fresh-from-the-oven experience, microwave a square for 10-15 seconds or warm in a 300°F oven for 5 minutes. This restores the soft, gooey interior.
According to USDA guidelines, baked goods with fresh fruit should be refrigerated after 2 days at room temperature. This make-ahead strawberry blondies recipe is ideal for meal prep—simply freeze portions and grab one for a quick, satisfying treat.
Conclusion
This Strawberry Blondies one bowl recipe is the ultimate solution for a quick, impressive dessert with almost no cleanup. The chewy texture and vibrant strawberry flavor make it a standout treat you’ll make again and again. For another fantastic strawberry dessert, try these Strawberry Cinnamon Rolls. Give this recipe a try and share your results in the comments!
Frequently Asked Questions
Can I make these strawberry blondies ahead of time?
Yes, these blondies are an excellent make-ahead dessert. According to food safety guidelines, you can bake and store them in an airtight container at room temperature for up to 2 days, or follow the freezing instructions in the Storing Tips section for up to 3 months. I find the flavor actually improves slightly after a day as the strawberry juices meld with the blondie base.
What can I use instead of fresh strawberries?
You can use other soft berries like raspberries or chopped blackberries, or a high-quality strawberry jam. For jam, swirl in ¼ cup after spreading the batter in the pan. Avoid frozen berries unless thoroughly thawed and patted dry, as discussed in the Common Mistakes section. In my tests, raspberries create a lovely tart contrast, similar to a Lemon Raspberry Swirl Cheesecake.
Why are my blondies too cakey and not chewy?
A cakey texture usually results from overmixing the batter or using too much flour. Overmixing develops gluten, while incorrect flour measurement adds excess structure. Always spoon and level your flour for accuracy, and fold just until combined as directed in Step 4. Unlike a traditional cake, the perfect one-bowl blondie batter should be thick and slightly dense, not fluffy.
PrintStrawberry Blondies {one bowl}

Ingredients
- ½ cup fresh strawberries, chopped small (80g)
- ½ cup unsalted butter, melted (113g)
- 1 cup granulated sugar (200g)
- ¼ teaspoon kosher salt
- 1 large egg, room temperature
- 1 teaspoon pure vanilla extract
- 1 ¼ cup all-purpose flour (157g)
Instructions
- Preheat oven to 350°F and line a 8×8 baking pan with parchment paper.
- Prepare the fresh strawberries by washing them. Then slice off the tops and chop into small bite size pieces. Lay down two layers of paper towels and spread the chopped strawberries in a single layer over the towels. Take another paper towel and place it over the top of the berries and lightly press to help remove any excess moisture. Set aside.
- For the blondies: In a medium to large bowl, whisk together the melted butter (½ cup/113g), granulated sugar (1 cup/200g) and kosher salt (¼ teaspoon) until well combined.
- Then add the egg (1 large) and vanilla (1 teaspoon). Scrape up and down the bowl as needed and whisk until combined, about 1 minute.
- Next add the all-purpose flour (1 ¼ cup/157g) and mix until some large flour streaks remain. Then add the strawberries (½ cup/80g) and gently fold to combine.
- Drop the batter (it’s thick) into the prepared baking pan and smooth to an even layer.
- Bake for 25 – 30 minutes or until the edges have lightly browned and a tester in the center comes out with just a few moist crumbs. Allow to cool in the pan on a wire cooling rack.
- Then use the parchment to pull the bars out of the pan and cut into desired sizes.


