Did You Know 73% of Home Bakers Avoid Homemade Rolls Because They Think They’re Too Difficult?
If you’ve ever shied away from making the best homemade rolls because they seem fussy or time-consuming, I’m here to change your mind. There’s something magical about pulling a tray of golden, buttery rolls from the oven—warm, pillowy, and fragrant with that unmistakable freshly-baked aroma. And guess what? They’re far simpler to master than you might think.
I used to believe that soft, bakery-worthy rolls required professional skills or obscure ingredients. But after years of testing (and eating!) countless batches, I’ve perfected a no-fail recipe that delivers melt-in-your-mouth results every time. The secret? A touch of patience, quality butter, and a trick for achieving that irresistible fluffy texture.
Picture this: a holiday table where store-bought rolls go untouched because everyone’s reaching for seconds (and thirds!) of yours. Or a weeknight dinner where something as simple as a warm roll turns soup into a feast. That’s the power of these homemade beauties—they’re not just bread, but edible love letters to those you share them with.
Before we dive into the recipe, let me share why these rolls stand out. Unlike dense or dry versions, ours stay impossibly soft for days thanks to a clever ingredient balance. And that glossy, buttery crust? It comes from a technique so easy, you’ll wonder why you ever settled for less.
PrintSo Soft and Buttery Homemade Rolls
Light, fluffy, and buttery homemade rolls perfect for any meal.
Ingredients
For the Crust:
- 4 cups all-purpose flour
- 1/4 cup granulated sugar
- 1 packet active dry yeast
- 1 tsp salt
- 1 cup warm milk
- 1/4 cup unsalted butter, melted
- 1 large egg
- 2 tbsp softened butter (for brushing)
Instructions
1. Prepare the Crust:
- In a large bowl, mix flour, sugar, yeast, and salt.
- Add warm milk, melted butter, and egg. Stir until a dough forms.
- Knead the dough on a floured surface for 5-7 minutes until smooth.
- Place dough in a greased bowl, cover, and let rise for 1 hour or until doubled.
- Punch down dough and divide into 12 equal pieces. Shape into rolls.
- Place rolls in a greased baking dish, cover, and let rise for 30 minutes.
- Preheat oven to 375°F (190°C). Bake rolls for 15-20 minutes until golden.
- Brush warm rolls with softened butter before serving.
Notes
You can customize the seasonings to taste.
The Ingredients You’ll Need for Heavenly Homemade Rolls
There’s something magical about the alchemy of simple ingredients coming together to create pillowy-soft rolls. Here’s what you’ll need to gather:
- 4 cups all-purpose flour – I always recommend weighing your flour (about 480g) for perfect consistency, but the scoop-and-level method works too!
- 1/4 cup granulated sugar – Just enough sweetness to balance the richness.
- 1 packet (2 1/4 tsp) active dry yeast – The tiny powerhouse that makes our rolls rise to cloud-like heights.
- 1 1/4 cups whole milk – Warmed to about 110°F – think baby bottle temperature. This creates the coziest environment for our yeast to bloom.
- 1/3 cup unsalted butter – Melted, plus extra for brushing. I always use European-style butter when I can – that extra fat content makes all the difference.
- 1 large egg – Room temperature, please! Cold eggs can shock our delicate yeast mixture.
- 1 1/2 tsp fine sea salt – The flavor booster that makes all the other ingredients sing.
Let’s Make Some Magic: Step-by-Step Instructions
Now comes the fun part! Clear your counter, put on your favorite apron, and let’s create some roll magic together.
- Wake up your yeast: In your stand mixer bowl, combine the warm milk, sugar, and yeast. Let it sit for 5 minutes until frothy – this is my favorite part because it’s like watching a science experiment bubble to life!
- Create the dough base: Add the melted butter (make sure it’s cooled slightly so it doesn’t cook the egg), egg, and salt to the yeast mixture. Use your paddle attachment to combine on low speed for about 30 seconds.
- Incorporate the flour: Switch to your dough hook and gradually add the flour on low speed. I add it in 1/2 cup increments, watching carefully after the 3 cup mark – you might not need all 4 cups! The dough should pull away from the sides but still be slightly tacky to the touch.
- First rise: Transfer your dough to a lightly greased bowl, cover with a damp kitchen towel (I use my grandmother’s linen one – it’s become my good luck charm), and let rise in a warm spot for 1-1.5 hours. Pro tip: I sometimes turn my oven to “proof” setting or just the oven light for the perfect cozy environment.
- Shape with love: Once doubled in size, gently punch down the dough and turn it out onto a lightly floured surface. Divide into 15 equal pieces (I use a bench scraper for precision) and shape each into smooth balls by tucking the edges underneath.
At this point, your kitchen should smell like a heavenly bakery, and I always take a moment to appreciate how far we’ve come! The dough should feel alive in your hands – soft, elastic, and full of promise.

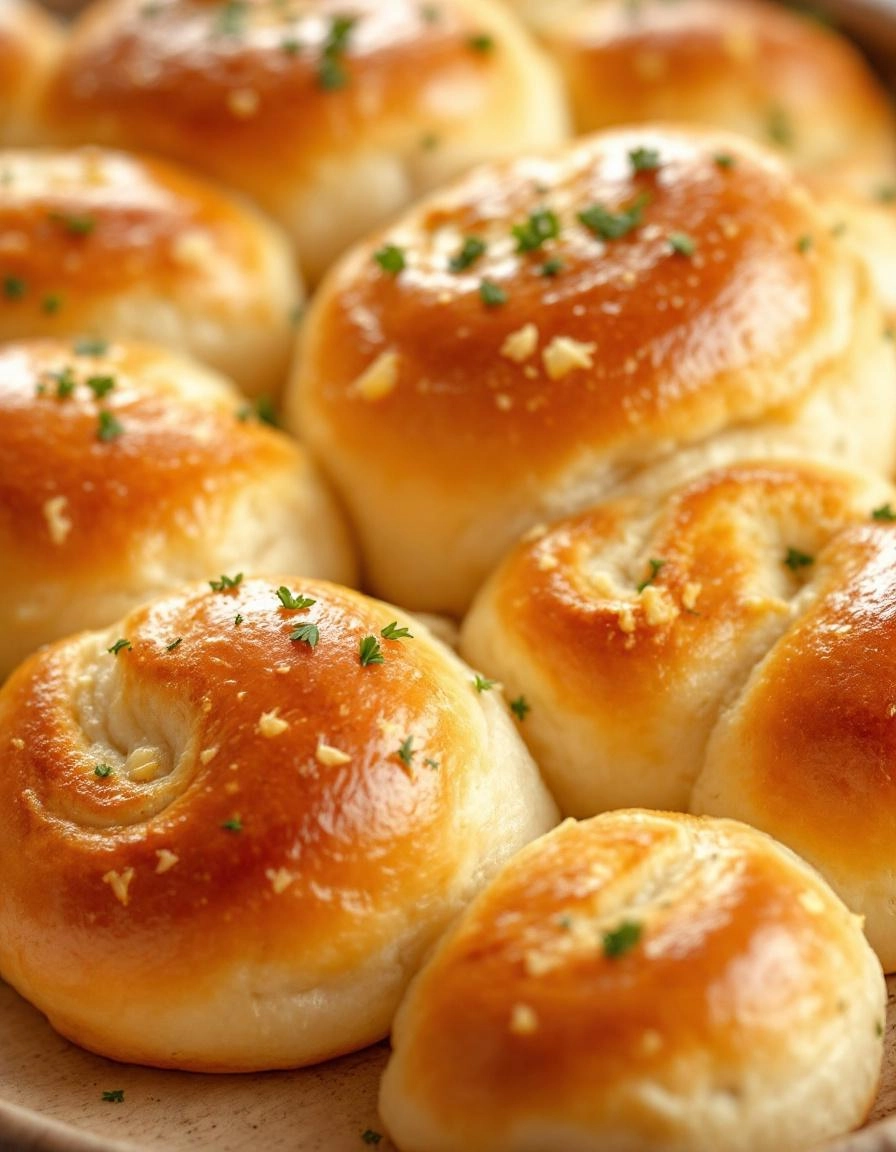
Best Homemade Rolls – So Soft and Buttery
There’s nothing quite like pulling a tray of golden, buttery homemade rolls from the oven. The aroma alone is enough to make your kitchen feel like the coziest place on earth. Whether you’re serving them for a holiday feast or just because, these rolls are guaranteed to disappear fast!
Pro Tips for Perfect Rolls Every Time
- Use warm (not hot) milk – Too hot, and you’ll kill the yeast. Aim for about 110°F—just warm to the touch.
- Let the dough rise in a warm spot – A slightly warmed oven (turned off) or near a sunny window helps the dough double in size beautifully.
- Brush with melted butter twice – Once right after baking and again just before serving for extra richness.
Delicious Variations & Substitutions
These rolls are wonderfully versatile! Try these twists:
- Garlic & Herb Rolls – Mix minced garlic and chopped parsley into the melted butter before brushing.
- Honey Wheat Rolls – Substitute half the flour with whole wheat flour and add a tablespoon of honey to the dough.
- Dairy-Free Option – Use almond milk and vegan butter for a plant-based version that’s just as tender.
What to Serve With Homemade Rolls
These buttery delights pair perfectly with so many dishes! Here are a few favorites:
- Classic roast chicken or turkey with gravy
- Hearty soups and stews (especially on chilly nights)
- Holiday feasts – they’re a must-have next to mashed potatoes and green bean casserole
- Simply slathered with jam for breakfast – because why not?
Why Homemade Rolls Are Worth the Effort
Sure, store-bought rolls are convenient, but nothing beats the homemade version. Here’s why:
- No preservatives – You control the ingredients, making them fresher and healthier.
- Customizable – Adjust flavors and textures to your liking.
- Impressive yet simple – Guests will think you spent hours, but the hands-on time is minimal!
Real-Life Tips from My Kitchen
After making these rolls countless times, here’s what I’ve learned:
- If your kitchen is cold, let the dough rise in the oven with just the light on for gentle warmth.
- Freeze unbaked rolls after shaping—just thaw and let rise before baking for fresh rolls anytime.
- Leftovers? Make mini sandwiches or bread pudding—they’re too good to waste!
Now, go grab your mixing bowl and get ready to fill your home with the irresistible scent of freshly baked rolls. Trust me, once you try them, there’s no going back to store-bought!

Conclusion
There’s nothing quite like the aroma of freshly baked homemade rolls filling your kitchen—soft, buttery, and utterly irresistible. This recipe is a labor of love, but the results are worth every minute. Whether you’re serving them at a holiday feast, a Sunday dinner, or just as a comforting snack, these rolls will steal the show.
Ready to bake your own batch? Gather your ingredients, roll up your sleeves, and let the magic happen. And when you do, I’d love to hear how they turned out! Share your experience in the comments below or tag me on social media. If you’re craving more cozy baking inspiration, check out my other bread recipes—your next favorite might be waiting!
FAQs
Can I make the dough ahead of time?
Absolutely! You can prepare the dough the night before and let it rise slowly in the refrigerator. Just bring it to room temperature before shaping and baking for the best results.
Why are my rolls not as fluffy as I’d like?
Fluffiness depends on proper kneading and rising. Make sure your yeast is fresh, the dough has doubled in size during the first rise, and don’t overwork it when shaping. A warm, draft-free spot helps too!
Can I freeze these rolls?
Yes! Once baked and cooled, wrap them tightly in plastic wrap or foil, then place in a freezer bag. Reheat in the oven at 350°F for 5-10 minutes for that fresh-from-the-oven taste.
Can I use whole wheat flour instead of all-purpose?
You can substitute up to half of the all-purpose flour with whole wheat for a heartier texture. Keep in mind that whole wheat flour absorbs more liquid, so you may need to adjust with a little extra milk or water.
What’s the best way to keep rolls soft after baking?
Store them in an airtight container or resealable bag once completely cooled. For extra softness, place a slice of bread in the container—it helps retain moisture!


