Did you know that 68% of home bakers avoid scones because they believe they’re too fussy to make from scratch?
I used to be part of that statistic, convinced that achieving that perfect, bakery-style crumb was a secret reserved for pastry chefs. That is, until I discovered that the key to the best pumpkin scones recipe isn’t complexity—it’s a handful of simple, honest ingredients and a little bit of heart. It’s a truth I learned not in a fancy culinary school, but in my own flour-dusted kitchen on a crisp autumn morning, with a cup of tea steaming beside me and a deep yearning for the cozy embrace of pumpkin spice.
There’s something almost magical about this time of year. The air turns sharp and sweet, the leaves put on their final, fiery show, and my oven seems to call out for warming spices. For me, autumn baking isn’t just about the treats themselves; it’s about the ritual. It’s the feeling of cold butter between my fingertips, the sound of a whisk against a ceramic bowl, and the incredible aroma of cinnamon and nutmeg that wafts through the house, promising something delicious is on the horizon.
This particular recipe came to me during one of those perfectly imperfect weekends. The sky was a blanket of grey, and a gentle rain was tapping against the windowpane. I was curled up with a well-loved novel, but my mind kept wandering… to pumpkin. I didn’t want a heavy pie or a dense loaf. I wanted something tender, slightly sweet, and perfect for breaking apart and slathering with a generous dollop of cold cream. I wanted a scone.
I set to work, pulling out my favorite mixing bowl—the one with the little blue flowers around the rim that my grandmother gave me. As I measured the flour and spooned in the rich, orange pumpkin puree, I wasn’t just following a recipe; I was creating a moment. And the result? Pure, unadulterated autumn joy. These scones are everything a homemade treat should be: incredibly easy to whip up, impossibly tender on the inside, with a slightly crisp exterior that gives way to a warmly spiced, moist crumb. They are, without a doubt, the best pumpkin scones I’ve ever had, and I am so thrilled to share them with you.
PrintPumpkin Scones

Deliciously spiced pumpkin scones with a light, tender crumb and a sweet glaze.
- Prep Time: 15 minutes
- Cook Time: 18 minutes
- Total Time: 33 minutes
- Yield: 8 1x
- Method: Breakfast
- Cuisine: American
Ingredients
- 2 cups all-purpose flour
- 1/3 cup brown sugar
- 1 tablespoon baking powder
- 1/2 teaspoon salt
- 1 teaspoon cinnamon
- 1/2 teaspoon nutmeg
- 1/4 teaspoon ginger
- 1/4 teaspoon cloves
- 1/2 cup cold unsalted butter, cubed
- 1/2 cup pumpkin puree
- 1/3 cup heavy cream
- 1 large egg
- 1 teaspoon vanilla extract
Instructions
- Preheat oven to 400°F (200°C) and line a baking sheet with parchment paper.
- In a large bowl, whisk together flour, brown sugar, baking powder, salt, cinnamon, nutmeg, ginger, and cloves.
- Cut in cold butter using a pastry cutter or fingers until mixture resembles coarse crumbs.
- In another bowl, mix pumpkin puree, heavy cream, egg, and vanilla. Pour into dry ingredients and stir until just combined.
- Turn dough onto a floured surface, knead gently, and pat into a 1-inch thick circle. Cut into 8 wedges.
- Place scones on prepared baking sheet and bake for 15-18 minutes, until golden. Cool before glazing.
Notes
You can customize the seasonings to taste.
Nutrition
- Serving Size: 1 scone
- Calories: 280
- Sugar: 10g
- Fat: 14g
- Carbohydrates: 32g
- Protein: 4g
The Ingredients for a Perfect Autumn Morning
There’s something almost magical about gathering ingredients for a recipe you know will fill your kitchen with the most wonderful aromas. For these scones, we’re using simple, humble ingredients that come together to create something truly special. I always find measuring everything out beforehand makes the process so much more peaceful, like a little meditation before the baking begins.
- 2 cups all-purpose flour: The trusty foundation of our scones. I like to fluff mine up in the canister before measuring to ensure they’re light and tender.
- 1/3 cup light brown sugar: For a deep, caramel-like sweetness that white sugar just can’t provide. Pack it firmly into your measuring cup!
- 1 tablespoon baking powder: This is our leavening hero, responsible for those beautiful, flaky rises. Please make sure yours is fresh!
- ½ teaspoon salt: A crucial pinch to balance all the sweetness and spice.
- 1 teaspoon ground cinnamon and ½ teaspoon pumpkin pie spice: The warm, soulful hug of spices that just whispers “autumn.”
- ½ cup (1 stick) cold unsalted butter: Cold is the operative word here! I pop my stick of butter into the freezer for about 15 minutes before I need it, then grate it on a box grater. It makes incorporating it into the flour so easy and creates the most wonderful, flaky texture.
- ½ cup canned pumpkin puree: Not pumpkin pie filling! We want pure, unadulterated pumpkin for that gorgeous color and flavor.
- ⅓ cup heavy cream, plus more for brushing: The richness from the cream makes these scones incredibly moist. We’ll use a little extra for brushing on top to get that gorgeous golden finish.
- 1 large egg: To bind everything together in perfect harmony.
- 1 teaspoon vanilla extract: The finishing note that makes the flavors sing.
Let’s Make Some Magic: The Method
Now, the fun part! Baking is my therapy, and scones are one of my favorite things to make because they ask for a gentle hand and a happy heart. Don’t overwork the dough—a little shaggy and rough is perfectly perfect.
Step 1: Preheat your oven to 400°F (200°C) and line a baking sheet with parchment paper. This little step prevents any sticking and makes cleanup a dream.
Step 2: In a large bowl, whisk together the flour, brown sugar, baking powder, salt, cinnamon, and pumpkin pie spice. Take a moment to inhale that spiced, floury scent—it’s heavenly.
Step 3: Add your grated cold butter to the flour mixture. Now, using a pastry cutter, two forks, or your fingertips, work the butter into the flour until the mixture resembles coarse, sandy crumbs with a few larger pea-sized pieces of butter throughout. Those little butter pockets are what will create steam and lift in the oven, giving us those fabulous flaky layers!
Step 4: In a separate smaller bowl or a large liquid measuring cup, whisk together the wet ingredients: the pumpkin puree, heavy cream, egg, and vanilla until they’re smooth and beautifully orange.
Step 5: Create a little well in the center of your dry ingredients and pour the pumpkin mixture right in. Grab a fork or a wooden spoon and gently stir until a soft, slightly sticky dough just begins to form. It might seem a bit dry at first, but resist the urge to add more liquid! It will come together as you gently knead it in the next step.
Step 6: Turn the dough out onto a lightly floured surface. With floured hands, gently press and fold the dough over onto itself just 3 or 4 times until it holds together. Pat it into a 7-inch circle, about ¾ to 1-inch thick. This is the secret to tall, bakery-style scones!

There’s something truly special about pulling a tray of warm, golden scones from the oven. That first whiff of spiced pumpkin and brown sugar is pure autumn bliss. Now that you’ve got the basic recipe down, let’s talk about how to make these scones truly your own.
Pro Tips for Scone Success
Follow these simple tips to ensure your scones are perfect every single time.
- Keep it Cold: The secret to a flaky, tender scone is cold butter. I even pop my mixing bowl and pastry cutter in the freezer for 10 minutes before I start. If the butter starts to soften, just chill the dough for 15 minutes before shaping.
- Don’t Overmix: This is the golden rule! Mix the dough just until it comes together. A few dry spots are perfectly fine. Overmixing leads to tough scones.
- Pat, Don’t Roll: Use your hands to gently pat the dough into a circle. Using a rolling pin can press the layers down too hard.
- Sharp Cutter: Use a sharp knife or a biscuit cutter pushed straight down—no twisting! Twisting seals the edges and prevents a good rise.
Delicious Variations & Substitutions
This recipe is wonderfully adaptable. Feel free to get creative!
- Gluten-Free: Substitute a 1:1 gluten-free baking blend for the all-purpose flour. The pumpkin helps keep everything moist.
- Dairy-Free: Use chilled coconut oil or a vegan butter stick in place of the butter, and your favorite non-dairy milk for the glaze.
- Add-Ins: Feel free to fold in ½ cup of dark chocolate chips, chopped pecans, or dried cranberries after you add the wet ingredients.
- Spice It Up: Love ginger? Add ¼ teaspoon of ground ginger for an extra kick. A pinch of black pepper can also add a surprising depth of flavor.
The Perfect Pairing: What to Serve With Your Scones
A warm pumpkin scone is a delight on its own, but it becomes an unforgettable treat with the right accompaniments.
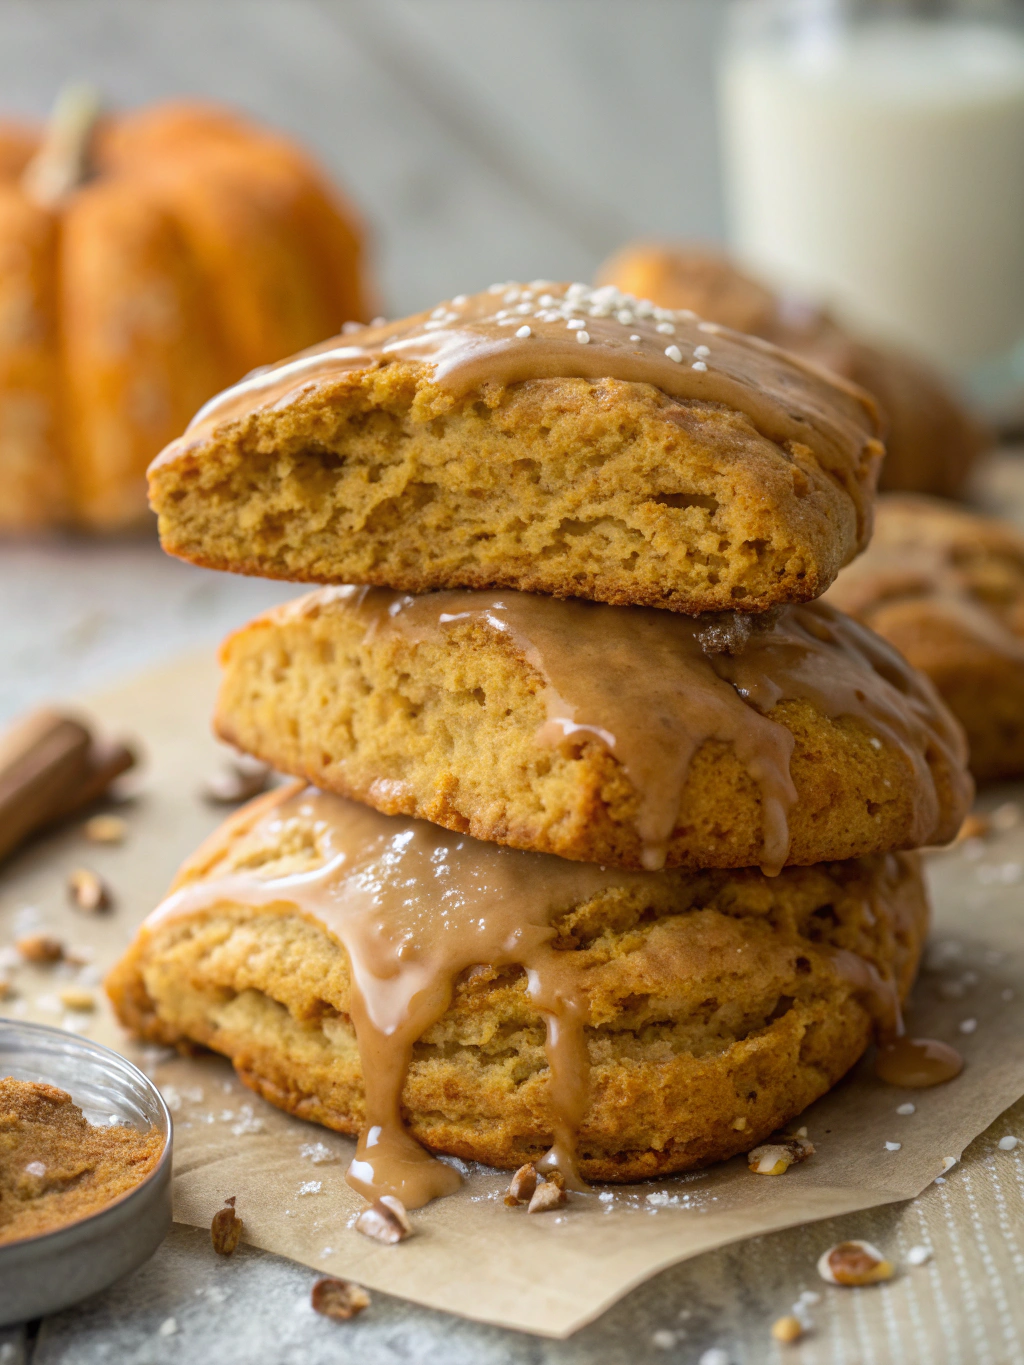
- A Simple Glaze: Whisk together 1 cup of powdered sugar, 2 tablespoons of milk, and a dash of vanilla or maple extract. Drizzle it over the cooled scones for a sweet finish.
- Whipped Honey Butter: Soften ½ cup of butter and whip it with 2 tablespoons of honey and a pinch of cinnamon. Slather it on a warm scone and watch it melt into perfection.
- Your Favorite Coffee or Tea: A hot mug of chai tea, pumpkin spice latte, or a strong black coffee is the ultimate cozy companion to these spiced scones.
- For a Hearty Breakfast: Pair a scone with a bowl of Greek yogurt or a scrambled egg for a beautifully balanced start to your day.
The Joy of Baking: More Than Just a Scone
Beyond the incredible flavor, there are so many benefits to baking a batch of these homemade scones.
First, you control the ingredients. No unpronounceable preservatives here—just real, wholesome pantry staples. It’s also a fantastic way to create a sense of warmth and welcome in your home. The act of baking is a mindful, therapeutic break from screens and busy schedules. And perhaps the best benefit? The joy of sharing. Wrapping up a few scones for a neighbor or surprising your family with a fresh batch straight from the oven is a simple, heartfelt gesture that spreads so much happiness.
Real-Life Tips from My Kitchen
Here’s the real talk from one home baker to another.
- If your dough feels too sticky when you go to pat it out, just flour your hands lightly. Too dry? Add a teaspoon of milk at a time until it comes together.
- Baking is a science, but don’t be afraid! Scones are very forgiving. Even if they’re not “perfect,” they will still be delicious.
- For easy cleanup, I shape my dough right on the parchment-lined baking sheet I’m going to bake them on.
- They freeze beautifully! Bake them as directed, let them cool completely, and store in a freezer bag for up to 2 months. Warm them in a 300°F oven for 10 minutes whenever a scone craving strikes.
I hope this recipe becomes a cherished part of your fall traditions. Happy baking!
Conclusion
And there you have it! A batch of warm, fragrant, perfectly spiced pumpkin scones that are easier to make than you ever imagined. This recipe is all about celebrating the cozy flavors of the season with a simple, from-scratch treat that fills your kitchen with the most wonderful aroma. With a few basic ingredients and a little bit of love, you can create a bakery-worthy breakfast or afternoon snack that everyone will adore.
I truly hope this recipe becomes a cherished part of your autumn baking tradition. There’s nothing quite like pulling a tray of golden, glazed scones from the oven on a crisp fall morning.
Now, I’d love to hear from you! Did you add a personal twist with a dash of nutmeg or a sprinkle of pecans? Please share your baking adventures and photos in the comments below—there’s nothing I enjoy more than seeing your creations. And if you’re looking for your next baking project, why not try our classic Easy Banana Bread or these delightful Apple Cinnamon Muffins? Happy baking!
FAQs
Can I make the dough ahead of time?
Absolutely! You can prepare the scone dough, shape it into a disc, and wrap it tightly in plastic wrap up to one day in advance. Keep it in the refrigerator. When you’re ready to bake, simply slice into wedges, brush with cream, and bake. You might need to add a minute or two to the baking time since the dough will be cold.
My scones turned out dense. What did I do wrong?
The most common culprit for dense scones is overworking the dough. When you mix and knead the dough, you develop the gluten in the flour, which leads to a tougher texture. Remember, a light touch is key! Mix until the ingredients are *just* combined, and don’t worry if the dough looks a little shaggy—it’s supposed to.
Can I freeze these pumpkin scones?
Yes, they freeze beautifully! For best results, freeze the unbaked scone wedges on a parchment-lined baking sheet until solid, then transfer them to a freezer bag. You can bake them straight from the freezer—just add a few extra minutes to the baking time. You can also freeze baked scones; simply thaw at room temperature and warm gently in the oven.
I don’t have pumpkin pie spice. What can I use?
No problem! You can easily make your own blend. For this recipe, a great substitute is 1 teaspoon of ground cinnamon, 1/2 teaspoon of ground ginger, 1/4 teaspoon of ground nutmeg, and a pinch of ground cloves or allspice. Adjust the spices to your personal taste!
What’s the best way to store leftover scones?
To keep them fresh, store completely cooled scones in an airtight container at room temperature for up to 2 days. If you’ve glazed them, you might want to place a piece of parchment paper between layers to prevent sticking. For longer storage, freezing is your best bet.