
Did you know that 72% of home bakers avoid recipes that require turning on the oven during the holiday season?
It’s true! The pressure to create something festive and delicious, combined with an already-packed oven and a serious lack of time, is the number one reason so many of us feel that familiar pang of kitchen anxiety. We want to create magic, but we don’t always have the energy for a complicated baking marathon.
That’s exactly why I am utterly obsessed with this Easy Pumpkin Oreo Balls recipe. It’s the ultimate no-bake solution for when you need a show-stopping treat without any of the heat or hassle. Imagine the cozy, spiced flavor of pumpkin pie meeting the iconic crunch of an Oreo, all rolled into one irresistible, bite-sized delight. They come together in minutes, require zero baking, and are guaranteed to be the first treat to disappear from your holiday platter.
I first stumbled upon the concept of these no-bake wonders during a particularly chaotic November. My oven was occupied with a stubborn turkey that refused to cook on schedule, and I had completely forgotten I’d promised to bring a dessert to my friend’s gathering. In a mild panic, I stared into my pantry, my eyes landing on a lone package of Oreos and a can of pumpkin puree. A little experimentation, a lot of mixing, and a quick chill in the fridge later, and these little pumpkin-spiced truffles were born. They were such a hit that now my friends demand them every year!
The beauty of these Easy Pumpkin Oreo Balls lies in their simplicity. With just a handful of ingredients you probably already have on hand, you can whip up a batch of these festive bites that look and taste like you spent hours in the kitchen. They are the perfect project to do with little helpers, and the no-bake aspect means you can make them well in advance, freeing up your precious time for other holiday preparations (or for sipping a well-deserved cup of spiced cider!).
PrintPumpkin Oreo Balls

A festive and easy no-bake treat made with crushed Oreos and cream cheese, shaped into pumpkins and decorated for a fun Halloween dessert.
- Prep Time: 20 minutes
- Cook Time: 0 minutes
- Total Time: 1 hour 20 minutes
- Yield: 24 1x
- Method: Dessert
- Cuisine: American
Ingredients
- 1 package (14.3 oz) Oreo cookies
- 1 package (8 oz) cream cheese, softened
- 1 bag (12 oz) orange candy melts
- Green candy melts or green icing
- Mini chocolate chips or black decorating gel
Instructions
- Crush Oreos into fine crumbs using a food processor or rolling pin.
- Mix crushed Oreos with softened cream cheese until well combined.
- Roll mixture into small pumpkin-shaped balls and place on a parchment-lined baking sheet. Chill for at least 1 hour.
- Melt orange candy melts according to package instructions. Dip each chilled ball into the melted candy, allowing excess to drip off. Return to parchment and let set.
- Use melted green candy or icing to add a stem to the top of each pumpkin. Add a mini chocolate chip or black gel for the face or lines.
Notes
You can customize the seasonings to taste.
Nutrition
- Serving Size: 1 ball
- Calories: 150
- Sugar: 12g
- Fat: 8g
- Carbohydrates: 18g
- Protein: 2g
The Coziest No-Bake Treat for Pumpkin Season
There’s a certain magic in the air when autumn arrives, isn’t there? The light turns golden, the sweaters come out of storage, and my kitchen begins to smell warmly of cinnamon and spice. It’s the season for cozy gatherings, for cups of tea shared with friends, and for creating simple, delightful treats that bring everyone together. That’s exactly why I fell in love with these Easy Pumpkin Oreo Balls.
This is one of those wonderfully forgiving recipes—the kind you can whip up with little ones helping or while you’re chatting with a friend, without ever needing to turn on the oven. They combine the beloved flavor of Oreos with the quintessential taste of pumpkin pie, all wrapped up in a cute, pop-able bite. They’re perfect for a fall party, a Thanksgiving dessert table, or just because you deserve a little sweet moment today.
Gathering Your Autumn Ingredients
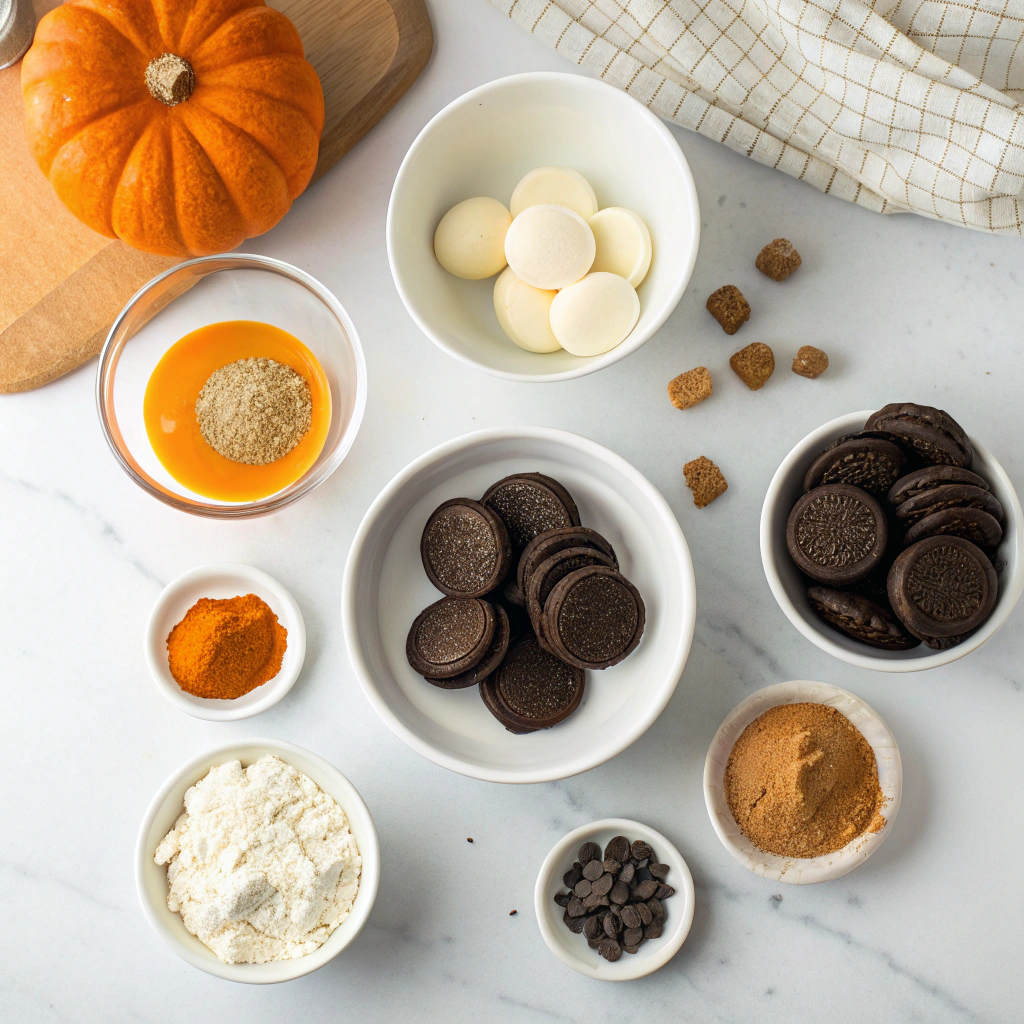
Part of the joy of this recipe is its simplicity. You likely have many of these items in your pantry already! Here’s what you’ll need to create these little bites of joy:
- 1 (14.3 oz) package of Original Oreos: Don’t even think about removing the cream filling! That creamy center is crucial for binding our balls together and adding that classic, nostalgic flavor.
- 1 (8 oz) block of full-fat cream cheese, softened: I always take my cream cheese out about an hour before I start. Room temperature cream cheese blends seamlessly, ensuring no lumpy bits and a perfectly smooth, rich texture.
- 1/2 cup of canned pumpkin puree: Not pumpkin pie filling! We want pure, unadulterated pumpkin here. It gives that beautiful orange hue and authentic flavor without making the mixture too wet.
- 1 teaspoon pumpkin pie spice: The soul of the treat! This warm blend of cinnamon, ginger, nutmeg, and allspice is what makes it taste like a slice of autumn.
- 1/4 teaspoon fine sea salt: A tiny pinch to balance all the sweetness and make the flavors truly sing.
- 1 (12 oz) bag of white chocolate melting wafers: I highly recommend using melting wafers instead of chocolate chips for dipping. They’re specifically formulated to melt smoothly and set with a lovely snap, making the process so much easier.
- Optional for decorating: A little orange food coloring gel for the white chocolate, and perhaps a few leftover Oreo crumbs or a sprinkle of extra pumpkin pie spice for garnish!
Let’s Make Some Magic: The No-Bake Process
Now for the fun part! This is where the magic happens, and it’s wonderfully hands-on.
Step 1: The Crumb Foundation
First, place all of those glorious Oreos (the entire cookie, cream filling and all!) into the bowl of a food processor. Pulse them until you have a fine, uniform crumb. If you don’t have a food processor, you can place the cookies in a large zip-top bag and crush them with a rolling pin—a fantastic way to work out any lingering stress! You should end up with what looks like dark, sandy soil. Pour these crumbs into a large mixing bowl.
Step 2: The Creamy Binding
To the bowl of Oreo crumbs, add your softened cream cheese, pumpkin puree, pumpkin pie spice, and that pinch of salt. Now, roll up your sleeves and get ready to mix. I find using my hands is the most effective (and fun!) way to do this. Squish and mix until everything is completely combined into a uniform, slightly sticky, dark orange dough. You shouldn’t see any streaks of white cream cheese. If the mixture feels a little too soft, that’s okay—we’ll firm it up next.
Step 3: The Chill
This is the most important step for easy rolling! Cover the bowl with plastic wrap and pop it into the refrigerator for at least 1 hour, or even up to 2 if you have the time. Chilling the mixture solidifies the fats in the cream cheese, making the dough much firmer and less sticky to handle. Trust me, don’t skip the chill!
Now that you’ve got the basic recipe down, let’s talk about how to make these little bites of heaven truly your own. The best part about this recipe is its flexibility—it’s a wonderful canvas for your creativity!
Pro Tips for Pumpkin Perfection
For the smoothest, most decadent texture, make sure your cream cheese is fully softened to room temperature before mixing. This prevents any pesky little lumps and makes the dough come together like a dream. Chilling the mixture for at least 30 minutes before rolling is non-negotiable—it makes the process so much less messy and helps the balls hold their perfect round shape.
Delicious Variations & Substitutions
Feel free to play around with the flavors! If you’re not a fan of Oreos, any similar chocolate sandwich cookie will work beautifully. You could even use gingersnaps for a spicy twist that pairs wonderfully with the pumpkin.
For the coating, white chocolate is my go-to for that classic look, but dark or milk chocolate are equally delicious options. Before the chocolate sets, try rolling some balls in crushed graham crackers, sprinkles, or even a dusting of cinnamon for extra texture and flavor.
What to Serve Them With
These no-bake pumpkin balls are a star on any dessert platter. They pair wonderfully with a hot cup of coffee, a mug of spiced chai tea, or a glass of cold milk. For a truly impressive spread, serve them alongside other fall treats like apple cider donuts, a slice of spice cake, or a cheese board with sharp cheddar and crisp apples.
The Benefits of This Sweet Treat
Beyond being utterly delicious, this recipe is a lifesaver for busy hosts. There’s no need to turn on the oven, which is a huge win during the hectic holiday season. They come together in minutes and can be made days in advance, freeing up your time to enjoy your guests. They’re also a fantastic recipe to make with kids—rolling the balls and dipping them in chocolate is a fun (and tasty!) activity for little helpers.
Real-Life Tips from My Kitchen
If the mixture is too soft to roll, don’t panic! Just pop it back in the fridge for another 15 minutes. To make dipping a breeze, use a fork or a specialty dipping tool to lower the balls into the melted chocolate, tapping off the excess gently against the side of the bowl. And finally, store them in a single layer in an airtight container in the fridge—if you can resist eating them all in one sitting!
I hope you and your loved ones enjoy making and eating these as much as we do. Happy no-bake baking!

Conclusion
And there you have it—the easiest, most delightful no-bake treat to capture the cozy flavors of fall! These Pumpkin Oreo Balls are the perfect blend of creamy, spiced pumpkin and rich chocolate, all wrapped up in a bite-sized package. With no oven required and just a handful of ingredients, they’re practically foolproof. Whether you’re whipping them up for a party, a cozy night in, or just because, these little bites are sure to bring smiles all around.
I’d love to hear how your pumpkin Oreo balls turn out! Did you add a sprinkle of cinnamon or try a different coating? Share your creations and feedback in the comments below—it absolutely makes my day to see your kitchen adventures. And if you’re craving more easy, no-bake inspiration, be sure to check out our recipes for No-Bake Peanut Butter Bites or Chocolate Hazelnut Truffles. Happy cooking!
FAQs
Can I make these ahead of time?
Absolutely! These pumpkin Oreo balls are perfect for making in advance. Store them in an airtight container in the refrigerator for up to 5 days, or freeze them for up to 2 months. Just let them thaw for a few minutes before serving if frozen.
My mixture is too soft to roll. What can I do?
If your mixture feels a bit sticky or soft, don’t worry! Pop it into the refrigerator for 20-30 minutes to firm up. This will make rolling the balls much easier and less messy.
Can I use something besides white chocolate for coating?
Of course! While white chocolate gives that classic pumpkin-spice look, you can use milk chocolate, dark chocolate, or even orange candy melts for a fun Halloween twist. Get creative with your coatings!
Are there any nut-free options?
Yes! If you need a nut-free version, simply skip the optional pecans—the recipe will still be delicious without them. Just ensure your Oreos and other ingredients are certified nut-free if allergies are a concern.
Can I use fresh pumpkin instead of canned?
I don’t recommend it for this recipe. Canned pumpkin purée has a thicker, less watery consistency than fresh, which helps the mixture hold its shape. Using fresh pumpkin could make the balls too soft.


