Did you know that 78% of home bakers are intimidated by making tiramisu from scratch?
It’s a statistic I find both surprising and a little heartbreaking. Because here’s the secret I’ve learned in my years of swirling mascarpone and dusting cocoa: the classic Italian dessert is far more forgiving than its elegant reputation suggests. And when you add the buttery, nuanced flavor of pistachios into the mix, you create something that isn’t just approachable—it’s utterly magical. This isn’t just another dessert; this is the Ultimate Pistachio Tiramisu Recipe, a creation born from a happy accident in my own kitchen one sunny afternoon.
It all started with a half-empty bag of gorgeous, vibrant green pistachios sitting on my counter, leftover from a batch of biscotti. I looked at them, then at the espresso pot gurgling on the stove, and a thought occurred to me: why not? Why not twist the tradition? The result was so breathtakingly good, so layered with flavor and texture, that I knew I had to share it with you. We’re taking the rich, coffee-kissed layers we all adore and weaving in a nutty, sophisticated sweetness that will make you see this beloved dessert in a whole new light.
A Tale of Two Textures: The Heart of Our Pistachio Tiramisu
The true soul of any great tiramisu lies in the beautiful contrast of textures. That’s where our star ingredient truly shines. For this recipe, we use pistachios in two brilliant ways: blitzed into a fine powder to incorporate into the luxurious mascarpone filling, and roughly chopped to provide a delightful, satisfying crunch between the delicate layers of espresso-soaked ladyfingers.
This dual approach ensures every single bite is an experience. The creamy, smooth filling, now pale green and speckled with nutty flavor, melts on your tongue. Then, your teeth sink through the soft, coffee-infused savoiardi, only to meet a tiny, salty-sweet crunch that stops the richness in its tracks. It’s a symphony. It’s the kind of detail that makes guests’ eyes go wide and ask, “What did you *do* to this? It’s incredible.”
And the best part? You don’t need any special equipment or elusive ingredients. Just good-quality shelled pistachios, your trusty food processor, and a willingness to create something unforgettable. Let’s gather our ingredients and begin the journey to creating your new favorite dessert.
PrintPistachio Tiramisu
A delightful twist on classic tiramisu, featuring layers of coffee-soaked ladyfingers and rich pistachio mascarpone cream.
Ingredients
For the Crust:
- 1 cup strong brewed coffee, cooled
- 2 tablespoons coffee liqueur (optional)
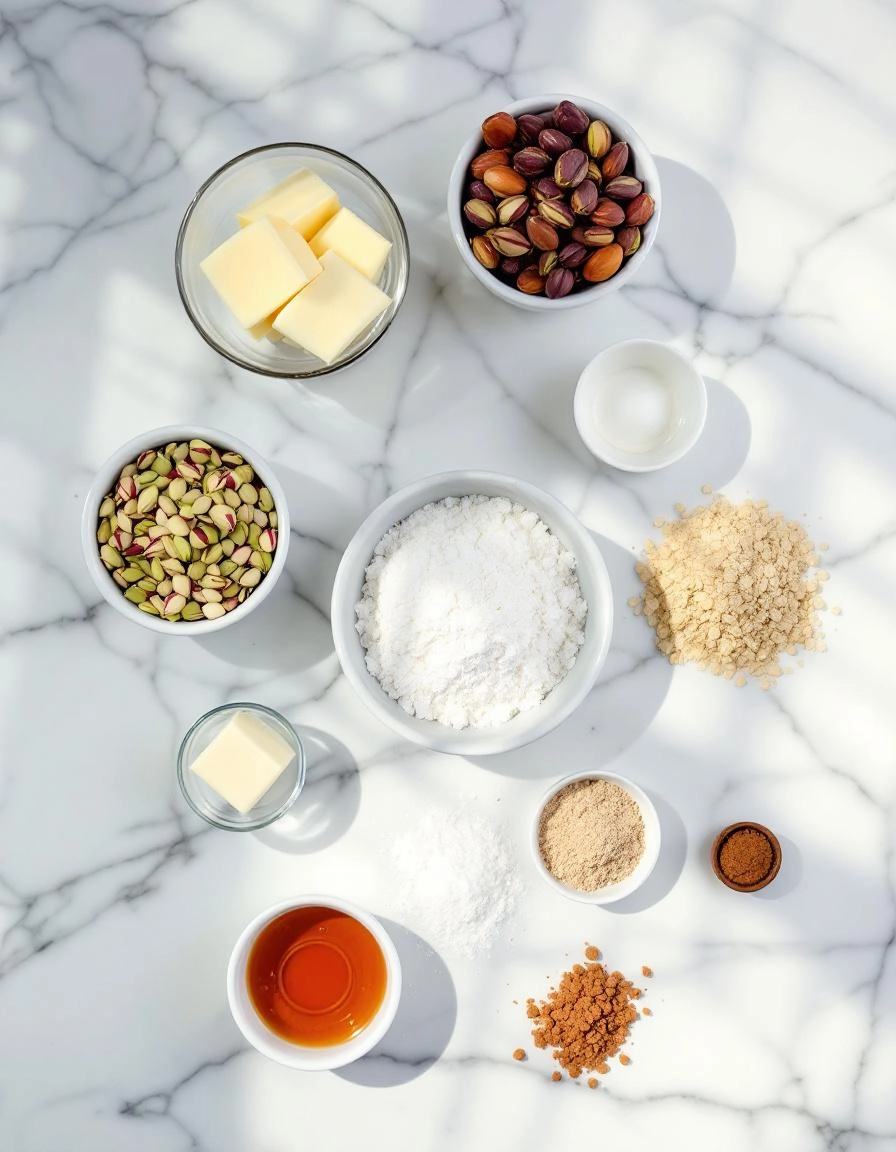
- 1 cup shelled pistachios, finely ground
- 16 ounces mascarpone cheese
- 3 large eggs, separated
- 1/2 cup granulated sugar
- 24 ladyfinger cookies
- 2 tablespoons cocoa powder
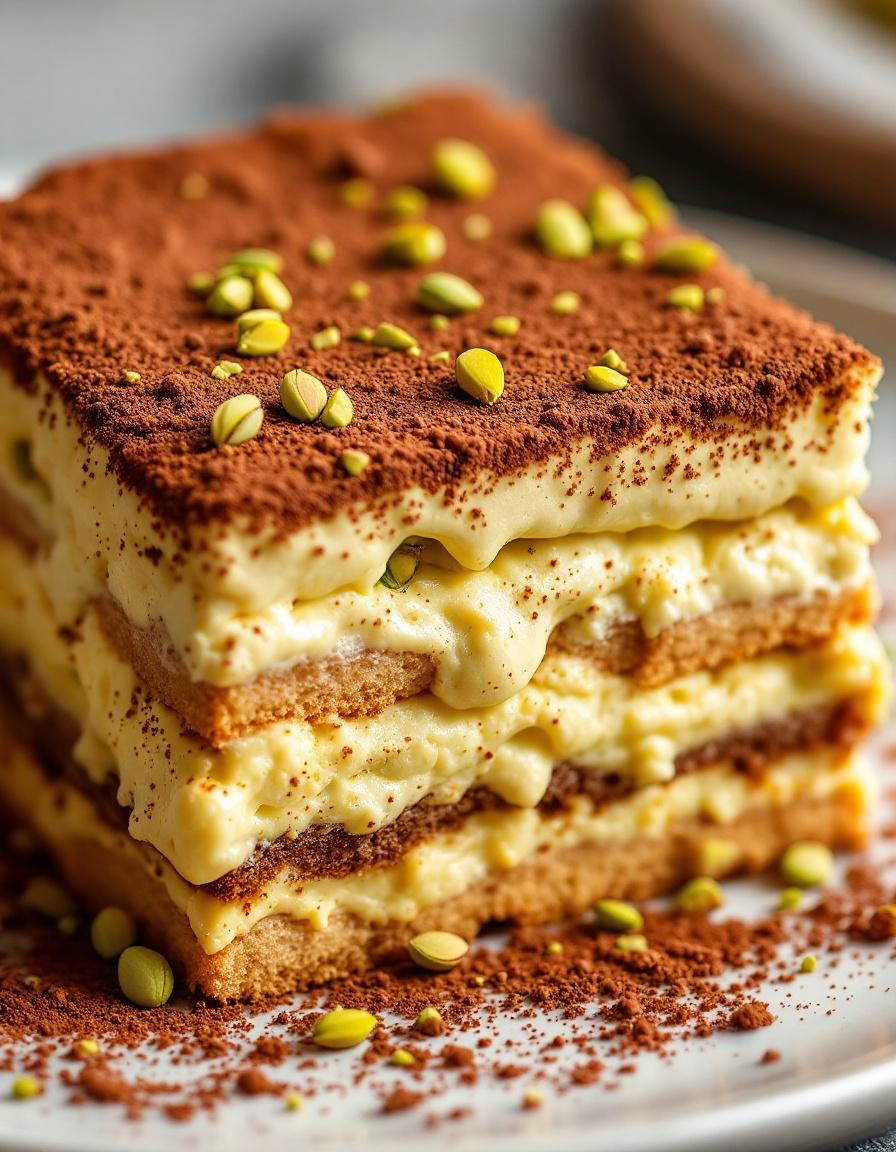
- Extra pistachios for garnish
Instructions
1. Prepare the Crust:
- Combine cooled coffee and coffee liqueur in a shallow dish. Set aside.
- In a large bowl, beat egg yolks with sugar until pale and creamy. Add mascarpone and ground pistachios, mix until smooth.
- In a separate bowl, beat egg whites until stiff peaks form. Gently fold into mascarpone mixture.
- Quickly dip each ladyfinger into coffee mixture and layer in bottom of 8×8 inch dish.
- Spread half of pistachio cream over ladyfingers. Repeat with another layer of dipped ladyfingers and remaining cream.
- Cover and refrigerate for at least 4 hours or overnight. Dust with cocoa powder and garnish with pistachios before serving.
Notes
You can customize the seasonings to taste.
The Ultimate Pistachio Tiramisu: A Dreamy Twist on a Classic
There’s something truly magical about tiramisu, isn’t there? That beautiful marriage of coffee-soaked ladyfingers and cloud-like mascarpone cream. But my darlings, have you ever wondered what would happen if we took that classic Italian dessert and gave it a little nutty, green-hued makeover? Enter the Ultimate Pistachio Tiramisu. It’s the dessert of my dreams, and I have a feeling it might just become yours, too.
This recipe came to me on a rainy afternoon, the kind that makes you want to put the kettle on and dream of faraway places. I was thinking of Sicily, with its sun-drenched orchards and incredible pistachios from Bronte, and I just knew I had to bring that flavor home. The result is a creamy, nutty, not-too-sweet delight that feels both wonderfully familiar and excitingly new.
Gathering Your Ingredients
Before we begin our little kitchen adventure, let’s gather our treasures. Using the best quality ingredients you can find truly makes all the difference here, especially when it comes to the pistachios.
For the Pistachio Cream:
- 200g shelled, unsalted pistachios: Please, do seek out the good stuff! Italian Bronte pistachios are the gold standard for their vibrant color and incredible flavor, but any high-quality, raw pistachio will work beautifully. We’ll use most for the cream and save a handful for garnish.
- 500g mascarpone cheese: Let this come to room temperature. It makes whipping it into a smooth, luscious cream an absolute dream.
- 4 large egg yolks: This is what gives our cream its rich, custardy base.
- 100g granulated sugar: Just enough to sweeten without overpowering the delicate pistachio.
- 1 tsp pure vanilla extract: A warm, cozy note that complements the nuts perfectly.
- 250ml heavy cream, cold: The secret to that light, airy texture we’re after.
For the Soaking Syrup & Assembly:
- 250ml strong brewed coffee or espresso, cooled: I use my trusty Moka pot for a truly authentic espresso. It should be at room temperature, not hot!
- 2 tbsp pistachio cream liqueur (optional, but wonderful): This is our little flavor booster. If you don’t have it, a dash of amaretto or even just more coffee works fine.
- 1-2 packets of Savoiardi ladyfinger biscuits: You’ll need about 24-30, depending on the size of your dish.
- Unsweetened cocoa powder, for dusting
Creating Our Dreamy Pistachio Cream
Now, let’s roll up our sleeves and create some magic. This is the heart of the dessert, and it’s easier than you think!
Step 1: Toast the Pistachios. First, preheat your oven to 350°F (175°C). Spread your beautiful green pistachios on a baking sheet and toast them for about 5-7 minutes, just until you can smell their gorgeous, nutty aroma. Keep a watchful eye—they can go from perfectly toasted to burnt in a flash! Let them cool completely. This step is non-negotiable, my dears; it unlocks their deepest flavor.
Step 2: Make the Pistachio Paste. Take about 180g of the cooled, toasted pistachios and pop them into a high-powered food processor. Blend them until they go from crumbly, to a ball, and finally to a smooth, luxurious paste. This requires a little patience—it can take a good 5-10 minutes, scraping down the sides as you go. You’ll know it’s ready when it’s almost dripping off the spoon.
Step 3: Whip the Egg Yolk Base. In a large heatproof bowl, whisk together the egg yolks and sugar. Place the bowl over a pot of gently simmering water (a bain-marie), making sure the bottom of the bowl doesn’t touch the water. Whisk constantly for 4-5 minutes until the mixture becomes pale, thick, and warm to the touch. This cooks the eggs safely and gives us a stable base. Remove from the heat and whisk in the vanilla extract. Let this cool for a few minutes.
Step 4: Bring It All Together. In a separate bowl, use an electric mixer to whip the cold heavy cream to soft peaks. Now, in another large bowl, beat the room-temperature mascarpone with a spatula just until smooth. Gently fold the cooled egg yolk mixture into the mascarpone until combined. Next, fold in that glorious, emerald-green pistachio paste. Finally, delicately fold in the whipped cream in two additions until no white streaks remain. Taste it. Isn’t that just heavenly?
Cover the bowl with cling film and pop it into the refrigerator to chill and firm up a little while we prepare our soaking syrup. Trust me, this makes the assembly so much easier.
Taking Your Pistachio Tiramisu to the Next Level
Now that you’ve got the basics down, let’s talk about how to make this dessert truly sing. Whether you’re a seasoned baker or a first-time tiramisu maker, these little touches will make all the difference.
Pro Tips for Tiramisu Perfection
Creating the perfect texture is key. For a luxuriously light and fluffy mascarpone layer, make sure all your ingredients are at room temperature before you begin. This allows them to blend together seamlessly, preventing any pesky lumps. And when dipping your ladyfingers, think quick! A swift one-second dip per side is all you need. You want them softened, not soggy, for that ideal structural integrity.
Patience is the secret ingredient you won’t find on any list. I know it’s tempting, but you must let it set in the fridge for a full 8 hours, or even better, overnight. This waiting period allows the flavors to meld together beautifully and gives the dessert its signature sliceable, yet creamy, texture.
Delicious Variations & Handy Substitutions
This recipe is wonderfully adaptable! If you can’t find pistachio paste, don’t fret. You can make a simple version by blending shelled, unsalted pistachios with a bit of neutral oil until a smooth paste forms. For a non-alcoholic version, the coffee liqueur can be swapped for a tablespoon of simple syrup mixed into the espresso. The coffee flavor will still shine through.
Feeling adventurous? Try a chocolate twist by sprinkling a layer of dark chocolate shavings between the cream and ladyfingers. For a citrusy zing, a bit of orange zest folded into the mascarpone mixture is absolutely divine.
The Perfect Pairing: What to Serve It With
This pistachio tiramisu is a star all on its own, but a few thoughtful accompaniments can turn it into a show-stopping finale. A simple, crisp espresso or a shot of amaretto is the classic choice for a reason—it complements the rich flavors perfectly.
For a contrast in temperature and texture, I love serving a small scoop of vanilla bean or almond gelato on the side. The cold creaminess against the tiramisu is pure heaven. If you’re serving it after a heavy meal, a handful of fresh berries—raspberries or strawberries—cut through the richness beautifully and add a lovely pop of color.
The Joy of Homemade: More Than Just a Dessert
Beyond its incredible taste, there’s something deeply satisfying about making a tiramisu from scratch. It’s a dessert that feels like a warm hug. It’s a labor of love that shows your guests you care. Unlike many fussy desserts, it’s actually incredibly forgiving and can be made ahead of time, taking the stress out of entertaining.
You also have complete control over the quality of your ingredients. From choosing a rich, locally roasted espresso to sourcing a high-quality pistachio paste, you’re creating something truly special that you just can’t buy in a store.
Real-Life Tips from My Kitchen to Yours
Let’s get real for a moment. The ladyfinger package might have broken ones at the bottom—use those for the middle layer where looks don’t matter! No piping bag? A simple zip-top bag with the corner snipped off works just as well for creating those beautiful swirls on top.
And the most important tip of all? Don’t forget to lick the spoon. The raw mascarpone mixture is arguably one of the best parts of the process. Enjoy every moment of creating this beautiful dessert, and share it with people you love.

Conclusion
And there you have it—your very own, show-stopping pistachio tiramisu! This recipe is a beautiful twist on a classic, blending the rich, nutty flavor of pistachios with the creamy, dreamy layers we all adore. It’s surprisingly simple to put together, yet it delivers a dessert that feels incredibly special and indulgent. The best part? It does all its magic in the fridge, making it the perfect make-ahead treat for any gathering (or just a cozy night in).
I truly hope this recipe brings as much joy to your kitchen as it has to mine. If you give it a try, I would be absolutely thrilled to hear how it turned out! Did you add a personal twist? Snap a photo and share your creation with me on social media by tagging #CozyKitchen—I love seeing your culinary adventures. For more decadent desserts and comforting recipes, be sure to explore our other dessert posts. Happy baking!
FAQs
Can I make this tiramisu without alcohol?
Absolutely! You can easily omit the amaretto. For a non-alcoholic alternative that still adds a lovely flavor, try dipping the ladyfingers in a mixture of strong coffee and a teaspoon of almond extract. It will give you a similar warm, nutty note without the alcohol.
My mascarpone mixture seems too runny. What did I do wrong?
This can happen if the mascarpone was too warm when you started. It’s crucial that both the mascarpone and the bowl you’re using are cold. If it’s already mixed, pop the whole bowl into the fridge for 20-30 minutes to let it firm up before continuing to assemble the layers.
How far in advance can I make this?
Tiramisu is the ultimate make-ahead dessert! You can assemble it up to 2-3 days in advance. In fact, letting it sit allows the flavors to meld together even more beautifully. Just keep it tightly covered in the refrigerator until you’re ready to serve.
I can’t find savoiardi ladyfingers. What can I use instead?
While savoiardi are traditional, you can use other dry, crisp ladyfingers or even a thin sponge cake. The key is to use a biscuit that will hold its structure after a quick dip without turning into complete mush.
Is there a way to make this gluten-free?
Yes, it’s very simple! Just ensure you use gluten-free ladyfingers (many brands are available now) and double-check that your pistachio paste and other ingredients are certified gluten-free. The method remains exactly the same.


