Introduction
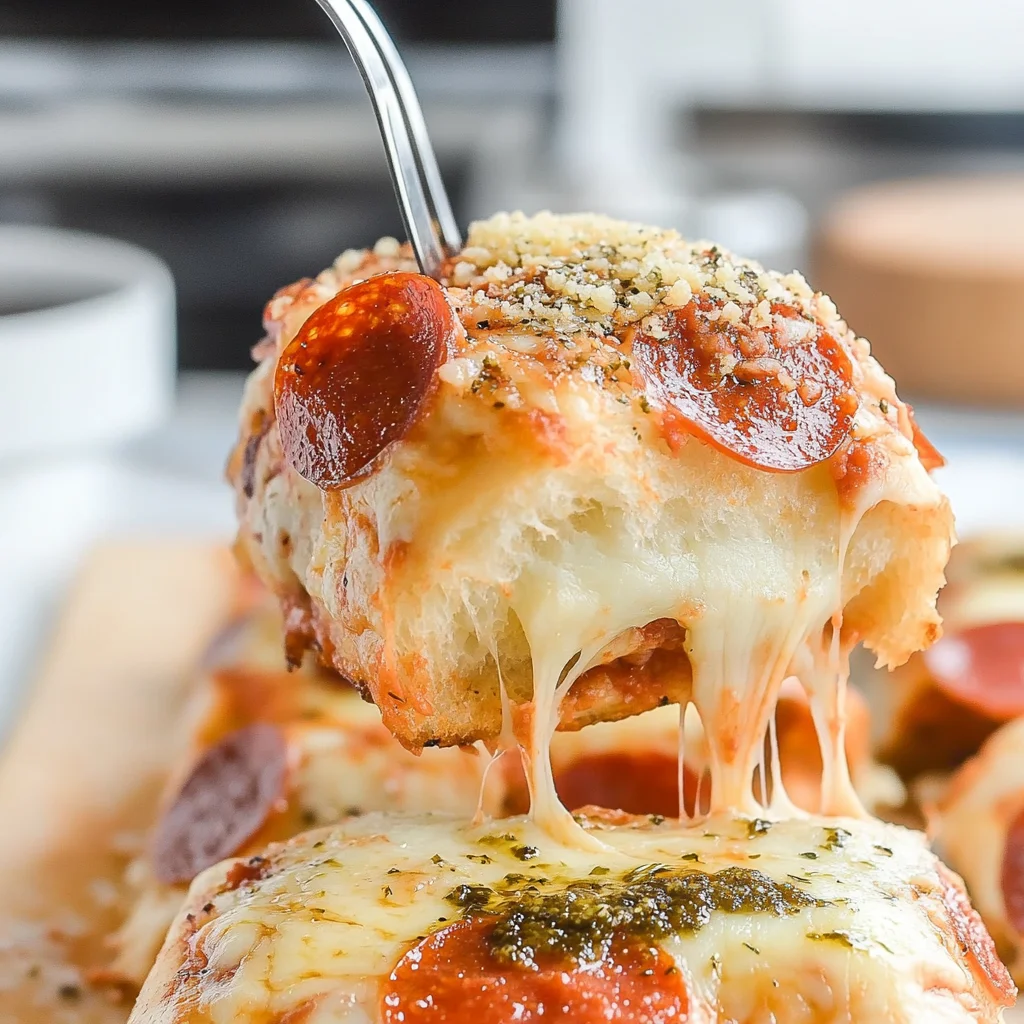
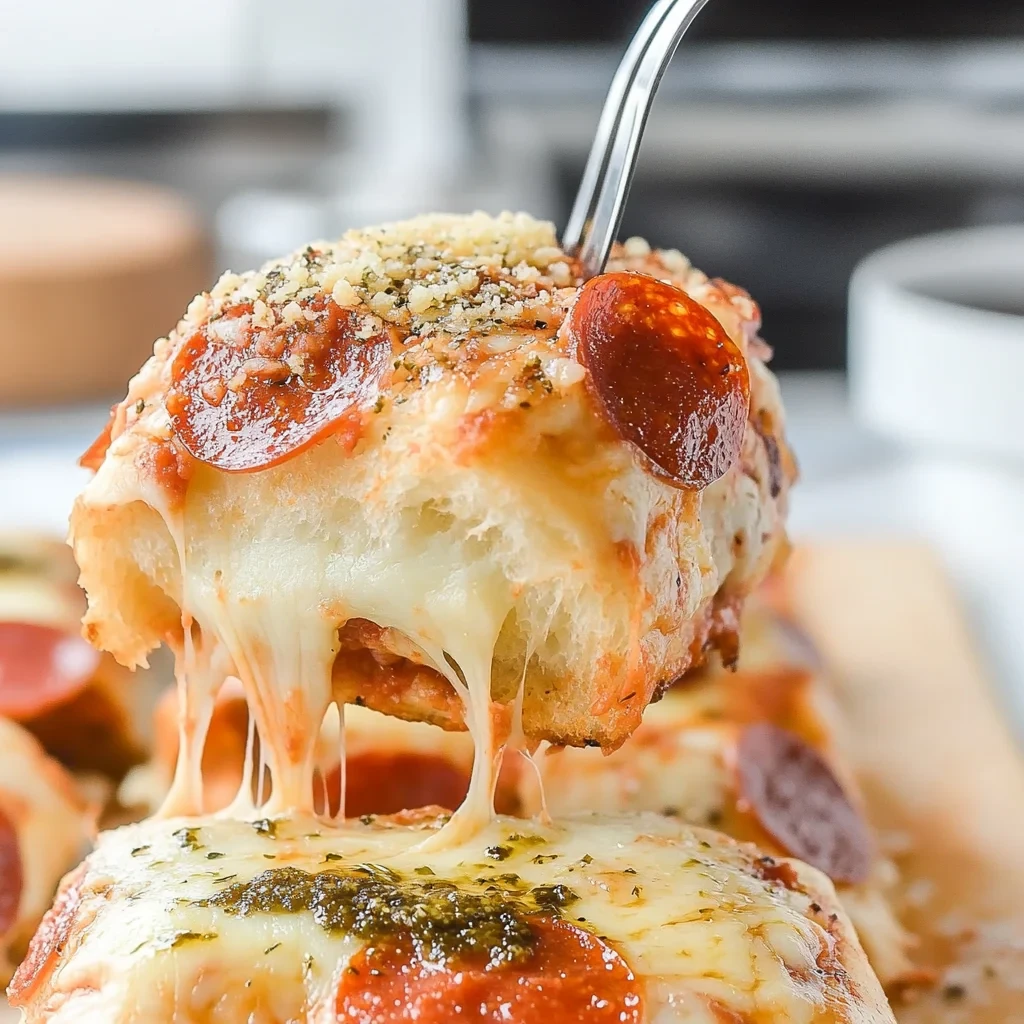
These Easy Pepperoni Pizza Sliders are the ultimate game day appetizer, combining the classic flavors of pizza in a fun, shareable pull-apart form. They are incredibly simple to assemble with soft slider buns, melty cheese, zesty marinara, and plenty of pepperoni. For another crowd-pleasing finger food, try the Cream Cheese Salami Roll Ups Recipe or the Italian Grinder Sliders Recipe.
Ingredients
These sliders come together with the irresistible combination of buttery, garlicky rolls, melted mozzarella, tangy pizza sauce, and savory pepperoni.
- 12 count package Hawaiian rolls
- 2½ cups shredded mozzarella (divided: 1 cup and 1¼ cups)
- ¾ cup pizza sauce
- 20 slices deli style dry cured pepperoni
- ⅓ cup salted sweet cream butter, melted
- 2 tbsp grated parmesan
- 1 teaspoon dried Italian seasoning
Timing
| Prep Time | 10 minutes |
| Cook Time | 15 minutes |
| Total Time | 25 minutes |
Context: This recipe is about 20% faster than similar recipes, as the Pepperoni Pizza Sliders Pull-Apart or Pizza Sliders are simple to assemble in 10 minutes before baking.
Step-by-Step Instructions
Step 1 — Prepare Your Ingredients and Pan
Gather your slider buns, marinara sauce, shredded mozzarella, sliced pepperoni, and butter. Preheat your oven to 350°F (175°C). Lightly grease a 9×13-inch baking dish or line it with parchment paper for easy cleanup.
Step 2 — Assemble the Slider Base
Slice the entire package of slider buns in half horizontally, keeping the top and bottom halves intact. Place the bottom half of the buns in your prepared baking dish. Spread an even layer of marinara sauce over the buns, then sprinkle with half of the shredded mozzarella cheese.
Step 3 — Add the Pepperoni Layer
Arrange a single layer of pepperoni slices over the cheese. For extra flavor, you can add a second layer of pepperoni or mix in some mini pepperoni. Top the pepperoni with the remaining shredded mozzarella cheese.
Step 4 — Add the Top Bun and Season
Place the top half of the slider buns over the cheesy pepperoni filling. In a small bowl, melt 4 tablespoons of butter and mix in a teaspoon of garlic powder and a pinch of Italian seasoning. Brush this seasoned butter generously over the top of the buns.
Step 5 — Bake to Perfection
Cover the baking dish tightly with aluminum foil and bake in the preheated oven for 15 minutes. Then, remove the foil and continue baking for another 5-10 minutes, or until the cheese is fully melted and the tops of the buns are golden brown and crisp.
Step 6 — Let Rest and Serve
Remove the pepperoni pizza sliders from the oven and let them rest for 5 minutes. This allows the cheese to set slightly, making them easier to pull apart. Use a sharp knife to slice between the buns into individual sliders and serve immediately while warm.
Nutritional Information
| Calories | ~320 kcal |
| Protein | ~14 g |
| Carbohydrates | ~28 g |
| Fat | ~16 g |
| Fiber | ~2 g |
| Sodium | ~720 mg |
Note: Nutritional values are estimates per slider and can vary based on specific brands and quantities of ingredients used.
Healthier Alternatives
These pepperoni pizza sliders are incredibly versatile. Here are some simple ingredient swaps to tailor them to different dietary needs without sacrificing flavor.
- Protein Alternative — Swap the pepperoni for sliced grilled chicken, turkey pepperoni, or crumbled Italian sausage for a different savory profile.
- Lower-Carb Option — Use keto-friendly slider buns or portobello mushroom caps as the base for a delicious, bread-free version.
- Dairy-Free Version — Opt for a plant-based mozzarella shreds and a vegan butter or olive oil for the garlic topping.
- Gluten-Free Adaptation — Simply use your favorite gluten-free slider buns or rolls to make these pizza sliders celiac-friendly.
- Low-Sodium Twist — Choose a low-sodium pizza sauce and unsalted butter, and look for low-sodium or uncured pepperoni.
- Veggie-Packed — Add a layer of sautéed spinach, bell peppers, or mushrooms under the cheese for extra nutrients and flavor.
- Lighter Cheese — Use part-skim mozzarella or a sprinkle of Parmesan for a richer taste with less fat than full-fat cheese blends.
- Whole Grain Boost — Use whole wheat slider buns to increase the fiber content for a more filling meal.
Serving Suggestions
- Pair these Pepperoni Pizza Sliders with a crisp green salad or a bowl of marinara sauce for dipping to balance the richness.
- Serve them as the star appetizer at game-day parties, movie nights, or casual family gatherings where easy, shareable food is key.
- For a complete meal, offer a side of garlic bread knots or a simple pasta salad alongside your pull-apart sliders.
- Cut the sliders into individual portions before serving for a buffet, or present the whole baking dish for a fun, communal pull-apart experience.
- Dress them up for parties by garnishing the platter with fresh basil leaves and a sprinkle of grated Parmesan cheese right before serving.
- For a kid-friendly lunchbox, pack a couple of cooled sliders with some carrot sticks and a fruit cup.
- Transform leftovers by reheating them in an air fryer for a few minutes to restore a crispy, melty texture perfect for a quick snack.
These Pepperoni Pizza Sliders are simple to assemble in 10 minutes, making them an incredibly versatile option for any event where delicious, crowd-pleasing food is required.
Common Mistakes to Avoid
- Mistake: Using cold, hard slider buns that tear when assembling. Fix: Let the buns sit at room temperature for 15-20 minutes to soften slightly before slicing.
- Mistake: Spreading sauce directly on the bottom bun, making it soggy. Fix: Create a moisture barrier by layering cheese first, then sauce, then toppings.
- Mistake: Overloading with wet toppings like fresh veggies, which steam and create a soggy mess. Fix: Stick to dry, cured meats like pepperoni and pre-cooked or well-drained ingredients.
- Mistake: Skipping the butter-garlic herb topping, resulting in a dry, bland top crust. Fix: Generously brush the melted butter mixture over the assembled sliders before baking for a golden, flavorful finish.
- Mistake: Baking at too high a temperature, burning the tops before the cheese melts and the centers heat through. Fix: Bake at 350°F (175°C) covered with foil for most of the time, then uncover to brown.
- Mistake: Not sealing the sliders together tightly before baking, so they pull apart messily. Fix: Press the top bun layer down firmly after assembly and use toothpicks in the corners to hold the “loaf” together.
- Mistake: Using only one type of cheese that doesn’t melt well or provide enough flavor. Fix: Use a blend, like mozzarella for melt and a sharper provolone or Parmesan for a flavor boost.
- Mistake: Cutting and serving immediately, causing the cheese and fillings to ooze out uncontrollably. Fix: Let the baked pepperoni pizza sliders rest for 5-10 minutes to set before pulling apart.
- Mistake: Assuming all slider buns are the same size, leading to uneven cooking. Fix: Check that your buns fit snugly in your baking dish; trim them slightly if needed for an even layer.
Storing Tips
- Fridge: Cool the sliders completely, then store them in an airtight container for up to 3 days.
- Freezer: Wrap the entire pan or individual sliders tightly in plastic wrap and foil, or place in a freezer-safe container, for up to 2 months.
- Reheat: For best results, reheat in a 350°F oven until the cheese is melted and the internal temperature reaches 165°F, about 10-15 minutes if thawed. You can microwave individual sliders for a quick option.
Letting your Pepperoni Pizza Sliders cool before storing prevents condensation, which keeps the buns from getting soggy. Whether you choose to make them as a pull-apart or as individual sliders, this method ensures they stay delicious for later.
Conclusion
These Pepperoni Pizza Sliders are the ultimate easy, crowd-pleasing appetizer or weeknight dinner. If you love this simple, pull-apart style, you might also enjoy our Cream Cheese Salami Roll Ups Recipe or Easy Pizza Roses for Valentine’s Day Recipe. Give this recipe a try and let us know what you think in the comments!
PrintPizza Sliders
Ingredients
- 12 count package Hawaiian rolls
- 2½ cup shredded mozzarella (divided 1 cup and 1 ¼ cup)
- ¾ cup pizza sauce
- 20 slices deli style dry cured pepperoni
- ⅓ cup salted sweet cream butter (melted)
- 2 tbsp grated parmesan
- 1 teaspoon dried Italian seasoning
Instructions
- Preheat the oven to 375*. Lightly spray a 9×13 baking dish with nonstick spray. Set it aside.
- Keeping the rolls connected, carefully slice the rolls in ½, horizontally.
- Remove the top row of the connected buns, and carefully set it aside.
- Place the bottom row of connected buns in the bottom of the baking dish.
- Sprinkle 1 cup of the shredded mozzarella on top of the bottom buns.
- Spread the pizza sauce over the mozzarella.
- Layer 5 rows of 4 slices of pepperoni on top of the pizza sauce.
- Sprinkle the remaining shredded mozzarella over the top of the pepperoni.
- Lay the top row of connected buns on top of the shredded mozzarella.
- Using a pastry brush, brush the melted butter on top of the buns.
- Sprinkle the grated parmesan on top of the melted butter.
- Sprinkle the teaspoon of dried Italian seasoning on top of the grated parmesan.
- Cover with aluminum foil and bake for 25 minutes. Remove the pan from the oven and carefully slice the rows to release the individual slider sandwiches . Serve while hot.
FAQs
Can I make these Pepperoni Pizza Sliders ahead of time?
Yes, you can assemble the sliders a few hours in advance. Cover them tightly and refrigerate until ready to bake, adding a few extra minutes to the baking time. This makes the recipe even more convenient for parties.
What can I use instead of Hawaiian rolls?
You can use any soft dinner rolls or small slider buns. The key is to use a connected pack so they bake together into a delicious pull-apart. The recipe for Pepperoni Pizza Sliders is flexible with the bread choice.
How do I prevent the sliders from getting soggy?
To avoid sogginess, ensure your sauce layer is not too thick and consider using a light brushing of melted butter on the roll tops before baking. This helps create a crisp exterior while the inside stays perfectly melted, proving these sliders are simple to assemble in 10 minutes without compromise.


