
Did you know that over 75% of home bakers report feeling intimidated by holiday cookie recipes, yet this classic treat consistently ranks as one of the easiest and most beloved to make?
It’s true! There’s something almost magical about the way a simple, humble dough transforms into a festive masterpiece with just one little chocolate kiss. And if there’s one recipe that proves baking joy doesn’t have to be complicated, it’s this timeless Classic Peanut Butter Blossoms recipe.
I can still remember the first time I helped my grandmother make these. The kitchen was warm, smelling of sugar and roasting peanuts, and a dusting of flour seemed to cover every surface, including the tip of my nose. She handed me the jar of peanut butter—the kind with the oil separated on top that we had to stir with great ceremony—and let me scoop it all into her big yellow mixing bowl. That feeling of pressing the chocolate kiss into the center of each warm, crisscross-fork-marked cookie, watching it sink just so, is a core memory for me. It’s a feeling I’ve carried with me into my own kitchen, and one I hope to pass on to you today.
This isn’t just a recipe; it’s a little piece of edible nostalgia. It’s the cookie that makes an appearance at every cookie swap, on every holiday platter, and somehow, it’s always the first to disappear. The combination of a soft, slightly crumbly peanut butter cookie that just melts in your mouth with the rich, solid chocolate center is simply unbeatable. It’s a perfect balance, a textural dream, and a flavor combination that feels like a hug.
So, tie on your favorite apron, put on some festive music, and let’s create some magic together. The first step to these perfect blossoms is gathering your ingredients. You’ll be thrilled to know that you likely have everything you need already waiting in your pantry.
PrintPeanut Butter Blossoms
Classic holiday cookies featuring a soft peanut butter cookie base topped with a chocolate candy kiss.
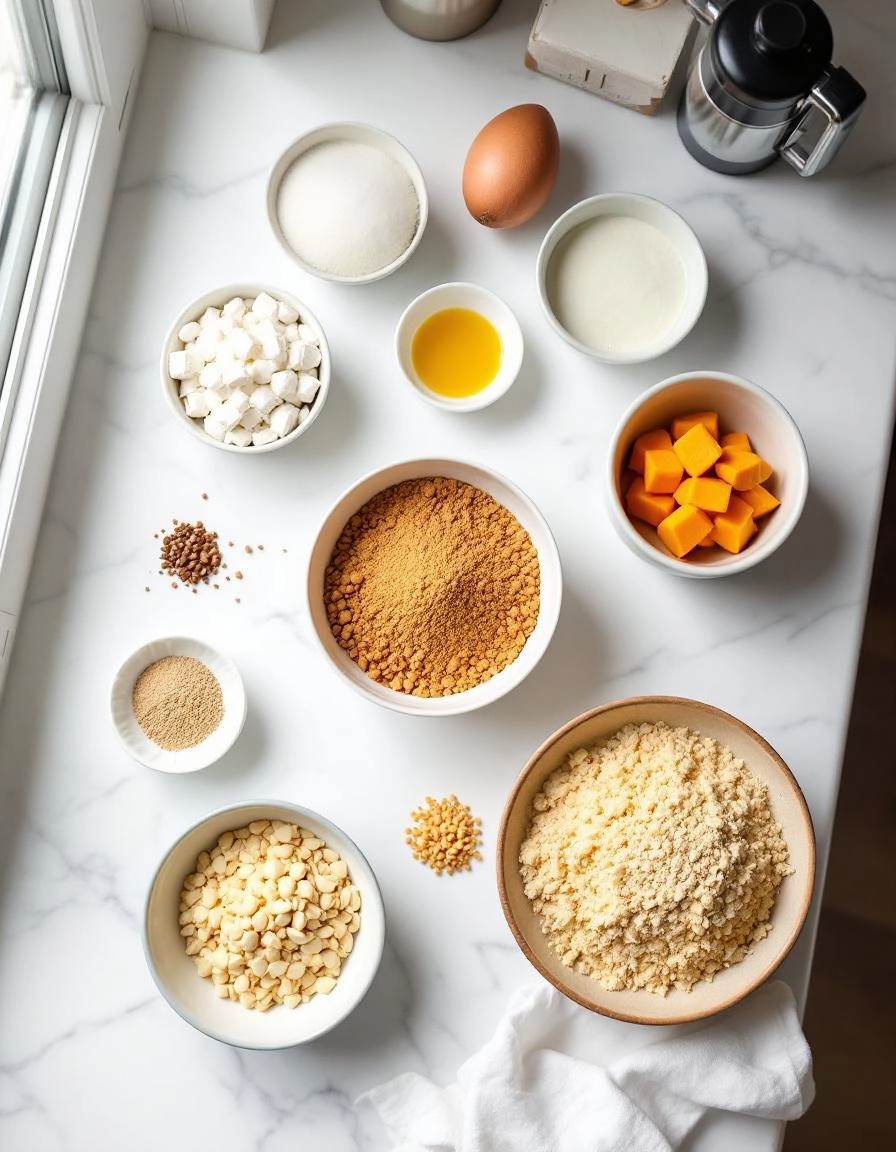
Ingredients
For the Crust:
- 1 cup creamy peanut butter
- 1 cup granulated sugar
- 1 large egg
- 1 teaspoon vanilla extract
- Additional sugar for rolling
- 48 milk chocolate candy kisses, unwrapped
Instructions
1. Prepare the Crust:
- Preheat oven to 350°F (175°C). Line baking sheets with parchment paper.
- In a medium bowl, mix peanut butter, 1 cup sugar, egg, and vanilla until well combined.
- Shape dough into 1-inch balls. Roll each ball in additional sugar and place on prepared baking sheets.
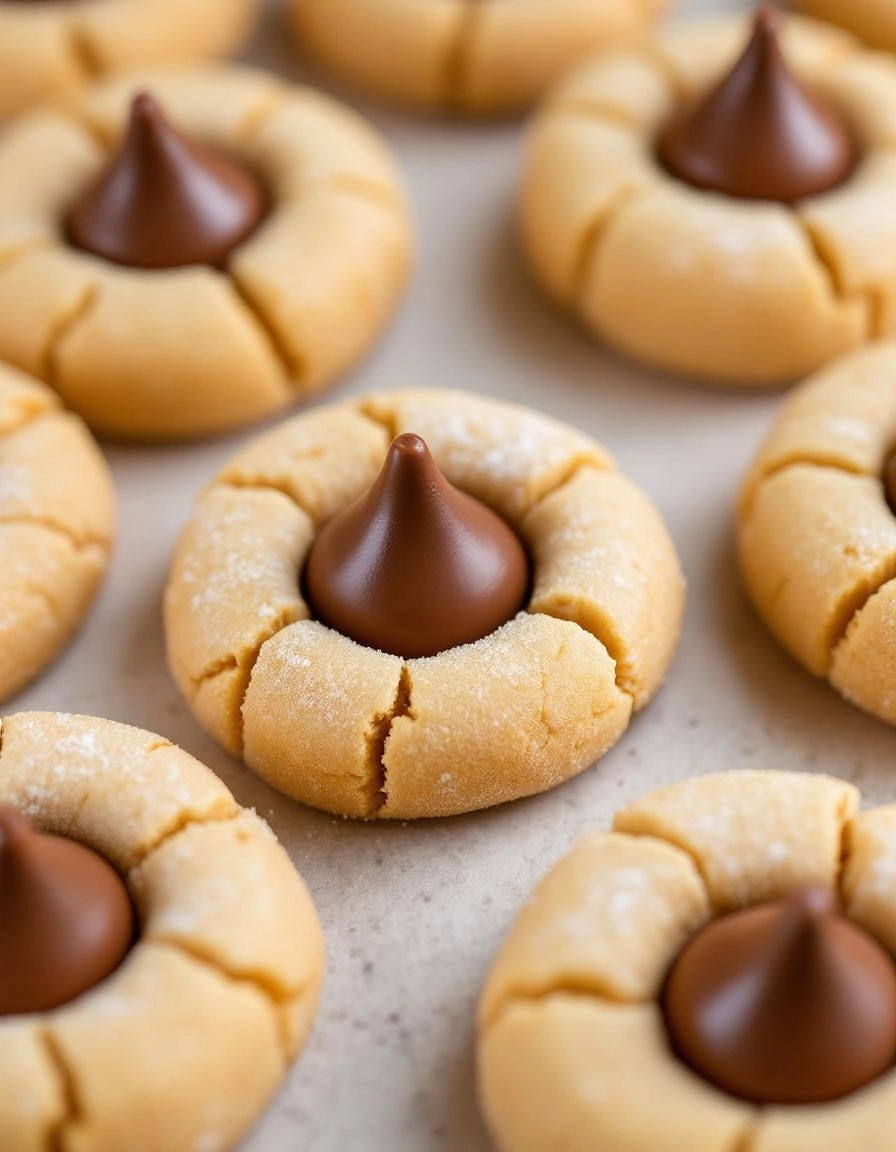
- Bake for 8-10 minutes until cookies are set and lightly cracked. Immediately press a chocolate kiss into the center of each cookie. Allow to cool completely on wire racks.
Notes
You can customize the seasonings to taste.
The Cookie Jar That Built a Family Tradition
There’s a certain magic that happens in the kitchen around the holidays, a kind of alchemy that turns flour, sugar, and love into memories. For me, that magic has a very distinct shape: a soft, crinkly peanut butter cookie cradling a rich, melting chocolate kiss. The Peanut Butter Blossom is more than a cookie in our house; it’s a time machine. The moment that warm, nutty scent hits the air, I’m ten years old again, standing on a chair next to my grandmother, my small hands covered in sugar, waiting for the glorious moment when we get to press the chocolate into the center.
It was her recipe, scribbled on a now-stained index card that I treasure, and it’s the one I’m so delighted to share with you today. It’s a classic for a reason—simple, utterly satisfying, and the kind of treat that makes everyone, from toddlers to grandpas, light up with joy. So, tie on your favorite apron, and let’s bake a batch of happiness together.
Gathering Your Cookie Companions
One of the beautiful things about this recipe is its simplicity. You likely have most of these ingredients waiting for you in your pantry right now. Here’s what you’ll need to create about four dozen little pieces of bliss:
- ½ cup (1 stick) of unsalted butter, softened to room temperature – This is our foundation. Taking the time to let your butter truly soften (it should give slightly when you press it, but not be oily) is the secret to a perfectly creamy dough.
- ¾ cup of creamy peanut butter – I’m a traditionalist and use a standard grocery store brand like Jif or Skippy for that classic, nostalgic flavor. The oils and sugars in these brands help create the ideal soft texture.
- ⅓ cup of granulated sugar, plus an extra ½ cup for rolling – We’ll use some in the dough for sweetness and reserve a generous amount for creating that iconic sugary, crackly exterior.
- ½ cup of light brown sugar, packed – This is where the warmth and depth of flavor comes from. Make sure to pack it firmly into your measuring cup!
- 1 large egg – Always best at room temperature to help it incorporate seamlessly into our creamed butter and sugar.
- 2 tablespoons of whole milk – Just a splash to add a bit of tenderness to the crumb.
- 1 teaspoon of pure vanilla extract – The supporting actor that makes all the other flavors sing a little louder.
- 1 ½ cups of all-purpose flour – Fluff it up in the container before you spoon it into your measuring cup and level it off. We want light cookies, not dense ones!
- 1 teaspoon of baking soda – Our leavening agent for that perfect little rise.
- ½ teaspoon of fine sea salt – Crucial for balancing all that sweetness and enhancing the peanut butter flavor.
- One 9-ounce bag of Hershey’s Kisses – Unwrapped, of course! This is the most delightful (and sometimes most fought-over) prep job in the kitchen. I highly enlisting a helper for this task.
Let’s Bake: The Cozy Step-by-Step
Now that our ingredients are assembled, it’s time for the fun part. Preheat your oven to 375°F (190°C) and line your baking sheets with parchment paper. There’s no need to grease them—the butter in the dough does the job beautifully.
- In the bowl of a stand mixer fitted with the paddle attachment, or in a large bowl using a hand mixer, cream together the softened butter, ⅓ cup of granulated sugar, and the packed brown sugar on medium speed. Beat it for a good 2-3 minutes, until it becomes pale, fluffy, and wonderfully smooth. This step incorporates air, which is key for texture!
- Add in the creamy peanut butter and beat for another minute until it’s fully combined and the mixture is a lovely, uniform tan color. Scrape down the sides of the bowl with a spatula—this is a habit we love, ensuring everything gets mixed evenly.
- Next, beat in the egg, milk, and vanilla extract. Mix until everything is just incorporated. It might look a little curdled at first, but it will come together beautifully.
- In a separate bowl, whisk together the flour, baking soda, and salt. This ensures our leavening is evenly distributed throughout the dough. With your mixer on low speed, gradually add the dry ingredients to the wet ingredients. Mix until the flour just disappears into the dough. Don’t overmix! A few stray flour streaks are okay; they’ll incorporate when we roll the dough.
- Now, pour that extra ½ cup of granulated sugar into a small bowl. Take about a tablespoon of dough and roll it between your palms into a smooth, one-inch ball. This is the perfect size for a balanced cookie-to-chocolate ratio. Roll each ball generously in the sugar until it’s completely coated, then place it on your prepared baking sheet about 2 inches apart. They need a little room to spread and become perfectly round.
And that’s where we’ll pause for a moment. Your kitchen should already be smelling incredible. Pop those first tray of sugared dough balls into the preheated oven, and I’ll meet you back here in just 8 minutes for the most magical part… the blossoming!
There’s something truly magical about pulling a tray of warm peanut butter blossoms from the oven. That sweet, nutty aroma fills the kitchen, promising a treat that’s both nostalgic and utterly irresistible. But the journey doesn’t end with the recipe card! Let’s talk about how to make these cookies truly your own.
Pro Tips for the Perfect Blossom
Want to ensure your blossoms are the talk of the cookie platter? Here are a few secrets from my kitchen to yours:
- Chill Your Dough: After mixing, pop the dough in the fridge for at least 30 minutes. This prevents the cookies from spreading too much and helps them hold their perfect shape when you press in the chocolate kiss.
- Roll Generously: Don’t be shy with the sugar coating! Rolling the dough balls thoroughly gives the cookies that classic, sparkly finish and a delightful crunch.
- The Perfect Press: Press the chocolate kiss into the center the moment the cookies come out of the oven. They’re just soft enough to allow the chocolate to settle in without melting into a puddle.
Delicious Variations & Substitutions
This recipe is wonderfully adaptable. Feel free to get creative!
- Flour Power: For a gluten-free version, a 1-to-1 gluten-free baking blend works beautifully in place of all-purpose flour.
- Nut-Free Option: Sunflower seed butter is a fantastic peanut-free alternative that bakes up with a similar texture and flavor.
- Chocolate Choices: While milk chocolate kisses are classic, try dark chocolate, caramel-filled, or even peppermint kisses for a festive twist!
- Extra Crunch: Add ½ cup of finely chopped peanuts to the dough for an added layer of texture.
What to Serve With Your Blossoms
These cookies are a star on their own, but they love company! They pair perfectly with a tall glass of ice-cold milk for the ultimate classic combo. For a cozy gathering, serve them on a platter alongside other holiday favorites like gingerbread men and shortbread cookies. They also make a wonderful dessert alongside a scoop of vanilla bean ice cream or a cup of rich hot chocolate.
The Benefits of Baking Together
Beyond the delicious result, baking these blossoms offers so much more. It’s a chance to slow down, to create something with your hands, and to fill your home with warmth and love. It’s a fantastic activity to do with little ones—they love rolling the dough balls and, of course, placing the chocolate kisses. You’re not just making cookies; you’re making memories.
Real-Life Tips from My Kitchen
In the hustle of real life, here’s what really works:
- If your dough feels too sticky to roll, wet your hands slightly. It prevents sticking without adding extra flour, which can make the cookies tough.
- No stand mixer? No problem! A sturdy wooden spoon and a little elbow grease will work just fine.
- To keep cookies soft for days, store them in an airtight container with a single slice of bread. The cookies will absorb the moisture from the bread, staying wonderfully chewy.
I hope these tips inspire you to bake a batch of these timeless treats. Happy baking!
Conclusion
And there you have it—the full, heartwarming journey to creating a batch of perfect Peanut Butter Blossoms. We’ve walked through the importance of creamy peanut butter, the magic of rolling the dough in sugar for that classic sparkle, and the gentle press of a chocolate kiss while the cookies are still warm from the oven. This recipe is more than just a list of ingredients; it’s a little piece of holiday tradition, a guaranteed smile-maker, and a testament to the fact that the simplest treats are often the most beloved.
I truly hope this recipe finds its way into your kitchen and becomes a new favorite for your family. There’s nothing that makes me happier than knowing these cookies are being enjoyed in homes just like yours. Did you add your own special twist? Did the kids love pressing in the chocolates? I’d be absolutely delighted to hear about your baking adventure! Share your stories and photos in the comments below, or tag me on social media. And if you’re craving more cozy baking inspiration, be sure to explore our other classic cookie recipes right here on the blog.
FAQs
Can I use natural peanut butter for this recipe?
I don’t recommend using natural peanut butter (the kind that separates) for this particular recipe. The extra oils can change the texture of the dough, making it too soft and potentially greasy, which might cause the cookies to spread too much and lose their perfect shape. For the best results, stick with a standard creamy peanut butter like Jif or Skippy.
My chocolate kisses are melting completely! What did I do wrong?
This usually happens if the cookies are too hot when you place the chocolate on top. The key is to press the kisses onto the cookies immediately after they come out of the oven—they should be warm, not scalding hot. The residual heat is just enough to slightly soften the chocolate and make it adhere without causing a total meltdown. Letting the cookies cool on the pan for a minute or two first can help.
How do I store these cookies to keep them fresh?
These cookies keep beautifully! Once they are completely cooled, store them in an airtight container at room temperature. They’ll stay soft and delicious for up to a week. You can also layer them between sheets of parchment paper to prevent any sticking.
Can I freeze Peanut Butter Blossoms?
Absolutely! They freeze wonderfully. Make sure the cookies are completely cooled, then place them in a single layer in a freezer-safe container or bag. They can be frozen for up to 3 months. When you’re ready for one, just let it thaw at room temperature for a little while—or enjoy it cold for a delightful, firm chocolate center!
Can I use a different kind of chocolate?
Of course! While Hershey’s Kisses are the classic choice, feel free to get creative. You can use unwrapped chocolate stars, Rolos for a caramel twist, or even dark chocolate chunks. The method remains the same: press them gently into the warm cookies right after baking.


