
Did you know that 72% of home bakers feel they don’t have enough time to create a truly show-stopping dessert?
I used to be firmly in that camp, my friends. I’d scroll through photos of elaborate, multi-layered confections, my heart filled with a longing that my schedule could never quite satisfy. I believed that a truly decadent, crowd-pleasing dessert required hours of labor, a mountain of dirty bowls, and a level of pastry skill I simply didn’t possess. That is, until this magical, no-bake creation waltzed into my life and changed everything. This Easy Oreo Peanut Butter Butterfinger Dessert is my ultimate rebuttal to that time-crunched belief.
It all started on a frantic Friday. My husband had, quite unexpectedly, invited his entire family over for a casual dinner the following evening. My mind immediately raced to the dessert dilemma. A from-scratch cake felt like too much. Store-bought cookies felt like too little. I needed a hero. I stood in front of the pantry, my eyes scanning the shelves for inspiration, and they landed on three beautiful things: a sleeve of Oreos, a jar of creamy peanut butter, and a few leftover Butterfinger bars from Halloween.
A lightbulb moment, pure and simple. What if I just… layered them? No oven, no fuss, just the glorious combination of chocolate, peanut butter, and that unique, crunchy candy bar goodness. The result was nothing short of legendary. It was the first dessert to ever receive a standing ovation from my toughest critics (my nieces and nephews) and a recipe request from my usually-reserved father-in-law.
The beauty of this dessert lies in its beautiful chaos. It’s not meant to be a pristine, perfectly sliced affair. It’s a scoopable, shareable, gloriously messy pile of joy. The Oreo crust provides a deep, chocolatey foundation that gives way to a cloud of sweetened peanut butter fluff. Then comes the rich pudding layer, and the entire masterpiece is crowned with a generous blanket of whipped cream and a reckless shower of Butterfinger bits. Every single spoonful is a textural adventure, a perfect bite of creamy, crunchy, sweet, and salty that will have everyone begging for the recipe.
So, let’s gather our ingredients and make a dessert that proves impressive doesn’t have to be complicated. You likely have most of these items in your kitchen already!
PrintOreo Peanut Butter Butterfinger Dessert
A decadent no-bake dessert featuring layers of crushed Oreos, creamy peanut butter filling, and crunchy Butterfinger pieces.
Ingredients
For the Crust:
- 1 package (14.3 oz) Oreo cookies, crushed
- 1/2 cup unsalted butter, melted
- 1 package (8 oz) cream cheese, softened
- 1 cup creamy peanut butter
- 1 cup powdered sugar
- 1 container (16 oz) frozen whipped topping, thawed
- 4 Butterfinger candy bars, crushed
- Chocolate syrup for drizzling (optional)
Instructions
1. Prepare the Crust:
- Combine crushed Oreos and melted butter. Press into bottom of 9×13 inch pan to form crust.
- In a large bowl, beat cream cheese, peanut butter, and powdered sugar until smooth. Fold in half of the whipped topping.
- Spread peanut butter mixture evenly over Oreo crust.
- Sprinkle crushed Butterfinger pieces over peanut butter layer.
- Top with remaining whipped topping. Refrigerate for at least 4 hours or overnight.
- Drizzle with chocolate syrup before serving if desired.
Notes
You can customize the seasonings to taste.
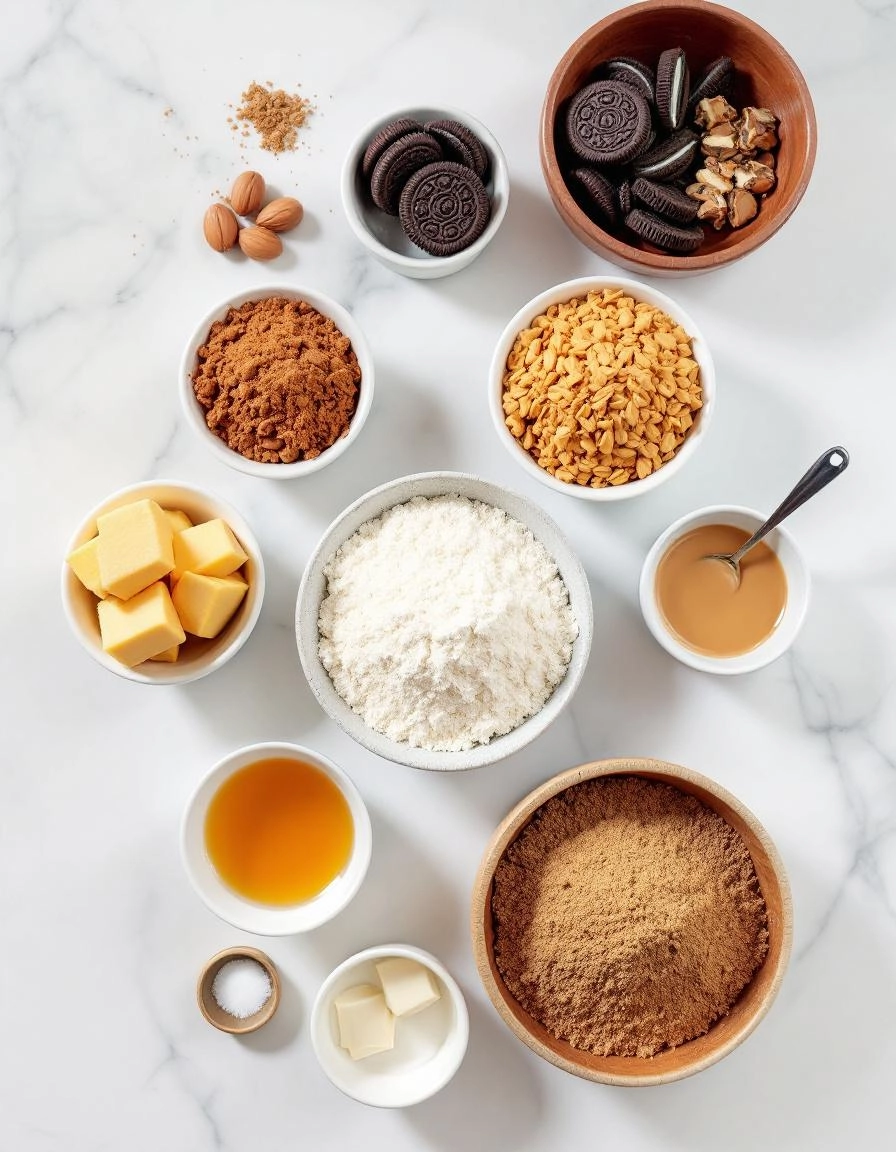
Let’s Gather Our Sweet Supplies
Before we begin, let’s get everything laid out on the counter. There’s something so comforting about seeing all the ingredients ready to go, don’t you think? This is one of those wonderfully simple recipes where you might already have most of these treasures in your pantry.
- 1 package (15.35 oz) of Oreo cookies: The classic, midnight-black kind. They’re the foundation of our dessert and that chocolatey crunch is simply non-negotiable.
- 6 tablespoons of unsalted butter, melted: This is what will bind our crust together into a firm, decadent base. Using unsalted lets us control the sweetness.
- 1 package (8 oz) of cream cheese, softened: Leave this on the counter for a good hour before you start. Trust me, wrestling with a cold brick of cream cheese is a battle you don’t want to fight.
- 1 cup of creamy peanut butter: I use the standard, no-stir kind for a smooth, even layer. If you’re feeling adventurous, a crunchy peanut butter would add a lovely texture!
- 1 cup of powdered sugar: Also called confectioner’s sugar. It dissolves beautifully into our filling, giving it structure without any graininess.
- 1 tub (16 oz) of frozen whipped topping, thawed: That’s Cool Whip, my dear. We’ll use about three-quarters of it in our peanut butter layer and save the rest for the top. Make sure it’s fully thawed in the fridge for the fluffiest results.
- 4-5 full-size Butterfinger candy bars (or 1.5 cups of chopped bits): This is the star of the show! That crispy, peanut-buttery, impossible-to-eat-neatly crunch is what makes this dessert so magical.
- Chocolate syrup, for drizzling (optional but highly recommended): Because a little extra chocolate never hurt anybody.
Creating Our No-Bake Masterpiece
Alright, apron on! Let’s create some layers of joy. This comes together so quickly, you’ll be pinching yourself.
Step 1: The Crust of Dreams
First, we need to transform those Oreos. Place the whole cookies—filling and all!—into a food processor and pulse until you have fine, dark crumbs. If you don’t have a processor, no worries. Place the cookies in a large zip-top bag, seal it tightly, and let out the day’s frustrations with a rolling pin. Once you have crumbs, pour them into a bowl and stir in the melted butter until every last crumb is moistened and looks like dark, damp sand.
Step 2: Press and Set
Transfer your buttery Oreo mixture into a 9×13 inch baking dish. Using the flat bottom of a measuring cup or a glass, press the crumbs firmly and evenly into the bottom of the pan. You want a nice, solid base for all the goodness we’re about to pile on top. Pop this into the refrigerator for at least 15 minutes to let it set while we make the next layer. This little chill time is the secret to a perfect slice later.
Step 3: The Cloud-Like Filling
In a large mixing bowl, beat the softened cream cheese and peanut butter together with an electric mixer until it’s completely smooth and creamy. No lumps allowed! Now, gradually beat in the powdered sugar until it’s fully incorporated. Here’s my tip: scrape down the sides of the bowl with a spatula halfway through to make sure everything is getting mixed in evenly.
Step 4: Fold in the Fluff
Now for the fun part. Gently fold in about 3/4 of the tub of thawed whipped topping. I like to do this by hand with a spatula to keep all that lovely airiness. We’re not beating it; we’re folding it with care, as if we’re tucking in a cloud. Keep going until the mixture is a uniform, pale tan color and no white streaks remain.
Making This Dessert Uniquely Yours
One of the best things about this no-bake wonder is how wonderfully adaptable it is. Don’t be afraid to play around and make it your own!
Pro Tips & Variations
- Crunch Factor: For an extra textural surprise, try using chunky peanut butter instead of smooth. Those little peanut bits add a fantastic homemade feel.
- Chocolate Swap: Not a fan of milk chocolate? Feel free to use dark chocolate or even white chocolate chips for the pudding layer. Semi-sweet would be divine, too!
- Candy Bar Twist: While Butterfinger is the classic, this dessert is a fantastic way to use up other candy bars. Crushed Heath bars, Snickers, or even Reese’s Pieces would be absolutely delicious.
- Lighter Option: You can easily use reduced-fat cream cheese and whipped topping (like Cool Whip Lite) with fantastic results. The flavor will still be incredibly rich and satisfying.
- For the Grown-Ups: A tablespoon of Bailey’s Irish Cream or Kahlúa mixed into the cream cheese layer adds a lovely, sophisticated depth of flavor for adult gatherings.
What to Serve It With
This dessert is a star all on its own, but a little something on the side never hurts. I love serving it with a piping hot cup of coffee—the bitterness of the coffee cuts through the sweetness of the layers perfectly. For a real treat, a scoop of vanilla bean ice cream on the side turns it into the ultimate indulgence. In the summer, fresh raspberries or strawberries add a lovely pop of color and a touch of tartness that balances everything out beautifully.
The Benefits of a No-Bake Dream
Beyond being insanely delicious, this dessert is a true friend to the busy home cook. There’s no need to turn on the oven, which is a lifesaver during hot summer months. It can be made a day or two in advance, allowing the flavors to meld and intensify in the fridge, making your party day completely stress-free. It’s also a fantastic recipe to get the kids involved in—they’ll love crushing the Oreos and sneaking a few Butterfinger pieces!
Real-Life Tips from My Kitchen
After making this more times than I can count, I’ve picked up a few tricks. Let your cream cheese and Cool Whip sit out for about 15-20 minutes before mixing—this prevents lumps and makes for a much smoother, fluffier layer. When you’re pressing the Oreo crust into the pan, use the flat bottom of a measuring cup to really pack it down firmly; this gives you a solid base that won’t crumble when you slice it. And finally, don’t skimp on the chilling time! I know it’s hard to wait, but letting it set for a full four hours, or even overnight, is the secret to getting those picture-perfect clean slices.
I hope you and your loved ones enjoy this dessert as much as my family does. It’s more than just a recipe; it’s a little piece of comfort and joy, perfect for sharing.

Conclusion
And there you have it! This Easy Oreo Peanut Butter Butterfinger Dessert is truly a no-bake dream. With its irresistible layers of crunchy chocolate crust, creamy peanut butter filling, and that final flourish of rich chocolate and crunchy candy, it’s a dessert that delivers maximum flavor with minimal effort. It’s the perfect make-ahead treat for potlucks, family gatherings, or just when a serious chocolate-peanut butter craving strikes.
I’d love to hear how your creation turns out! Did you add your own twist? Share your photos and feedback in the comments below—it makes my day to see your kitchen triumphs. And if you’re looking for more easy, crowd-pleasing desserts, be sure to check out our recipes for No-Bake Cheesecake Bars and Chocolate Peanut Butter Pie next!
FAQs
Can I make this dessert ahead of time?
Absolutely! In fact, it’s even better when made ahead. The extra chilling time allows the layers to set firmly and the flavors to meld together beautifully. You can make it up to 24 hours in advance. Just keep it covered tightly in the refrigerator until you’re ready to serve.
What can I use instead of Cool Whip?
If you prefer not to use Cool Whip, you can substitute with an equal amount of freshly whipped heavy cream. Just make sure to whip it to stiff peaks so it holds its structure in the layers. You could also use a stabilized whipped cream for a firmer set.
My cream cheese mixture is lumpy. How can I fix it?
Lumps usually happen if the cream cheese is too cold. To avoid this, always make sure your cream cheese is fully softened to room temperature before mixing. If you do end up with a few lumps, you can try beating the mixture a little longer on medium speed, or even pressing it through a fine-mesh sieve to ensure it’s perfectly smooth.
Can I use a different type of candy bar?
Of course! While Butterfinger provides that unique crunchy, flaky texture, this recipe is wonderfully adaptable. Chopped Reese’s Peanut Butter Cups, Snickers, or even heath bars would be delicious alternatives. Feel free to get creative with your favorite candy!
How should I store leftovers?
Store any leftovers covered tightly with plastic wrap or in an airtight container in the refrigerator. It will keep well for 3-4 days. The crust may soften slightly over time, but it will still be delicious!


