Introduction
This Oreo Brownie cake recipe combines two beloved chocolate desserts into one irresistible treat. It’s perfect for satisfying intense chocolate cravings and is surprisingly simple to make. For more decadent chocolate ideas, try the Caramel Pecan Chocolate Cheesecake Recipe or the Homemade Halloween Fudge Recipe.
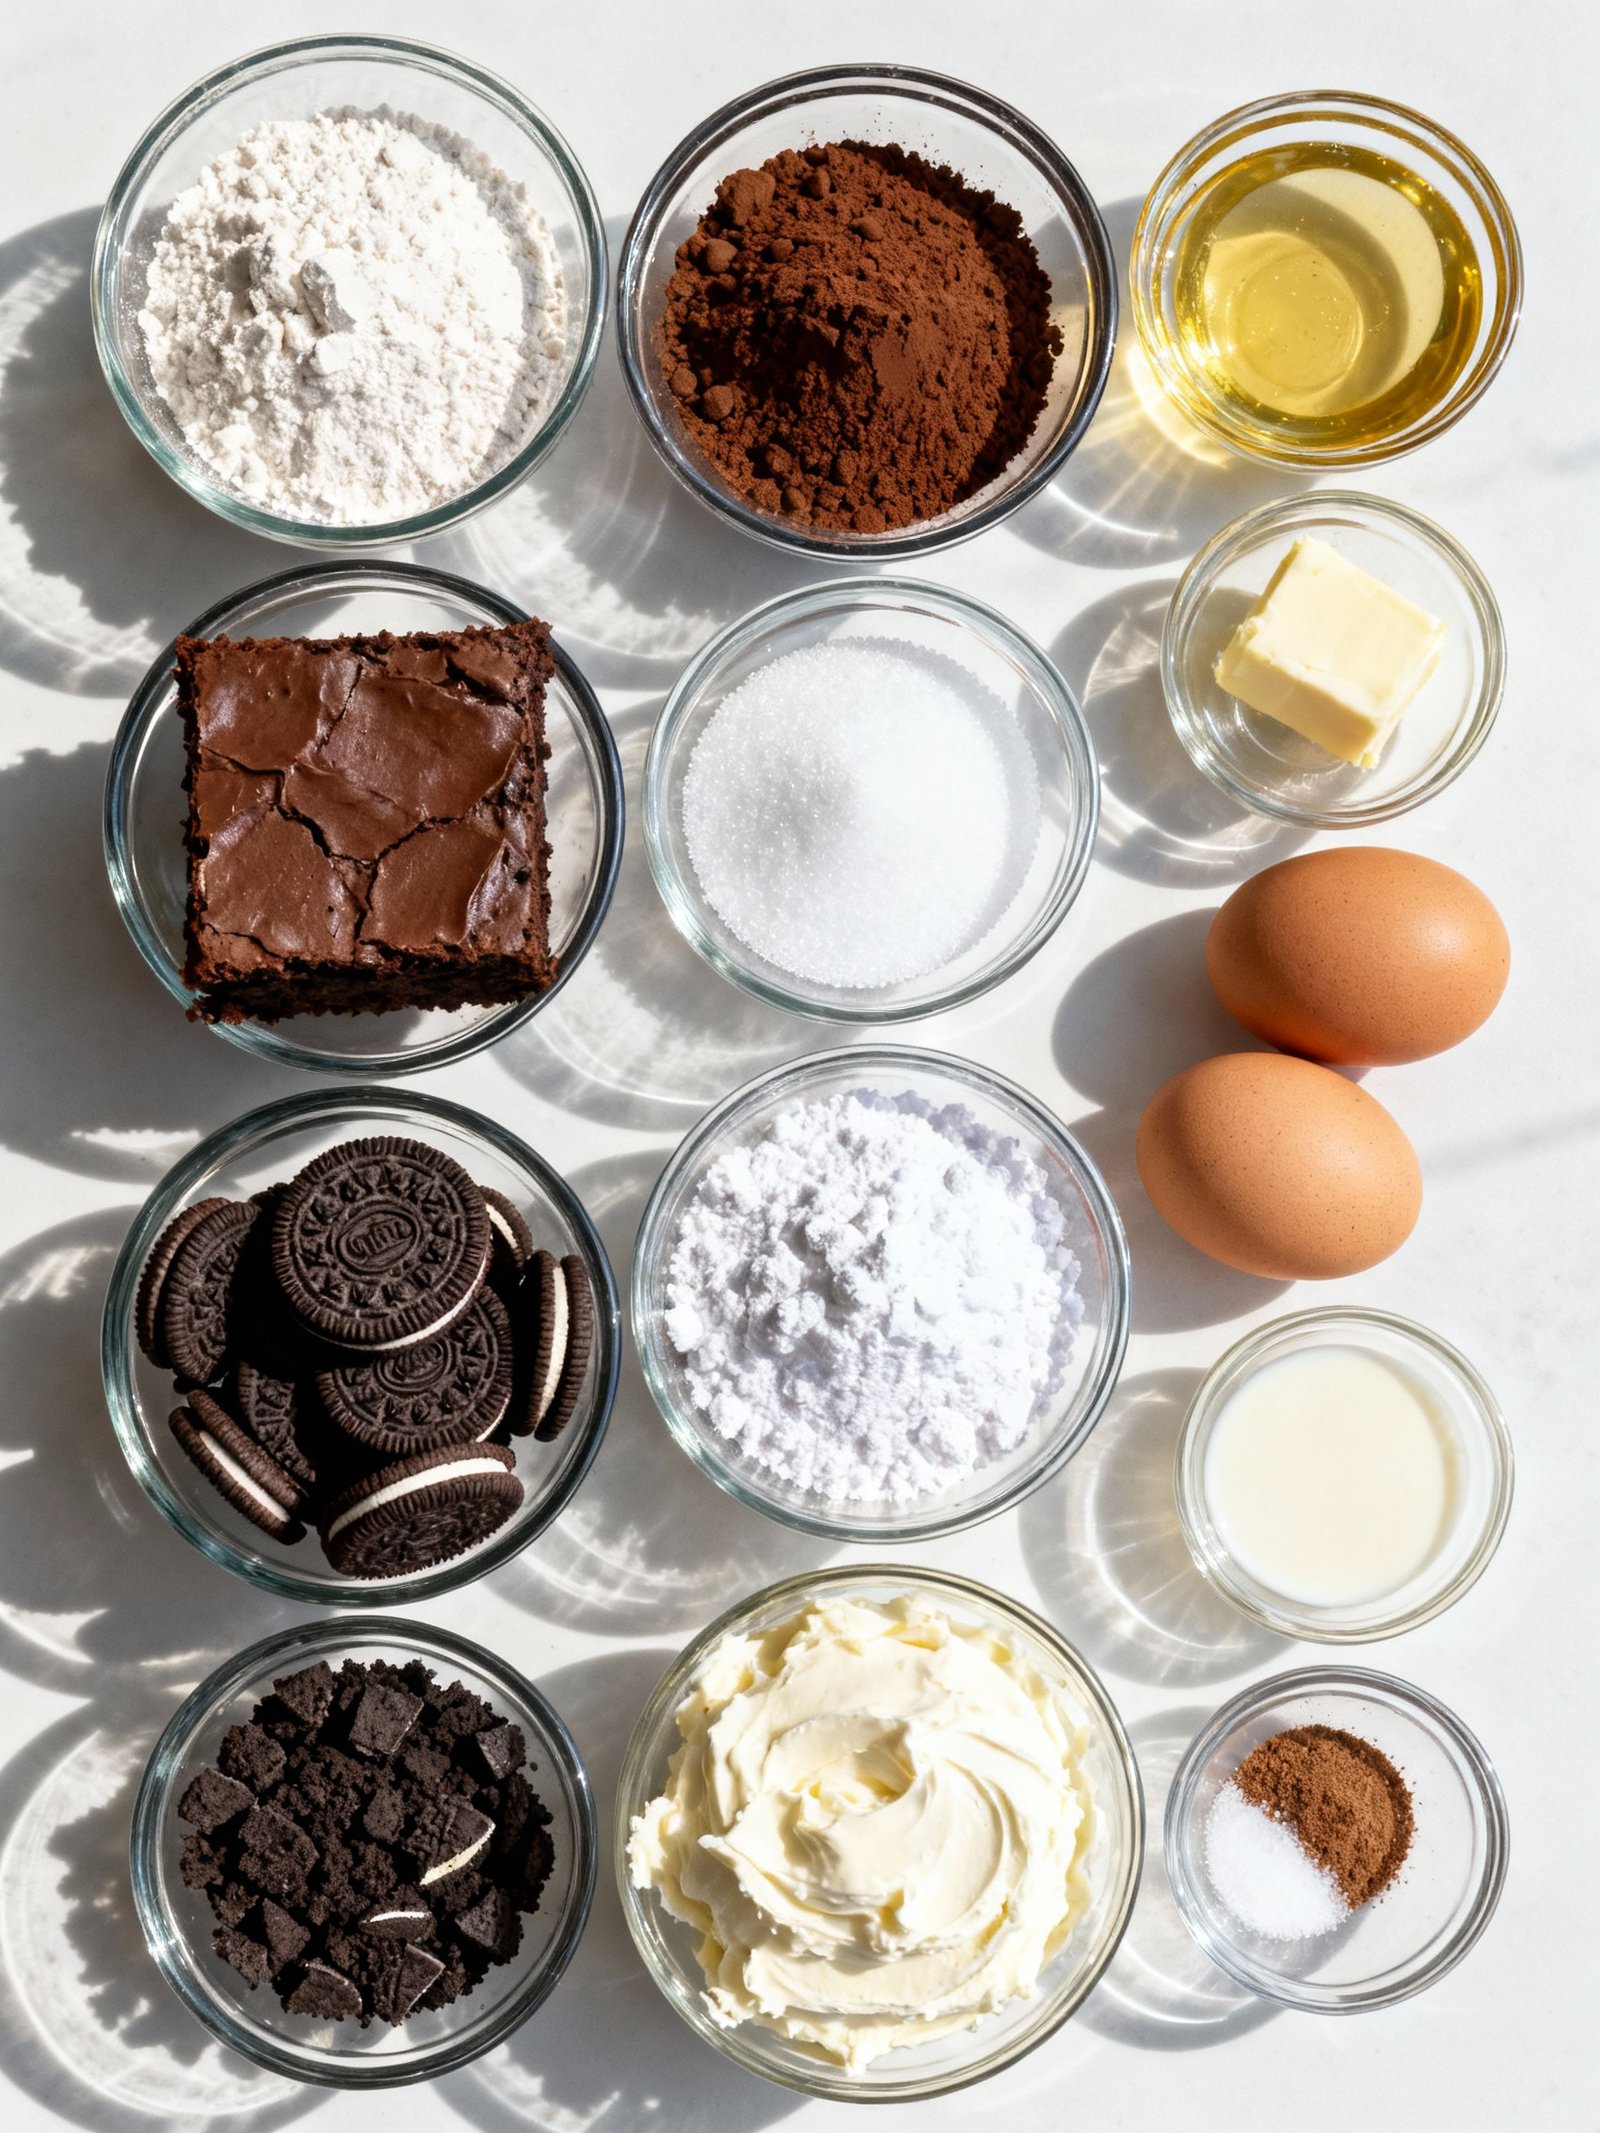
Ingredients
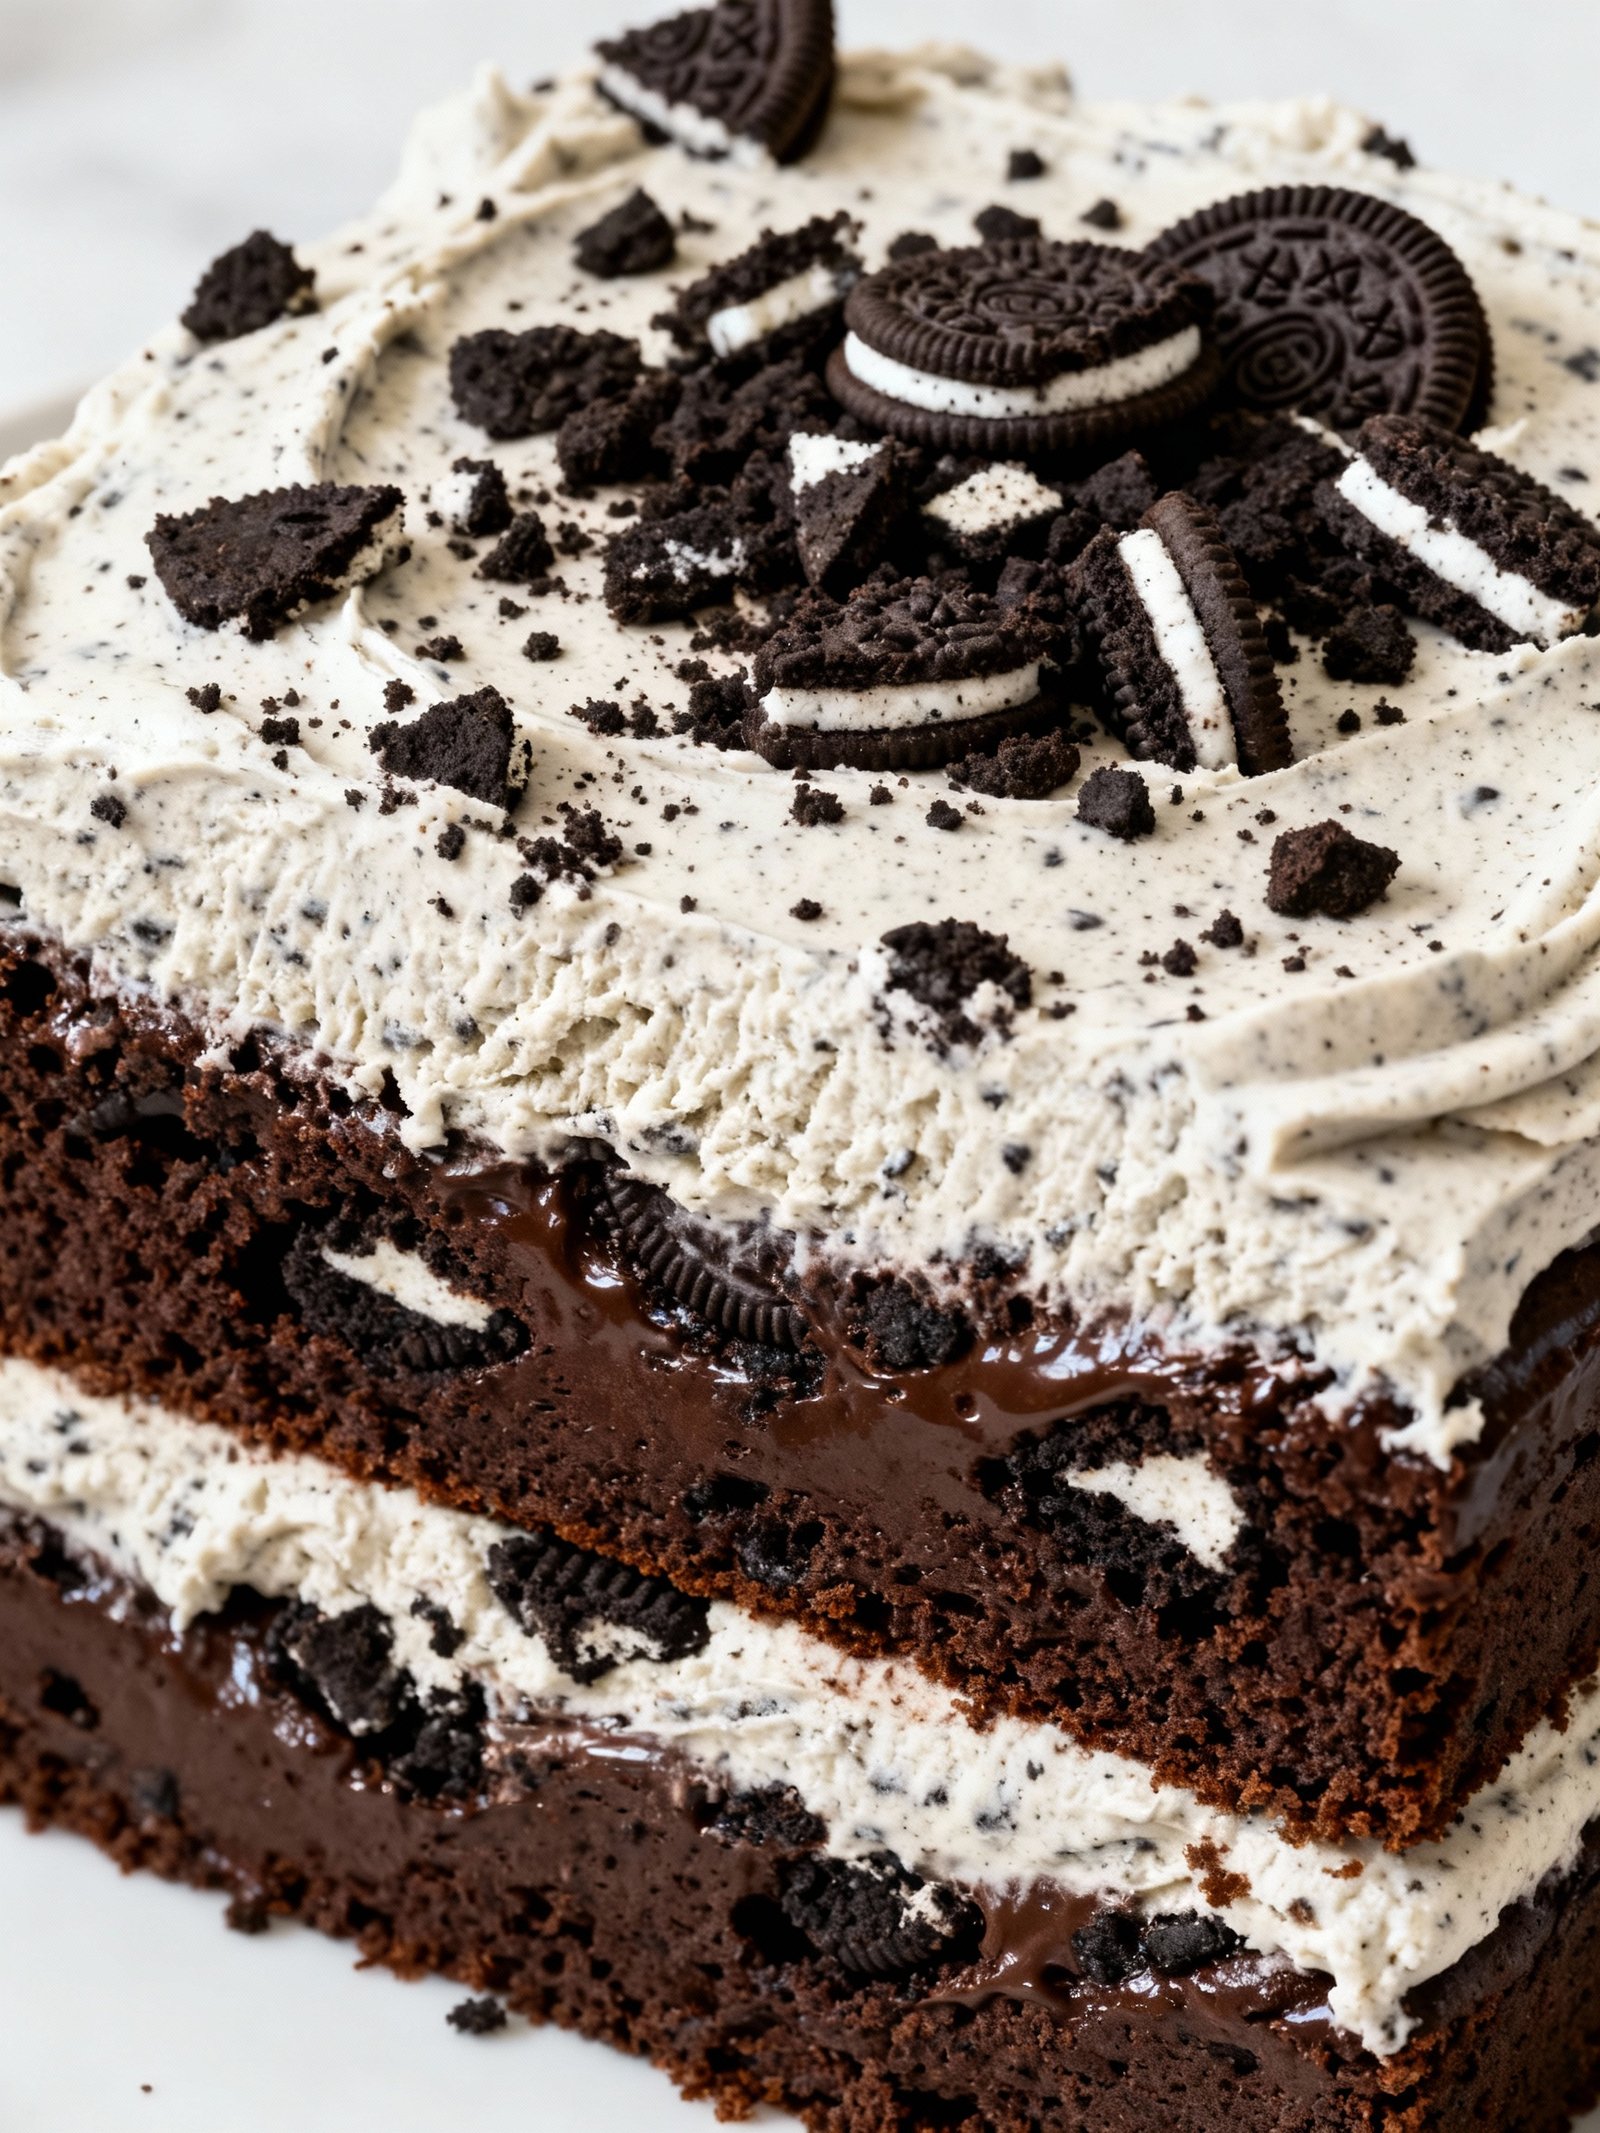
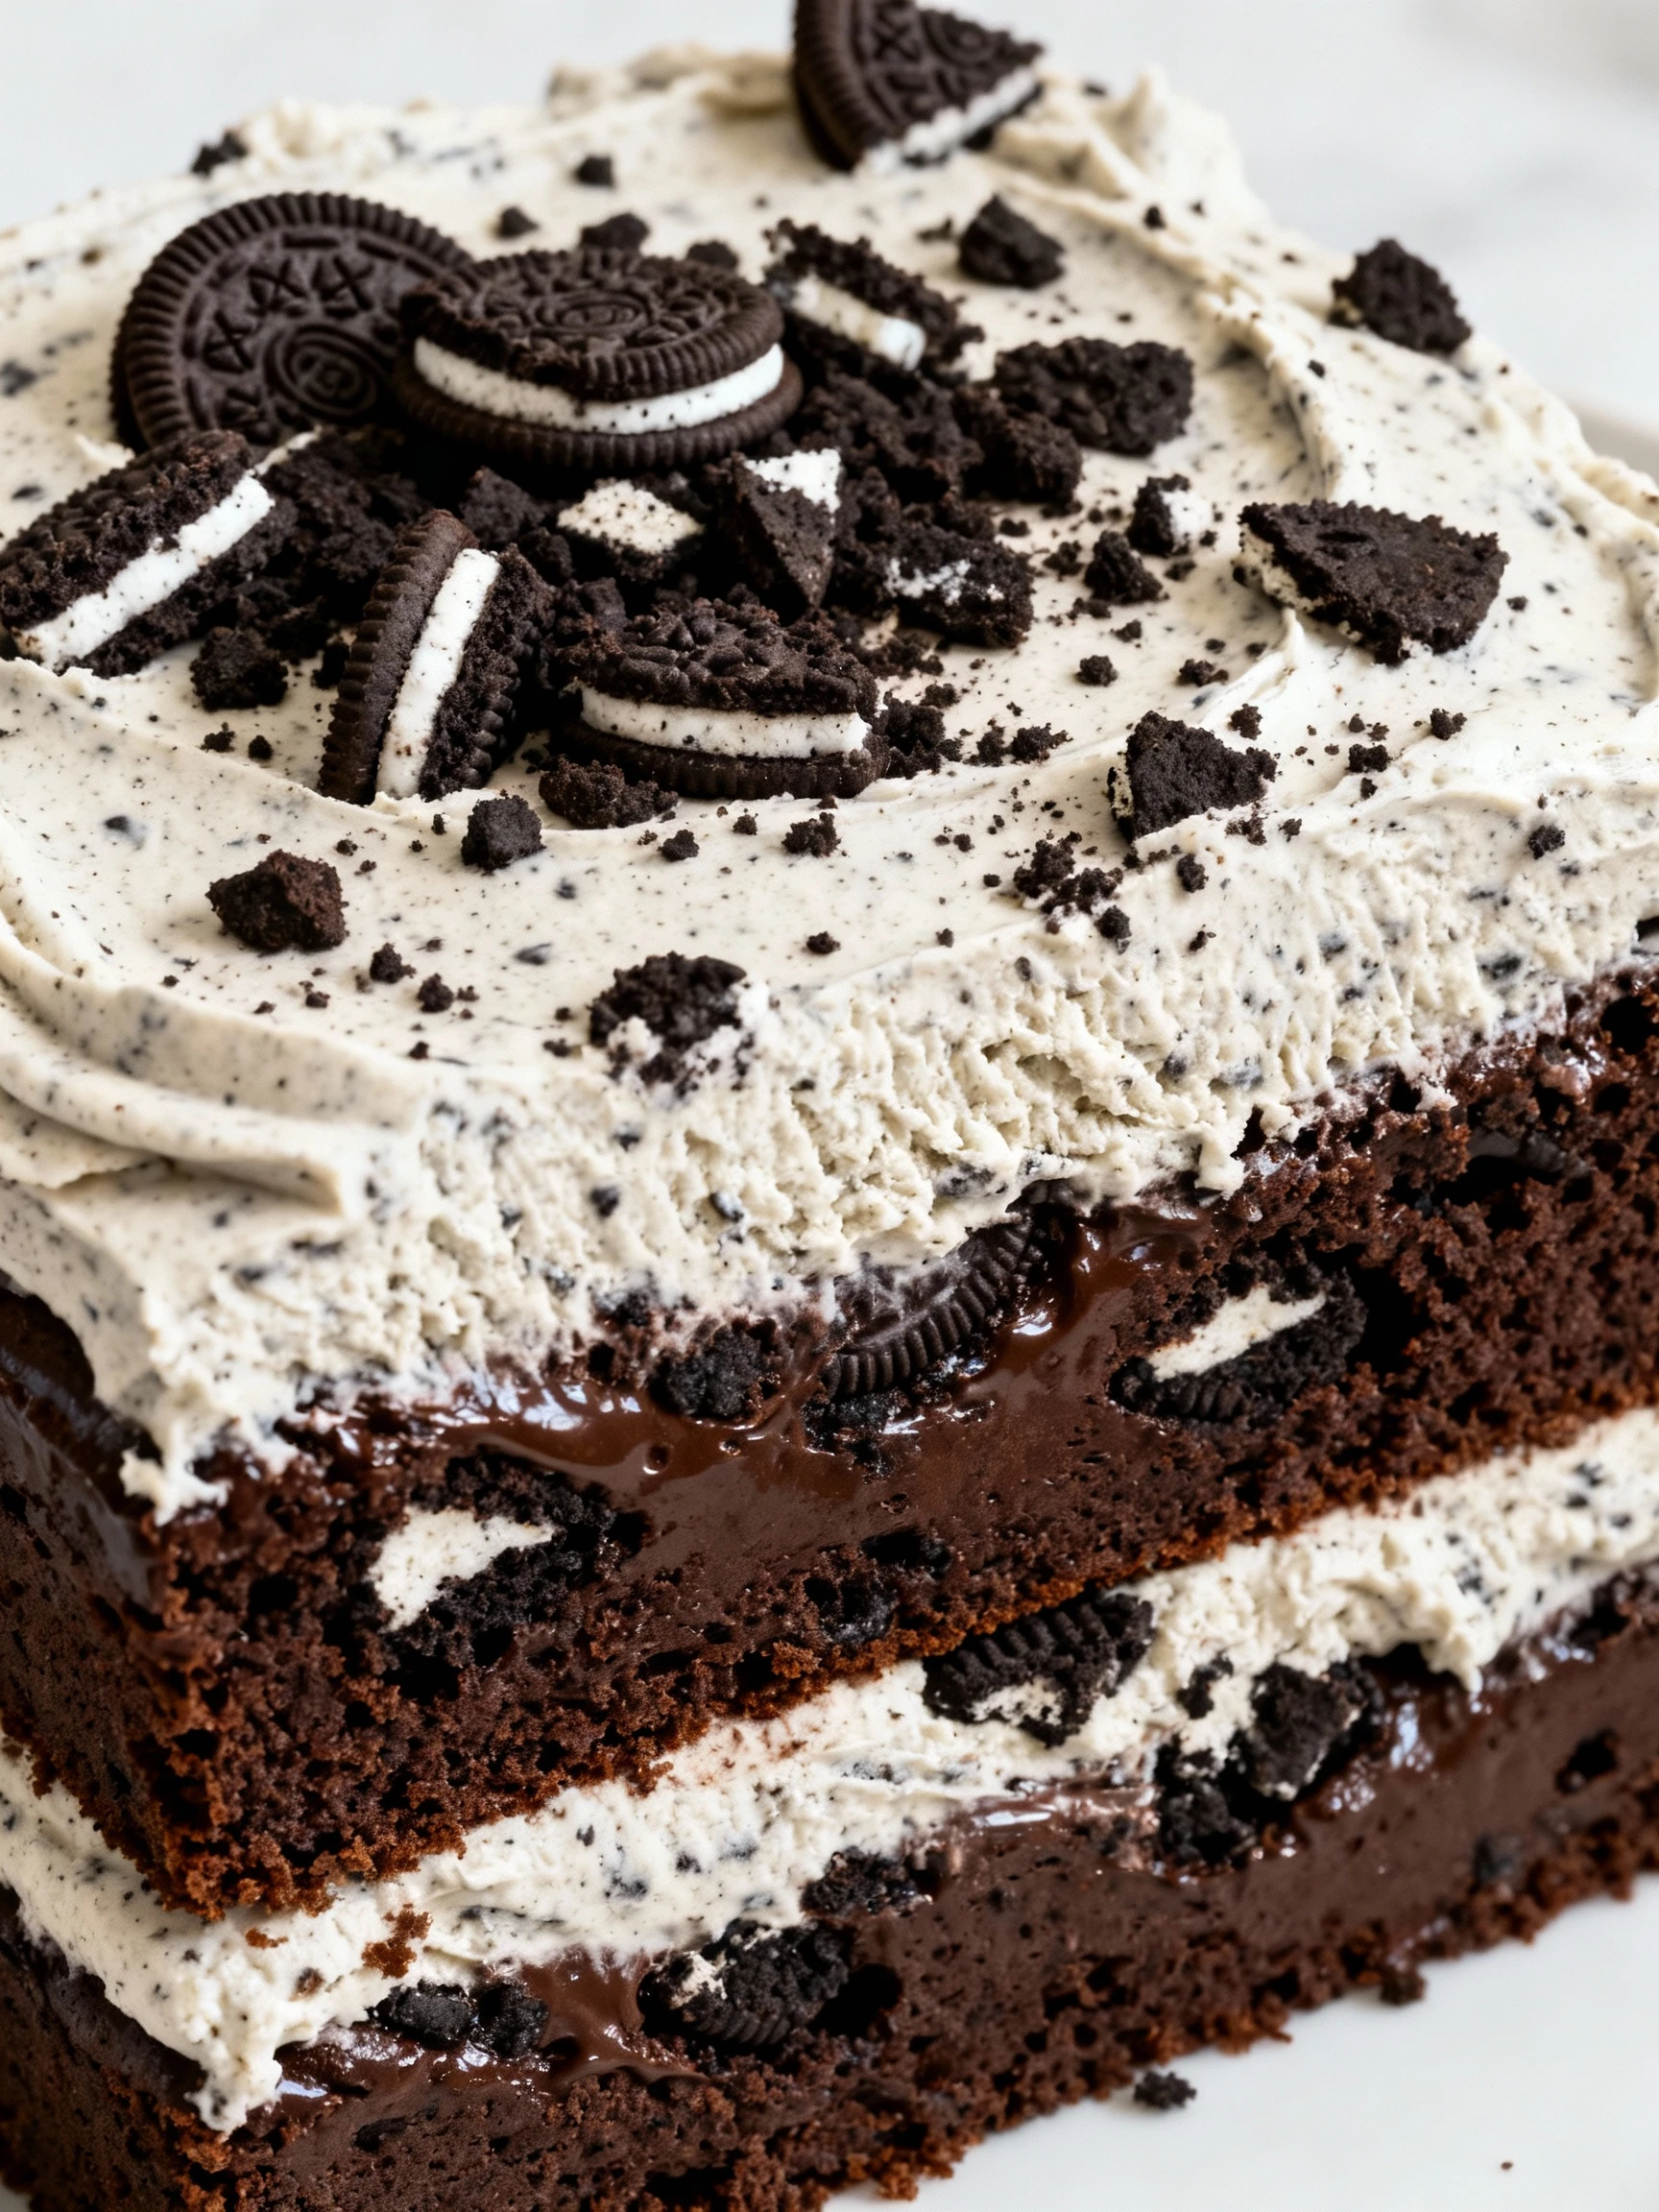
This decadent Oreo Brownie cake recipe delivers the ultimate chocolate experience with fudgy brownie layers, creamy Oreo filling, and a rich chocolate ganache that will satisfy any sweet tooth.
- 1 box brownie mix (or homemade brownie batter)
- 24 Oreo cookies
- 8 oz cream cheese, softened
- 1/4 cup granulated sugar
- 1 tsp vanilla extract
- 1 cup heavy cream
- 1 cup semi-sweet chocolate chips
Timing
| Prep Time | 15 minutes |
| Cook Time | 25 minutes |
| Total Time | 40 minutes |
Context: This Oreo Brownie cake recipe is approximately 20% faster than similar recipes.
Step-by-Step Instructions
Step 1 — Prepare Your Ingredients
Gather all ingredients for your Oreo Brownie cake recipe: brownie mix, eggs, oil, water, and Oreo cookies. Ensure your butter is at room temperature for easier mixing if making a homemade brownie batter.
Preheat your oven to 350°F (175°C) to ensure it’s ready when your batter is prepared.
Step 2 — Mix the Brownie Batter
Combine the brownie mix with eggs, oil, and water in a large bowl. Stir until just combined; avoid overmixing to keep the texture fudgy.
For an extra chocolatey Oreo Brownie cake, add a tablespoon of cocoa powder to the batter.
Step 3 — Prepare the Oreo Cookies
Coarsely chop about 15 Oreo cookies. Reserve a few whole cookies for topping if desired.
Gently fold the chopped Oreos into the brownie batter, distributing them evenly without breaking them too much.
Step 4 — Prepare the Baking Pan
Line an 8×8 inch baking pan with parchment paper, leaving an overhang on two sides for easy removal.
Lightly grease the parchment to prevent sticking and ensure clean slices later.
Step 5 — Pour and Top the Batter
Pour the Oreo brownie batter into the prepared pan, spreading it evenly with a spatula.
Press the reserved whole or halved Oreo cookies on top for a decorative finish before baking.
Step 6 — Bake to Perfection
Bake at 350°F for 25–30 minutes, or until a toothpick inserted into the center comes out with a few moist crumbs.
Avoid overbaking; the center should be set but still fudgy. The edges will pull away slightly from the pan when done.
Step 7 — Cool Completely
Let the Oreo Brownie cake cool in the pan on a wire rack for at least 1 hour. This helps it set for cleaner cutting.
For best results, chill in the refrigerator for 30 minutes before slicing if you prefer firmer, neater squares.
Step 8 — Slice and Serve
Use the parchment paper overhang to lift the cake out of the pan. Cut into squares with a sharp knife.
Wipe the knife between cuts for clean edges. Serve your Oreo Brownie cake slightly warm or at room temperature.
Nutritional Information
| Calories | 420 |
| Protein | 5g |
| Carbohydrates | 58g |
| Fat | 20g |
| Fiber | 2g |
| Sodium | 280mg |
Note: Estimates based on typical ingredients and serving size.
Healthier Alternatives
- Protein powder — Replace ¼ cup flour with vanilla or chocolate protein powder for a protein boost without losing the rich chocolate flavor.
- Almond flour — Use almond flour instead of all-purpose flour for a gluten-free, lower-carb alternative with a nutty taste.
- Coconut sugar — Substitute granulated sugar with coconut sugar for a lower glycemic index and subtle caramel notes.
- Applesauce — Swap half the oil or butter with unsweetened applesauce to reduce fat while keeping the brownie cake moist.
- Dairy-free chocolate — Use dairy-free chocolate chips and a plant-based butter alternative to make this Oreo Brownie cake recipe dairy-free.
- Reduced-sodium baking soda — If your recipe calls for baking soda, use a reduced-sodium version to lower the overall sodium content.
- Greek yogurt — Replace sour cream or some fat with plain Greek yogurt for added protein and a tangy twist.
- Stevia blend — Use a stevia-based sweetener in place of some sugar to cut calories while maintaining sweetness.
Serving Suggestions
- Pair warm slices with a scoop of vanilla ice cream for a classic hot-and-cold dessert experience.
- Serve alongside a glass of cold milk or a rich hot chocolate to enhance the chocolate Oreo flavor.
- Perfect for birthday parties, potlucks, or as a special weekend treat for the family.
- Dust with powdered sugar or drizzle with chocolate sauce for an elegant plating touch.
- Garnish with extra crushed Oreo pieces on top to highlight the Oreo brownie cake recipe.
- Cut into small squares for bite-sized party favors or a kids’ snack option.
This Oreo brownie cake recipe is incredibly versatile—enjoy it fresh from the oven or chilled for a firmer, fudgier texture.
Common Mistakes to Avoid
- Mistake: Overmixing the brownie batter. Fix: Mix just until ingredients are combined to avoid a tough, cake-like texture.
- Mistake: Using cold ingredients straight from the fridge. Fix: Bring eggs and butter to room temperature for a smoother, more homogenous batter.
- Mistake: Incorrectly measuring flour by scooping from the bag. Fix: Spoon flour into the measuring cup and level it off for accuracy.
- Mistake: Baking in a pan that’s too small. Fix: Use the specified pan size to prevent overflow and ensure even cooking.
- Mistake: Overbaking for a dry cake. Fix: Start checking a few minutes early; the toothpick should have a few moist crumbs.
- Mistake: Adding Oreos too early so they sink. Fix: Gently press whole Oreos into the top of the batter just before baking.
- Mistake: Cutting the brownie cake while it’s hot. Fix: Let it cool completely in the pan for clean, neat slices.
- Mistake: Not greasing the baking pan properly. Fix: Grease and line the pan with parchment paper for easy removal.
- Mistake: Using low-quality cocoa powder. Fix: Opt for a high-quality, unsweetened cocoa for a rich, deep chocolate flavor.
- Mistake: Skipping the preheating step for the oven. Fix: Always preheat your oven to ensure the cake bakes evenly from the start.
Storing Tips
- Fridge: Store in an airtight container for up to 5 days.
- Freezer: Wrap slices tightly in plastic wrap and freeze in a freezer-safe bag for up to 3 months.
- Reheat: Warm individual slices in the microwave for 15-20 seconds or in a preheated 300°F (150°C) oven until heated through to an internal temperature of 165°F (74°C).
Always allow the cake to cool completely before storing to prevent condensation and maintain the best texture for your Oreo Brownie cake.
Conclusion
This Oreo Brownie cake recipe delivers the ultimate chocolate experience with minimal effort. For more decadent desserts featuring Oreo crusts, try this This dreamy Peanut Butter Cheesecake recipe features a decadently creamy peanut butter filling crunchy OREO crust and luscious chocolate ganache topping every bit as indulgent as it sounds. Give this recipe a try and share your results in the comments!
PrintBrownie Oreo Cake
A decadent 5-layer cake made with alternating layers of tender Oreo cake and brownies, frosted with homemade Oreo buttercream.
- Prep Time: 20 minutes
- Cook Time: 30 minutes
- Total Time: 1 hour
- Yield: 12 1x
- Method: Dessert
- Cuisine: American
Ingredients
- 1 cup all-purpose flour
- 1 cup cocoa powder
- 1 tsp baking powder
- 1/2 tsp salt
- 1 cup unsalted butter, melted
- 2 cups granulated sugar
- 4 large eggs
- 1 tsp vanilla extract
- 15 Oreo cookies, crushed
- For Oreo buttercream:
- 1 cup unsalted butter, softened
- 3 cups powdered sugar
- 10 Oreo cookies, finely crushed
- 2 tbsp heavy cream
- 1 tsp vanilla extract
Instructions
- Preheat the oven to 350°F (175°C). Grease and flour two 9-inch round cake pans.
- In a bowl, sift together flour, cocoa powder, baking powder, and salt.
- In another large bowl, mix melted butter and sugar until combined.
- Add eggs one at a time, mixing well after each addition, then stir in vanilla.
- Gradually add dry ingredients to wet ingredients and mix until smooth.
- Fold in crushed Oreo cookies gently.
- Divide batter evenly between the prepared pans and bake for 25-30 minutes or until a toothpick comes out clean.
- Allow cakes to cool completely.
- Prepare the Oreo buttercream by beating softened butter until creamy.
- Gradually add powdered sugar, crushed Oreos, heavy cream, and vanilla extract and beat until fluffy.
- Layer the cakes with Oreo buttercream between each layer and frost the outside.
- Decorate with extra Oreo crumbs or whole Oreos if desired.
Notes
Ensure the cakes are completely cooled before frosting to avoid melting the buttercream. For richer flavor, use high-quality cocoa powder. The buttercream can be adjusted for consistency by varying cream amount.
Nutrition
- Calories: 450
- Sugar: 40
- Sodium: 200
- Fat: 25
- Saturated Fat: 15
- Unsaturated Fat: 10
- Trans Fat: 0
- Carbohydrates: 55
- Fiber: 3
- Protein: 5
- Cholesterol: 85
FAQs
Can I use a different type of Oreo for this Oreo Brownie cake recipe?
Yes, you can use different Oreo flavors like Double Stuf or Mint. This may slightly alter the taste, but it works well with the chocolate base.
How do I know when the Oreo Brownie cake is done baking?
Insert a toothpick into the center; it should come out with a few moist crumbs. Overbaking can make the cake dry, so watch the time closely.
Can I make this Oreo Brownie cake recipe ahead of time?
Yes, you can bake it a day in advance. Store it in an airtight container at room temperature to keep it fresh and fudgy.


