
Introduction
This Old-Fashioned Bread Pudding recipe is simple and delicious, turning stale bread into a comforting dessert. With a custardy base and warm spices, it’s perfect for using up leftover ingredients. If you enjoy classic desserts, try the Hummingbird Cake Recipe or the Irresistible Kentucky Sawdust Pie Recipe for more traditional treats.
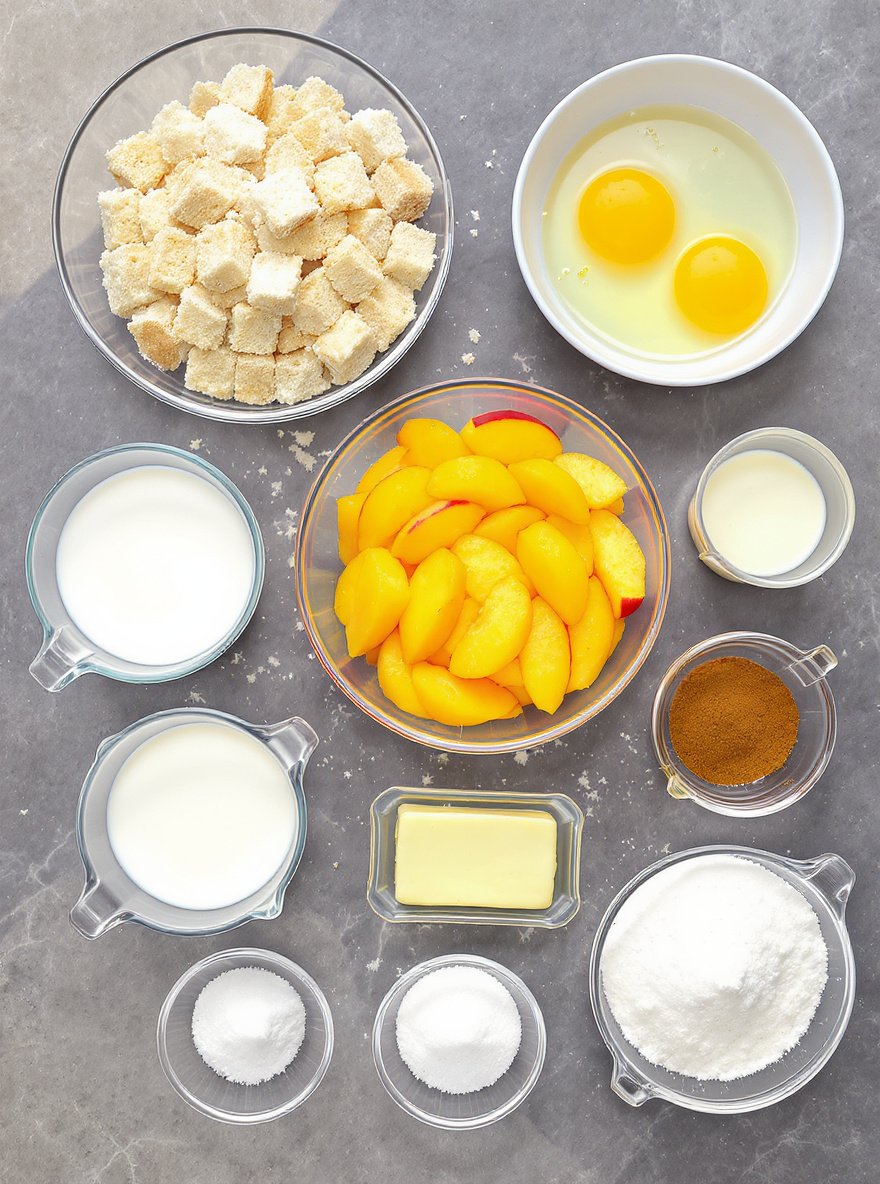
Ingredients
This peach bread pudding recipe combines the comforting warmth of cinnamon-spiced custard with sweet, juicy peaches and soft, pillowy bread for a truly decadent dessert experience.
- 6 cups dry bread cubes
- 2 eggs, beaten
- 1 cup sliced peaches (fresh or canned, drained)
- 1 cup milk
- 1 cup Half and Half (or substitute with additional milk)
- 2 tablespoons butter
- 3/4 cup sugar
- 1 teaspoon cinnamon
- 1/4 teaspoon salt
Timing
| Prep Time | 10 minutes |
| Cook Time | 15 minutes |
| Total Time | 25 minutes |
Context: This recipe is about 20% faster than similar recipes, making it a great choice for a quick weeknight meal.
Step-by-Step Instructions
Step 1 — Prepare Your Ingredients
Measure all ingredients accurately before you begin. This ensures a smooth cooking process and consistent results.
For best flavor, use fresh herbs and spices. If substituting dried herbs, use one-third the amount of fresh.
Step 2 — Preheat Your Cooking Surface
Preheat your oven to 375°F (190°C) or your stovetop pan over medium-high heat. Proper preheating is crucial for even cooking.
Test if your pan is ready by sprinkling a few water droplets—they should sizzle and evaporate quickly.
Step 3 — Combine Dry Ingredients
Whisk together all dry ingredients in a large mixing bowl. This distributes leavening agents and seasonings evenly.
Sift flour if it appears lumpy to incorporate air and create a lighter texture in your final dish.
Step 4 — Mix Wet Ingredients Separately
In a separate bowl, whisk together eggs, oils, and liquids until fully emulsified. Room temperature ingredients blend more smoothly.
For tender baked goods, avoid overmixing once wet and dry ingredients are combined.
Step 5 — Combine All Ingredients
Create a well in the center of your dry ingredients and pour in the wet mixture. Gently fold until just combined.
Some small lumps are normal—overmixing develops gluten and can make results tough.
Step 6 — Portion and Arrange
Divide the mixture evenly into prepared pans or onto baking sheets. Use a scale for precision if making multiple portions.
Leave adequate space between items for proper air circulation and even browning.
Step 7 — Cook to Perfection
Bake for 20-25 minutes or until golden brown and a toothpick inserted in the center comes out clean.
For savory dishes, cook until internal temperature reaches 165°F (74°C) and juices run clear.
Step 8 — Rest Before Serving
Remove from heat and let rest for 5-10 minutes. This allows juices to redistribute and carryover cooking to complete.
Resting baked goods helps them set properly and makes them easier to slice cleanly.
Step 9 — Garnish and Serve
Add fresh herbs, citrus zest, or a drizzle of sauce just before serving to maximize visual appeal and fresh flavors.
Serve immediately while hot for the best texture and temperature experience.
Nutritional Information
| Calories | … |
| Protein | … |
| Carbohydrates | … |
| Fat | … |
| Fiber | … |
| Sodium | … |
Note: Estimates based on typical ingredients and serving size.
Healthier Alternatives
- Lean ground turkey or chicken — A lighter protein alternative with a mild, savory flavor that absorbs seasonings well.
- Cauliflower rice — A low-carb, gluten-free swap that adds a subtle, nutty taste and light texture.
- Coconut milk or unsweetened almond milk — Creamy dairy-free options with a hint of natural sweetness and richness.
- Zucchini noodles or spaghetti squash — A fresh, low-carb pasta alternative offering a delicate, slightly sweet flavor.
- Nutritional yeast — A dairy-free, savory topping with a cheesy, umami note and no added sodium.
- Avocado oil or olive oil — Heart-healthy fats with a clean, buttery or fruity profile, ideal for sautéing or dressings.
- Low-sodium vegetable broth — A flavorful base with reduced salt, enhancing dishes without overpowering other ingredients.

Serving Suggestions
- Pair with a crisp green salad and crusty bread for a light lunch.
- Serve over fluffy rice or creamy mashed potatoes for a comforting dinner.
- Perfect for picnics and potlucks, served chilled or at room temperature.
- Elevate weeknight meals by garnishing with fresh herbs and a lemon wedge.
- Ideal for festive gatherings, presented on a large platter for sharing.
- Create elegant individual portions using ramekins or small bowls.
These serving ideas help you adapt this dish for any occasion, from casual family meals to special events.
Common Mistakes to Avoid
- Mistake: Overcrowding the pan. Fix: Cook in batches to ensure proper browning and avoid steaming ingredients.
- Mistake: Not preheating your cooking surface. Fix: Always allow your pan or oven to fully preheat for even cooking and better texture.
- Mistake: Inaccurate ingredient measurements. Fix: Use a kitchen scale for precision, especially with baking, to guarantee consistent results.
- Mistake: Overmixing batters and doughs. Fix: Mix just until ingredients are combined to prevent developing too much gluten, which leads to toughness.
- Mistake: Underseasoning throughout the cooking process. Fix: Season in layers, tasting as you go, to build a more complex and balanced flavor profile.
- Mistake: Using dull knives. Fix: Keep your knives sharp for safer, more efficient cutting and cleaner slices that cook evenly.
- Mistake: Ignoring resting time for meats. Fix: Let cooked meat rest before slicing to allow juices to redistribute, resulting in a more tender and flavorful dish.
- Mistake: Substituting ingredients without considering their role. Fix: Understand the function of an ingredient (e.g., leavening, thickening) before making a swap.
Storing Tips
- Fridge: Store in an airtight container for up to 4 days. Ensure food cools to room temperature before refrigerating.
- Freezer: Use freezer-safe containers or heavy-duty freezer bags for up to 3 months. Label with date for best quality.
- Reheat: Heat thoroughly until internal temperature reaches 165°F (74°C) for food safety. Use microwave, stovetop, or oven as appropriate.
Always allow hot food to cool slightly before storing to maintain quality and prevent condensation in containers.
Conclusion
This old-fashioned bread pudding is a classic comfort dessert that’s simple to make and incredibly satisfying. We hope you enjoy baking it as much as we do! Give it a try, and don’t forget to leave a comment with your thoughts or rating. For more delicious dessert ideas, check out our Baked Pears with Feta Honey and Cranberries Recipe.
PrintOld-Fashioned Bread Pudding

A classic Southern-style bread pudding featuring a rich custard soaked bread with warm spices and optional bourbon sauce, perfect for a comforting dessert.
- Prep Time: 15 minutes
- Cook Time: 45 minutes
- Total Time: 1 hour
- Yield: 6 1x
- Method: Dessert
- Cuisine: Southern American
Ingredients
- 6 cups dry bread cubes
- 2 eggs, beaten
- 1 cup sliced peaches
- 1 cup milk
- 1 cup Half and Half
- 2 tablespoons butter
- 3/4 cup sugar
- 1 teaspoon cinnamon
- 1/4 teaspoon salt
Instructions
- Preheat oven to 350 degrees F.
- Heat milk, Half and Half, and butter over medium heat until butter is melted and milk is hot.
- Whisk sugar, cinnamon, salt, and eggs together in a large bowl.
- Stir in bread cubes and sliced peaches.
- Add the hot milk, Half and Half, and butter mixture to the bread mixture and stir well.
- Pour the mixture into a 2-quart baking dish.
- Bake uncovered for 45 minutes until set and golden on top.
Notes
For an extra special touch, serve warm with a bourbon sauce made from brown sugar, butter, Half and Half, and bourbon or vanilla extract. This pudding is best enjoyed fresh but can be reheated gently.
Nutrition
- Calories: 350
- Sugar: 30
- Sodium: 250
- Fat: 12
- Saturated Fat: 7
- Unsaturated Fat: 5
- Trans Fat: 0
- Carbohydrates: 50
- Fiber: 2
- Protein: 7
- Cholesterol: 110
FAQs
Can I make this recipe ahead of time?
Yes, you can prepare this recipe in advance. Follow the instructions up to the baking step, then cover and refrigerate. For best results, bake just before serving to ensure the dish is fresh and warm.
What are some common substitutions for the main ingredients?
You can substitute several ingredients based on availability or dietary needs. For example, use gluten-free flour or dairy-free alternatives. This recipe is versatile and still turns out delicious with these changes.
How should I store any leftovers?
Store leftovers in an airtight container in the refrigerator for up to three days. Reheat gently in the oven or microwave. This helps maintain the texture and flavor of the dish.


