
Introduction
This Easy No-Bake Pistachio Pie requires just five ingredients and no oven time, making it the perfect fuss-free dessert. For more pistachio treats, try the Pistachio Swirl Fudge Recipe or the Two-Layer Pistachio Cake with Cream Cheese Frosting Recipe. It’s creamy, refreshing, and always a crowd-pleaser.
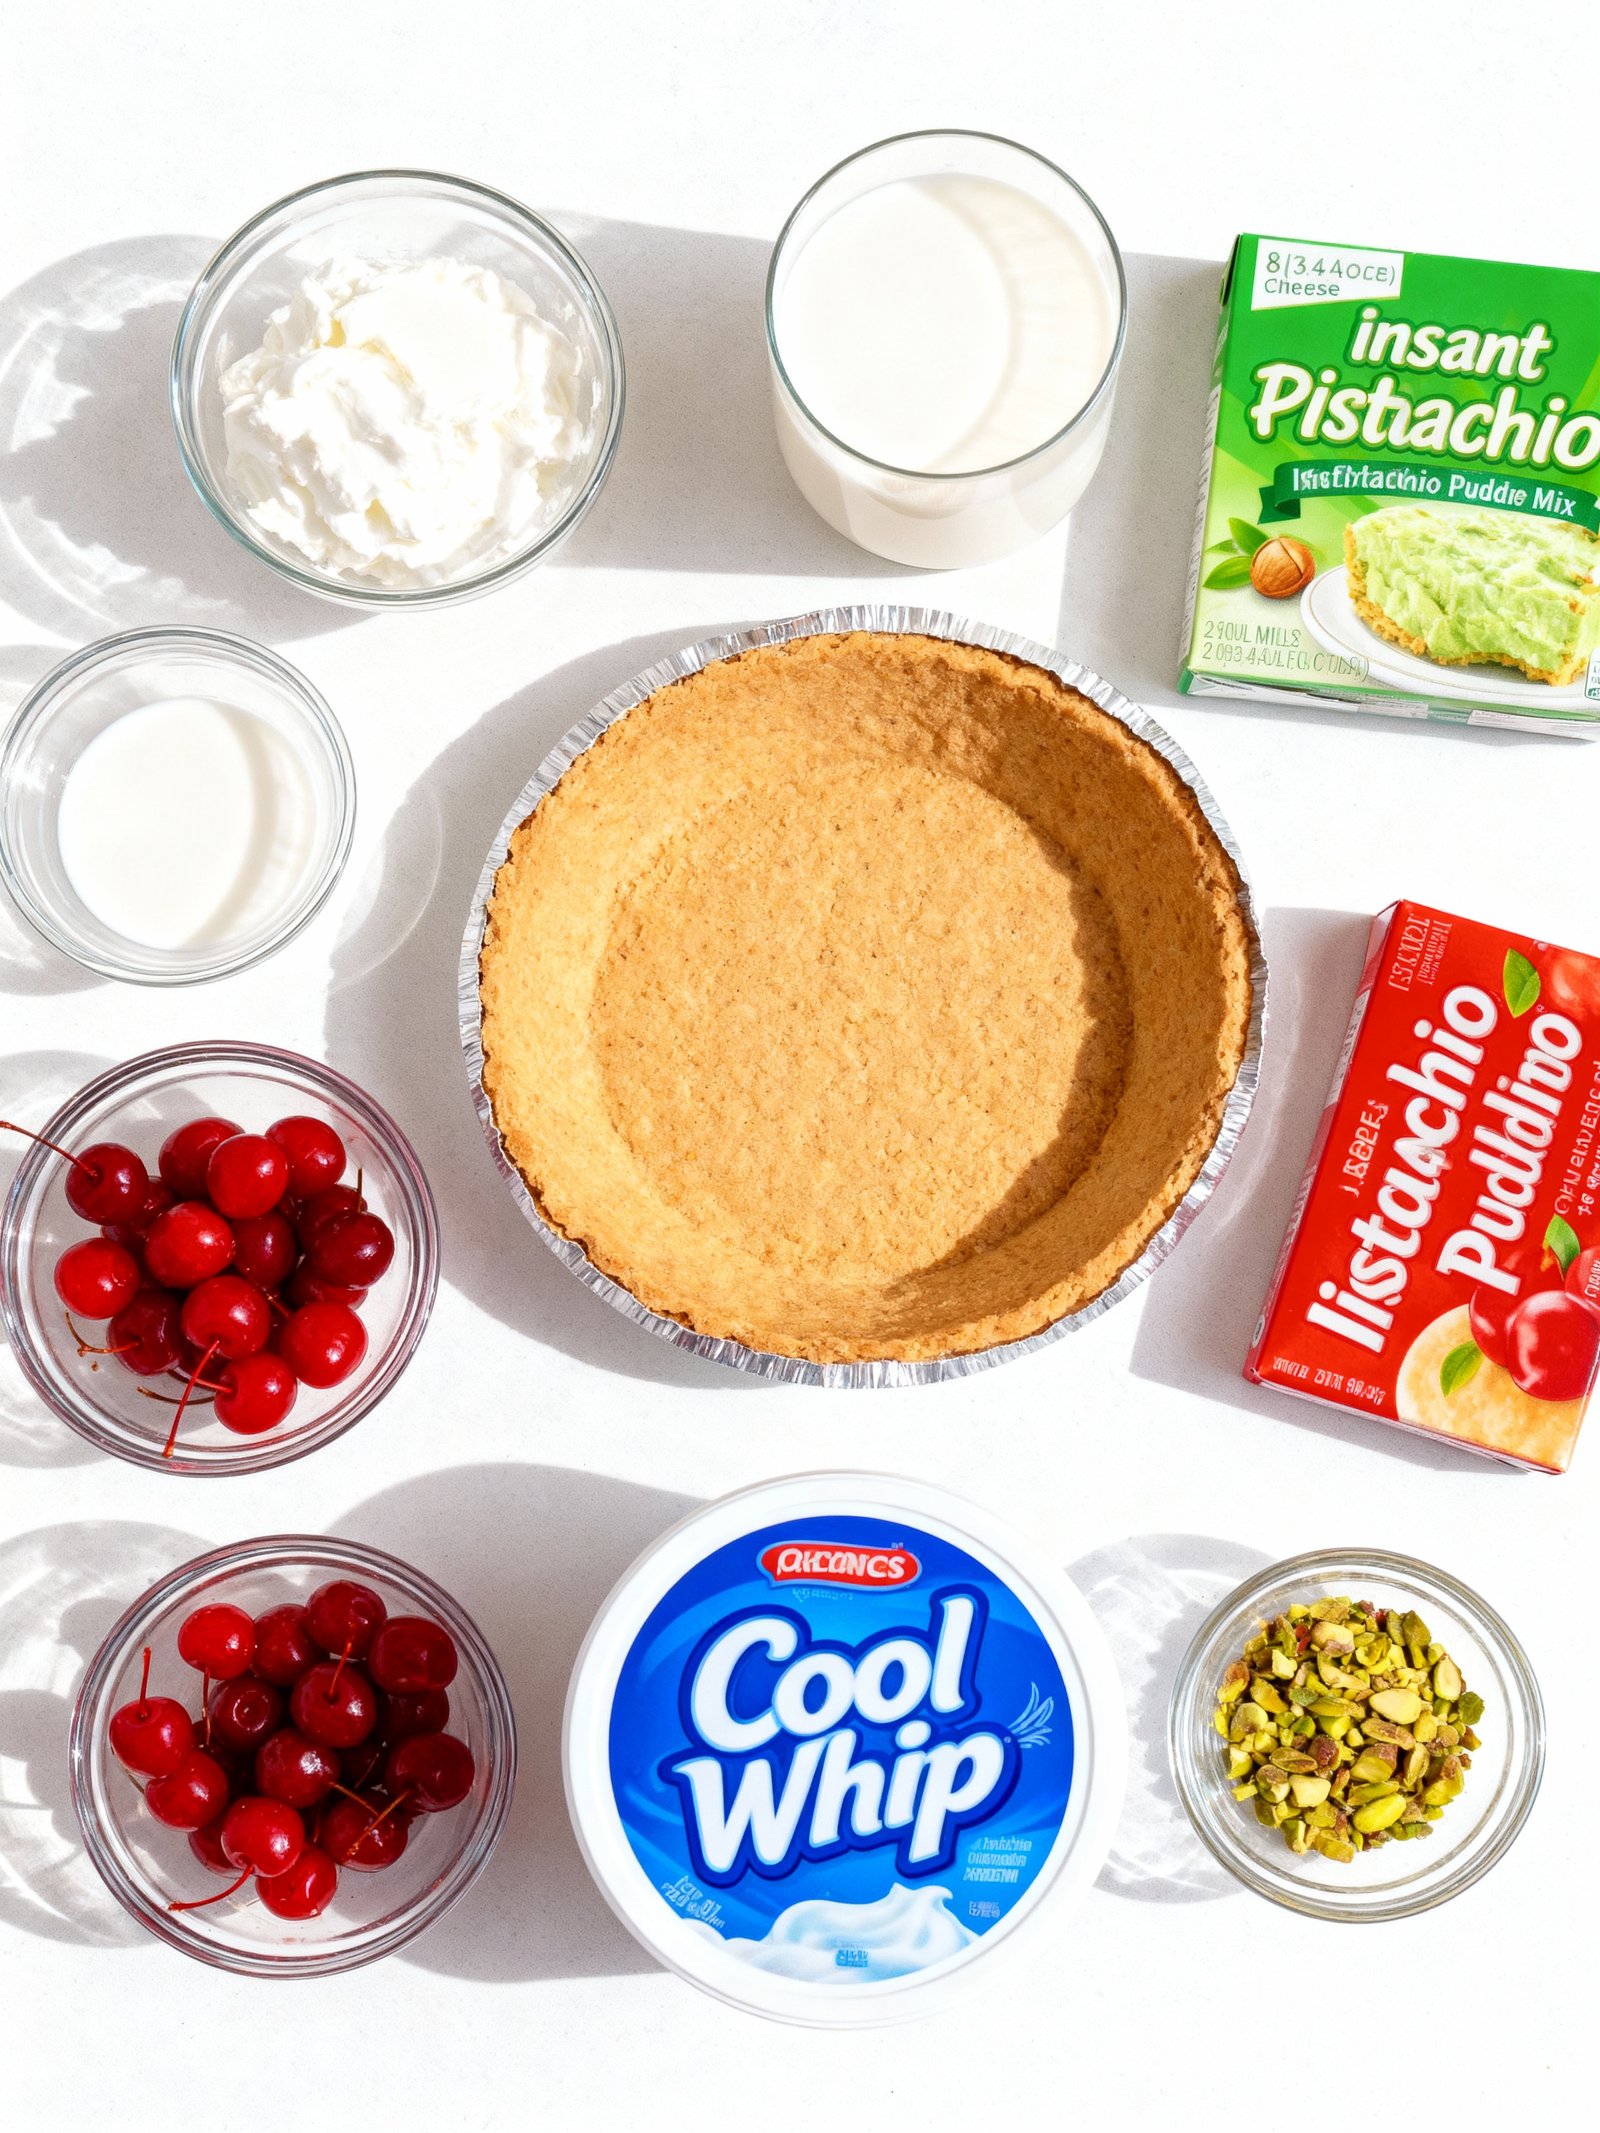
Ingredients
This No Bake Pistachio Pie delivers a wonderfully creamy, nutty filling with a sweet, crunchy crust—all without ever turning on your oven.
- 8 ounces cream cheese, softened
- 2 cups milk
- 2 (3.4-ounce) boxes instant pistachio pudding mix
- 1 (8-ounce) tub Cool Whip, thawed
- 1 (6-ounce) 9 inch prepared graham cracker pie crust
- Whipped topping, maraschino cherries, and chopped pistachios for garnish (optional)
Timing
| Prep Time | 25 minutes |
| Cook Time | 0 minutes |
| Total Time | 25 minutes |
Context: This No Bake Pistachio Pie is about 20% faster than similar recipes that require baking.
Step-by-Step Instructions
Step 1 — Prepare the Crust
Combine graham cracker crumbs, melted butter, and a pinch of salt in a medium bowl. Press the mixture firmly into the bottom and up the sides of a 9-inch pie dish using the bottom of a measuring cup.
Tip: For a crisp, firm crust, press the crumbs evenly and chill the crust in the freezer for 10 minutes before adding the filling.
Step 2 — Make the Pistachio Filling
In a large mixing bowl, beat softened cream cheese and powdered sugar together until smooth and creamy. Add pistachio pudding mix and milk, then mix until fully incorporated and no lumps remain.
Tip: Use room-temperature cream cheese for easier blending and a silky texture in your No Bake Pistachio Pie.
Step 3 — Whip the Cream
In a separate chilled bowl, whip heavy cream until stiff peaks form. Be careful not to over-whip, or the cream may become grainy.
Tip: Chill your bowl and beaters in the freezer for 15 minutes before whipping to help the cream hold its shape better.
Step 4 — Fold Ingredients Together
Gently fold the whipped cream into the pistachio cream cheese mixture using a spatula. Use a folding motion to maintain airiness and avoid deflating the cream.
Tip: Fold just until no white streaks remain for a light, fluffy filling.
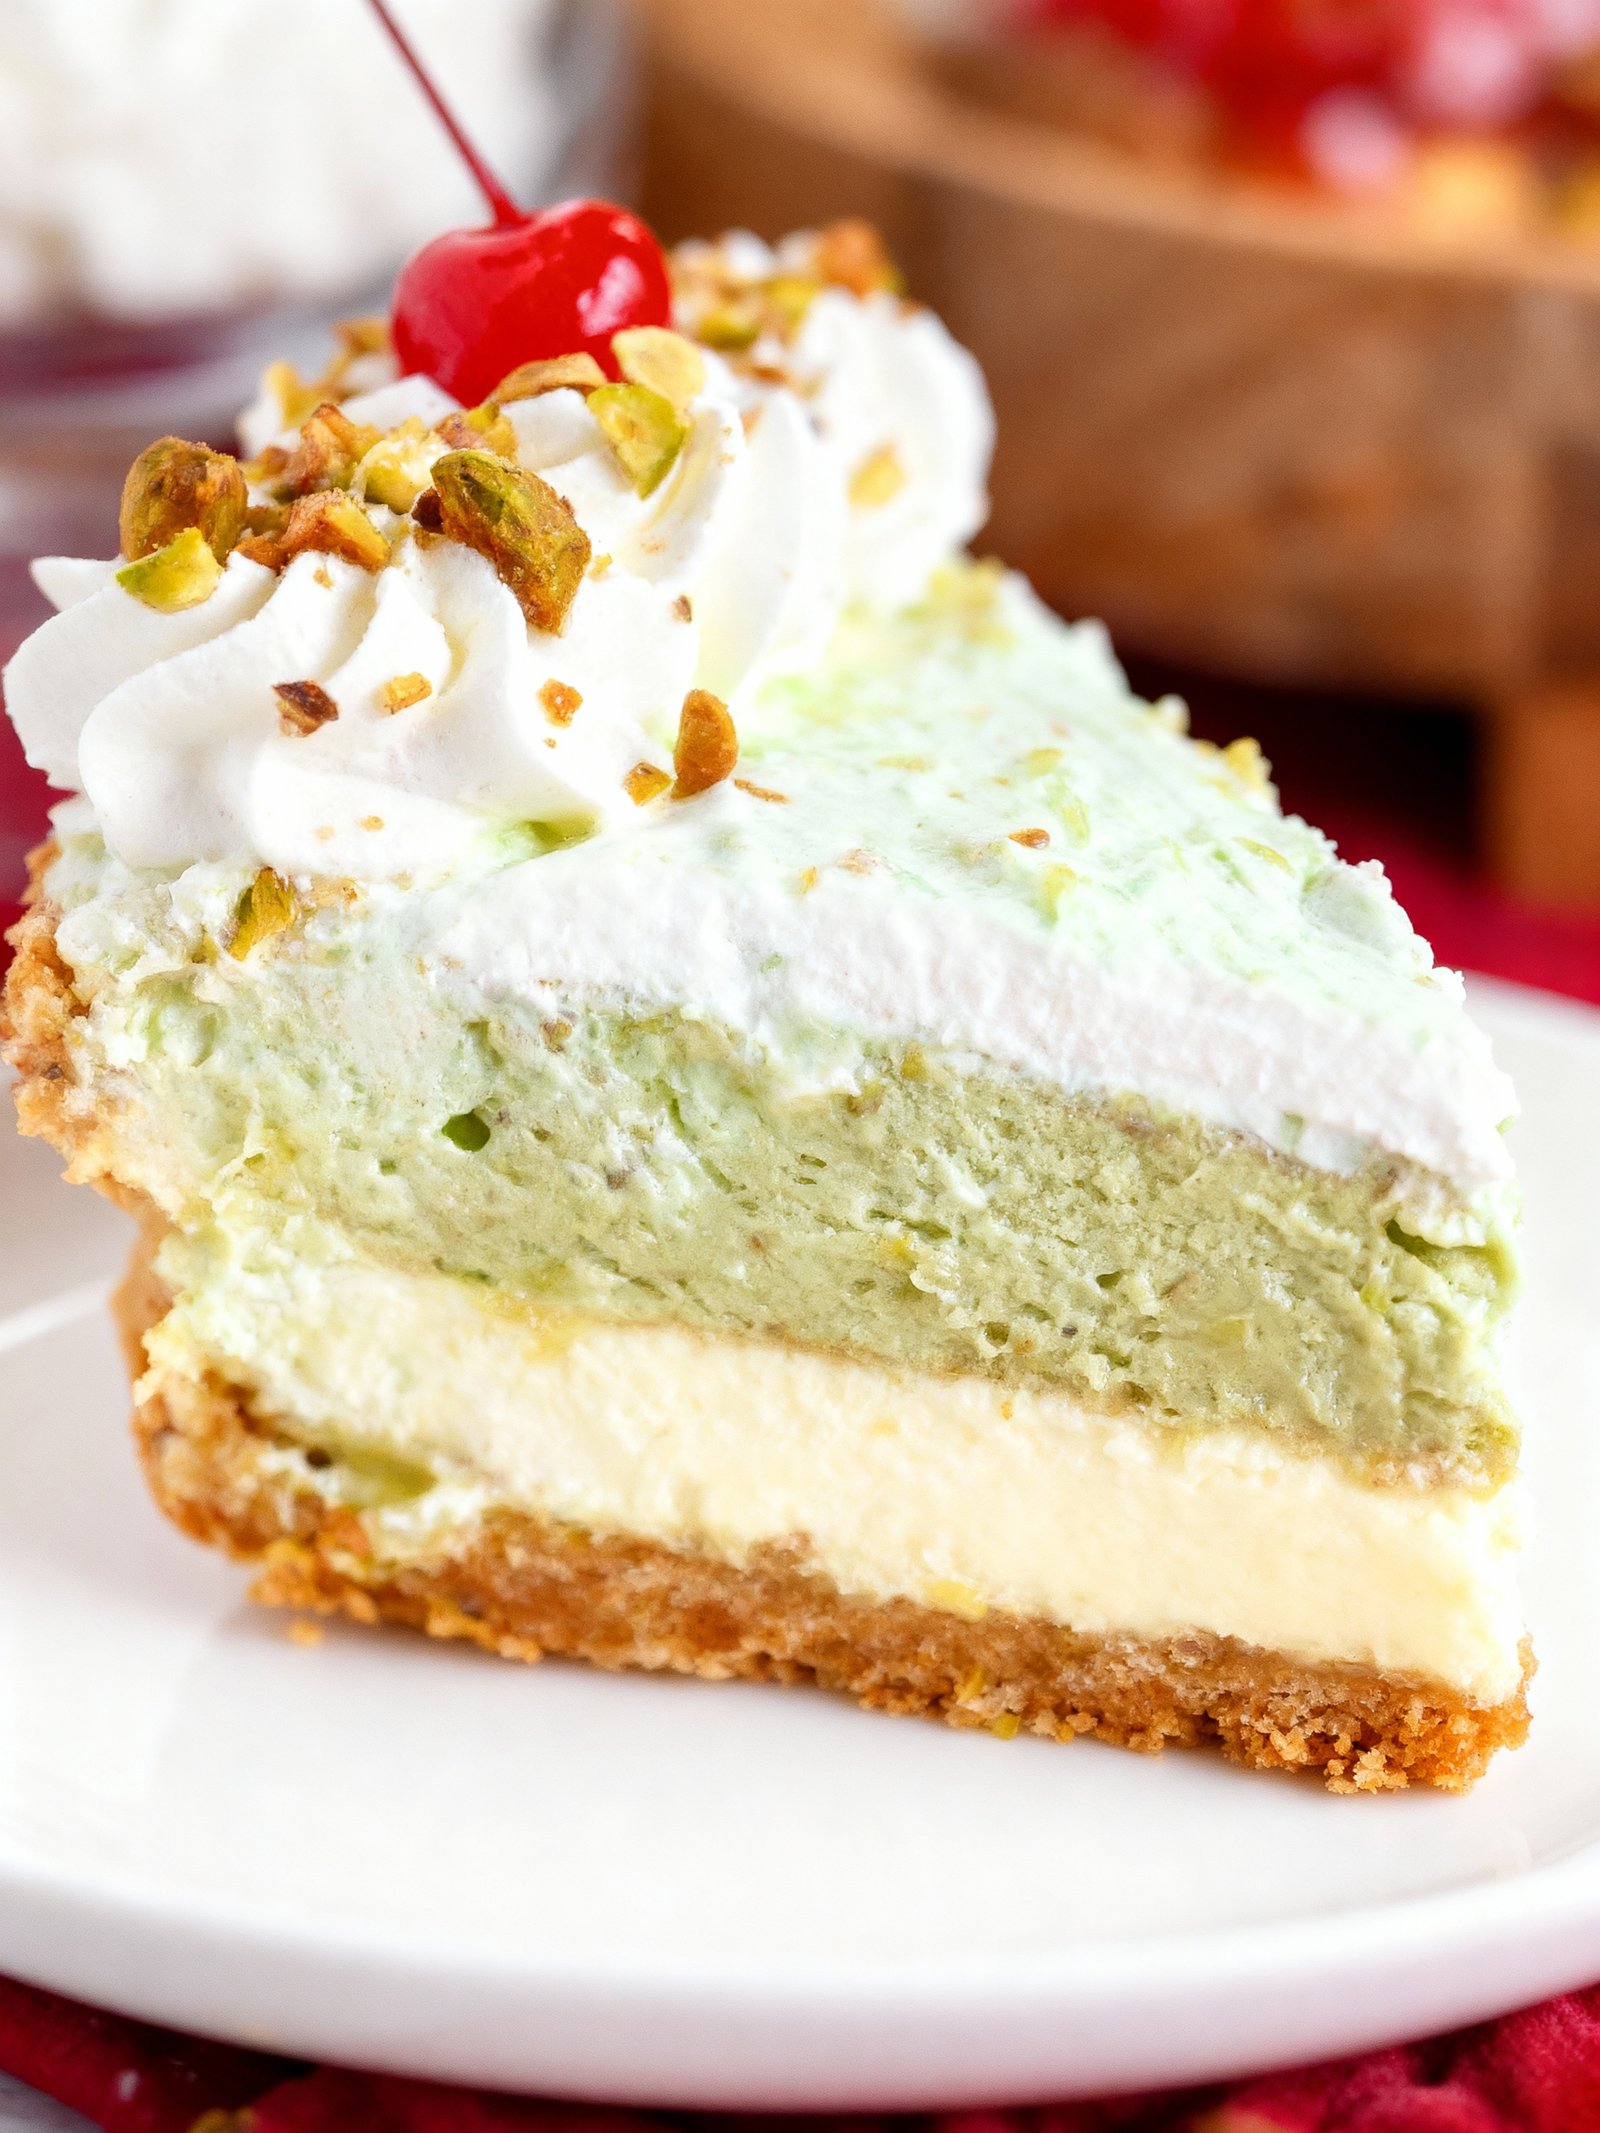
Step 5 — Assemble the Pie
Spoon the pistachio filling into the prepared crust and smooth the top with an offset spatula or the back of a spoon.
Tip: Tap the pie dish lightly on the counter to remove any air bubbles and create an even surface.
Step 6 — Chill to Set
Cover the No Bake Pistachio Pie with plastic wrap and refrigerate for at least 4 hours, or until firm. Overnight chilling yields the best texture.
Tip: The pie is ready when the filling does not jiggle when gently shaken and a knife inserted comes out clean.
Step 7 — Garnish and Serve
Before serving, top with chopped pistachios, a dollop of whipped cream, or a drizzle of chocolate sauce if desired.
Tip: Use a warm knife to slice clean portions, wiping the blade between cuts for neat presentation.
Nutritional Information
| Calories | 420 |
| Protein | 7g |
| Carbohydrates | 38g |
| Fat | 28g |
| Fiber | 3g |
| Sodium | 180mg |
Note: Estimates based on typical ingredients and serving size.
Healthier Alternatives
- Greek yogurt for cream cheese — Adds protein while maintaining creaminess with a tangy note.
- Almond flour crust instead of graham crackers — Lower-carb, gluten-free option with nutty flavor.
- Coconut cream for heavy cream — Dairy-free alternative that whips up rich and lightly tropical.
- Monk fruit sweetener instead of sugar — Zero-calorie swap that keeps the sweetness without carbs.
- Avocado blended into filling — Adds healthy fats and creaminess without altering pistachio flavor.
- Unsalted pistachios and reduced-salt ingredients — Low-sodium version letting natural nut taste shine.
- Protein powder mixed into filling — Boosts protein content subtly; vanilla or unflavored works best.
- Date paste as sweetener binder — Whole-food sweetener with fiber, complementing the nutty profile.
Serving Suggestions
- Pair this No Bake Pistachio Pie with a scoop of vanilla bean ice cream for a classic creamy contrast.
- Serve alongside a cup of strong coffee or espresso to balance the dessert’s sweetness.
- Garnish with extra chopped pistachios and a dusting of powdered sugar for an elegant finish.
- Perfect for summer gatherings, potlucks, or holiday meals where a refreshing, no-bake dessert is ideal.
- Slice and serve chilled on individual plates with a dollop of whipped cream and a fresh mint sprig.
- Create a dessert platter by pairing with lemon bars or shortbread cookies for varied textures.
For a beautiful presentation, use a springform pan to create clean slices, and drizzle each plate with a thin chocolate or raspberry sauce before placing the No Bake Pistachio Pie slice.
Common Mistakes to Avoid
- Mistake: Using stale pistachios that have lost their vibrant flavor. Fix: Always buy raw, unsalted pistachios from a source with high turnover and store them in an airtight container.
- Mistake: Not processing the crust mixture long enough, resulting in a crumbly base. Fix: Pulse the crust ingredients until the mixture holds together when pinched, ensuring proper binding.
- Mistake: Overheating the cream cheese before mixing, causing a lumpy filling. Fix: Ensure your cream cheese is at true room temperature for about an hour to achieve a perfectly smooth texture.
- Mistake: Under-whipping the heavy cream, leading to a runny pie that doesn’t set. Fix: Whip the cream to stiff peaks so it provides structure and helps the No Bake Pistachio Pie firm up.
- Mistake: Skipping the chilling time and serving the pie too soon. Fix: Refrigerate the pie for at least 4-6 hours, or ideally overnight, for the flavors to meld and the texture to set completely.
- Mistake: Using pre-ground pistachios, which can be overly dry and lack fresh flavor. Fix: Grind your own pistachios for the filling to release their natural oils and maximize their distinctive taste.
- Mistake: Adding liquid food coloring that can water down the filling. Fix: Use a tiny amount of gel food coloring for that classic green hue without compromising the pie’s consistency.
- Mistake: Overmixing the filling after adding the whipped cream, which deflates it. Fix: Gently fold in the whipped cream just until no white streaks remain to keep the filling light and airy.
- Mistake: Not toasting the pistachios for the crust, missing out on enhanced nutty flavor. Fix: Lightly toast the nuts for the crust in a dry pan to deepen their flavor and improve the overall texture.
Storing Tips
- Fridge: Keep your No Bake Pistachio Pie covered in an airtight container in the refrigerator for up to 5 days.
- Freezer: Wrap slices or the whole pie tightly in plastic wrap and store in a freezer-safe container for up to 3 months.
- Reheat: This pie is best served chilled, but if needed, let a frozen slice thaw in the refrigerator overnight before serving.
Always refrigerate your No Bake Pistachio Pie promptly after serving, and ensure your refrigerator maintains a safe temperature below 40°F (4°C).
Conclusion
This No Bake Pistachio Pie is the perfect easy dessert for any occasion. If you love no-bake treats, try our Chocolate Raspberry Cheesecake Crumb Cake or Ice Cream Burfi Recipe. We hope you enjoy making this pie—leave a comment with your results and subscribe for more delicious recipes!
PrintNo Bake Pistachio Pie

A creamy, cool, no-bake pistachio pie that combines instant pistachio pudding, cream cheese, and whipped topping in a premade graham cracker crust. This pie is light, luscious, and perfect for any occasion.
- Prep Time: 10 minutes
- Cook Time: 0 minutes
- Total Time: 4 hours 10 minutes
- Yield: 8 1x
- Method: Dessert
- Cuisine: American
Ingredients
- 8 ounces cream cheese, softened
- 2 cups milk
- 2 (3.4-ounce) boxes instant pistachio pudding mix
- 1 (8-ounce) tub Cool Whip, thawed
- 1 (6-ounce) 9 inch prepared graham cracker pie crust
- Whipped topping, maraschino cherries, and chopped pistachios for garnish (optional)
Instructions
- Beat softened cream cheese in a mixing bowl until creamy, about 1 minute.
- Add milk and instant pistachio pudding mixes to the cream cheese and continue to beat until the mixture thickens, about 2-3 minutes.
- Fold in the Cool Whip gently until combined.
- Pour the filling into the prepared graham cracker crust and spread evenly.
- Refrigerate for at least 4 hours or overnight for the best texture.
- Decorate the top with additional whipped topping, maraschino cherries, and chopped pistachios if desired before serving.
Notes
Use full-fat cream cheese for the creamiest texture. Refrigerating overnight improves the pie’s firmness and flavor. Instant pistachio pudding mix is essential—do not substitute with cook-and-serve pudding.
Nutrition
- Calories: 350
- Sugar: 16g
- Sodium: 260mg
- Fat: 24g
- Saturated Fat: 15g
- Unsaturated Fat: 7g
- Trans Fat: 0g
- Carbohydrates: 28g
- Fiber: 1g
- Protein: 5g
- Cholesterol: 45mg
FAQs
How long does the No Bake Pistachio Pie need to set in the refrigerator?
This No Bake Pistachio Pie typically needs at least 4 hours to set properly. For best results and a firmer texture, we recommend chilling it overnight before serving.
Can I make this No Bake Pistachio Pie ahead of time?
Yes, this No Bake Pistachio Pie is an excellent make-ahead dessert. You can prepare it up to two days in advance, keeping it covered in the refrigerator until you are ready to serve.
What can I use if I don’t have a springform pan?
You can use a standard 9-inch pie dish for this No Bake Pistachio Pie. The dessert will still set perfectly, though serving individual slices may be slightly less neat than with a springform pan.


