Did You Know 75% of Home Bakers Avoid No-Bake Treats Because They Think They’re Complicated?
If you’re nodding along right now, I have a sweet little secret to share: these Easy No Bake Peanut Butter Oat Cups are about to change everything. With just a handful of pantry staples and zero oven time, you can whip up a batch of these irresistible bites faster than it takes to preheat your oven. Perfect for busy weeknights, last-minute cravings, or when you simply want a wholesome treat without the fuss.
I remember the first time I made these for my niece’s sleepover—the way the creamy peanut butter melded with the hearty oats and rich chocolate had everyone reaching for seconds (and thirds!). And the best part? No baking means no waiting, no mess, and no stress. Just pure, indulgent flavor in every bite.
Whether you’re a seasoned baker or someone who’s never touched a mixing bowl, this recipe is your golden ticket to effortless deliciousness. So, let’s dive into why these peanut butter oat cups are about to become your new go-to treat.
PrintNo Bake Peanut Butter Oat Cups
Easy, delicious, and healthy no-bake peanut butter oat cups that require minimal ingredients and no oven.
Ingredients
For the Crust:
- 1 cup creamy peanut butter
- 1/3 cup honey
- 1/4 cup coconut oil, melted
- 1 tsp vanilla extract
- 2 cups rolled oats
- 1/4 cup mini chocolate chips (optional)
Instructions
1. Prepare the Crust:
- In a large bowl, mix peanut butter, honey, melted coconut oil, and vanilla extract until smooth.
- Stir in the rolled oats until fully combined. Fold in mini chocolate chips if using.
- Scoop the mixture into a lined muffin tin, pressing down firmly. Chill in the refrigerator for at least 30 minutes before serving.
Notes
You can customize the seasonings to taste.
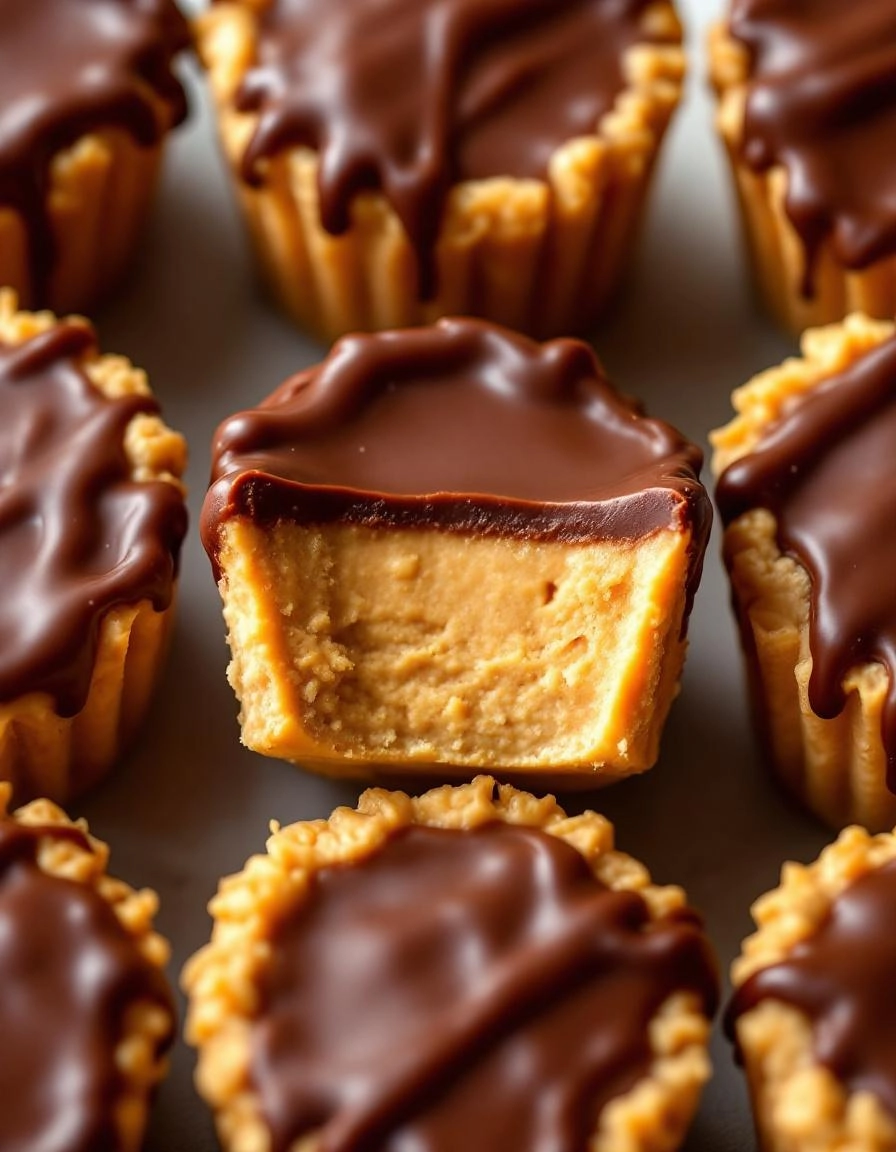
Easy No Bake Peanut Butter Oat Cups Recipe
There’s something so comforting about a recipe that requires zero baking—especially when it involves peanut butter. These no-bake peanut butter oat cups are little bites of joy, perfect for when you need a sweet treat without turning on the oven. They’re chewy, rich, and just sweet enough to satisfy that afternoon craving. Plus, they come together in minutes with pantry staples!
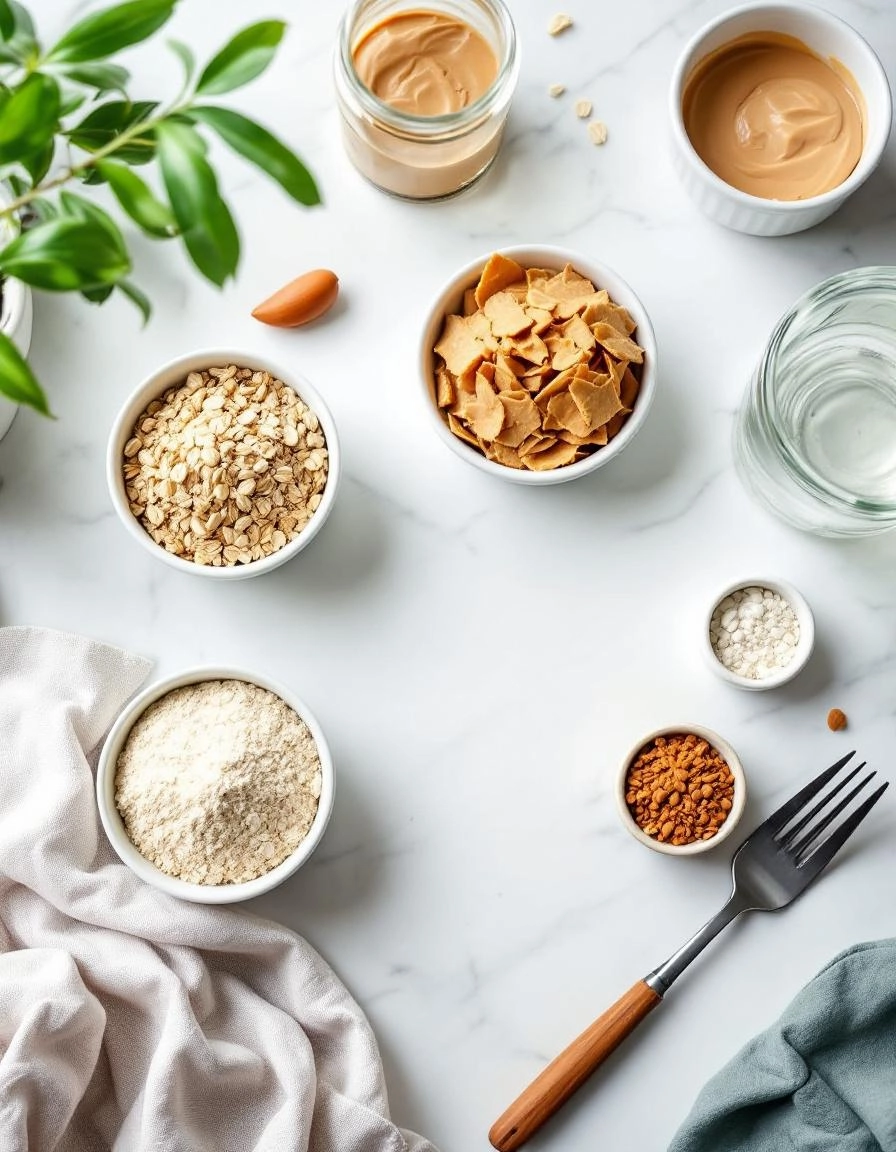
Ingredients You’ll Need
- 1 cup creamy peanut butter – Use the good stuff! Natural peanut butter works, but if you prefer a smoother texture, go for the classic kind with a bit of added sweetness.
- ½ cup honey or maple syrup – Honey gives a deeper sweetness, while maple syrup keeps it vegan-friendly. Both are delicious, so pick your favorite.
- 2 cups old-fashioned rolled oats – Quick oats can work in a pinch, but rolled oats give the best chewy texture.
- ¼ cup ground flaxseed – A little boost of fiber and omega-3s, but if you don’t have any, chia seeds or extra oats will do.
- 1 tsp vanilla extract – Just a splash to round out the flavors.
- Pinch of salt – Trust me, this makes the peanut butter shine even more.
- ½ cup chocolate chips (optional) – Because everything’s better with chocolate, right? Dark, milk, or even mini chips—take your pick.
Let’s Make These Little Bites of Happiness
Step 1: Mix the wet ingredients. In a large bowl, combine the peanut butter and honey (or maple syrup). Warm them slightly in the microwave for 20 seconds if they’re too thick—this makes stirring a breeze.
Step 2: Add the dry ingredients. Stir in the oats, flaxseed, vanilla, and salt. If the mixture feels too sticky, add a tablespoon more oats. Too dry? A drizzle of extra honey will do the trick.
Step 3: Fold in the chocolate chips. If you’re going the chocolate route, now’s the time! Gently fold them in so they’re evenly distributed.
Step 4: Shape the cups. Using a spoon or a small cookie scoop, portion the mixture into a lined muffin tin. Press down firmly with your fingers or the back of a spoon to compact them—this keeps them from crumbling later.
Step 5: Chill and set. Pop them in the fridge for at least 30 minutes. If you’re impatient (no judgment!), the freezer works in a pinch—just 15 minutes will do!
Pro Tips for Perfect Peanut Butter Oat Cups
Want to take your no-bake peanut butter oat cups to the next level? Here are my favorite insider secrets:
- Press it right: Use the back of a small spoon to firmly press the oat mixture into the muffin liners – this prevents crumbling when you bite into them.
- Chill before dipping: Always refrigerate the oat cups for at least 30 minutes before adding the chocolate topping to prevent melting.
- Microwave magic: Heat your peanut butter for 15 seconds to make it easier to mix with the other ingredients.
- Freezer friendly: These keep beautifully in the freezer for up to 3 months – just thaw for 10 minutes before serving.
Delicious Variations to Try
One of the best things about this recipe is how easily you can customize it:
- Chocolate lovers: Swap half the peanut butter for Nutella
- Crunchy texture: Add ¼ cup chopped peanuts or almonds
- Fruity twist: Mix in 2 tablespoons of dried cranberries or raisins
- Protein boost: Stir in 2 scoops of vanilla protein powder
- Vegan option: Use maple syrup instead of honey and dairy-free chocolate
What to Serve With Your Oat Cups
These tasty treats pair perfectly with:
- A cold glass of almond milk for dunking
- Fresh fruit like banana slices or apple wedges
- A scoop of vanilla ice cream for an indulgent dessert
- Your morning coffee as a grab-and-go breakfast
- Greek yogurt for a balanced afternoon snack
Why You’ll Love These Healthy Treats
Beyond being delicious, these no-bake cups offer some great benefits:
- Energy boost: The combination of oats and peanut butter provides lasting energy
- Fiber-rich: Helps keep you full and supports digestion
- No refined sugar: Naturally sweetened with honey or maple syrup
- Quick to make: Ready in about 20 minutes with no oven required
- Kid-friendly: Perfect for little hands and picky eaters
Real-Life Tips From My Kitchen
After making these dozens of times, here’s what I’ve learned:
- If your mixture seems too dry, add 1 teaspoon of milk at a time until it holds together
- For cleaner cuts, use a sharp knife dipped in hot water when slicing
- Store between layers of parchment paper to prevent sticking
- Double the batch – they disappear faster than you’d expect!
- Let kids help with pressing the mixture into cups – it’s a fun kitchen activity

Conclusion
These no-bake peanut butter oat cups are the perfect treat for when you need a quick, wholesome snack without turning on the oven. With just a handful of pantry staples, you can whip up a batch of these delicious bites in no time. They’re naturally sweetened, packed with protein, and absolutely irresistible—whether you enjoy them as an afternoon pick-me-up or a guilt-free dessert.
Ready to give them a try? Whip up a batch and let us know how they turn out! Tag us on social media or leave a comment below—we’d love to hear your variations or see your creations. And if you’re craving more easy no-bake treats, check out our 5-Ingredient Chocolate Energy Balls or Healthy Almond Butter Bars next!
FAQs
Can I use a different nut butter instead of peanut butter?
Absolutely! Almond butter, cashew butter, or even sunflower seed butter (for a nut-free option) work just as well. Just make sure it’s creamy and natural for the best texture.
Are these peanut butter oat cups gluten-free?
Yes, as long as you use certified gluten-free oats, this recipe is naturally gluten-free. Always double-check your labels if you have dietary restrictions.
How long do these stay fresh?
Stored in an airtight container in the fridge, they’ll keep for up to a week. You can also freeze them for up to 3 months—just thaw for a few minutes before enjoying.
Can I add mix-ins to these cups?
Definitely! Mini chocolate chips, chopped nuts, shredded coconut, or even a drizzle of melted chocolate on top would be delicious additions.
My mixture is too sticky—what should I do?
If the dough isn’t holding together well, try adding a tablespoon more oats or chilling it in the fridge for 10-15 minutes before shaping. If it’s too dry, a splash of maple syrup or milk will help bind it.


