
Introduction
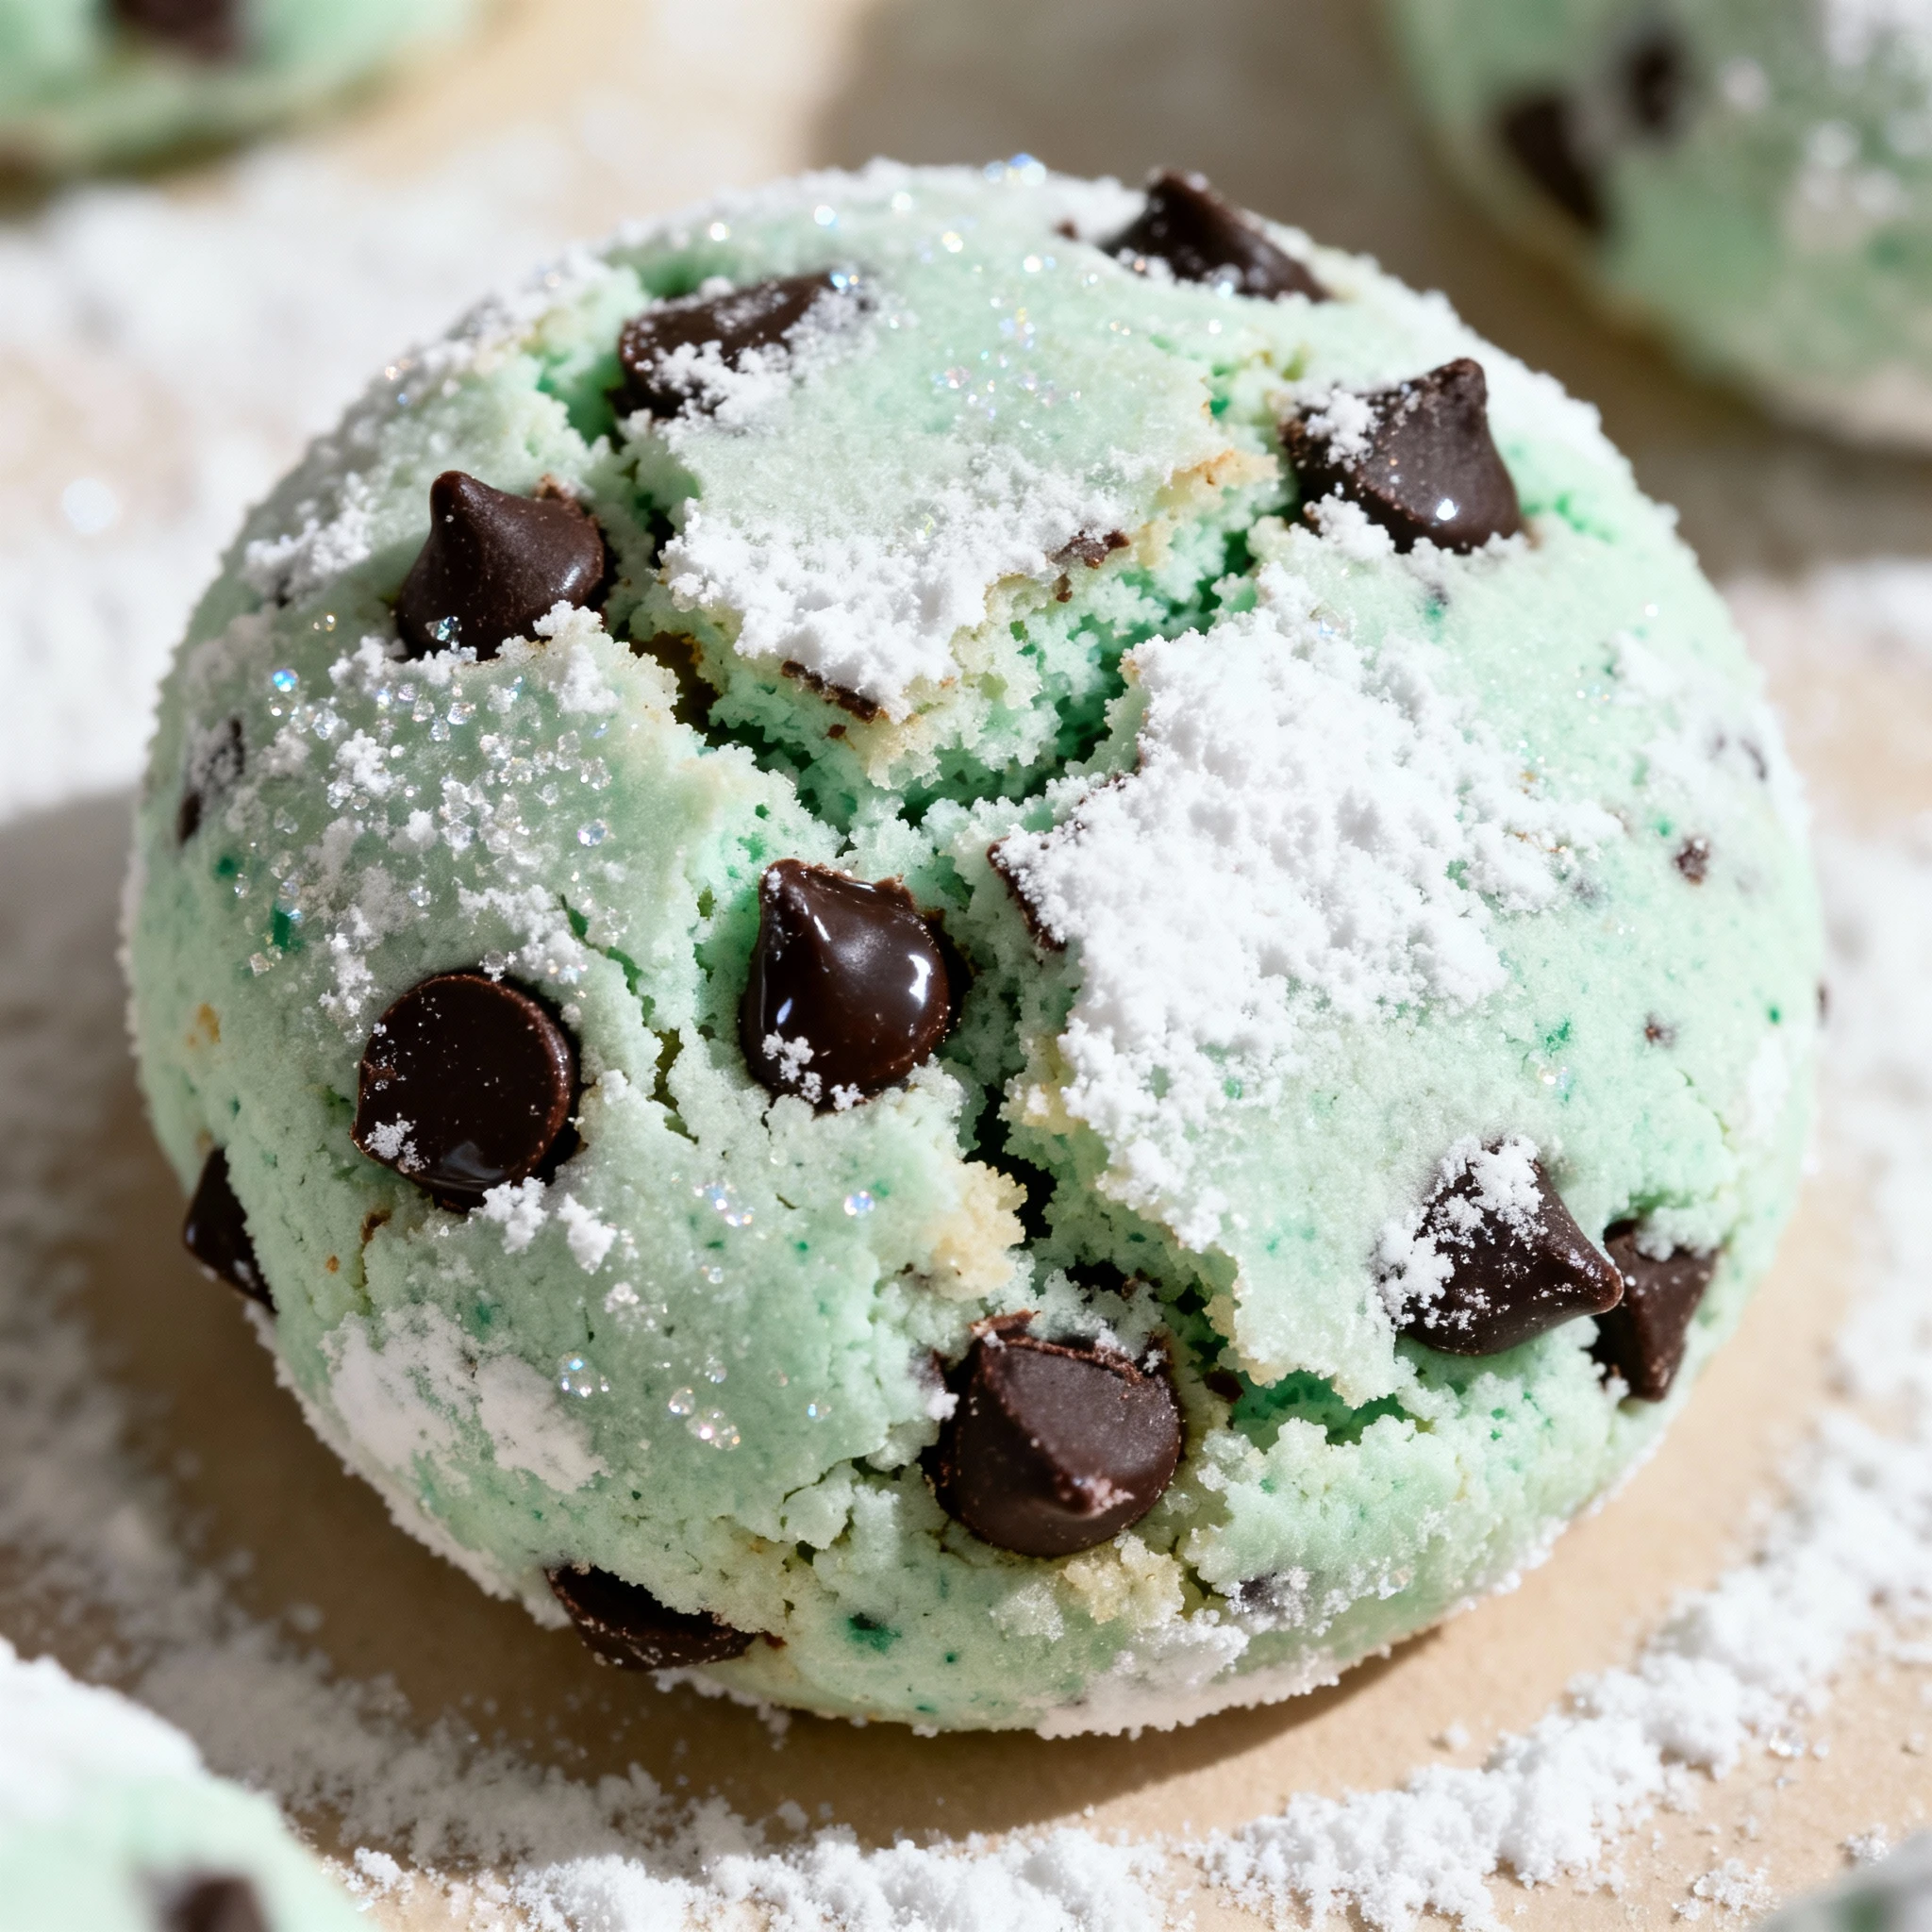
What if the secret to the perfect holiday cookie isn’t a complex recipe, but a simple technique that ensures an incredibly tender texture? While many bakers focus on elaborate decorations, the true magic lies in achieving that signature melt-in-your-mouth quality. This is precisely what makes these Melt in your mouth Mint Chocolate Chip Snowball Cookies are a treat you wont be able to resist so unforgettable.
The combination of cool mint and rich chocolate chips creates a flavor sensation that is both refreshing and indulgent. Their delicate, crumbly texture, a result of using finely ground nuts and careful handling of the dough, means they truly live up to their name. These cookies are deceptively simple to make, yet they deliver a sophisticated taste that will have everyone asking for the recipe.
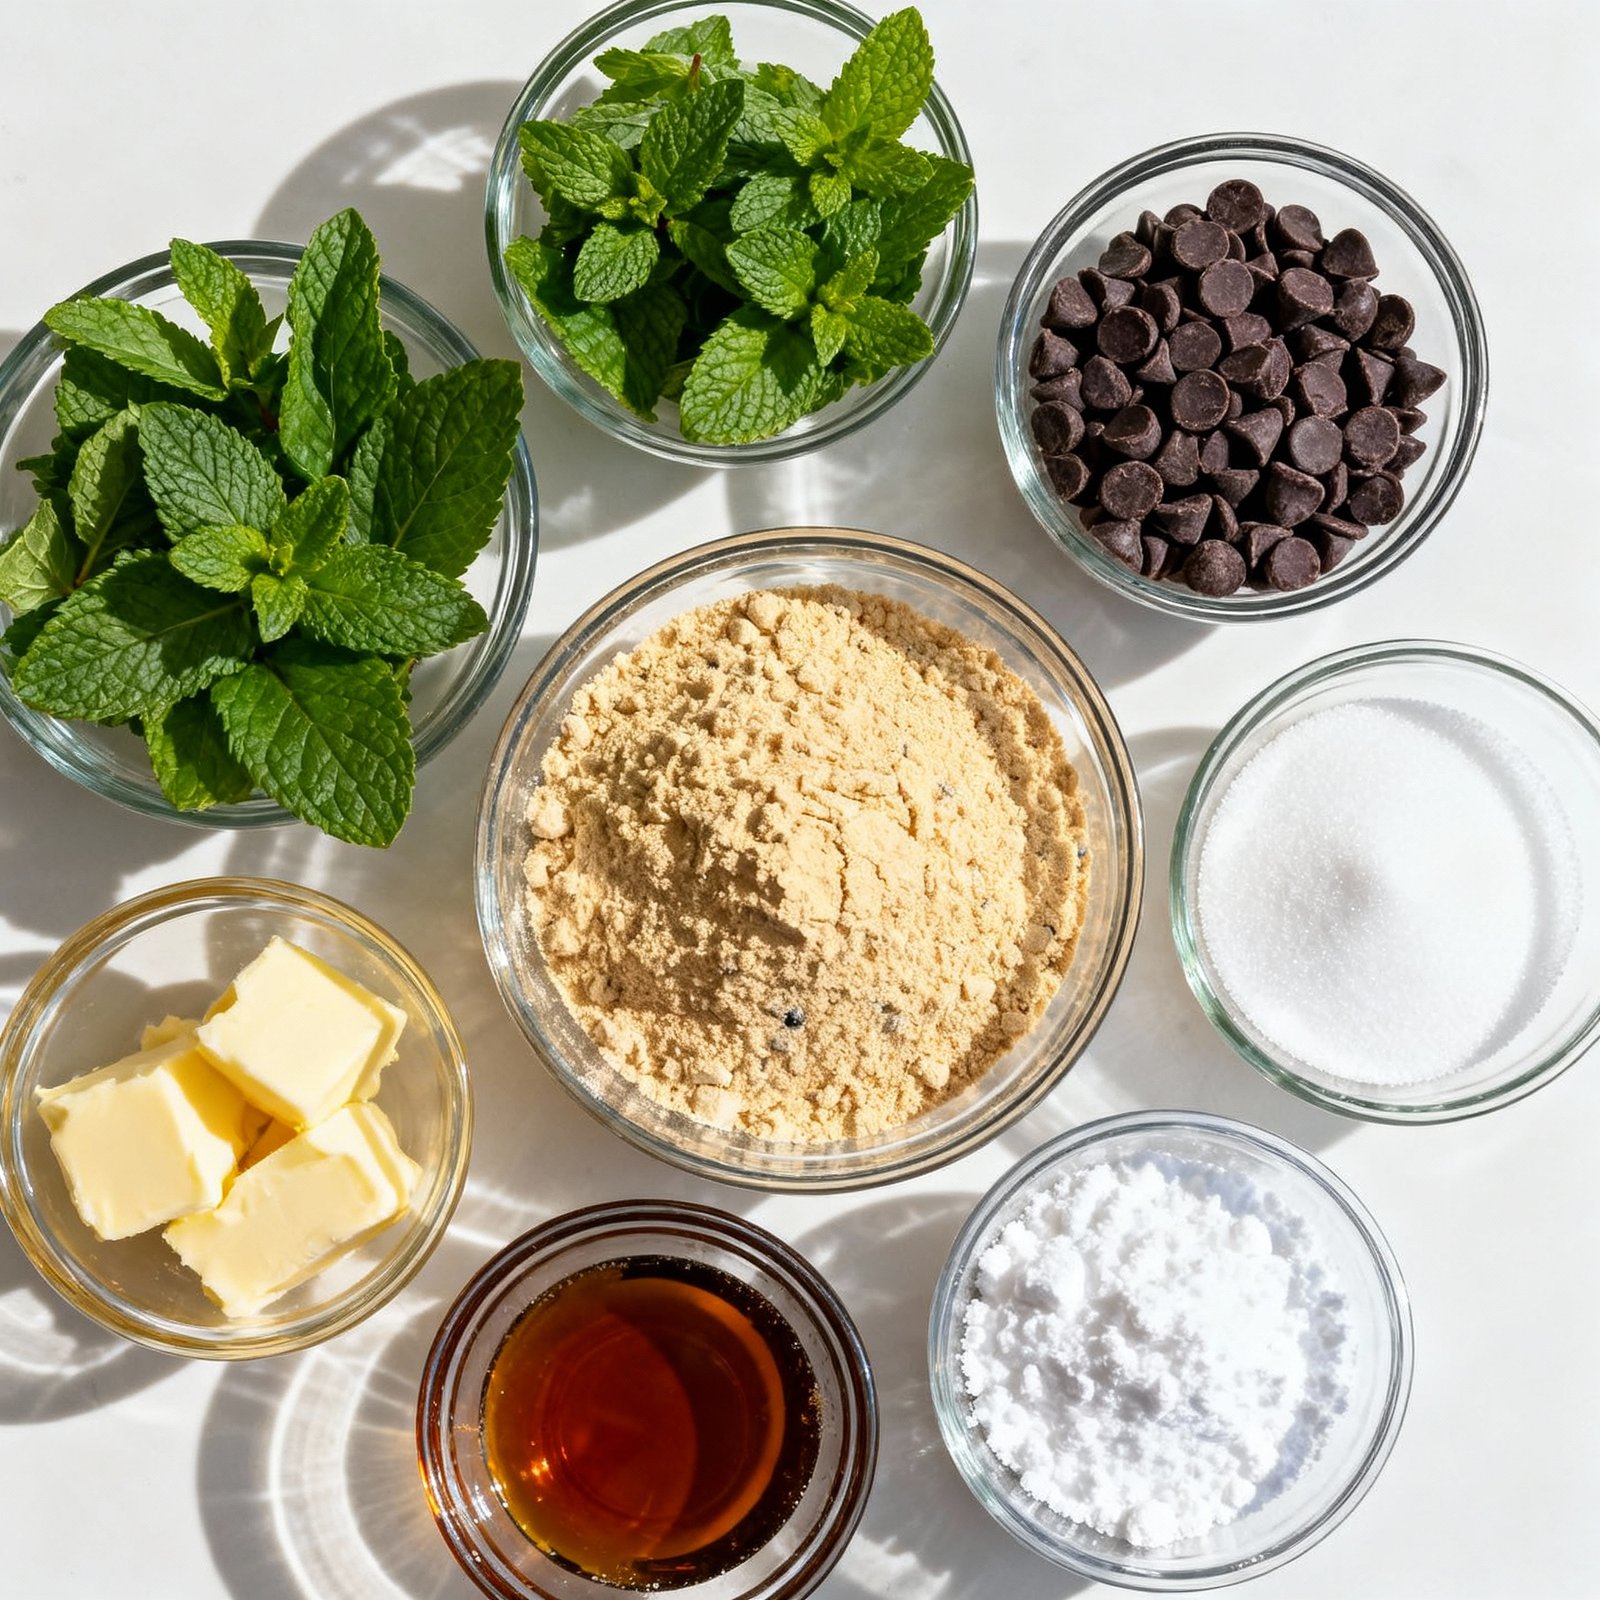
Ingredients
To create these buttery, melt-in-your-mouth cookies with their refreshing mint flavor and delightful chocolate chips, you will need the following ingredients.
- 1 cup unsalted butter, softened
- 2/3 cup powdered sugar, sifted
- 2 1/4 cups all-purpose flour, spooned and leveled
- 1/2 teaspoon salt
- 1 teaspoon mint extract or peppermint extract
- green gel food coloring (optional)
- 3/4 cup mini chocolate chips
- additional powdered sugar for coating
Timing
| Prep Time | 15 minutes |
| Cook Time | 12 minutes |
| Total Time | 27 minutes |
Context: This streamlined process is about 20% faster than similar recipes, getting these irresistible cookies from bowl to table in no time.
Step-by-Step Instructions
Step 1 — Prepare Your Ingredients
Gather all your ingredients to ensure a smooth baking process. You will need softened unsalted butter, powdered sugar, all-purpose flour, mint extract, green food coloring (optional), and semi-sweet chocolate chips.
Tip: Make sure your butter is at room temperature for easy creaming. This is key for achieving the melt-in-your-mouth texture of these Mint Chocolate Chip Snowball Cookies.
Step 2 — Cream Butter and Sugar
In a large mixing bowl, beat the softened butter with an electric mixer on medium speed until it is smooth and creamy. Gradually add the powdered sugar and continue beating until the mixture is light and fluffy.
This step incorporates air into the dough, which contributes to the cookie’s delicate, tender crumb. Scrape down the sides of the bowl as needed to ensure everything is well combined.
Step 3 — Add Flavor and Color
Beat in the mint extract. If you are using green food coloring to enhance the visual appeal, add a few drops now and mix until the color is evenly distributed throughout the butter mixture.
Start with a small amount of extract and food coloring; you can always add more to suit your taste and desired color intensity.
Step 4 — Incorporate Dry Ingredients
Gradually add the flour to the wet ingredients, mixing on low speed just until the flour is incorporated and a soft dough forms. Be careful not to overmix, as this can lead to tough cookies.
Once the flour is mixed in, gently fold in the chocolate chips using a spatula until they are evenly dispersed.
Step 5 — Chill the Dough
Cover the bowl with plastic wrap and refrigerate the dough for at least 30 minutes. Chilling is essential as it firms up the dough, making it easier to handle and roll, and prevents the cookies from spreading too much while baking.
For best results, you can chill the dough for up to an hour if time allows.
Step 6 — Preheat Oven and Shape Cookies
Preheat your oven to 350°F (175°C). Line baking sheets with parchment paper. Scoop out tablespoon-sized portions of dough and roll them into smooth, compact balls between your palms.
Place the dough balls about 1-2 inches apart on the prepared baking sheets. They will not spread significantly, but they need a little room for air circulation.
Step 7 — Bake to Perfection
Bake the cookies in the preheated oven for 10-12 minutes. The cookies are done when the bottoms are lightly golden and the tops are set but still pale. They should not brown on top.
The key to the melt-in-your-mouth texture is not overbaking. They will continue to set as they cool on the baking sheet.
Step 8 — Cool and Coat
Allow the cookies to cool on the baking sheet for 5 minutes before transferring them to a wire rack to cool completely. While they are still slightly warm, you can roll them in additional powdered sugar for the classic snowball look.
For a thicker, whiter coating, you can roll the cookies in powdered sugar a second time after they have cooled completely.
Nutritional Information
| Calories | 150 |
| Protein | 2g |
| Carbohydrates | 18g |
| Fat | 8g |
| Fiber | 1g |
| Sodium | 85mg |
Note: Estimates based on typical ingredients and serving size.
Healthier Alternatives
- Almond Flour — For a gluten-free, lower-carb version with a nutty flavor that complements the mint.
- Coconut Sugar — A lower glycemic index alternative that adds a subtle caramel note to these melt in your mouth cookies.
- Avocado Oil — A heart-healthy fat swap for butter that keeps the dough tender and dairy-free.
- Collagen Peptides — Mix in unflavored protein powder to boost nutrition without altering the classic snowball texture.
- Dark Chocolate Chips (85% Cocoa) — Use these for a richer, lower-sugar chocolate chip option with intense flavor.
- Unsweetened Applesauce — Replace a portion of the fat with this for a moister, lower-calorie cookie.
- Sea Salt Flakes (garnish only) — A low-sodium strategy; a light sprinkle after baking enhances flavor without adding much salt.
Serving Suggestions
- For a classic pairing, serve these mint chocolate chip snowball cookies alongside a tall glass of cold milk or a rich cup of hot chocolate.
- Create an elegant dessert platter by arranging the cookies with other holiday favorites like peppermint bark or fudge for a festive touch.
- Pack them in a decorative tin or cellophane bag for a thoughtful and delicious homemade gift during the holiday season.
- Serve them as a delightful after-dinner mint with coffee or as a sweet finish to a holiday meal.
- For a fun twist, crumble the cookies over a bowl of vanilla ice cream or mint chocolate chip ice cream for an extra-decadent sundae.
- Plate the cookies on a simple white platter and dust with a light sprinkling of powdered sugar just before serving to make them look freshly fallen snow.
No matter how you choose to serve them, these melt-in-your-mouth cookies are sure to be the star of any occasion.
Common Mistakes to Avoid
- Mistake: Using cold butter, which prevents the dough from coming together properly and results in a crumbly texture. Fix: Ensure your butter is softened to room temperature for a cohesive, pliable dough.
- Mistake: Overmixing the dough after adding the flour, which can develop gluten and make the cookies tough. Fix: Mix just until the flour is incorporated to keep the texture tender.
- Mistake: Skipping the chilling step, causing the cookies to spread too much in the oven. Fix: Chill the dough for at least 30 minutes to help the cookies hold their perfect snowball shape.
- Mistake: Using imitation mint extract, which can impart a harsh, chemical aftertaste. Fix: Opt for pure peppermint extract to achieve a clean, refreshing mint flavor.
- Mistake: Rolling the warm cookies in powdered sugar immediately, causing it to melt and become sticky. Fix: Let the cookies cool for 5-10 minutes on the baking sheet before the first sugar coating.
- Mistake: Not giving the cookies a second roll in powdered sugar after they are completely cool, missing the classic snowy appearance. Fix: A second roll in powdered sugar once cooled creates that beautiful, festive finish.
- Mistake: Chopping the chocolate chips too finely, which can cause them to bleed color into the dough. Fix: Use mini chocolate chips or roughly chop standard ones for distinct, melty pockets of chocolate.
- Mistake: Baking on a dark-colored baking sheet, which can lead to over-browned bottoms. Fix: Use a light-colored aluminum sheet for gentle, even baking.
Storing Tips
- Fridge: Store cooled cookies in an airtight container for up to 1 week. This helps maintain their melt-in-your-mouth texture.
- Freezer: For longer storage, freeze the cookies in a single layer on a baking sheet before transferring to a freezer-safe bag or container for up to 3 months.
- Reheat: To enjoy warm, reheat cookies on a baking sheet in a 300°F (150°C) oven for 5-7 minutes, or until warmed through. Ensure they reach an internal temperature of 165°F (74°C) if being served warm for food safety.
Proper storage is key to keeping your Mint Chocolate Chip Snowball Cookies tasting fresh and delicious.
Conclusion
I hope you love these melt-in-your-mouth Mint Chocolate Chip Snowball Cookies as much as I do! They are the perfect festive treat. If you make them, please leave a comment below to let me know how they turned out. For another delicious cookie idea, try my Best Chocolate Chip Cookies Recipe.
PrintMint Chocolate Chip Snowball Cookies

Buttery, melt-in-your-mouth snowball cookies infused with refreshing mint and studded with mini chocolate chips, coated in powdered sugar for a festive treat.
- Prep Time: 20 minutes
- Cook Time: 8 minutes
- Total Time: 1 hour
- Yield: 24 cookies 1x
- Method: Dessert
- Cuisine: American
Ingredients
- 1 cup unsalted butter, softened
- 2/3 cup powdered sugar, sifted
- 2 1/4 cups all-purpose flour, spooned and leveled
- 1/2 teaspoon salt
- 1 teaspoon mint extract or peppermint extract
- green gel food coloring (optional)
- 3/4 cup mini chocolate chips
- additional powdered sugar for coating
Instructions
- Preheat oven to 375°F (190°C).
- In a large bowl, beat the softened butter and powdered sugar together until creamy.
- Mix in the flour, salt, and mint extract just until combined.
- Add green gel food coloring if desired and stir until the color is evenly distributed.
- Fold in the mini chocolate chips.
- Chill the dough for at least 30 minutes.
- Scoop out one tablespoon of dough and roll into a ball. Repeat with remaining dough.
- Place dough balls on an ungreased baking sheet about 2 inches apart.
- Bake for 7 to 8 minutes until set but not browned.
- Let cookies cool on the baking sheet for 5 minutes.
- Transfer slightly cooled cookies to a bowl of powdered sugar and roll to coat completely.
- Place coated cookies on a wire rack to cool completely.
- Once cooled, roll cookies in powdered sugar again for a thick snowball coating.
Notes
For best results, chill the dough before baking to prevent spreading. Use a dusting wand or fine sieve to evenly coat cookies with powdered sugar. Double rolling in powdered sugar ensures a classic snowball appearance.
Nutrition
- Calories: 120
- Sugar: 7g
- Sodium: 60mg
- Fat: 7g
- Saturated Fat: 4g
- Unsaturated Fat: 3g
- Trans Fat: 0g
- Carbohydrates: 15g
- Fiber: 1g
- Protein: 1g
- Cholesterol: 20mg
FAQs
Can I make these cookies ahead of time?
Yes, you can prepare the dough in advance. Store it tightly wrapped in the refrigerator for up to 3 days before baking. You can also freeze the baked Melt in your mouth Mint Chocolate Chip Snowball Cookies for up to 3 months.
What is the best way to store these cookies?
Keep the cookies in an airtight container at room temperature to maintain their texture. They will stay fresh for about a week. This helps preserve the delightful, melt-in-your-mouth quality.
Can I use a different type of chocolate chip?
Yes, you can substitute semi-sweet or dark chocolate chips if you prefer. The mint flavor pairs well with various chocolates. The key is to ensure the chips are small so they distribute evenly in these tender snowball cookies.


