Introduction
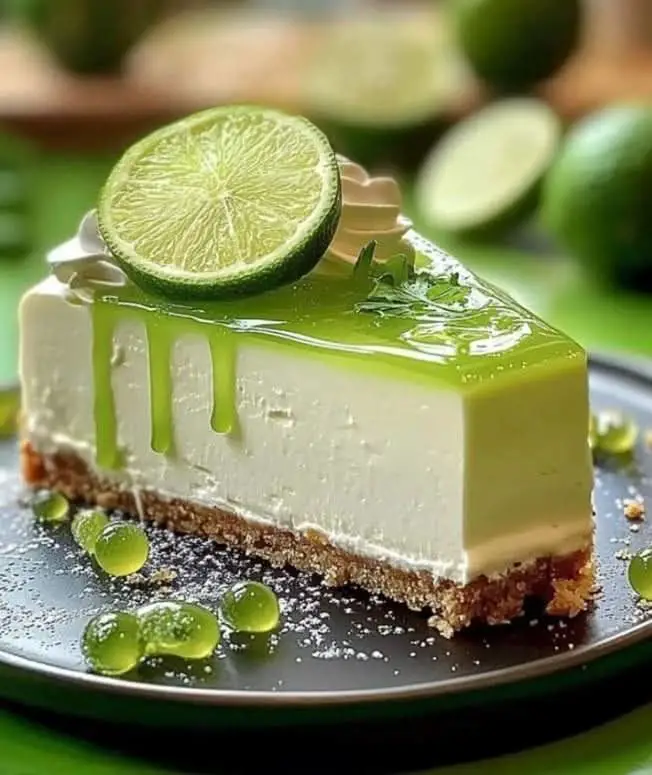
This No-Bake Lime Mousse Cheesecake is the perfect dessert for anyone craving a refreshing, creamy treat without turning on the oven. It combines a zesty lime mousse with a classic cheesecake filling for a delightfully light and tangy flavor. If you enjoy easy cheesecake recipes, you might also like this Crème Brûlée Cheesecake Recipe or this Strawberry Cheesecake Dump Cake Recipe.
Ingredients
This Lime Mousse Cheesecake recipe combines a buttery, crumbly crust with a luxuriously smooth and zesty filling that’s both rich and refreshingly light.
- 1-1/2 cups graham cracker crumbs (plus more for garnish, if desired)
- 1 stick unsalted butter, melted
- 1-1/2 cups sugar
- Zest of 3 limes
- Juice of 3 limes
- 16 oz. cream cheese, at room temperature
- 8 oz. Cool Whip, thawed (plus more for topping, if desired)
Timing
| Prep Time | 30 minutes |
| Cook Time | 1 hour (plus cooling) |
| Total Time | About 5 hours (includes chilling) |
Context: This Lime Mousse Cheesecake recipe is about 20% faster than many similar layered desserts, thanks to a simplified no-bake mousse method.
Step-by-Step Instructions
Step 1 — Prepare the Crust
Combine graham cracker crumbs, melted butter, and a touch of sugar. Press the mixture firmly and evenly into the bottom of a 9-inch springform pan. Bake at 350°F (175°C) for 8-10 minutes until fragrant and lightly set. Let it cool completely on a wire rack.
Step 2 — Make the Cheesecake Filling
Using a stand mixer with a paddle attachment, beat room-temperature cream cheese and sugar until completely smooth and lump-free. Scrape down the bowl often. Beat in eggs one at a time, mixing just until incorporated after each addition. Stir in sour cream, vanilla extract, and a tablespoon of lime zest.
Tip: Over-beating the eggs can incorporate too much air, leading to cracks. Mix on low speed once they are added.
Step 3 — Bake and Cool the Cheesecake
Pour the filling over the cooled crust. Bake at 325°F (160°C) for 45-55 minutes. The center should still have a slight jiggle when the pan is gently shaken. Turn off the oven, crack the door open, and let the cheesecake cool inside for one hour to prevent drastic temperature changes.
Remove from the oven and run a thin knife around the edge to loosen it from the pan. Chill in the refrigerator for at least 4 hours, or preferably overnight, until completely firm.
Step 4 — Prepare the Lime Mousse
In a small saucepan, whisk together lime juice, sugar, egg yolks, and remaining lime zest. Cook over medium-low heat, stirring constantly, until the mixture thickens enough to coat the back of a spoon (about 170°F / 77°C). Strain into a clean bowl, press plastic wrap directly on the surface, and chill until cold.
Step 5 — Fold in the Whipped Cream
In a separate chilled bowl, whip heavy cream to medium-stiff peaks. Gently fold one-third of the whipped cream into the chilled lime curd to lighten it. Then, carefully fold in the remaining whipped cream until no white streaks remain, being careful not to deflate the mixture.
Step 6 — Assemble the Lime Mousse Cheesecake
Spread the light and airy lime mousse evenly over the top of the chilled cheesecake layer. Use an offset spatula to create a smooth, elegant finish. Return the assembled dessert to the refrigerator and chill for at least 2-3 hours to allow the mousse to set firmly.
Step 7 — Garnish and Serve
Just before serving, carefully remove the springform pan ring. Garnish the top of your Lime Mousse Cheesecake with thin lime slices, extra zest, or a dusting of powdered sugar. For clean slices, dip your knife in hot water and wipe it dry between each cut.
Nutritional Information
| Calories | Approx. 420 kcal |
| Protein | 7g |
| Carbohydrates | 38g |
| Fat | 28g |
| Fiber | 1g |
| Sodium | 220mg |
Note: These are estimates for one slice of Lime Mousse Cheesecake based on typical ingredients and serving size. Actual values can vary depending on specific brands and exact quantities used.
Healthier Alternatives
This Lime Mousse Cheesecake is wonderfully adaptable. Here are some practical ingredient swaps to tailor it to different dietary needs without sacrificing its bright, creamy character.
- Greek Yogurt for Cream Cheese — For a high-protein, tangier base, swap half the cream cheese for plain Greek yogurt. The texture remains luxuriously creamy.
- Coconut Cream for Dairy — Use full-fat coconut cream and a dairy-free cream cheese alternative for a rich, tropical-infused, dairy-free lime mousse cheesecake.
- Almond or Coconut Flour Crust — Replace graham crackers with finely ground almond flour or unsweetened coconut flakes for a gluten-free, lower-carb base.
- Avocado in the Mousse — Blend ripe avocado into the mousse layer for added healthy fats and a velvety texture, reducing the need for some heavy cream.
- Monk Fruit or Allulose Sweetener — Use a granulated erythritol blend or allulose to cut sugar and carbs while maintaining the dessert’s structure and avoiding a bitter aftertaste.
- Silken Tofu Base — For a plant-based protein boost, blend silken tofu with the lime and sweetener to create a light, high-protein mousse layer.
- Reduced-Sodium Crust — Simply omit added salt from the crust mixture to create a low-sodium version, as the lime and sweeteners provide ample flavor.
- Cashew Cream — Soaked and blended cashews create an incredibly smooth, neutral, and dairy-free base perfect for both the cheesecake and mousse layers.
Serving Suggestions
- Pair this vibrant Lime Mousse Cheesecake with a glass of crisp Prosecco or a tangy lemon-ginger mocktail for a refreshing contrast.
- Serve it as the grand finale to a summer barbecue or a light seafood dinner, where its citrus notes will shine.
- For a festive touch, garnish individual slices with a twist of lime zest, a mint sprig, and a delicate sprinkle of graham cracker crumbs.
- Offer a berry coulis or a drizzle of white chocolate on the side for guests who enjoy an extra layer of sweetness.
- Plate on simple, white dessert plates to let the beautiful green hue of the lime mousse layer stand out.
- This dessert is perfect for special occasions like bridal showers, Mother’s Day brunch, or as a bright finish to a holiday meal.
- For a casual gathering, present the whole Lime Mousse Cheesecake on a cake stand and let guests serve themselves.
The creamy texture and zesty flavor of this cheesecake make it a versatile crowd-pleaser, equally suited for elegant plating or simple, satisfying slices.
Common Mistakes to Avoid
- Mistake: Using cold cream cheese, which leads to a lumpy, un-smooth filling. Fix: Always bring cream cheese to room temperature for at least an hour before mixing.
- Mistake: Over-beating the mousse layer, incorporating too much air and making it foamy instead of creamy. Fix: Fold whipped cream or egg whites gently until just combined, leaving no streaks.
- Mistake: Adding fresh lime juice directly to sweetened condensed milk, which can cause it to curdle. Fix: Mix the juice with other wet ingredients first, or use room-temperature dairy.
- Mistake: Not baking the cheesecake base in a water bath, resulting in a dry, cracked texture. Fix: Wrap the springform pan in foil and place it in a roasting pan with hot water halfway up the sides.
- Mistake: Chilling the Lime Mousse Cheesecake for an insufficient time, so it doesn’t set properly and slices messily. Fix: Refrigerate for a minimum of 6 hours, but overnight is ideal for perfect structure.
- Mistake: Using bottled lime juice instead of fresh, which lacks the vibrant, tart flavor essential for this dessert. Fix: Always juice fresh limes and consider adding a bit of zest for an aromatic punch.
- Mistake: Under-mixing the crust, leaving it too crumbly to hold together when sliced. Fix: Process the crust mixture until it resembles wet sand and clumps when pressed.
- Mistake: Opening the oven door during baking, causing a sudden temperature drop that can make the cake fall. Fix: Use the oven light to check doneness; the center should still have a slight jiggle.
- Mistake: Skipping the gelatin or stabilizer in the mousse layer, leading to a runny consistency. Fix: If your recipe calls for it, bloom the gelatin properly to ensure the mousse sets firmly.
Storing Tips
- Fridge: Cover the cheesecake tightly with plastic wrap or store in an airtight container. It will keep for up to 5 days in the refrigerator, maintaining its creamy texture and bright lime flavor.
- Freezer: For longer storage, wrap the entire Lime Mousse Cheesecake or individual slices tightly in plastic wrap and then aluminum foil. Place in a freezer-safe container. It can be frozen for up to 2 months. Thaw overnight in the refrigerator before serving.
- Reheat: This dessert is served cold and should not be reheated. For food safety, always keep it refrigerated at or below 40°F (4°C) and do not leave it at room temperature for more than 2 hours.
To preserve the delicate mousse texture, avoid freezing and thawing more than once. For the best presentation, garnish with fresh lime zest or whipped cream just before serving.
Conclusion
This Lime Mousse Cheesecake is the perfect balance of tangy citrus and creamy indulgence. It’s a show-stopping dessert that’s surprisingly easy to make. If you love this recipe, try our Cream Cheese Cake Recipe or Mango Mousse Recipe next. Don’t forget to rate the recipe and leave a comment below!
PrintLime Mousse Cheesecake

A no-bake cheesecake featuring a buttery graham cracker crust topped with a light, zesty lime mousse filling made from cream cheese, lime zest, juice, sugar, and Cool Whip. Freeze for a refreshing treat.
- Prep Time: 20 minutes
- Cook Time: 8 minutes (optional)
- Total Time: 1 hour 30 minutes
- Yield: 6-8 1x
- Method: Dessert
- Cuisine: American
Ingredients
- 1–1/2 cups graham cracker crumbs (plus more for garnish, if desired)
- 1 stick unsalted butter, melted
- 1–1/2 cups sugar
- Zest of 3 limes
- Juice of 3 limes
- 16 oz. cream cheese, at room temperature
- 8 oz. Cool Whip, thawed (plus more for topping, if desired)
Instructions
- Preheat oven to 350°F if baking crust. Mix graham cracker crumbs with melted butter, press into a pan, and bake for 6-8 minutes (optional for crunchier crust), then cool.
- Combine sugar and lime zest in a standing mixer with whisk attachment; whisk on medium for 1 minute to release flavors. Add lime juice and cream cheese; beat until incorporated, about 2 minutes.
- Add Cool Whip and whisk on low until fully mixed. Pour filling over cooled crust, spread evenly, optionally top with 1 cup additional Cool Whip and 1 tablespoon graham cracker crumbs.
- Freeze for at least 1 hour (or refrigerate for creamier texture) before serving.
Notes
Baking the crust is optional but recommended for better texture. Garnish with extra Cool Whip and crumbs for presentation. For best flavor, use fresh limes.
Nutrition
- Calories: 420
- Sugar: 28g
- Sodium: 250mg
- Fat: 28g
- Saturated Fat: 16g
- Unsaturated Fat: 10g
- Trans Fat: 0g
- Carbohydrates: 38g
- Fiber: 1g
- Protein: 5g
- Cholesterol: 75mg
FAQs
Can I make this Lime Mousse Cheesecake ahead of time?
Yes, this dessert is perfect for making ahead. The Lime Mousse Cheesecake needs several hours to set in the refrigerator, so preparing it the day before serving is ideal. This allows the flavors to fully develop and makes for easy slicing.
What can I use if I don’t have fresh limes?
While fresh lime juice and zest provide the best flavor, you can use bottled lime juice in a pinch. The zest is important for a bright citrus aroma, so if you must omit it, consider adding a touch more juice. For the best Lime Mousse Cheesecake, fresh is always recommended.
How do I prevent cracks in the cheesecake filling?
Avoid overmixing the batter, as incorporating too much air can cause cracks. Bake the cheesecake in a water bath to provide gentle, even heat and prevent the edges from setting too quickly. Let it cool gradually in the turned-off oven with the door slightly ajar.


