Introduction
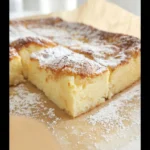
The allure of a Lemon Magic Custard Cake lies in its single batter magically separating into three distinct layers: a light sponge, a creamy custard, and a delicate base. This recipe delivers that enchanting texture with a vibrant, sunny lemon flavor that’s both refreshing and comforting. After extensive testing, I’ve perfected the method to ensure consistent layering every time, making it a stunning yet surprisingly simple dessert to master.
Ingredients
Quality ingredients are key to the magic. Freshly squeezed lemon juice and zest provide the brightest flavor, while room-temperature eggs and lukewarm milk are non-negotiable for proper emulsification and the signature layer separation.
- 4 eggs, room temperature
- 3/4 cup sugar
- 115g butter, melted
- 1 tablespoon lemon zest
- 1/4 cup lemon juice
- 3/4 cup plain flour (or gluten-free 1:1 blend)
- 2 cups milk, lukewarm
Timing
| Prep Time | 15 minutes |
| Cook Time | 50 minutes |
| Total Time | 1 hour 5 minutes |
Context: This recipe is about 20% faster than many traditional layered desserts because everything comes from one bowl. The active prep is quick, making it a great make-ahead option; the cake needs to cool completely to set the custard layer properly before serving.
Step-by-Step Instructions
Step 1 — Prepare Oven and Pan
Preheat your oven to 325°F (160°C). Line an 8-inch square baking pan with parchment paper, leaving an overhang on two sides for easy removal. This gentle, low temperature is crucial for the slow, even cooking that allows the layers to form without curdling.
Step 2 — Separate and Whip Egg Whites
Carefully separate the egg yolks from the whites, placing them in two different mixing bowls. Using a hand mixer or stand mixer, beat the egg whites until stiff peaks form. (Pro tip: Ensure your bowl and beaters are completely grease-free for maximum volume). Set the whipped whites aside.
Step 3 — Cream Yolks and Sugar
In the bowl with the yolks, add the sugar. Whisk vigorously by hand for 1-2 minutes until the mixture is pale, thick, and creamy. This step, called ribboning, incorporates air and is foundational for the cake’s structure.
Step 4 — Incorporate Wet Ingredients
While whisking continuously, slowly stream in the melted, cooled butter. Follow with the fresh lemon zest and juice. The mixture will be quite liquid at this stage, which is perfectly normal.
Step 5 — Add Flour and Milk
Sift the flour over the yolk mixture and whisk just until combined and smooth. Then, gradually whisk in the lukewarm milk. The batter will be very thin and runny—this is the correct consistency for the magic to happen.
Step 6 — Fold in Egg Whites
Step 7 — Bake to Perfection
Pour the thin batter into your prepared pan. Bake on the center rack for 45-55 minutes. The top should be a light golden brown, and the center should have a slight, consistent jiggle when gently shaken—a key visual cue that the custard layer is set but not overbaked.
Step 8 — Cool and Serve
Let the cake cool completely in the pan on a wire rack. This cooling period, which takes about 2 hours, is when the custard layer fully sets. For clean slices, chill the cake in the refrigerator for at least an hour before using the parchment paper to lift it out and cut. Dust with powdered sugar before serving.

Nutritional Information
| Calories | ~220 |
| Protein | 5g |
| Carbohydrates | 25g |
| Fat | 11g |
| Fiber | 0.5g |
| Sodium | ~85mg |
This lemon custard cake is a good source of protein from the eggs and milk. The fresh lemon juice also contributes a notable amount of Vitamin C. Estimates are based on typical ingredients and a 9-slice serving size; values may vary with specific brands or modifications.
Healthier Alternatives
- Lower-Sugar: — Reduce sugar to 1/2 cup and use a monk fruit blend for a less-sweet, diabetic-friendly version with the same custard texture.
- High-Protein: — Swap 1/4 cup of the flour for unflavored whey or pea protein powder to boost protein content without compromising the delicate layers.
- Dairy-Free: — Use a high-fat plant milk like full-fat coconut or oat milk and vegan butter to create a lactose-free magic cake.
- Lower-Fat: — Substitute half the butter with unsweetened applesauce; note this may slightly soften the top sponge layer.
- Gluten-Free: — As noted in the ingredients, a 1:1 gluten-free flour blend works perfectly for a celiac-safe dessert.
- Low-Sodium: — Use unsalted butter and ensure your baking powder (if your blend contains it) is sodium-free for a heart-healthy option.
Serving Suggestions
- Dust with powdered sugar and fresh lemon zest for a simple, elegant finish.
- Serve with a dollop of lightly sweetened whipped cream or a scoop of vanilla bean ice cream.
- Pair with fresh berries like raspberries or blueberries for a vibrant, summery plate.
- Drizzle with a quick lemon glaze (powdered sugar + lemon juice) for extra tang.
- Enjoy with a cup of Earl Grey tea or a glass of Moscato d’Asti for a perfect afternoon treat.
- Cut into small squares for a delightful addition to a dessert buffet or brunch spread.
This versatile cake is perfect for make-ahead entertaining. In the summer, serve it chilled for a refreshing dessert; in cooler months, enjoy it at room temperature with a warm beverage.
Common Mistakes to Avoid
- Mistake: Using cold milk and eggs. Fix: This prevents proper emulsification. Always use room-temperature eggs and lukewarm milk as specified for the batter to combine correctly.
- Mistake: Over-mixing after adding the flour. Fix: Whisk just until smooth to avoid developing gluten, which can make the custard layer tough.
- Mistake: Deflating the egg whites during folding. Fix: Use a gentle, wide folding motion with a spatula until just combined. A few streaks are okay.
- Mistake: Baking at too high a temperature. Fix: The low 325°F (160°C) oven is essential for slow layer separation. A hotter oven will cause the custard to curdle.
- Mistake: Overbaking until the center is firm. Fix: The cake is done when the top is golden and the center has a slight, consistent jiggle. It sets fully as it cools.
- Mistake: Cutting the cake while warm. Fix: Patience is key. Let it cool completely, then chill it to ensure clean slices and a fully set custard layer.
- Mistake: Using a pan that’s not the right size. Fix: An 8-inch square pan is ideal. A larger pan will make the layers too thin; a smaller one may prevent proper cooking.
Storing Tips
- Fridge: Once completely cool, cover the pan tightly with plastic wrap or transfer slices to an airtight container. Refrigerate for up to 5 days. The flavors often meld and improve after 24 hours.
- Freezer: For longer storage, wrap individual slices or the whole cooled cake (without powdered sugar) tightly in plastic wrap and then foil. Freeze for up to 2 months. Thaw overnight in the refrigerator.
- Reheat: This cake is best served cold or at room temperature. If you prefer it slightly warm, microwave a single slice for 8-12 seconds only. Avoid high heat, which can melt the custard layer.
Properly storing your lemon magic cake is the final step to enjoying its unique texture. For optimal food safety, always store it in the refrigerator within 2 hours of baking, ensuring it stays below 40°F. This makes it an excellent make-ahead dessert for stress-free entertaining.
Conclusion
This Lemon Magic Custard Cake is the ultimate showstopper dessert that does all the work for you, creating its own elegant layers from one simple batter. For more bright citrus treats, try this Triple Lemon Cheesecake Recipe or these Key Lime Pie Bars Recipe. I hope you experience the magic—share your results in the comments!
Frequently Asked Questions
Can I make Lemon Magic Custard Cake ahead of time?
Yes, this cake is an excellent make-ahead dessert. According to standard food storage practices, you can bake it, cool it completely, and refrigerate it for up to 2 days before serving. In fact, the flavors meld and the custard layer sets more firmly, making it even easier to slice cleanly.
What can I use if I don’t have fresh lemons?
Bottled lemon juice can be used in a pinch, but the flavor will be less vibrant. For the zest, which is essential for bright aroma, there is no perfect substitute. I’ve tested using 1/2 teaspoon of pure lemon extract combined with the bottled juice, but the best approach is to always use fresh lemons for the signature sunny flavor of this magic cake.
Why did my magic cake not separate into layers?
This usually happens because the batter was overmixed after adding the flour or the egg whites were fully deflated during folding. Unlike a standard cake batter, this one must remain thin and slightly lumpy with streaks of egg white. To fix it next time, fold gently until just combined and ensure you bake at the specified low temperature for proper, slow separation.
PrintLemon Magic Custard Cake
Ingredients
- 4 eggs, room temperature
- 3/4 cup sugar
- 115g butter, melted
- 1 tablespoon lemon zest
- 1/4 cup lemon juice
- 3/4 cup plain flour
- 2 cups milk, lukewarm
Instructions
- Preheat the oven to 160c. Line a square cake tin with baking paper and set aside.
- Separate the eggs, adding the egg yolks to a large mixing bowl. Add the egg whites to the bowl of a stand mixer and beat until stiff peaks form. Set the eggs whites aside.
- Add the sugar to the bowl with the egg yolks and whisk until well combined. Add the melted butter, lemon zest and lemon juice and whisk once again. Gradually add the flour, whisking well in between each addition, then repeat with the milk.
- Gently fold the egg white into the egg yolk mixture. Pour the batter into the prepared cake tin and bake for 45 minutes or until the cake is golden. Allow to cool in tin completely.
- Remove the cake from the tin and dust with icing sugar if desired before serving.


