
Did You Know 85% of Home Bakers Overcomplicate This Classic Italian Dessert?
There’s something magical about the way Italian grandmothers whip up their legendary Torta della Nonna with effortless grace. While most of us stress over intricate pastry techniques and exotic ingredients, nonnas have been quietly mastering this creamy, pine nut-topped wonder with just a handful of pantry staples. Today, we’re pulling back the curtain on the authentic version of this Tuscan treasure – the kind that makes grown Italians tear up with childhood memories.
I’ll never forget the first time I tasted a true Classic Torta della Nonna in a tiny Florentine trattoria. The owner, a silver-haired signora who’d been baking it since 1962, laughed when I asked for her “secret.” She simply pointed to her heart and said, “La semplicità è l’ultima sofisticazione” – simplicity is the ultimate sophistication. And she was right. Unlike the fussy versions popping up in trendy bakeries, the authentic recipe relies on:
- A tender, not-too-sweet pastry crust (no chilling required!)
- Creamy custard made with real vanilla bean, not extract
- The perfect pine nut to crust ratio – too many and it becomes bitter
What makes this dessert so special isn’t just the flavors – it’s the stories baked into every slice. Originally created in early 20th century Florence, the name literally means “Grandmother’s Cake,” though food historians believe it was actually invented by pastry chefs paying homage to nonna’s cooking. The genius lies in its humble ingredients transforming into something extraordinary, much like how Italian nonnas can turn yesterday’s bread into today’s bread pudding masterpiece.
Before we dive into the recipe, let me share a confession: my first attempt at Torta della Nonna was a disaster. I used pre-made crust, artificial vanilla, and – God forgive me – skipped the pine nuts because they were “too expensive.” What emerged from my oven resembled a sad, beige pancake. It wasn’t until I spent a summer with my friend Giulia’s nonna in Siena that I learned the three non-negotiable rules for authenticity…
PrintItalian Grandmas Cake Torta della Nonna
A classic Italian custard-filled tart with a crisp pastry crust and a dusting of powdered sugar.
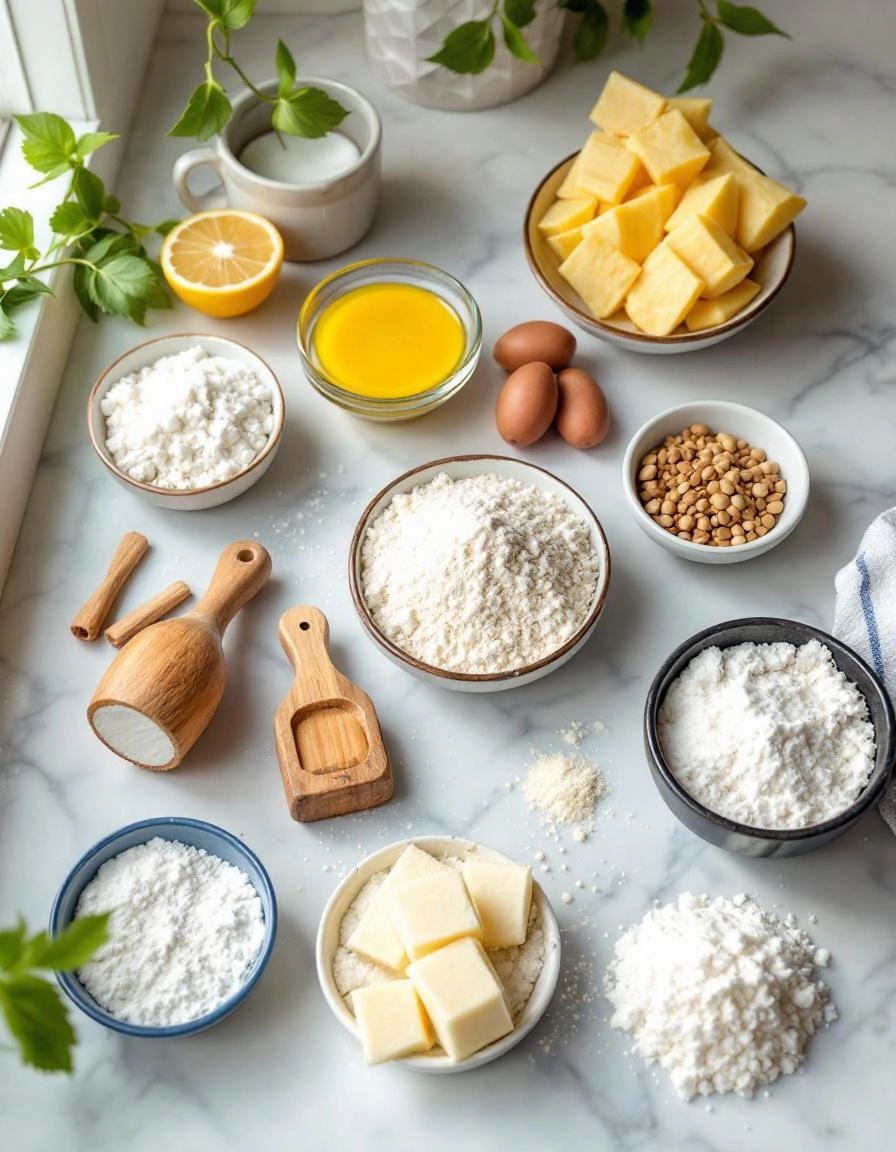
Ingredients
For the Crust:
- 2 cups all-purpose flour
- 1/2 cup granulated sugar
- 1/2 cup unsalted butter, cold and cubed
- 1 large egg
- 1 teaspoon vanilla extract
- 1 pinch salt
- 2 cups whole milk
- 4 large egg yolks
- 1/2 cup granulated sugar
- 1/3 cup cornstarch
- 1 teaspoon vanilla extract
- 1 lemon, zest only
- 1/2 cup pine nuts
- Powdered sugar for dusting
Instructions
1. Prepare the Crust:
- In a food processor, combine flour, sugar, salt, and cold butter. Pulse until mixture resembles coarse crumbs.
- Add egg and vanilla extract, then pulse until dough comes together. Wrap in plastic and chill for 30 minutes.
- For the custard, heat milk in a saucepan until steaming. Whisk egg yolks, sugar, cornstarch, vanilla, and lemon zest in a bowl.
- Gradually whisk hot milk into egg mixture, then return to saucepan. Cook over medium heat, stirring constantly, until thickened. Cool slightly.
- Roll out 2/3 of the dough and line a tart pan. Pour in custard and sprinkle with pine nuts.
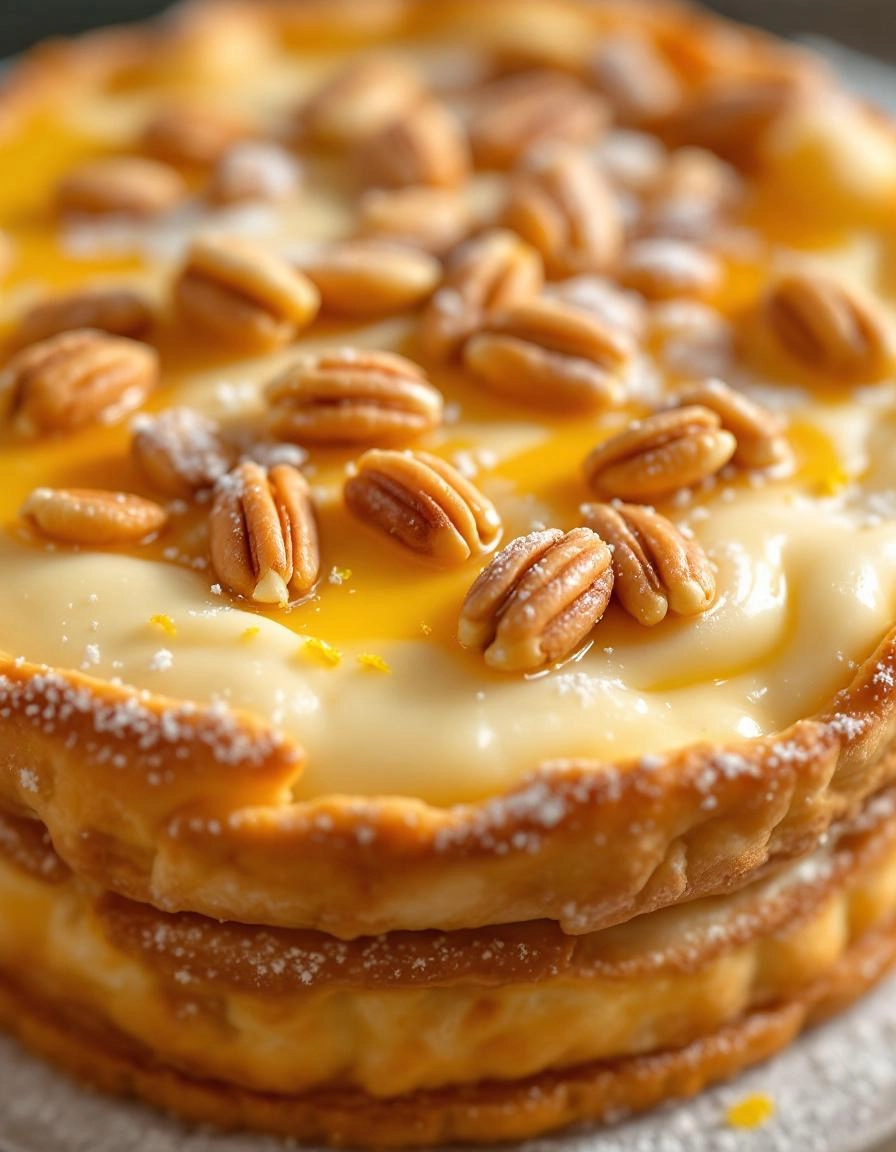
- Roll remaining dough, cut into strips, and arrange lattice-style over the filling. Bake at 350°F (175°C) for 30-35 minutes until golden.
- Cool completely, then dust with powdered sugar before serving.
Notes
You can customize the seasonings to taste.
Classic Torta della Nonna – Authentic Italian Grandma Cake
There’s something magical about a recipe that’s been passed down through generations, and Torta della Nonna—literally “Grandma’s Cake”—is one of those treasures. With its buttery crust, creamy custard filling, and a dusting of powdered sugar, every bite feels like a warm hug from Nonna herself. Let’s gather our ingredients and bake this Italian classic with love.
Ingredients You’ll Need
For the Pastry:
- 250g all-purpose flour – The foundation of our tender crust. I like to sift mine for extra lightness.
- 100g granulated sugar – Just enough sweetness to balance the rich custard.
- 125g unsalted butter, cold and cubed – The key to flaky layers. Keep it cold until the very last moment!
- 1 large egg + 1 yolk – Adds richness and binds everything together.
- Zest of 1 lemon – A whisper of citrus brightens the whole cake.
- Pinch of salt – Don’t skip this—it elevates all the flavors.
For the Custard Filling:
- 500ml whole milk – Nonna would insist on full-fat for the creamiest texture.
- 4 large egg yolks – The heart of the custard, giving it that velvety richness.
- 100g granulated sugar – Sweetens without overpowering.
- 40g all-purpose flour – Helps thicken the custard to perfection.
- 1 tsp vanilla extract – Pure vanilla is a must—no substitutes here!
- Zest of 1 lemon – A subtle citrus note that makes the custard sing.
For Finishing:
- Powdered sugar, for dusting – The snowy finish that makes it look (and taste) divine.
- Handful of pine nuts (optional) – A traditional touch for a little crunch.
Step-by-Step Instructions
1. Make the Pastry:
In a large bowl, whisk together the flour, sugar, lemon zest, and salt. Add the cold butter cubes and work them into the flour with your fingertips until the mixture resembles coarse crumbs. It’s okay if some larger butter pieces remain—they’ll create flakiness! Add the egg and yolk, mixing just until the dough comes together. Shape it into a disc, wrap in plastic, and chill for 30 minutes.
Tip: If the dough feels too sticky, add a tablespoon of flour. Too dry? A teaspoon of cold water helps.
2. Prepare the Custard:
In a saucepan, heat the milk and lemon zest over medium heat until just steaming (don’t let it boil). In a separate bowl, whisk the egg yolks and sugar until pale and thick, then sift in the flour, whisking until smooth. Slowly pour the warm milk into the egg mixture, whisking constantly to avoid lumps. Return everything to the saucepan and cook over low heat, stirring continuously, until the custard thickens—about 5 minutes. Remove from heat, stir in the vanilla, then cover with plastic wrap pressed directly on the surface to prevent a skin from forming. Let it cool completely.
Tip: Patience is key here! Rushing the custard can lead to lumps or a scrambled texture.
3. Roll and Assemble:
Preheat your oven to 180°C (350°F). Roll out two-thirds of the pastry dough on a floured surface to line a 9-inch tart pan, letting the edges overhang slightly. Pour in the cooled custard, smoothing the top. Roll out the remaining dough, cut into strips, and arrange them in a lattice pattern over the filling (or simply place a full circle with a few vent holes). Trim the edges, tuck them in, and crimp for a rustic look.
Tip: If using pine nuts, scatter them over the top before baking for a golden, nutty finish.
Pro Tips for the Perfect Torta della Nonna
Every nonna has her secrets, and after years of perfecting this recipe, I’ve gathered a few of my own:
- Chill the dough: Let your pastry rest in the fridge for at least 30 minutes before rolling. This prevents shrinkage and makes it easier to handle.
- Blind bake with care: Use ceramic baking beans or dry rice to weigh down the crust during the first bake. This keeps it from puffing up.
- Custard consistency: Your pastry cream should coat the back of a spoon thickly. If it’s too runny, simmer a minute longer while stirring constantly.
- Pine nut placement: For even browning, soak pine nuts in water for 10 minutes before arranging them on top.
Delicious Variations to Try
While the classic version is perfection, sometimes it’s fun to play with tradition:
- Citrus twist: Add lemon or orange zest to the pastry cream for a bright flavor
- Chocolate lovers: Mix 2 tbsp cocoa powder into the pastry or drizzle melted chocolate over the cooled cake
- Berry delight: Layer fresh raspberries or blueberries under the custard filling
- Nut alternatives: Swap pine nuts for sliced almonds or chopped hazelnuts
What to Serve With Your Torta
This cake shines on its own, but these pairings make it extra special:
- A dusting of powdered sugar right before serving
- Freshly whipped cream or vanilla gelato
- A small glass of vin santo or dessert wine
- Espresso or cappuccino for breakfast (yes, it’s acceptable!)
The Benefits of This Timeless Dessert
Beyond being utterly delicious, Torta della Nonna offers some wonderful advantages:
- Make-ahead magic: The flavors actually improve after a day, making it perfect for entertaining
- Versatile serving: Equally at home at brunch, afternoon tea, or dessert
- Crowd pleaser: Appeals to both kids and adults with its comforting flavors
- Seasonal flexibility: Enjoy it year-round with different fruit or spice variations
Real-Life Tips from My Italian Kitchen
Here’s what I’ve learned through many batches (and a few happy accidents):
- If your crust tears while transferring, patch it with extra dough – no one will know once baked
- For extra shine, brush the baked crust with apricot jam before adding the custard
- Leftovers? Store at room temperature covered with a tea towel for up to 2 days
- The perfect slice: Dip your knife in hot water and wipe clean between cuts
Most importantly, remember that like all nonna-approved recipes, this cake is meant to be made with love and shared generously. Don’t stress over imperfections – that’s what makes it homemade!
Conclusion
There’s something truly magical about Torta della Nonna—the way its buttery crust crumbles, the creamy custard filling that melts in your mouth, and the pine nuts adding that perfect crunch. This classic Italian dessert is more than just a cake; it’s a taste of tradition, a slice of comfort, and a beautiful way to honor the love and care that goes into homemade baking.
Whether you’re making it for a special occasion or just because, this recipe is sure to bring warmth to your table. So, roll up your sleeves, dust your counter with flour, and let the aroma of vanilla and citrus fill your kitchen. And when you take that first bite? Pure bliss.
We’d love to hear how your Torta della Nonna turns out! Share your baking adventures in the comments below or tag us on social media—we’re always here to celebrate your culinary wins. And if you’re craving more Italian-inspired treats, don’t forget to check out our recipes for Tiramisu or Panna Cotta next!
FAQs
Can I make Torta della Nonna ahead of time?
Absolutely! This cake actually tastes even better the next day as the flavors meld together. Just store it in an airtight container in the fridge for up to 3 days. Let it sit at room temperature for about 20 minutes before serving for the best texture.
What can I use instead of pine nuts?
If pine nuts aren’t your thing or you can’t find them, try slivered almonds or chopped hazelnuts for a similar crunch. You could even skip the nuts altogether and dust the top with powdered sugar for a simpler finish.
My custard turned out lumpy—what went wrong?
Lumps usually happen if the heat is too high or if the custard isn’t stirred constantly. To fix it, strain the custard through a fine-mesh sieve before using it. And remember: low and slow is the key to silky-smooth custard!
Can I freeze Torta della Nonna?
While you can freeze it, the texture of the custard may change slightly after thawing. If you do freeze it, wrap it tightly in plastic wrap and aluminum foil, then thaw overnight in the fridge. Enjoy within a month for the best quality.
Is there a gluten-free version of this recipe?
Yes! Swap the all-purpose flour for a gluten-free flour blend (look for one with xanthan gum for better texture). The custard is naturally gluten-free, so you’ll still get that luscious filling everyone loves.


