Hot Fudge Chocolate Pudding Cake: A Decadent Dessert That Bakes Itself
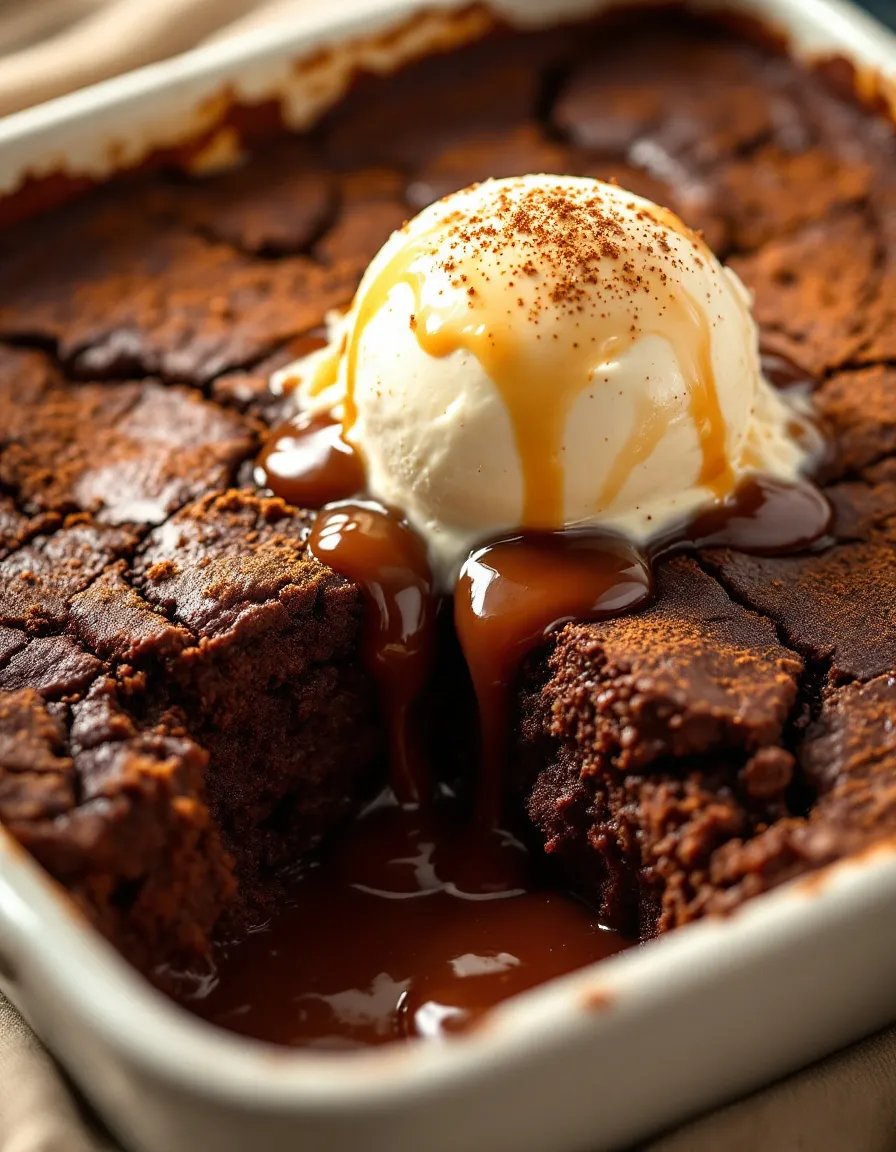
This magical Hot Fudge Chocolate Pudding Cake is the ultimate dessert for chocolate lovers. As it bakes, the cake transforms into two irresistible layers – a fluffy chocolate cake on top with a rich, gooey fudge sauce underneath. The contrast between the light, airy cake and the decadent pudding-like sauce creates a dessert experience that will have everyone asking for seconds.
What makes this chocolate pudding cake so special is its self-saucing nature. With just a simple mixture of pantry staples, you’ll create a dessert that seems far more sophisticated than the effort required. The warm chocolate aroma that fills your kitchen as it bakes is just a preview of the indulgent treat to come. Serve it warm with a scoop of vanilla ice cream for the perfect temperature and texture contrast.
Quick Recipe Highlights
- Flavor Profile: Rich chocolate with deep cocoa notes balanced by sweet fudge sauce
- Texture: Light cake layer contrasts beautifully with thick, velvety pudding sauce
- Aroma: Intense chocolate fragrance with warm vanilla undertones
- Visual Appeal: Rustic presentation with dramatic sauce oozing when served
- Skill Level Needed: Beginner-friendly with simple mixing techniques
- Special Equipment: Just a mixing bowl and 8-inch baking dish
Recipe Overview
- Difficulty Level: Perfect for novice bakers, this recipe requires no special skills beyond basic mixing
- Category: Dessert, comfort food, chocolate recipes
- Cuisine: American classic with roots in Depression-era cooking
- Cost: Inexpensive ingredients make this an affordable luxury
- Season: Ideal year-round but especially comforting in colder months
- Occasion: Perfect for family dinners, potlucks, or when you need chocolate therapy
Why You’ll Love This Hot Fudge Chocolate Pudding Cake
The magic of this dessert lies in its transformation during baking. What starts as a simple batter separates into two distinct layers – cake on top, sauce underneath. The contrast between the light, spongy cake and the rich, molten chocolate sauce creates a textural experience that’s simply irresistible. Each spoonful delivers the perfect balance of cake and sauce, making every bite as good as the first.
Beyond its delicious results, this recipe offers incredible convenience. With just 15 minutes of prep time, you can have this dessert ready for the oven. It uses basic pantry ingredients you likely already have on hand, making it perfect for spontaneous chocolate cravings. The hands-off baking time means you can focus on preparing the rest of your meal while dessert takes care of itself.
Nutritionally, this dessert offers more than just empty calories. Cocoa powder provides antioxidants, while the milk in the sauce contributes calcium. When served in reasonable portions, it can satisfy chocolate cravings without going overboard. The protein from the eggs and milk helps balance the carbohydrates, preventing the sugar crash that comes with many desserts.
For entertaining, this pudding cake is a guaranteed crowd-pleaser. Its rustic presentation makes it approachable, while the dramatic sauce reveal when serving adds an element of surprise. Guests will be impressed by what appears to be a complicated dessert, never guessing how simple it was to prepare. It’s particularly popular at dinner parties where you want to serve something homemade but don’t have hours to spend in the kitchen.
Cost-effectiveness is another major advantage. Compared to restaurant desserts or specialty bakery items, this homemade version delivers premium taste at a fraction of the price. The ingredients are all affordable staples, and the recipe yields generous portions that can serve 6-8 people comfortably. For budget-conscious home cooks who still want to indulge, this recipe hits the sweet spot.
Historical Background and Cultural Significance
The concept of self-saucing puddings dates back to early American cooking, when resourceful home cooks developed clever techniques to create impressive desserts with limited ingredients. Chocolate pudding cakes became particularly popular during the Great Depression, offering a way to stretch expensive ingredients like chocolate and eggs while still delivering satisfying results. The magic of the sauce forming beneath the cake was both practical and delightful.
In mid-20th century America, these types of desserts saw a resurgence as packaged mixes made them even more accessible to home cooks. The convenience of the method combined with the irresistible chocolate flavor made them staples at church potlucks and family gatherings. Many home cooks have fond memories of these desserts from their childhood, making them nostalgic comfort foods.
The evolution of the recipe has seen variations emerge, from using different types of chocolate to adding flavorings like espresso or mint. Some versions incorporate nuts or coconut for texture, while others keep it pure and simple. The basic technique remains remarkably consistent though – a batter topped with liquid that transforms during baking into a sauce.
Regionally, you’ll find similar concepts under different names – some call it chocolate cobbler, others molten lava cake, or simply hot fudge pudding. The principle remains the same: creating a dessert that bakes its own sauce, delivering maximum flavor with minimal effort. This version stays true to the classic while using quality ingredients for superior results.
Ingredient Deep Dive
Cocoa Powder
Dutch-processed cocoa powder works best in this recipe, providing a deep, rich chocolate flavor without acidity. Cocoa powder contains flavonoids with antioxidant properties, and its intense flavor allows you to use less than you would with solid chocolate. Store in an airtight container in a cool, dark place to prevent moisture absorption and flavor degradation.
For substitutions, natural cocoa powder can be used but may result in a slightly less rich flavor. In a pinch, you could melt dark chocolate and reduce some of the other liquids, though this changes the texture. The type of cocoa significantly impacts the final taste, so choose a quality brand you enjoy for best results.
Brown Sugar
The molasses in brown sugar contributes to the sauce’s rich, caramel-like flavor and thick consistency. It also helps create the perfect balance between sweet and bitter chocolate notes. Brown sugar contains slightly more minerals than white sugar due to the molasses content, though the amounts are nutritionally insignificant.
Storage is crucial – keep brown sugar in an airtight container to prevent hardening. If it does harden, place a slice of bread in the container overnight to restore moisture. For substitutions, you can make your own brown sugar by mixing white sugar with molasses, or use all white sugar in a pinch, though the flavor profile will be different.
Common Mistakes to Avoid
- Overmixing the batter – this can develop gluten and make the cake tough rather than tender
- Using cold ingredients – bring eggs and milk to room temperature for better incorporation
- Incorrect baking dish size – an 8-inch square is ideal; too large and the sauce may burn
- Opening the oven too early – this can cause the cake to fall before setting properly
- Undermeasuring the boiling water – precise liquid amounts are crucial for proper sauce formation
- Skipping the dusting of sugar/cocoa – this helps create the distinct layer separation
- Overbaking – the cake should be just set with sauce bubbling beneath it
- Serving too soon – let it rest 10-15 minutes so sauce thickens slightly
Essential Techniques
Proper Layering
The key to success with this pudding cake lies in the careful layering of ingredients before baking. After spreading the batter evenly in the pan, you’ll sprinkle a mixture of sugar and cocoa over the top. This layer is what helps create the magical sauce beneath the cake. When you pour the hot water over everything, resist the urge to stir – the water needs to percolate through these layers to create the proper texture contrast.
Temperature Control
Baking at the right temperature is crucial for proper layer formation. Too hot and the cake may set before the sauce can form properly; too cool and the layers might not separate distinctly. The oven should be fully preheated before baking, and position the rack in the center for even heat distribution. Watch for visual cues – the cake should look set on top with visible bubbling around the edges when done.
Pro Tips for Perfect Hot Fudge Chocolate Pudding Cake
- Use good quality cocoa powder – it makes a noticeable difference in flavor intensity
- Bring all ingredients to room temperature for easiest mixing and most even baking
- Measure flour correctly by spooning into the cup and leveling – don’t scoop directly
- For extra flavor, add a pinch of espresso powder to enhance the chocolate notes
- Let the baked cake rest 10-15 minutes before serving – this helps the sauce thicken slightly
- Serve warm with vanilla ice cream for the perfect temperature contrast
- For a pretty presentation, dust with powdered sugar just before serving
Variations and Adaptations
Mint Chocolate Version
Add 1/2 teaspoon peppermint extract to the batter and sprinkle crushed peppermint candies over the top before baking. The cool mint flavor pairs beautifully with the rich chocolate, creating a refreshing twist on the classic. This variation is especially nice during the winter holidays.
Mocha Variation
Dissolve 1 tablespoon instant espresso powder in the hot water before pouring it over the cake. The coffee enhances the chocolate flavor without making the dessert taste like coffee. This adult version is perfect for dinner parties or when you want a more sophisticated flavor profile.
Serving and Presentation Guide
Presentation is key to maximizing the visual appeal of this rustic dessert. Serve the pudding cake directly from the baking dish at the table for a homespun, comforting effect. Use a large spoon to scoop down through the cake layer into the sauce below, creating a dramatic reveal of the fudgy layer beneath.
Garnishes can elevate the simple presentation – a dusting of powdered sugar, fresh berries, or mint leaves add color contrast. For individual servings, spoon into shallow bowls, making sure each portion gets plenty of sauce. Always include a scoop of vanilla ice cream or dollop of whipped cream on the side or directly on top.
Wine and Beverage Pairing
The rich chocolate flavors of this dessert pair beautifully with a glass of ruby port or a sweet sherry. The wine’s sweetness balances the dessert’s intensity while its acidity cuts through the richness. For non-alcoholic options, try cold milk (a classic pairing) or a dark roast coffee. The bitterness of coffee provides a nice contrast to the sweet chocolate.
If serving after a heavy meal, consider offering espresso or strong tea to help digestion. For summer gatherings, iced coffee or chocolate milk shakes make fun accompaniments. Remember that the dessert is quite rich, so beverages should either complement or cut through that richness rather than compete with it.
Storage and Shelf Life
This dessert is best enjoyed fresh, but leftovers can be stored covered in the refrigerator for up to 3 days. To reheat, place individual portions in the microwave for 30-45 seconds or warm in a 300°F oven for about 10 minutes. The sauce will thicken when chilled but becomes fluid again when reheated.
For longer storage, you can freeze portions for up to a month. Thaw in the refrigerator overnight before reheating. Note that the cake texture changes slightly after freezing – it becomes more dense but still delicious. Always store with plastic wrap pressed directly on the surface to prevent drying out.
Make Ahead Strategies
While best baked fresh, you can prepare components in advance. Mix the dry ingredients up to a week ahead and store in an airtight container. The wet ingredients can be measured and kept refrigerated overnight. When ready to bake, simply combine everything and proceed with the recipe.
For complete make-ahead convenience, bake the pudding cake and refrigerate before serving. Reheat the entire dish in a 325°F oven for 15-20 minutes before serving. The texture will be slightly different but still enjoyable. For best results, bake no more than 4 hours before serving.
Scaling Instructions
This recipe scales beautifully for different group sizes. To halve, use a 6-inch square baking dish and reduce baking time by about 5 minutes. For doubling, use a 9×13-inch pan and increase baking time by 10-15 minutes. Watch for visual cues rather than relying strictly on time.
When scaling up, mix the batter in batches if your bowls aren’t large enough to accommodate the increased volume. Ensure your baking dish has high enough sides to contain the increased quantity, especially important with the liquid component that creates the sauce.
Nutritional Deep Dive
While certainly an indulgent dessert, this pudding cake offers some nutritional benefits. Cocoa powder provides flavonoids with antioxidant properties, while eggs contribute protein and essential amino acids. The milk in the sauce offers calcium and vitamin D. A standard serving contains about 350-400 calories, with most coming from carbohydrates.
To make it slightly healthier, you can reduce the sugar by 1/4 cup without dramatically affecting texture. Using whole wheat pastry flour adds fiber, though it will make the cake denser. For portion control, serve with fresh fruit to increase satisfaction with smaller servings of the rich dessert.
Dietary Adaptations
Gluten-Free Version
Replace all-purpose flour with an equal amount of gluten-free flour blend containing xanthan gum. Ensure all other ingredients are certified gluten-free. The texture may be slightly more delicate but still delicious.
Dairy-Free Option
Use plant-based milk (almond or oat work well) and dairy-free margarine. Check that your cocoa powder is dairy-free (some brands may contain milk solids). The sauce will be slightly thinner but still flavorful.
Troubleshooting Guide
Sauce Too Thin
If your sauce doesn’t thicken properly, you may have added too much liquid or not baked long enough. Next time, measure water carefully and ensure your oven temperature is accurate. For immediate fix, let the dessert rest longer before serving – the sauce will thicken as it cools.
Cake Too Dense
A dense cake layer usually results from overmixing the batter or using too much flour. Mix just until ingredients are combined, and measure flour carefully by spooning into cups and leveling. If your cake consistently turns out dense, try substituting 1/4 cup of flour with cornstarch for a lighter texture.
Frequently Asked Questions
Can I make this pudding cake in individual ramekins?
Absolutely! Divide the batter among 6-8 ovenproof ramekins, sprinkle with the sugar mixture, and add hot water to each. Baking time will be shorter – start checking at 25 minutes. Individual servings make for an elegant presentation.
Why did my sauce end up on top instead of underneath?
This usually happens if the batter is too thin or the baking dish is too large. Ensure you’re using the correct size pan and that your batter has the proper consistency – it should be thick but pourable.
Can I use melted chocolate instead of cocoa powder?
While possible, it will change the texture significantly. If substituting, use 3 ounces melted dark chocolate and reduce the butter by 1 tablespoon. The sauce may be thicker and richer.
Additional Resources
For more chocolate dessert inspiration, check out our recipes for flourless chocolate cake and chocolate soufflé. If you enjoy the self-saucing concept, try our lemon pudding cake or caramel pecan version. Our baking essentials guide has tips on measuring ingredients accurately and working with cocoa powder.
Invest in an oven thermometer to ensure your baking temperature is accurate – crucial for recipes like this where timing affects texture. A good quality cocoa powder makes all the difference – we recommend Valrhona or Droste for intense chocolate flavor.
Join the Conversation
We’d love to see your Hot Fudge Chocolate Pudding Cake creations! Share your photos on Instagram with #ChocolatePuddingCake and tag us @BakingDelights. Tell us about any variations you tried or special occasions you made it for. Your feedback helps us create even better recipes for our community.
Have a question we didn’t answer? Leave a comment below and our baking experts will respond within 24 hours. We read every comment and appreciate your input. If you loved this recipe, please consider rating it and sharing with friends who might enjoy it too!
The Recipe
Hot Fudge Chocolate Pudding Cake
Serves: 6
Prep Time: 15 mins
Cook Time: 40 mins
Total Time: 55 mins
Kitchen Equipment Needed
- 8-inch square baking dish
- Mixing bowls
- Whisk
- Measuring cups and spoons
- Spatula
Ingredients
- 1 cup all-purpose flour
- 3/4 cup granulated sugar
- 2 tablespoons plus 1/4 cup cocoa powder, divided
- 2 teaspoons baking powder
- 1/4 teaspoon salt
- 1/2 cup milk
- 2 tablespoons melted butter
- 1 teaspoon vanilla extract
- 3/4 cup packed brown sugar
- 1 3/4 cups hot water
Directions
- Preheat oven to 350°F (175°C).
- In a medium bowl, whisk together flour, granulated sugar, 2 tablespoons cocoa powder, baking powder, and salt.
- Stir in milk, melted butter, and vanilla until smooth. Spread batter evenly in ungreased 8-inch square baking dish.
- In a small bowl, mix brown sugar and remaining 1/4 cup cocoa powder. Sprinkle evenly over batter.
- Pour hot water over the top (do not stir!).
- Bake 35-40 minutes until center is almost set and sauce is bubbling around edges.
- Remove from oven and let stand 10 minutes before serving.
Recipe Notes
- For extra richness, serve with vanilla ice cream or whipped cream
- Leftovers can be refrigerated and reheated gently in the microwave
- Double the recipe in a 9×13-inch pan for larger gatherings


