
Discover the joy of making your own homemade pop-tarts, a delightful twist on a classic breakfast treat. This simple recipe transforms premade pie crust into golden, flaky pastries filled with your favorite jelly flavor and topped with a smooth layer of frosting and colorful sprinkles. Whether you’re reliving childhood memories or creating new ones, these pop-tarts offer a customizable, fun, and delicious way to start your day or enjoy as a snack. Perfect for bakers of all levels, they’re a surefire way to bring smiles to the breakfast table.
PrintHomemade pop-tarts Recipe

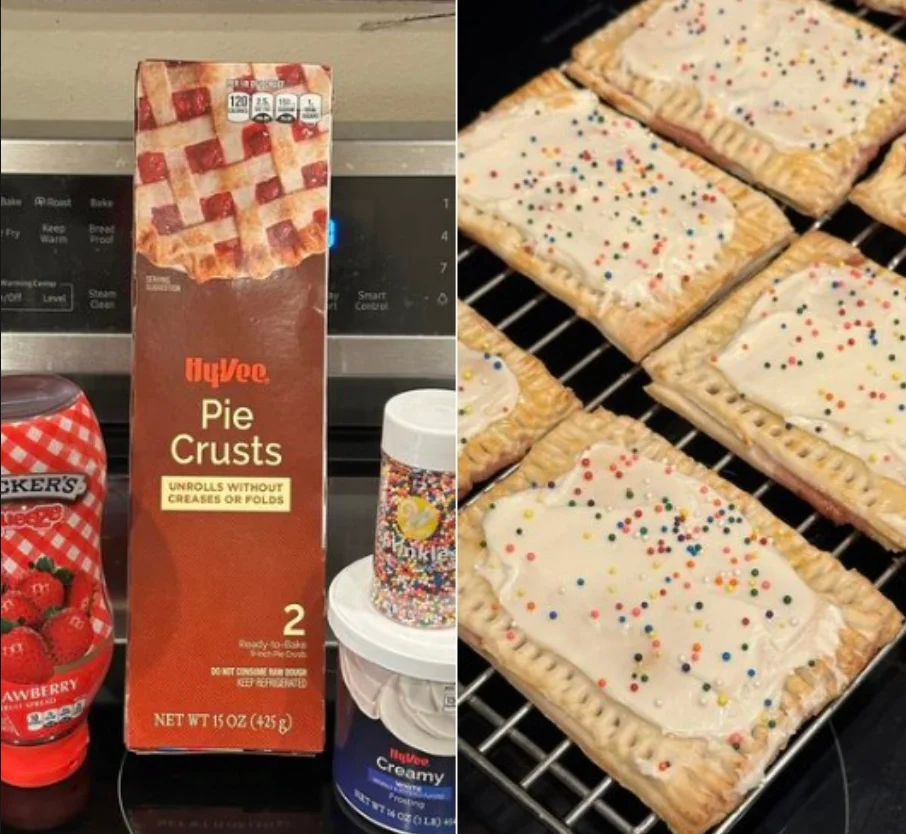
Ingredients
- 2 boxes of premade pie crust
- Strawberry jelly (or your favorite flavor)
- 1 egg
- Frosting (store-bought or homemade)
- Sprinkles
Instructions
- Preheat the Oven: Begin by preheating your oven to 425°F (220°C). This ensures that your oven is at the right temperature for baking the pop-tarts.
- Prepare the Baking Sheet: Line a cookie sheet with parchment paper. This prevents the pop-tarts from sticking and makes cleanup easier.
- Cut the Pie Crust: Unroll each pie crust on a flat surface. Using a knife (or a pizza cutter for more precision), cut out rectangles or squares of your desired size. Aim for 16 pieces in total, which will create 8 pop-tarts.
- Arrange the Base: Place 8 of the cut pie crust pieces on the prepared cookie sheet, spacing them apart to allow for expansion during baking.
- Add the Jelly: Spoon approximately 1 teaspoon of strawberry jelly (or your chosen flavor) onto the center of each piece on the cookie sheet. Spread the jelly gently, leaving a small border around the edges to seal the pop-tarts.
- Top and Seal: Lay the remaining 8 pieces of pie crust on top of the jelly-covered bases. Use a fork to crimp and seal the edges of each pop-tart, ensuring the filling is securely enclosed.
- Ventilate: Poke a few holes in the top crust of each pop-tart with a toothpick. This allows steam to escape and prevents the pop-tarts from bursting open.
- Apply Egg Wash: Beat the egg in a small bowl to create an egg wash. Brush the top of each pop-tart with the egg wash, giving them a nice golden finish upon baking.
- Bake: Place the cookie sheet in the preheated oven and bake for 7-8 minutes, or until the pop-tarts are lightly golden brown.
- Cool: After baking, transfer the pop-tarts to a wire cooling rack. Let them cool completely before proceeding to the next step. This is crucial for the frosting to set properly.
- Frost and Decorate: Once cooled, spread a layer of frosting over the top of each pop-tart. Add sprinkles for a colorful, fun finish.
- Let Frosting Set: Allow some time for the frosting to set before serving or storing the pop-tarts. This ensures they keep their shape and are less messy to eat.
- Serve or Store: Enjoy your homemade pop-tarts fresh, or store them in the refrigerator if you prefer them chilled. They can be reheated for a warm treat.
Enjoy creating and indulging in your very own homemade pop-tarts, a delightful treat that’s perfect for breakfast, snack time, or any moment in need of a sweet, personalized touch.
Notes
- Pie Crust Selection: While premade pie crusts are convenient and time-saving, opting for high-quality brands can significantly affect the taste and texture of your pop-tarts. Look for crusts that are buttery and flaky for the best results.
- Jelly Filling: Strawberry jelly is a classic choice, but don’t hesitate to experiment with different flavors like raspberry, apricot, or even mixed berry. For a less traditional take, consider chocolate spread or peanut butter.
- Frosting Choices: Whether you choose store-bought or homemade frosting, consider flavor matching or contrasting with your jelly. Vanilla frosting is versatile, but chocolate or cream cheese frosting can add an interesting twist.
Tips:
- Cutting the Crust: For uniform pop-tarts, use a ruler and a pizza cutter instead of a knife. This will help you achieve even rectangles or squares, making your pop-tarts look professionally made.
- Sealing the Edges: After crimping the edges with a fork, you might also want to lightly brush the edge of one piece of crust with water before placing the second piece on top. This acts as a “glue,” ensuring a tighter seal and reducing the chances of the jelly leaking out.
- Egg Wash: When applying the egg wash, be careful not to let it drip down the sides, as this can cause the pop-tarts to stick to the parchment paper.
- Cooling Before Frosting: Ensure the pop-tarts are completely cooled before applying frosting. If they are too warm, the frosting will melt and run off the sides.
- Decorating: For a more creative touch, use colored frosting or make your own by adding a few drops of food coloring to white frosting. You can also use themed sprinkles for holidays or special occasions.
- Storage: If you plan to store the pop-tarts, wait until the frosting is fully set before stacking them. Use wax paper between layers to prevent sticking. They can be stored in an airtight container at room temperature for a couple of days or refrigerated for longer freshness.
- Reheating: To recapture the just-baked taste, pop-tarts can be briefly reheated in the oven or toaster oven. Avoid using a microwave, as it can make the crust soggy.
- Serving Suggestion: For an extra indulgent treat, serve your homemade pop-tarts with a scoop of vanilla ice cream or a dollop of whipped cream on the side.
By following these notes and tips, you’ll elevate your homemade pop-tart experience, creating a delicious, comforting treat that’s sure to impress family and friends alike. Enjoy the process and the tasty results!


