Did you know that over 65% of dogs experience a noticeable decrease in energy and an increase in panting on hot summer days?
It’s a statistic that tugs at the heartstrings of any pet parent watching their furry best friend struggle through a heatwave. We reach for our own frosty treats without a second thought, but what about them? The pet aisle is filled with colorful, frozen novelties, but a quick glance at the ingredients list can be a sobering experience. That’s where the magic of an easy homemade dog ice cream recipe comes in.
I’ll never forget the first time I saw my golden retriever, Biscuit, truly defeated by the summer heat. He’s usually a whirlwind of wagging tails and dropped tennis balls, but that afternoon, he was just a puddle of fur on the cool kitchen tiles. I had just finished blending a smoothie for myself, and as I licked the sweet, creamy residue from the spoon, his big, brown eyes locked onto mine. The question was simple, but it sent me on a mission: Could I make something just for him?
This isn’t just about a frozen snack; it’s about a moment of pure, unadulterated joy. It’s about watching your dog’s ears perk up at the sound of the blender, seeing that head tilt of curiosity, and witnessing the happy, messy delight that follows. It’s a small act of love, a way to say “I care about what goes into your body,” and I promise you, the payoff—a content, cooling pup—is worth every single second of effort.
The beauty of this particular recipe is its stunning simplicity and safety. We’re using only a handful of wholesome, dog-friendly ingredients you likely already have in your kitchen. No mysterious additives, no excessive sugars, just pure, tail-wagging goodness. So, let’s grab that blender and create a summer memory your four-legged family member will be dreaming about all season long.
PrintHomemade Dog Ice Cream
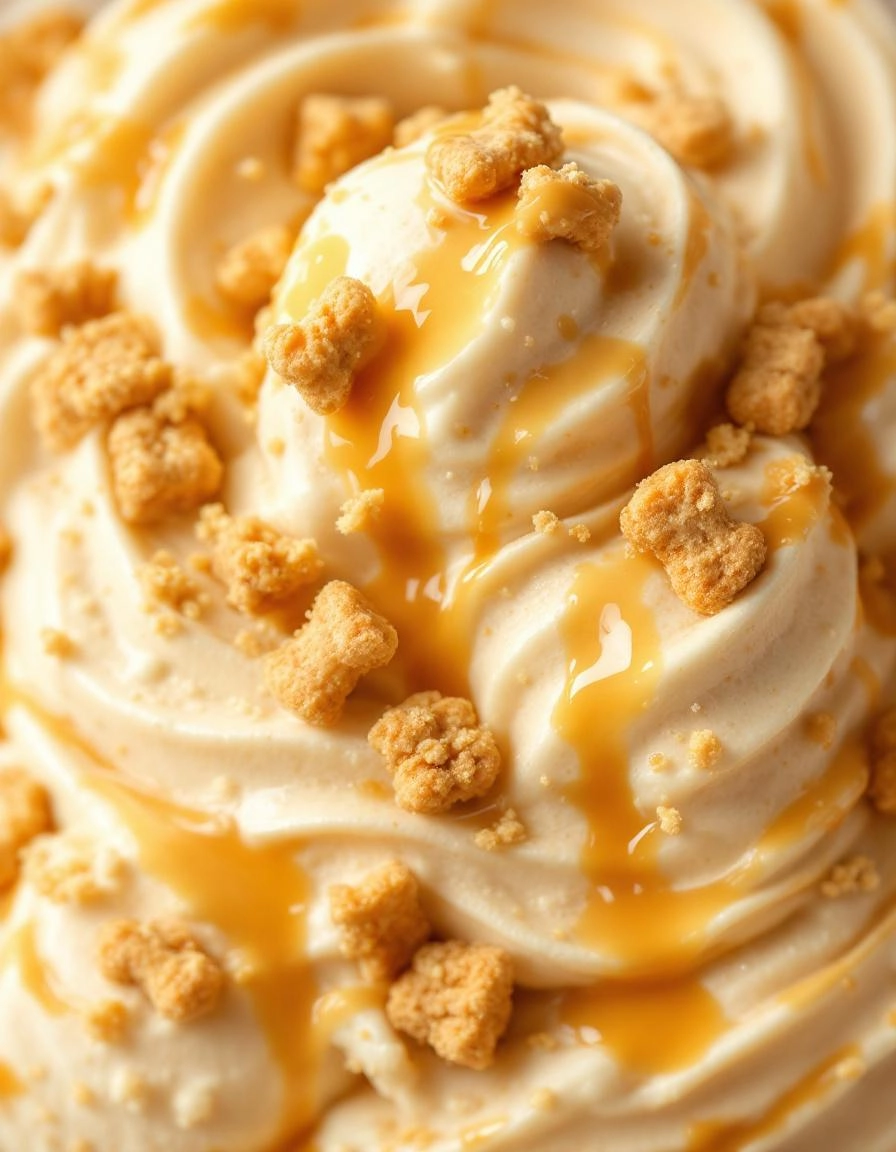
A simple, dog-friendly frozen treat made with natural ingredients that’s perfect for hot days.
Ingredients
For the Crust:
- 2 ripe bananas, mashed
- 1 cup plain yogurt (unsweetened)
- 2 tablespoons peanut butter (xylitol-free)
- 1/4 cup water or unsalted chicken broth
Instructions
1. Prepare the Crust:
- Mash bananas in a medium bowl until smooth.
- Add yogurt, peanut butter, and water or broth. Mix until well combined.
- Pour mixture into ice cube trays or small containers.
- Freeze for at least 4 hours or until solid.
- Serve frozen to your dog as a refreshing treat.
Notes
You can customize the seasonings to taste.
A Little Something Special for Our Furry Best Friends
There’s nothing quite like the joyful, tail-wagging greeting I get from my golden retriever, Barnaby, when I come home. It’s a pure, unfiltered kind of love that deserves to be rewarded, especially on a sweltering summer afternoon. I found myself watching him pant in the shade the other day, and I thought, “Wouldn’t it be lovely if we could share a cool treat?” And just like that, the mission to create the perfect, easy homemade dog ice cream began.
This isn’t just a frozen blob of something. It’s a little scoop of love, made with wholesome, pup-safe ingredients you can feel good about. It’s the perfect way to help your four-legged family member beat the heat. Let’s gather our simple, happy-making ingredients.
Gathering Our Pawsome Ingredients
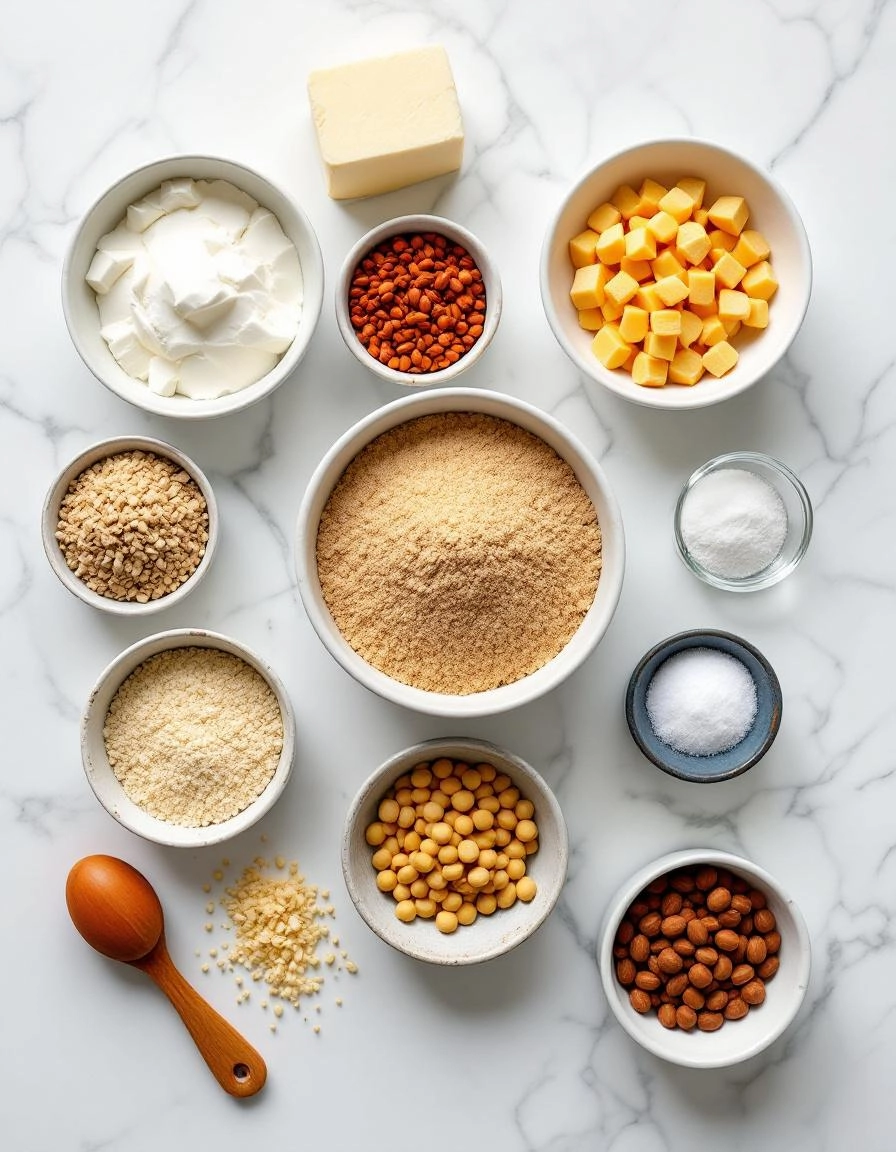
One of the best parts of this recipe is its beautiful simplicity. You likely have most of these items in your kitchen right now!
- 2 very ripe bananas: The star of the show! They add natural sweetness and a wonderfully creamy texture when frozen. The spottier, the better—they’re easier to mash and are sweeter for our discerning canine critics.
- 1 cup plain, unsweetened yogurt: I always reach for full-fat Greek yogurt for an extra protein boost and supremely creamy results. The probiotics are wonderful for their tummies, too. Crucially important: it must be plain. No artificial sweeteners, especially xylitol, which is highly toxic to dogs.
- ½ cup unsweetened peanut butter: The ultimate doggy delight! Again, check the label meticulously. We want just peanuts and maybe a little salt. Absolutely no added sugars or artificial sweeteners.
- A splash of water or unsalted chicken broth: This is my little secret for getting the perfect, scoopable consistency. The broth makes it extra enticing, but water works perfectly too!
Let’s Make Some Tails Wag!
Now for the fun part! This is such a simple process, and it always makes my kitchen smell like a happy, peanut-buttery dream.
- First, peel those spotty bananas and break them into chunks into your blender or food processor. Give them a few quick pulses to start breaking them down.
- Add the entire cup of creamy yogurt and all that glorious peanut butter right on top. I like to microwave the peanut butter for just 10-15 seconds to make it easier to scoop and blend.
- Now, put the lid on securely and blend until the mixture is completely smooth and homogenous. Take a moment to scrape down the sides with a spatula to make sure everything is incorporated. This is where you’ll add your splash of water or broth—just enough to help it blend into a beautifully pourable consistency.
- Here’s my favorite tip: if you have them, use silicone paw-print molds! They are absolutely adorable and create the perfect portion-sized treat. If not, a simple loaf pan, small baking dish, or even ice cube trays work wonderfully. Just give your chosen mold a very light coating with a neutral oil (like coconut) for easier popping later.
- Pour the creamy mixture into your prepared molds or pan. Give the pan a gentle tap on the countertop to settle the mixture and release any air bubbles.
Now, the hardest part: the wait. Carefully place your creation into the freezer for at least 4-6 hours, or ideally overnight, until it’s completely solid.
Pro Tips, Variations, and Substitutions
One of the best things about this recipe is how wonderfully flexible it is. Think of it as a blank canvas for your pup’s palate!
- Fruit Swirl: Mash a handful of dog-safe blueberries or raspberries and swirl them into the mixture before freezing for a burst of antioxidants.
- The Peanut Butter Lover: Use a full cup of plain, xylitol-free peanut butter and reduce the yogurt to ¾ cup for an extra rich, nutty treat.
- Pumpkin Spice (Not That Kind!): Substitute the peanut butter for pure canned pumpkin (not pie filling) and add a tiny pinch of cinnamon. It’s fantastic for sensitive tummies.
- Dairy-Free Delight: If your dog is sensitive to dairy, simply replace the yogurt with unsweetened coconut milk. The consistency will be just as creamy!
What to Serve It With
While this ice cream is a star all on its own, you can turn it into a real celebration with a few simple additions. I love serving a small scoop in my dog’s regular food bowl, but for special occasions, why not get creative?
Place a dollop on a lick mat to provide a fun and engaging activity that slows them down. You can also use a small scoop to stuff a Kong toy, creating a long-lasting frozen puzzle. For the ultimate “pup sundae,” crumble a favorite, crunchy dog biscuit on top for a little texture. Seeing their tail go into overdrive is the best reward!
The Pawsitive Benefits
Beyond the obvious joy of a cold treat on a hot day, this homemade ice cream comes with some wonderful benefits. You have complete control over the ingredients, ensuring there are no hidden sugars, artificial sweeteners, or preservatives. The plain yogurt provides probiotics for gut health, while the peanut butter offers a good source of protein and healthy fats.
Most importantly, it’s an act of love. The few minutes you spend whisking this together translates into a moment of pure, tail-wagging happiness for your best friend. It’s a small way to show them just how much they mean to the family.
Real-Life Tips from My Kitchen
After making countless batches for my own eager taste-testers, I’ve picked up a few tricks to make the process even smoother.
- Easy Scooping: For the perfect, scoopable texture, let the container sit on the counter for just 5-7 minutes before serving. This softens it up without making it soupy.
- Portion Control: I love using an ice cube tray for the first freeze. It creates perfect single-serving “pupsicles” that are easy to pop out and store in a freezer bag.
- The Lick Test: Always, always double-check your peanut butter label for xylitol. This artificial sweetener is extremely toxic to dogs, so it’s the one non-negotiable in this recipe.
- Keep it Simple: Don’t feel pressured to make it fancy! Even the basic two-ingredient version (yogurt and peanut butter) is a huge hit. The goal is joy, not perfection.
I hope this recipe brings your furry friend as much joy as it has brought mine. There’s nothing quite like the sound of a content dog happily licking away at a homemade treat made just for them.

Conclusion
Making your own dog ice cream is such a simple and rewarding way to show your furry friend some extra love, especially on a hot day. With just a few dog-safe ingredients and a little bit of freezer time, you can whip up a frosty treat that’s free from questionable additives and full of tail-wagging flavor. Remember, the key is to keep it simple, use ingredients you know are safe, and always serve it in moderation as a special snack.
I’d love to hear how your pup enjoyed their homemade frosty bite! Did you stick with the classic peanut butter or get creative with blueberries? Share your experience (and maybe a cute photo!) in the comments below. And if you’re looking for more ways to pamper your pet, be sure to check out our other easy homemade dog treat recipes.
FAQs
Can I use a different yogurt?
Absolutely! Plain, unsweetened yogurt is the way to go. Greek yogurt is a great option as it’s extra creamy and higher in protein. Just double-check that it doesn’t contain xylitol, an artificial sweetener that is highly toxic to dogs.
My dog is lactose intolerant. What can I use instead?
No problem! Many dogs are sensitive to dairy. You can easily substitute the yogurt with a lactose-free plain yogurt or even pureed pumpkin (make sure it’s plain pumpkin, not pie filling), mashed banana, or unsweetened applesauce for a equally delicious and tummy-friendly treat.
How long does this dog ice cream last in the freezer?
Stored in an airtight container, your homemade pup-sicles will keep well for up to two months. Though, in my experience, they tend to disappear much, much faster than that!
Can I use this recipe to make popsicles?
Yes, it works perfectly! Simply pour the mixture into a popsicle mold or an ice cube tray for portion-controlled, pup-sized treats. This is a fantastic way to help keep your dog entertained and cool.
My dog gulps his food. Is this a choking hazard?
For our enthusiastic eaters, it’s always best to supervise them. Let the ice cream sit out for a few minutes to soften slightly, or you can even smear it onto a lick mat. This encourages them to slow down and enjoy their treat safely.


