
Introduction
Craving a classic dessert that’s both comforting and incredibly simple to make? This is The Best Homemade Banana Pudding, a no-bake treat that comes together in just 20 minutes. It’s the perfect creamy, sweet solution for a quick family dessert or a last-minute potluck contribution. If you love banana flavor, you might also enjoy this Banana Pudding Crunch Cheesecake Recipe for another delicious twist.
Ingredients
This classic homemade banana pudding recipe comes together with simple ingredients for a dessert that’s wonderfully creamy, sweet, and full of nostalgic flavor.
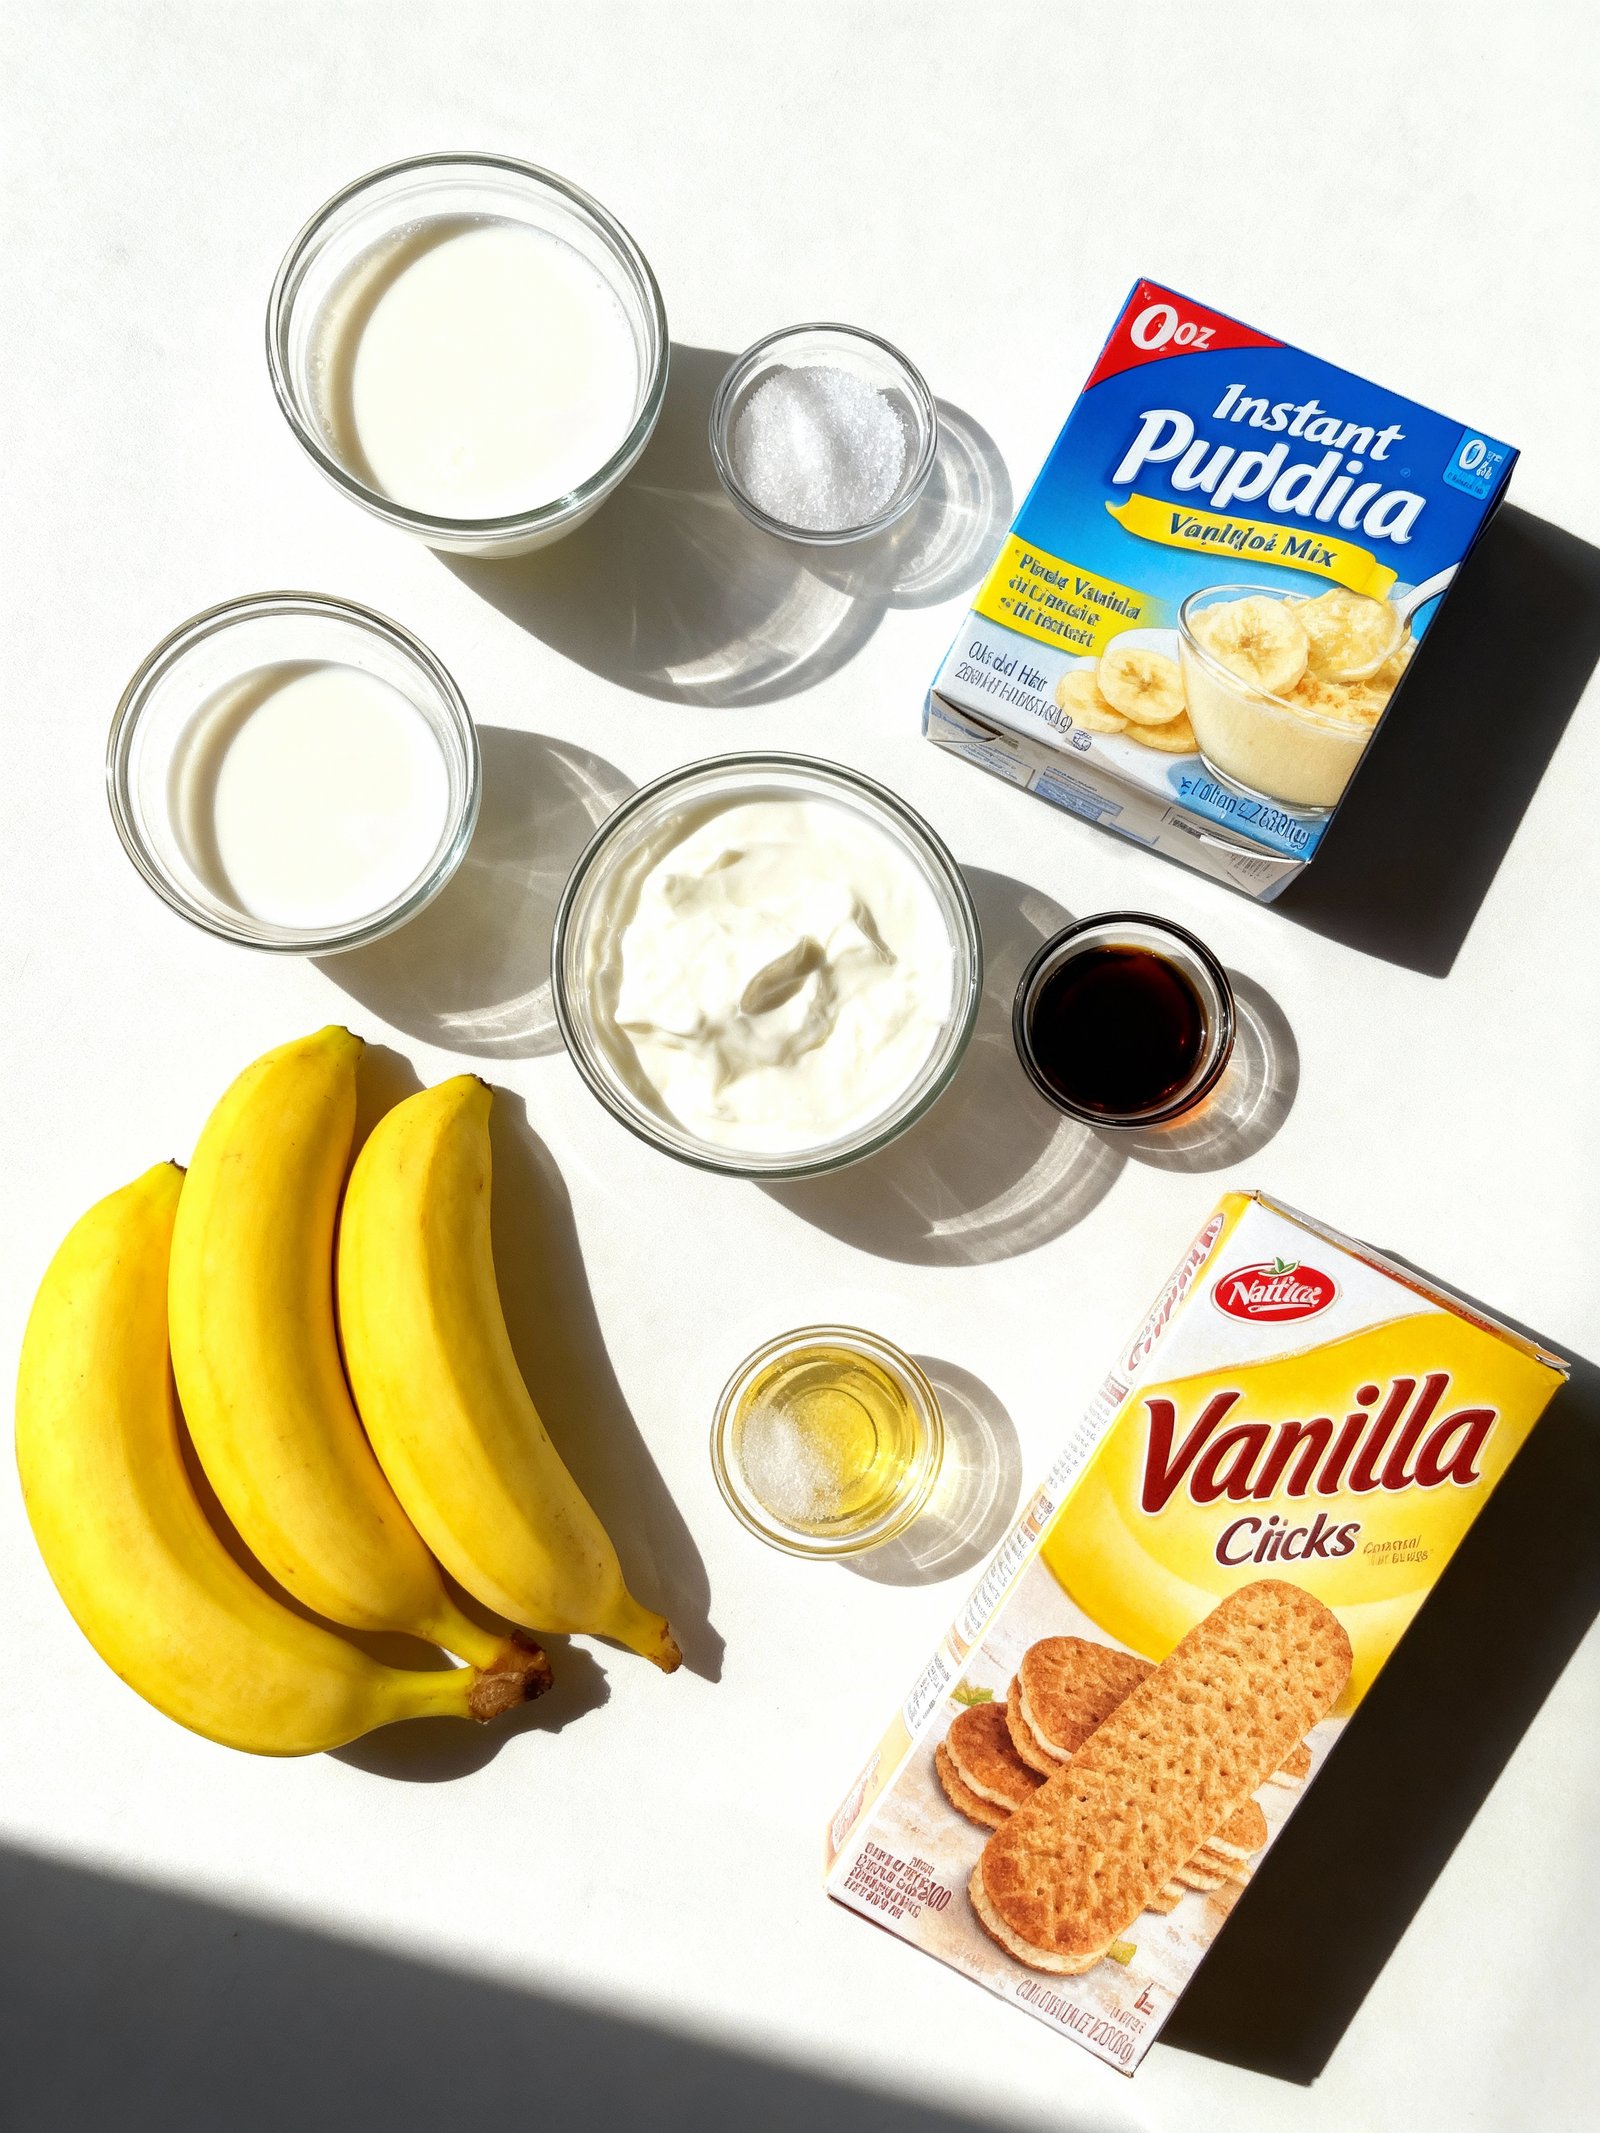
- 2 cups cold milk (whole, 2%, or 1%)
- 1 (5 oz) box instant vanilla pudding mix
- 2 tablespoons granulated sugar
- 2 teaspoons vanilla extract
- 1 cup cold heavy cream
- 1 tablespoon sugar
- 1 teaspoon vanilla extract
- 5 large bananas, sliced
- 1 box vanilla wafers (about 30-40 cookies)
Timing
| Prep Time | 15 minutes |
| Cook Time | 10 minutes |
| Total Time | 25 minutes |
Context: This Homemade Banana Pudding Recipe comes together in about 25 minutes, which is roughly 20% faster than many similar recipes that require chilling custard separately.
Step-by-Step Instructions
Step 1 — Prepare the Pudding Base
In a medium saucepan, whisk together sugar, cornstarch, and a pinch of salt. Gradually whisk in milk and egg yolks until completely smooth. Cook over medium heat, stirring constantly with a wooden spoon, until the mixture thickens and begins to bubble, about 8-10 minutes.
Tip: The pudding is done when it coats the back of the spoon and a finger drawn through it leaves a clean path.
Step 2 — Temper the Eggs & Finish Cooking
Once bubbling, reduce heat to low and cook for 1 more minute, stirring constantly. Remove from heat and immediately stir in butter and vanilla extract until fully incorporated. Pour the hot pudding through a fine-mesh sieve into a clean bowl to ensure a perfectly smooth texture.
Tip: Tempering (slowly heating the eggs with the milk mixture) prevents them from scrambling for a silky custard.
Step 3 — Assemble the First Layer
Spread a thin layer of the warm pudding in the bottom of your serving dish. Arrange a single layer of vanilla wafer cookies over the pudding. Slice bananas into ¼-inch rounds and place a single layer over the wafers.
Tip: For best texture, slice bananas just before assembling to prevent excessive browning.
Step 4 — Build the Layers
Spoon about one-third of the remaining pudding over the banana layer. Repeat the layers: wafers, bananas, and pudding, ending with a final layer of pudding on top. Gently press down to eliminate any large air pockets.
Tip: For a classic presentation, reserve a few wafers and banana slices for garnish.
Step 5 — Make the Meringue Topping (Optional)
For a baked version, preheat your oven broiler. In a very clean bowl, beat room-temperature egg whites with cream of tartar until soft peaks form. Gradually add sugar and beat until stiff, glossy peaks form.
Tip: Ensure no trace of yolk is in the whites and your beaters are grease-free for maximum volume.
Step 6 — Apply Topping & Chill
If using meringue, spread it over the warm pudding, sealing it to the edges of the dish. Broil for 1-2 minutes until golden brown. For a no-bake topping, simply cover the surface directly with plastic wrap to prevent a skin from forming.
Tip: Chill your Homemade Banana Pudding Recipe for at least 4 hours, or preferably overnight, to allow the flavors to meld and the wafers to soften perfectly.
Nutritional Information
| Calories | 420 |
| Protein | 6g |
| Carbohydrates | 68g |
| Fat | 15g |
| Fiber | 2g |
| Sodium | 220mg |
Note: These values are estimates for one serving of this Homemade Banana Pudding Recipe and can vary based on specific ingredients and portion sizes.
Healthier Alternatives
This classic Homemade Banana Pudding Recipe is wonderfully adaptable. Here are several ingredient swaps to tailor it to different dietary needs without sacrificing that beloved creamy, comforting flavor.
- Greek Yogurt for Pudding Mix — For a protein boost and tangier flavor, layer plain Greek yogurt sweetened with a touch of honey or vanilla instead of the traditional pudding.
- Almond or Coconut Milk — Use unsweetened almond, oat, or coconut milk to make this a dairy-free Homemade Banana Pudding. The flavor is subtly nutty and works beautifully with the bananas.
- Sugar-Free Pudding & Sweetener — Opt for a sugar-free instant pudding mix and a natural sweetener like monk fruit or stevia in the whipped cream to create a lower-carb version.
- Gluten-Free Vanilla Wafers — Many brands offer gluten-free vanilla wafers or shortbread cookies. This simple swap makes the entire dessert gluten-free while keeping the essential texture.
- Reduced-Sodium Wafers — Check labels for low-sodium or no-salt-added vanilla wafers to easily cut down on sodium without changing the recipe’s method.
- Chia Seed Pudding Base — For a high-fiber, plant-based alternative, use a thick chia seed pudding made with your choice of milk and vanilla. It provides a delightful texture and wholesome twist.
- Lite Coconut Milk in Whipped Cream — Chill a can of lite coconut milk, then whip the solid cream with a little sweetener for a rich, dairy-free topping with a hint of coconut flavor.
- Avocado in Pudding — Blend ripe avocado with banana, cocoa powder, and sweetener for a surprisingly creamy, nutrient-dense pudding layer that’s naturally dairy-free and lower in sugar.
Serving Suggestions
- Pair this classic Homemade Banana Pudding Recipe with a cup of strong coffee or a glass of cold milk to balance the sweetness.
- Serve it as the grand finale for a Southern-style dinner, a summer barbecue, or a casual family potluck.
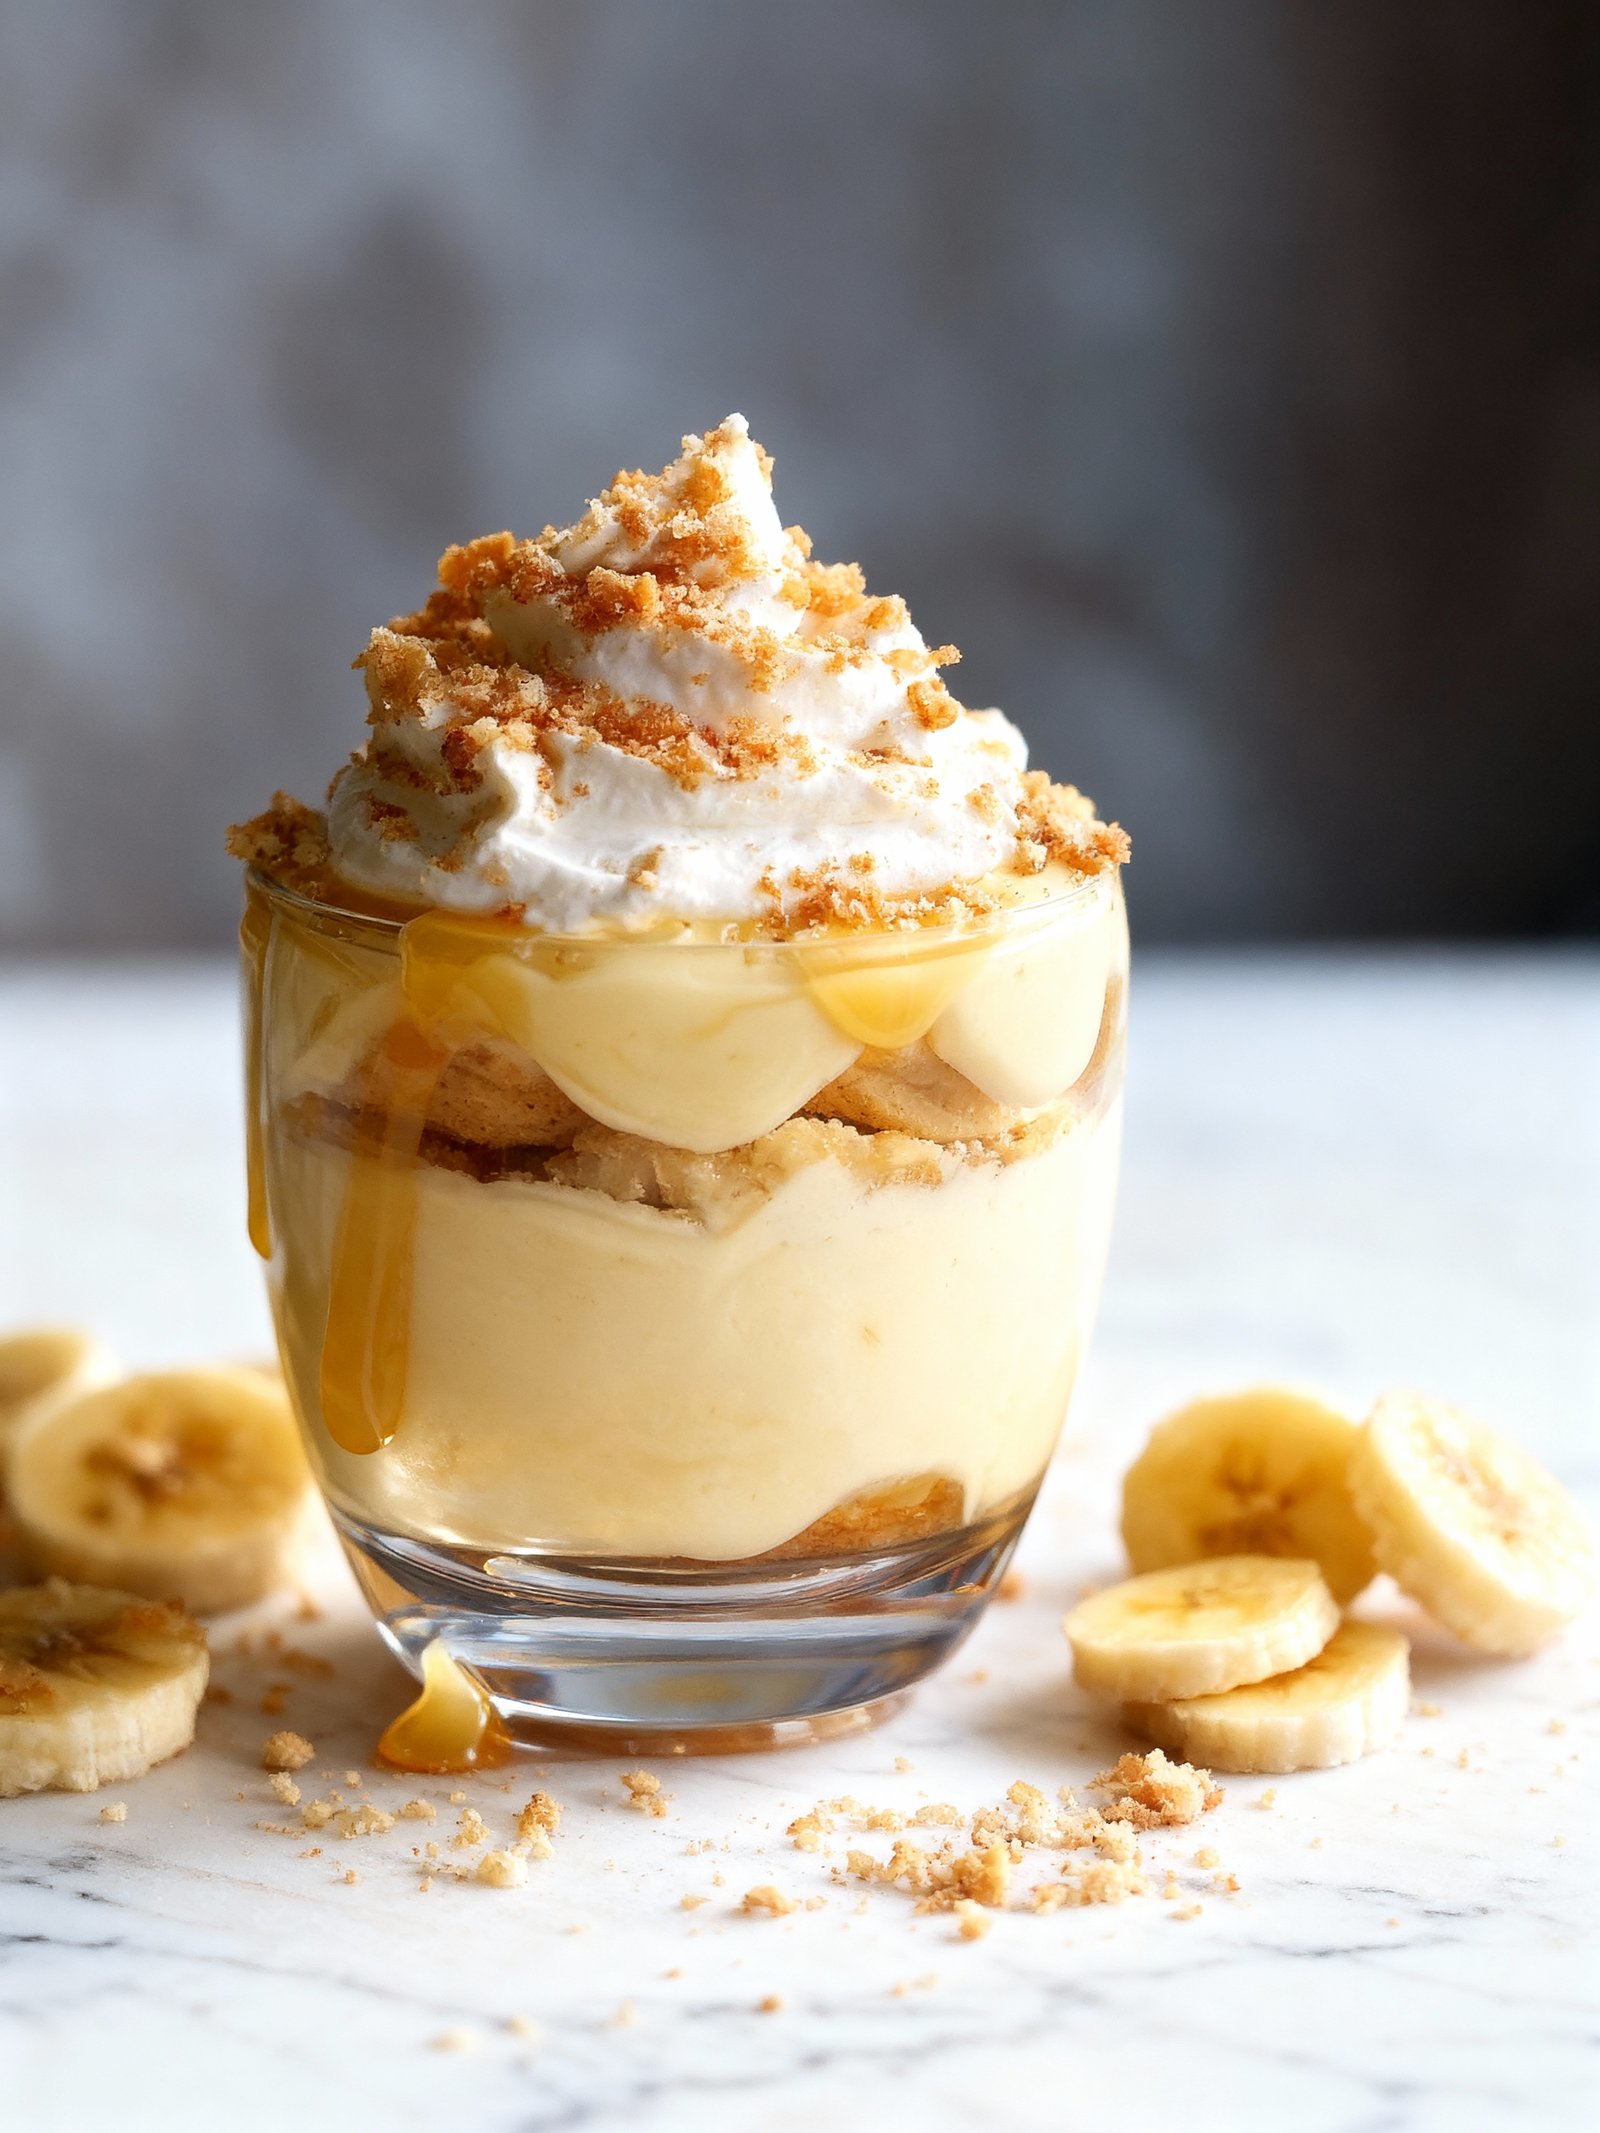
- For an elegant twist, layer individual portions in clear glass trifle dishes, parfait glasses, or vintage mason jars.
- Top each serving with extra vanilla wafer cookies, a dollop of freshly whipped cream, and a few thin banana slices just before serving for a beautiful presentation.
- This pudding is perfect for make-ahead convenience; prepare it a few hours before your event so the flavors meld and the cookies soften perfectly.
- For a festive touch during the holidays, sprinkle a dash of cinnamon or nutmeg over the top or add a drizzle of caramel sauce.
This versatile Homemade Banana Pudding Recipe transitions effortlessly from a homey weeknight treat to the star of your dessert table, always promising a taste of comforting nostalgia.
Common Mistakes to Avoid
- Mistake: Using underripe, green bananas. Fix: Use fully yellow, ripe bananas for the perfect natural sweetness and creamy texture.
- Mistake: Slicing bananas too early, causing them to brown and turn mushy. Fix: Slice bananas just before layering and toss them in a little lemon juice to prevent oxidation.
- Mistake: Overcooking the custard, leading to a grainy or scrambled texture. Fix: Cook over medium-low heat, stirring constantly, and remove from heat as soon as it thickens to coat the back of a spoon.
- Mistake: Not letting the pudding cool before assembling. Fix: Allow the warm pudding to cool for 15-20 minutes; this prevents it from “cooking” the banana slices and making them soggy.
- Mistake: Using the wrong type of wafer. Fix: For authentic texture, use traditional Nilla Wafers; they hold up better than generic brands.
- Mistake: Skipping the chill time and serving immediately. Fix: Refrigerate your assembled Homemade Banana Pudding Recipe for at least 4 hours, ideally overnight, to let the flavors meld and wafers soften perfectly.
- Mistake: Whipping the meringue or whipped cream topping too early. Fix: Whip your topping just before serving to maintain its light, airy structure and prevent weeping.
- Mistake: Making a single, thick layer. Fix: Create multiple thin layers of pudding, bananas, and wafers for the best distribution of flavor and texture in every bite.
- Mistake: Substituting instant pudding mix for the cooked custard. Fix: Stick with the cooked custard base; its rich, from-scratch flavor and velvety consistency are what make this dessert special.
Storing Tips
- Refrigerating: Store your Homemade Banana Pudding in an airtight container in the refrigerator for up to 3 days. For best results, press plastic wrap directly onto the surface of the pudding before sealing to prevent a skin from forming.
- Freezing: While possible, freezing is not generally recommended for this Homemade Banana Pudding Recipe as the texture of the bananas and custard can become watery and separate upon thawing. If you must freeze it, use a freezer-safe container for up to 1 month. Thaw overnight in the fridge before serving.
- Reheating: This dessert is typically served chilled. If you prefer it slightly warmed, gently reheat individual portions in the microwave in 15-second intervals, stirring between each, until just warmed through. Ensure it reaches an internal temperature of at least 165°F (74°C) for food safety if any dairy components were left at room temperature for an extended time.
Always use clean utensils when serving to extend the shelf life of your pudding. The wafers will soften over time, so for the best texture, assemble close to when you plan to serve.
Conclusion
This easy Homemade Banana Pudding Recipe is a classic dessert that’s always a crowd-pleaser. We hope you love making it as much as we do! Give it a try, leave a comment with your thoughts, and don’t forget to check out our other no-bake treats like No-Bake Buckeye Candy Recipe.
PrintHomemade Banana Pudding Recipe

A classic no-bake dessert made with layers of creamy vanilla pudding, crisp vanilla wafers, and plenty of fresh bananas, topped with velvety whipped cream.
- Prep Time: 15 minutes
- Cook Time: 0 minutes
- Total Time: 3 hours 15 minutes
- Yield: 8 1x
- Method: Dessert
- Cuisine: American
Ingredients
- 2 cups cold milk (whole, 2%, or 1%)
- 1 (5 oz) box instant vanilla pudding mix
- 2 tablespoons granulated sugar
- 2 teaspoons vanilla extract
- 1 cup cold heavy cream
- 1 tablespoon sugar
- 1 teaspoon vanilla extract
- 5 large bananas, sliced
- 1 box vanilla wafers (about 30–40 cookies)
Instructions
- In a large bowl, combine 2 cups cold milk, instant vanilla pudding mix, 2 tablespoons granulated sugar, and 2 teaspoons vanilla extract. Whisk until smooth and thickened.
- In a separate bowl, beat 1 cup cold heavy cream, 1 tablespoon sugar, and 1 teaspoon vanilla extract until soft stiff peaks form.
- Gently fold the whipped cream into the pudding mixture until well combined.
- In a serving dish, layer a portion of vanilla wafers, followed by sliced bananas, then a layer of the pudding mixture. Repeat layers until all ingredients are used, ending with a layer of pudding.
- Cover and refrigerate for at least 3 hours, or until set.
- Serve chilled, optionally topped with additional whipped cream and a few extra vanilla wafers.
Notes
For best results, use bananas that are ripe but not overly soft. The pudding can be made up to 24 hours ahead. For a richer flavor, use whole milk and heavy cream.
Nutrition
- Calories: 320
- Sugar: 28
- Sodium: 220
- Fat: 14
- Saturated Fat: 8
- Unsaturated Fat: 5
- Trans Fat: 0
- Carbohydrates: 45
- Fiber: 2
- Protein: 5
- Cholesterol: 35
FAQs
Can I make this Homemade Banana Pudding Recipe ahead of time?
Yes, you can assemble it a day ahead. For the best texture, add the banana slices and final layer of whipped cream or meringue just before serving to prevent sogginess. This Homemade Banana Pudding Recipe tastes even better after the flavors meld overnight.
What is the best way to prevent the bananas from turning brown?
Ensure the banana slices are fully coated with pudding and not exposed to air. You can also toss them in a little lemon or pineapple juice, though this may slightly alter the classic flavor of your Homemade Banana Pudding.
Can I use a different type of cookie or pudding?
Vanilla wafers are traditional, but shortbread or ladyfingers work well. For the pudding, instant pudding is quicker, but cooking a custard from scratch yields a richer, more authentic texture for this dessert.


