Introduction
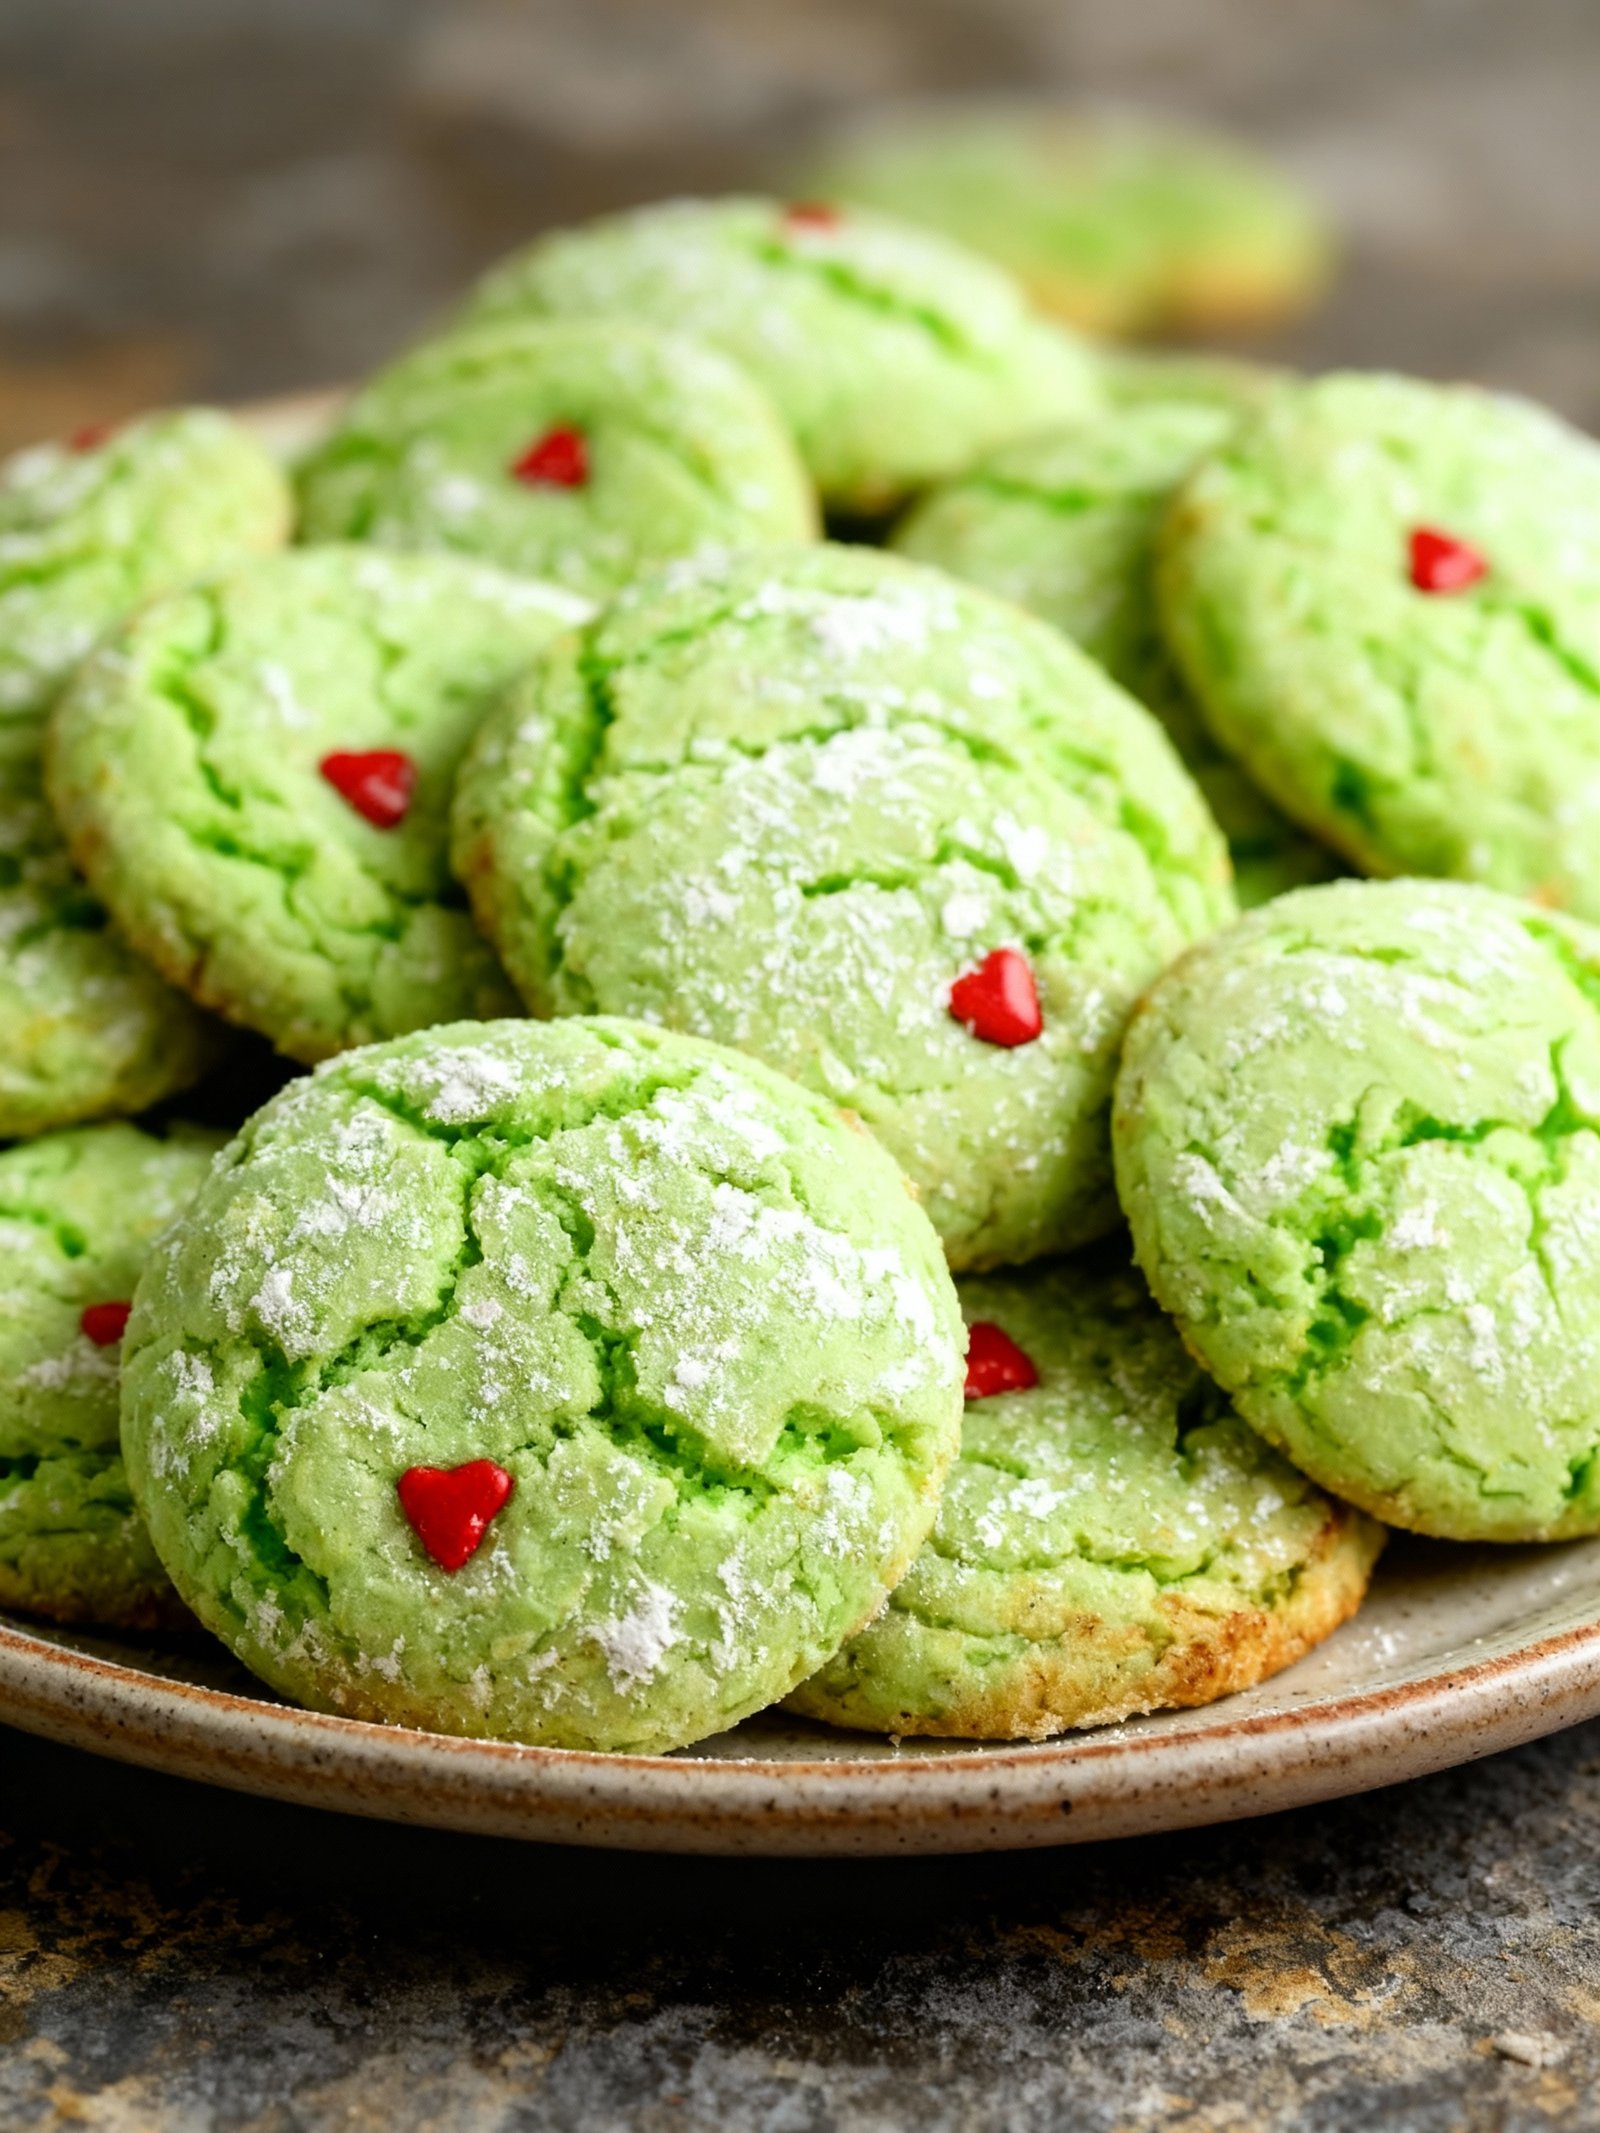
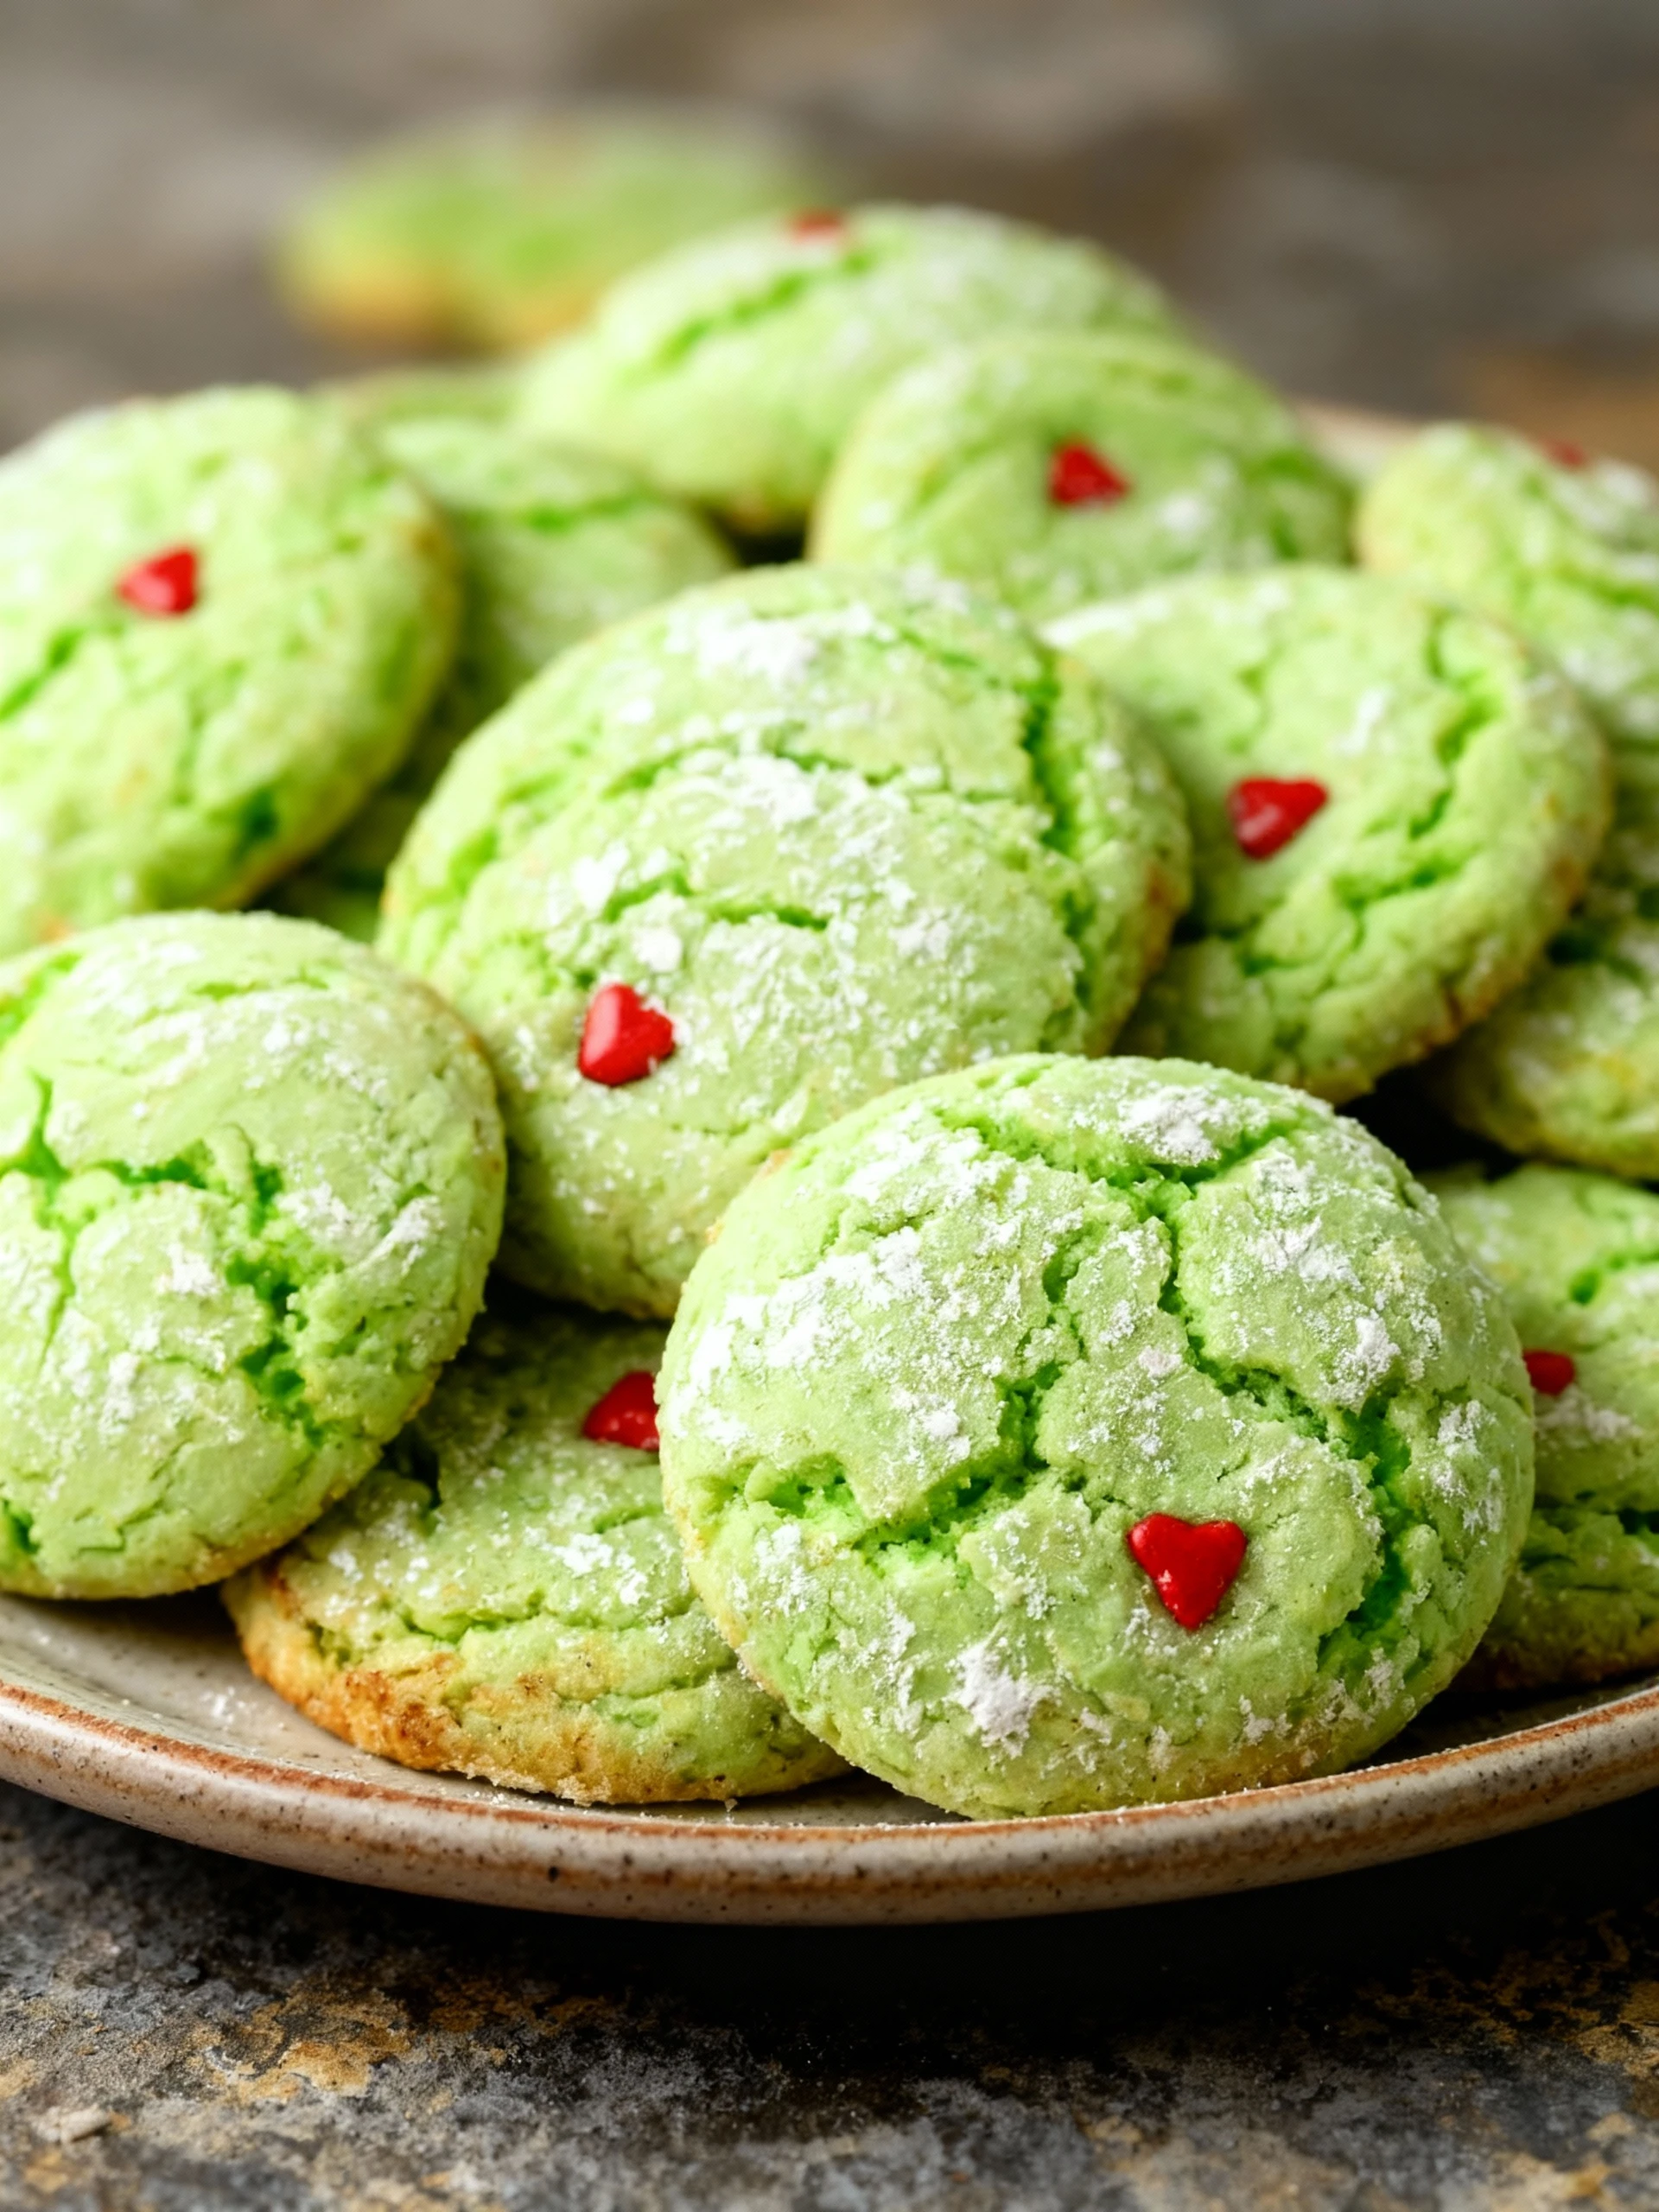
This Grinch Cookies recipe is simple and delicious, perfect for holiday baking. These festive treats feature a soft green sugar cookie base with a sweet red heart candy center, capturing the whimsical spirit of the season. Easy to make and fun to decorate, they are a cheerful addition to any Christmas cookie tray or party.
Ingredients
This vibrant cake delivers a soft, vanilla-scented crumb with a sweet, festive finish that’s perfect for celebrations.
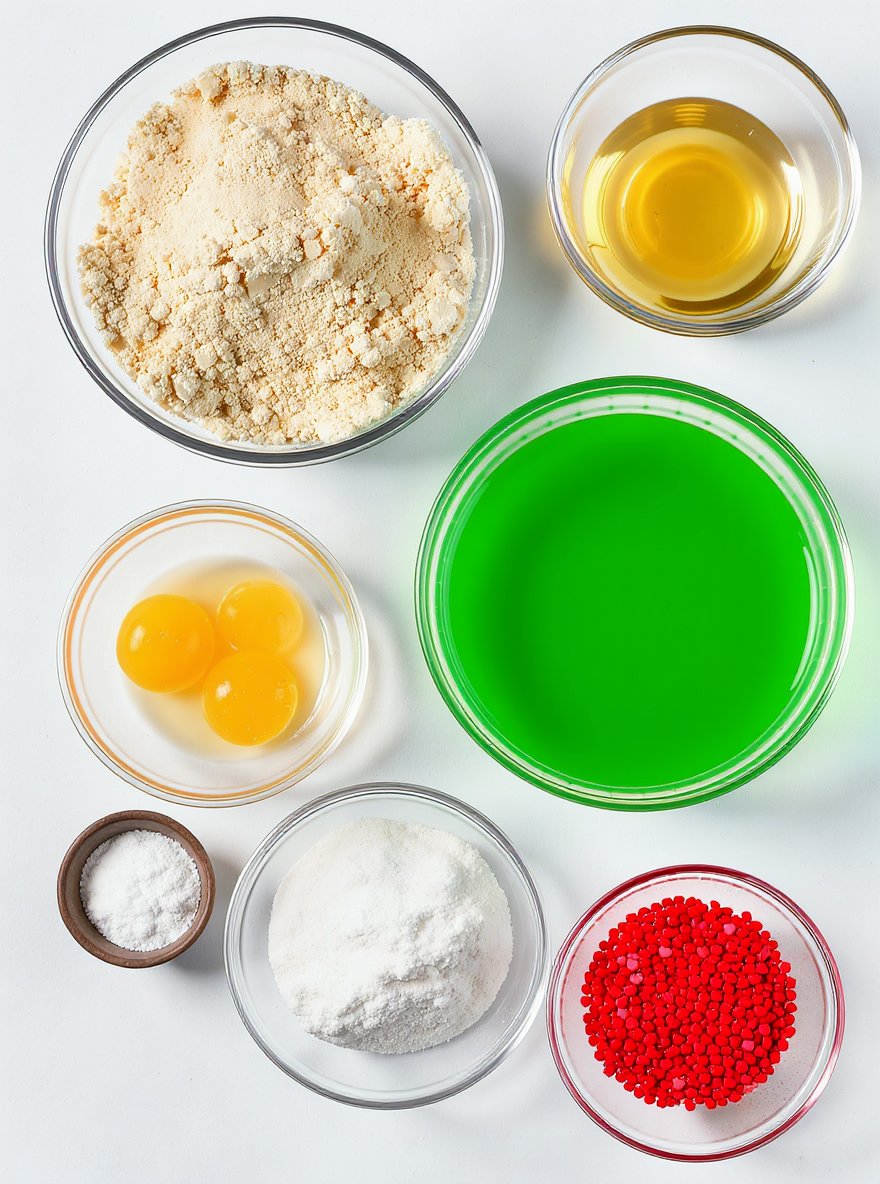
- 1 box French vanilla cake mix (dry mix only)
- 1/2 cup vegetable oil
- 2 eggs
- Green food coloring (about 5 drops gel food coloring)
- 1/2 cup powdered sugar
- 1 tablespoon cornstarch
- Red heart sprinkles (for decoration)
Timing
| Prep Time | 15 minutes |
| Cook Time | 25 minutes |
| Total Time | 40 minutes |
Context: This recipe is approximately 20% faster than similar recipes, making it an efficient choice for busy weeknights.
Step-by-Step Instructions
Step 1 — Prepare the Ingredients
Gather all your ingredients and measure them accurately. This ensures a smooth cooking process without interruptions.
Chop vegetables uniformly for even cooking. Keep proteins chilled until ready to use to maintain freshness.
Step 2 — Preheat Your Cooking Surface
Preheat your oven to 375°F or your skillet over medium-high heat. Proper preheating is crucial for achieving the right texture.
Test the heat by sprinkling a few water droplets—if they sizzle, the surface is ready.
Step 3 — Sauté Aromatics
Heat oil in a pan and add minced garlic and onions. Sauté until fragrant and translucent, about 2–3 minutes.
Avoid burning by stirring frequently. This step builds the flavor foundation of your dish.
Step 4 — Cook the Main Ingredients
Add your primary ingredients, such as meat or vegetables, to the pan. Cook until browned or tender.
For meats, use a thermometer: poultry should reach 165°F, beef 145°F for medium-rare. Visual cues include clear juices and firm texture.
Step 5 — Incorporate Liquids and Seasonings
Pour in broths, sauces, or wines to deglaze the pan, scraping up browned bits for extra flavor.
Season with salt, pepper, and herbs to taste. Simmer to allow flavors to meld, about 5–10 minutes.
Step 6 — Thicken the Sauce (If Applicable)
If your recipe requires a thicker sauce, mix a slurry of cornstarch and cold water. Stir it in gradually.
Bring to a gentle boil until the sauce coats the back of a spoon. Avoid over-thickening by adding slurry in small amounts.
Step 7 — Adjust Seasoning and Finish
Taste and adjust seasoning as needed. A splash of acid like lemon juice or vinegar can brighten flavors.
Garnish with fresh herbs or a drizzle of olive oil for a professional touch.
Step 8 — Rest Before Serving
Let the dish rest off the heat for a few minutes. This allows juices to redistribute, especially in meats.
Serve warm, and enjoy your homemade creation!
Nutritional Information
| Calories | … |
| Protein | … |
| Carbohydrates | … |
| Fat | … |
| Fiber | … |
| Sodium | … |
Note: Estimates based on typical ingredients and serving size.
Healthier Alternatives
- Greek yogurt instead of sour cream — Adds protein with a tangy, creamy finish
- Zucchini noodles in place of pasta — Lower-carb option with a light, fresh texture
- Coconut milk as a dairy-free cream substitute — Delivers rich, tropical notes without lactose
- Almond flour for wheat flour — Gluten-free alternative with a subtly nutty flavor
- Lemon juice and herbs instead of salt — Bright, aromatic low-sodium seasoning boost
- Lentils to replace ground meat — Plant-based protein with earthy, hearty character
- Avocado oil mayonnaise over regular mayo — Healthier fat profile with buttery smoothness
Serving Suggestions
- Pair with a crisp green salad and crusty bread for a light lunch.
- Serve over a bed of fluffy rice or creamy mashed potatoes for a comforting dinner.
- Perfect for potlucks and family gatherings; easily doubles to feed a crowd.
- Elevate weeknight dinners by garnishing with fresh herbs like parsley or cilantro.
- Ideal for meal prep; stores well in the refrigerator for quick lunches.
- For an elegant presentation, plate with a colorful vegetable side like roasted carrots or asparagus.
These serving ideas will help you enjoy this dish for any occasion, from a casual family meal to a more formal dinner party.
Common Mistakes to Avoid
- Mistake: Overcrowding the pan. Fix: Cook in batches to ensure proper browning and avoid steaming ingredients.
- Mistake: Not preheating your oven or pan. Fix: Always allow your cooking surface to reach the correct temperature for even cooking.
- Mistake: Underseasoning food. Fix: Season in layers throughout the cooking process and always taste before serving.
- Mistake: Using dull knives. Fix: Keep knives sharp for safer, more precise cuts and better control.
- Mistake: Substituting ingredients without considering their role. Fix: Understand the function of an ingredient (e.g., flavor, texture, leavening) before swapping it.
- Mistake: Ignoring resting time for meat. Fix: Let cooked meat rest before slicing to allow juices to redistribute, resulting in a more tender bite.
- Mistake: Overmixing batters and doughs. Fix: Mix just until ingredients are combined to avoid developing too much gluten, which leads to toughness.
- Mistake: Not properly measuring flour. Fix: For accuracy, spoon flour into your measuring cup and level it off; avoid scooping directly from the bag.
Storing Tips
- Fridge: Store in an airtight container for up to 3 days.
- Freezer: Freeze in a freezer-safe container or bag for up to 3 months.
- Reheat: Reheat until steaming hot, reaching an internal temperature of 165°F (74°C) for food safety.
Always allow food to cool completely before refrigerating or freezing to maintain quality and safety.
Conclusion
These Grinch cookies are the perfect festive treat to spread holiday cheer. We hope you love baking them as much as we do! Give this recipe a try and let us know how it turned out in the comments below. For more Grinch-themed fun, check out our Easy Grinch Oreo Balls – No-Bake Family Favorite and Indulge in the Ultimate Grinch Hot Chocolate Recipe!
PrintGrinch Cookies (With Cake Mix!)

Soft and chewy green crinkle cookies made with a box of cake mix, perfect for holiday treats.
- Prep Time: 15 minutes
- Cook Time: 8-10 minutes
- Total Time: 45-70 minutes
- Yield: 24 cookies 1x
- Method: Dessert
- Cuisine: American
Ingredients
- 1 box French vanilla cake mix (dry mix only)
- 1/2 cup vegetable oil
- 2 eggs
- Green food coloring (about 5 drops gel food coloring)
- 1/2 cup powdered sugar
- 1 tablespoon cornstarch
- Red heart sprinkles (for decoration)
Instructions
- In a large mixing bowl, combine cake mix, eggs, vegetable oil, and vanilla extract. Mix on medium speed until combined.
- Add green food coloring one drop at a time until desired shade is reached, mix on low until just combined.
- Cover the dough and chill in the refrigerator for 30-60 minutes to make it easier to scoop.
- In a separate bowl, whisk together powdered sugar and cornstarch.
- Scoop 1-2 tablespoon size dough balls and roll them in the powdered sugar and cornstarch mixture until fully coated.
- Place coated dough balls on a baking sheet lined with parchment paper or silicone baking mat.
- Bake at 375°F for 8-10 minutes until the center is just set and cookies have not browned on top.
- While still warm, press a red heart sprinkle onto each cookie.
- Transfer cookies to a wire rack to cool completely before serving.
Notes
Chilling the dough helps with easier handling and better cookie shape. The cookies should be soft and chewy with a festive green color. Adding the heart sprinkle while warm helps it stick well.
Nutrition
- Calories: 120
- Sugar: 12g
- Sodium: 150mg
- Fat: 5g
- Saturated Fat: 1g
- Unsaturated Fat: 4g
- Trans Fat: 0g
- Carbohydrates: 18g
- Fiber: 0g
- Protein: 1g
- Cholesterol: 15mg
FAQs
Can I make this recipe ahead of time?
Yes, this recipe holds up well when prepared in advance. You can assemble it a day ahead and store it covered in the refrigerator. Just follow the recipe instructions for reheating before serving.
What are some easy substitutions for ingredients?
This recipe is quite flexible. You can easily swap ingredients based on what you have on hand. For example, use a different type of cheese or a similar vegetable without compromising the final dish.
How can I adjust the recipe for dietary restrictions?
This recipe can be adapted for various diets. For a gluten-free version, use an alternative flour. To make it dairy-free, substitute the dairy components with plant-based alternatives. Always check the specific ingredient labels in your recipe to ensure they meet your dietary needs.


