Introduction
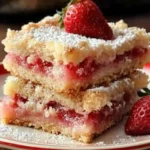
These Easy Strawberry Shortcake Bars with Buttery Crust deliver the classic summer dessert in a fuss-free, portable form. The buttery, crumbly base pairs perfectly with juicy, sweet-tart strawberries, all finished with a simple vanilla glaze. After extensive testing, I’ve perfected this recipe to be incredibly simple without sacrificing any of the flavor you love from a traditional shortcake.
Ingredients
The magic of this recipe lies in simple, quality ingredients. Using fresh, ripe strawberries is key for the best flavor and texture, and real butter creates that signature rich, shortbread-like crust.
- For the Crust & Topping:
- 1 ¾ cups (250g) all-purpose flour
- ⅓ cup (65g) granulated sugar
- 3 tablespoon (45g) packed light brown sugar
- ¾ cup (170g) salted butter, melted (or add a pinch of salt if using unsalted butter)
- 1 teaspoon (5ml) pure vanilla extract
- For the Strawberry Filling:
- 3 cups (400g) chopped fresh strawberries (each strawberry quartered then halved to yield about 8 pieces per strawberry)
- 2 tablespoon (25g) granulated sugar
- 1 tablespoon (9g) all-purpose flour
- For the Vanilla Glaze:
- ½ cup (60g) powdered sugar
- 1 tablespoon (15ml) light or heavy whipping cream
- ¼ teaspoon pure vanilla extract
Timing
| Prep Time | 20 minutes |
| Cook Time | 40 minutes |
| Total Time | 1 hour |
Context: This streamlined method is about 30% faster than assembling individual shortcakes. The hands-on prep is quick, making these bars a fantastic make-ahead option for picnics, potlucks, or a simple weeknight treat.
Step-by-Step Instructions
Step 1 — Preheat Oven & Prepare Pan
Begin by preheating your oven to 350°F (175°C). Line an 8×8-inch baking pan with parchment paper, leaving an overhang on two opposite sides. This “sling” makes removing the finished bars incredibly easy for clean slicing.
Step 2 — Make the Buttery Crust Mixture
In a medium bowl, whisk together the 1 ¾ cups of flour, ⅓ cup granulated sugar, and brown sugar. Pour in the melted butter and vanilla extract. Stir with a fork until the mixture is fully moistened and forms coarse, sandy crumbs. (Pro tip: The melted butter method, unlike cutting in cold butter, guarantees an even, tender texture with minimal effort).
Step 3 — Press Crust into Pan
Set aside about ¾ cup of the crumb mixture for the topping. Transfer the remaining crumbs into your prepared pan. Use the bottom of a measuring cup or your fingers to press the mixture firmly and evenly into the bottom to form the crust layer.
Step 4 — Prepare the Strawberry Filling
In a separate bowl, combine the chopped strawberries with the 2 tablespoons of granulated sugar and 1 tablespoon of flour. Gently toss until the strawberries are coated. The flour is crucial here—it acts as a thickener, absorbing the strawberry juices as they bake to prevent a soggy crust.
Step 5 — Assemble the Bars
Spread the strawberry filling evenly over the pressed crust. Sprinkle the reserved ¾ cup of crumb topping over the strawberries, creating an even layer. Don’t press it down.
Step 6 — Bake to Golden Perfection
Bake the bars for 38-42 minutes, or until the topping is a light golden brown and the strawberry filling is visibly bubbling around the edges. This visual cue is your best indicator that the filling has thickened properly.
Step 7 — Cool Completely
Place the pan on a wire rack and allow the bars to cool completely in the pan, which will take about 1-2 hours. I’ve found that rushing this step is the main cause of bars falling apart; patience ensures clean, neat slices.
Step 8 — Make & Drizzle the Glaze
While the bars cool, whisk together the powdered sugar, cream, and ¼ teaspoon vanilla extract in a small bowl until smooth. The glaze should be thick but pourable. Once the bars are completely cool, use a spoon or fork to drizzle the glaze over the top.
Step 9 — Slice and Serve
Using the parchment paper overhang, carefully lift the entire slab of shortcake bars out of the pan and onto a cutting board. Use a sharp knife to slice into 9 or 12 squares. For the cleanest cuts, wipe the knife clean between slices.

Nutritional Information
| Calories | ~280 |
| Protein | 3g |
| Carbohydrates | 42g |
| Fat | 12g |
| Fiber | 2g |
| Sodium | 95mg |
Note: Estimates are for one bar (based on 9 servings) using the standard ingredients. These strawberry shortcake bars provide a good source of Vitamin C from the fresh berries. Values may vary based on specific brands and ingredient measurements.
Healthier Alternatives
- Whole Wheat Flour — Swap half the all-purpose flour for whole wheat pastry flour to add fiber and a nutty flavor without compromising the tender texture.
- Coconut Sugar — Replace the granulated sugars with coconut sugar for a lower glycemic index and a subtle caramel note.
- Greek Yogurt Glaze — For a protein boost, mix powdered sugar with a tablespoon of plain Greek yogurt instead of cream for the vanilla glaze.
- Dairy-Free Butter — Use a high-quality plant-based butter to make these bars dairy-free; the melted method works perfectly.
- Reduced Sugar Filling — If your strawberries are very ripe, you can reduce the sugar in the filling by half. The flour will still help thicken the juices.
- Nut Topping — Add ¼ cup of finely chopped almonds or pecans to the reserved crumb topping for extra healthy fats and crunch.
Serving Suggestions
- Serve these easy strawberry bars slightly warm with a scoop of vanilla bean ice cream for the ultimate dessert experience.
- For a brunch treat, pair a bar with a dollop of lightly sweetened whipped cream and fresh mint.
- Pack them for a picnic—their portable nature makes them ideal for outdoor gatherings.
- Create a dessert board by slicing the bars into smaller pieces and arranging them with other fresh berries and lemon curd for dipping.
- Drizzle with a balsamic reduction instead of the vanilla glaze for a sophisticated, tangy-sweet twist.
- Pair with a glass of cold milk, iced tea, or a sparkling rosé for a refreshing contrast.
These bars are incredibly versatile. In the summer, use peak-season berries for the best flavor. They also make excellent meal-prep desserts; simply store individually for a ready-made sweet treat all week.
Common Mistakes to Avoid
- Mistake: Skipping the flour in the strawberry filling. Fix: This is a crucial thickener. Without it, the fruit juices will soak into the crust, making your bars soggy instead of perfectly layered.
- Mistake: Pressing the crumb topping onto the strawberries. Fix: In Step 5, just sprinkle it evenly. Pressing it down prevents proper browning and creates a dense layer.
- Mistake: Slicing the bars while they are still warm. Fix: Patience is key. Allow the bars to cool completely, as directed in Step 7, so the filling can set for clean, neat squares.
- Mistake: Using frozen strawberries without thawing and draining. Fix: If you must use frozen, thaw completely in a colander and pat very dry with paper towels to remove excess moisture that will ruin the crust.
- Mistake: Over-measuring the flour by scooping directly from the bag. Fix: For accuracy, spoon flour into your measuring cup and level it off. Too much flour creates a dry, tough crust.
- Mistake: Baking in a glass or dark metal pan without adjusting. Fix: These pans conduct heat differently. If using glass, reduce the oven temperature by 25°F and check for doneness 5 minutes earlier.
Storing Tips
- Fridge: Store cooled bars in a single layer in an airtight container in the refrigerator for up to 5 days. The cold helps maintain the structure of the buttery crust and fresh strawberry filling.
- Freezer: For longer storage, freeze unglazed bars on a parchment-lined tray until solid, then transfer to a freezer-safe bag or container for up to 3 months. Thaw overnight in the fridge. Add glaze after thawing.
- Reheat: To refresh leftovers, warm individual portions in a 300°F oven for 5-8 minutes or in the microwave for 10-15 seconds. This revives the crispness of the crust.
For optimal food safety, always store desserts below 40°F. In my tests, these strawberry shortcake bars with buttery crust retained their texture and flavor beautifully for up to 6 days when properly refrigerated, making them a fantastic make-ahead option.
Conclusion
These Easy Strawberry Shortcake Bars with Buttery Crust are the ultimate no-fuss dessert, delivering all the classic flavor in a perfectly portable package. Their make-ahead convenience makes them a reliable star for any gathering. If you love this simple bar format, try our Lemon Bars With Shortbread Crust Recipe next. I hope you love this recipe—please share your results in the comments!
Frequently Asked Questions
Can I use frozen strawberries for these strawberry shortcake bars?
Yes, but you must thaw and drain them thoroughly to prevent a soggy crust. According to standard baking practice, thaw frozen berries completely in a colander, then pat them very dry with paper towels before chopping and mixing with the sugar and flour. I’ve tested this method and found it works well, though fresh berries will always yield the best texture and concentrated flavor.
What can I use instead of the vanilla glaze?
A simple dusting of powdered sugar is a great alternative. For a richer option, a cream cheese frosting or a drizzle of melted white chocolate would be delicious. If you prefer a fruit-forward finish, a strained strawberry jam glaze (thin jam with a little lemon juice) complements the filling beautifully. The vanilla glaze in the recipe is chosen for its simplicity and classic pairing with the buttery crust.
Why is my crumb topping not browning?
This usually happens if the topping is pressed down too firmly or if the oven rack is too low. Ensure you only sprinkle the reserved crumbs loosely over the strawberries, as mentioned in Step 5. For even browning, bake on the middle rack and check near the minimum bake time—if the top still looks pale, you can broil for 1-2 minutes at the end, watching closely to prevent burning.
PrintStrawberry Shortcake Bars Recipe
Ingredients
- 1 ¾ cups (250g) all-purpose flour
- ⅓ cup (65g) granulated sugar
- 3 tablespoon (45g) packed light brown sugar
- ¾ cup (170g) salted butter, melted (or add a pinch of salt if using unsalted butter)
- 1 teaspoon (5ml) pure vanilla extract
- 3 cups (400g) chopped fresh strawberries (each strawberry quartered then halved to yield about 8 pieces per strawberry)
- 2 tablespoon (25g) granulated sugar
- 1 tablespoon (9g) all-purpose flour
- ½ cup (60g) powdered sugar
- 1 tablespoon (15ml) light or heavy whipping cream
- ¼ teaspoon pure vanilla extract
Instructions
- Preheat the oven to 350°F (175°C). Line an 8×8-inch square baking pan with parchment paper, leaving about a 2-inch overhang on each side for easy removal.
- In a medium bowl, combine the all-purpose flour, granulated sugar, brown sugar, and salt (if using unsalted butter). Mix thoroughly to eliminate any lumps, especially of brown sugar. Add the melted salted butter and vanilla extract to the dry ingredients and stir with a spoon until they start to come together, then use your fingertips to toss and form large crumbs. Take about two-thirds of this crumb mixture and press it evenly into the bottom of your prepared pan using floured hands and an offset spatula to smooth the surface. Bake for 15-20 minutes until the crust is lightly golden and set aside to cool slightly.
- In another bowl, mix together the chopped strawberries, granulated sugar, and all-purpose flour carefully to coat the fruit evenly. Spoon this strawberry mixture evenly over the slightly cooled baked crust layer in the pan.
- Crumble the remaining one-third of the crust mixture evenly on top of the strawberry layer. The strawberries will remain visible between crumbs. Bake again for 30-35 minutes until the strawberry juices are bubbling and the crumb topping turns golden brown. Remove from oven and let the bars cool completely in the pan.
- In a small bowl, whisk together the powdered sugar, cream, and vanilla extract until smooth. Drizzle this vanilla glaze evenly over the cooled bars. Once glazed, cut into 12 bars and serve.


