Introduction
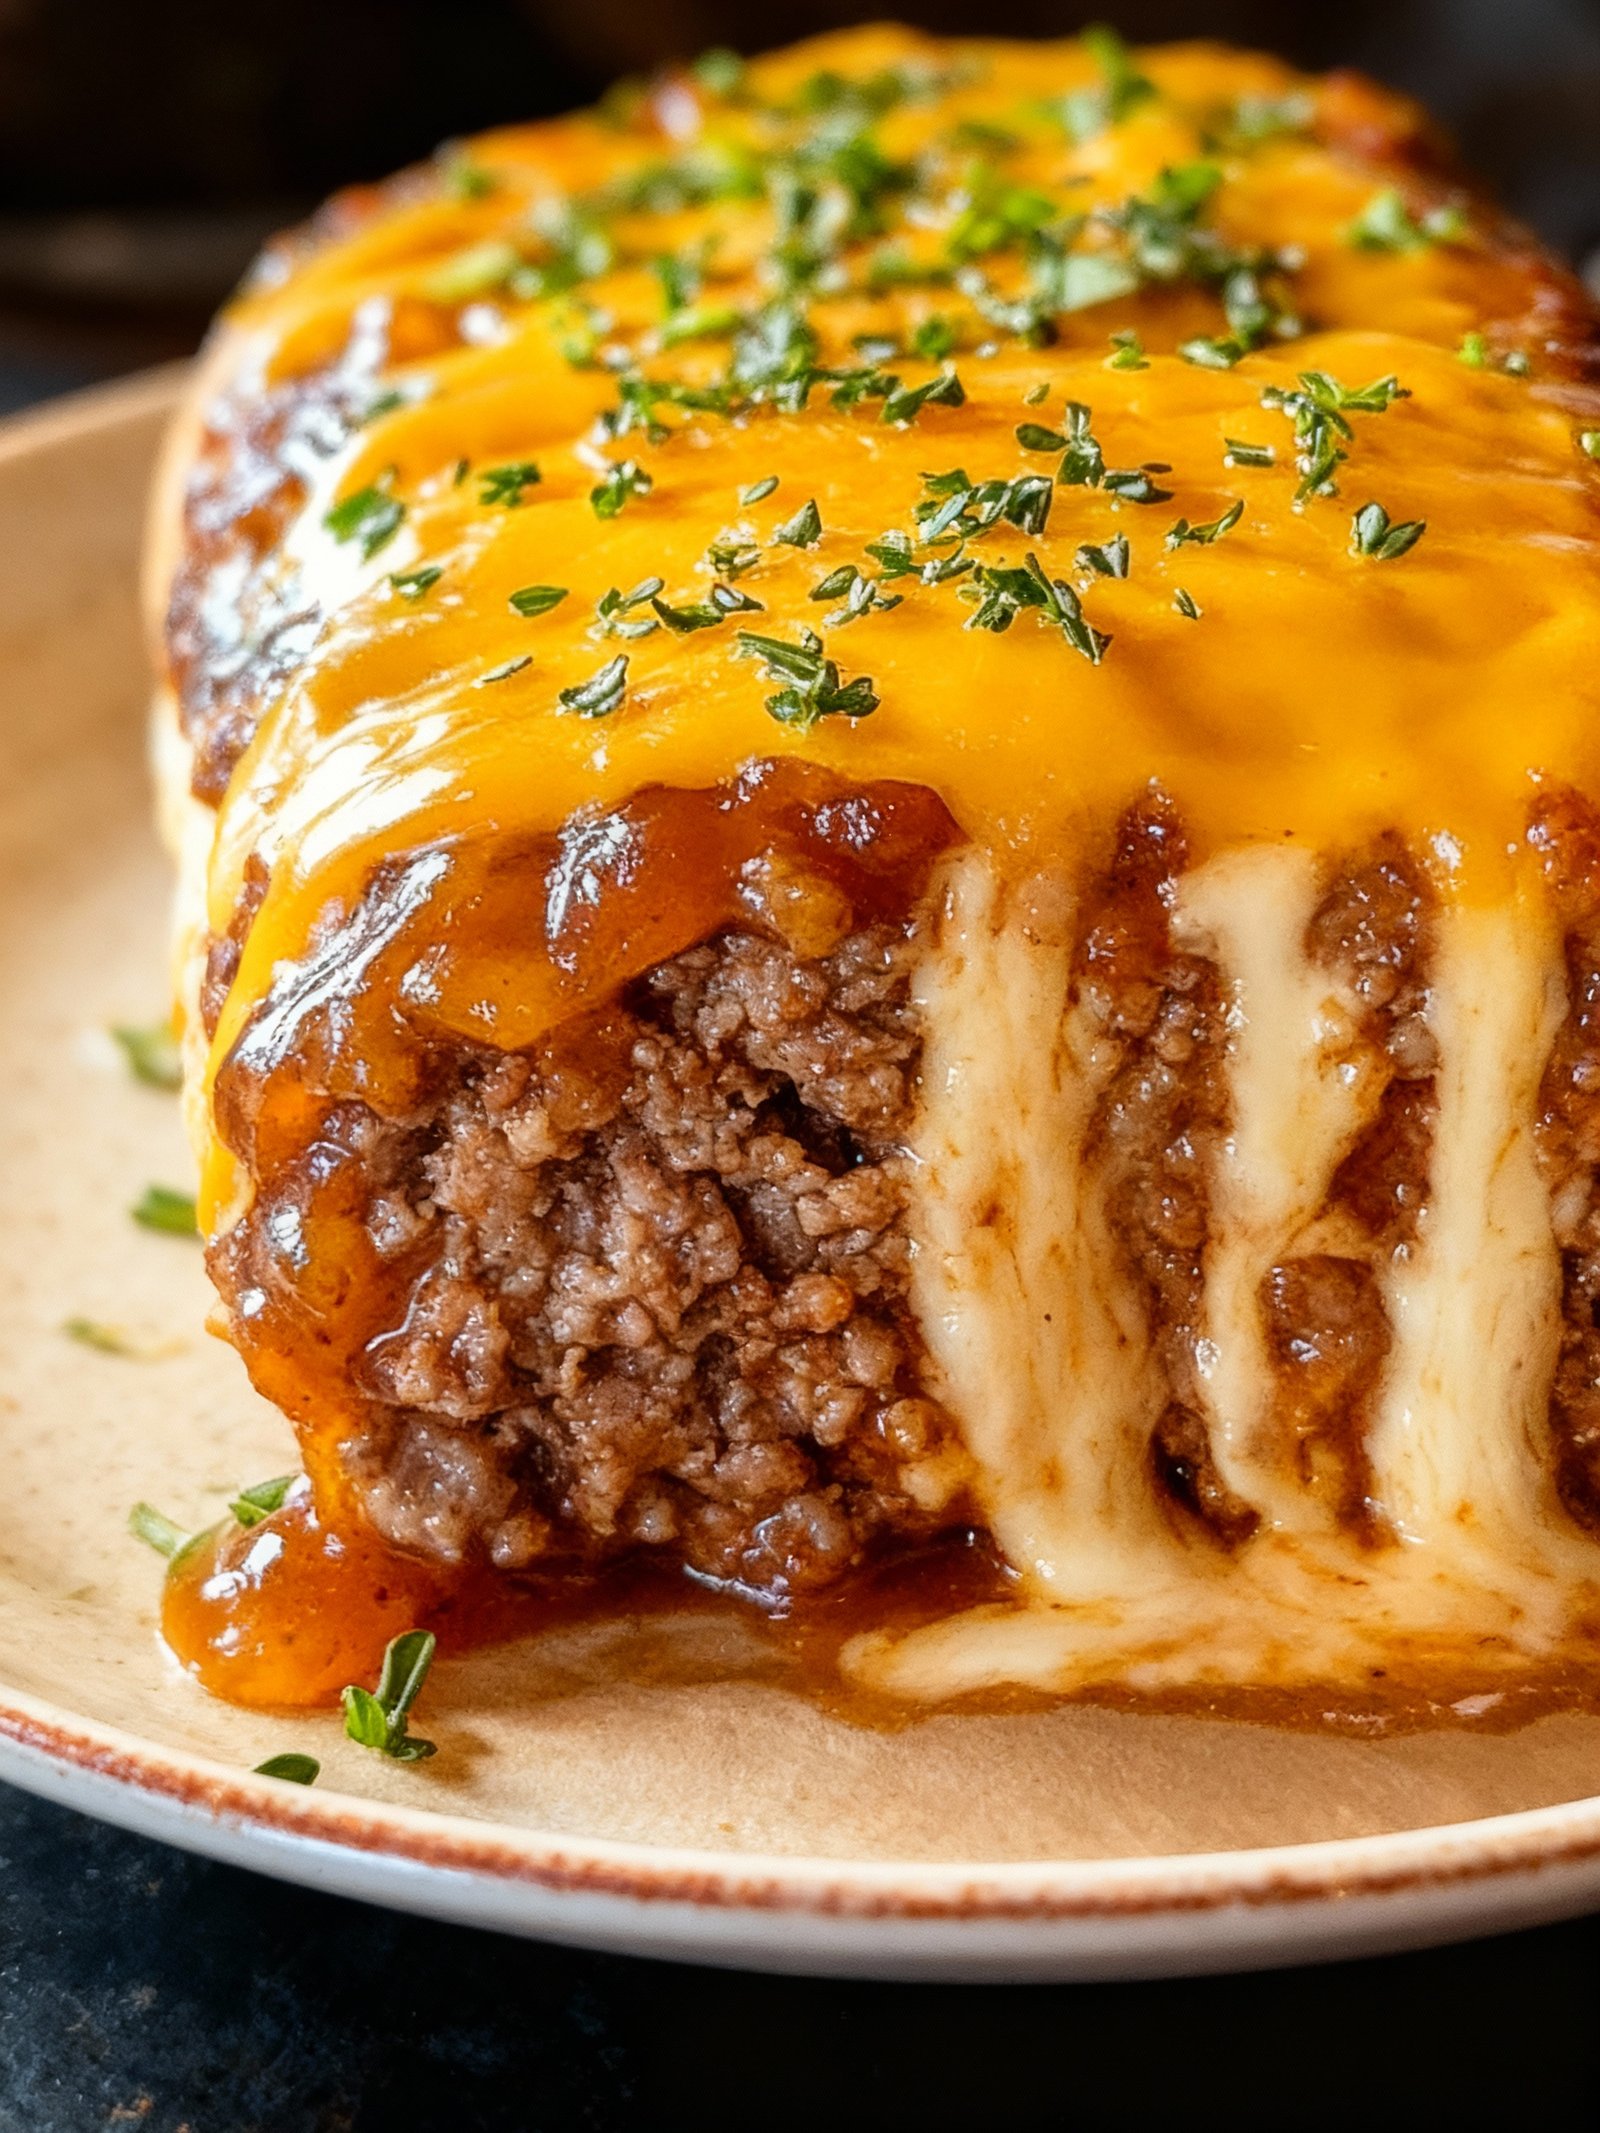
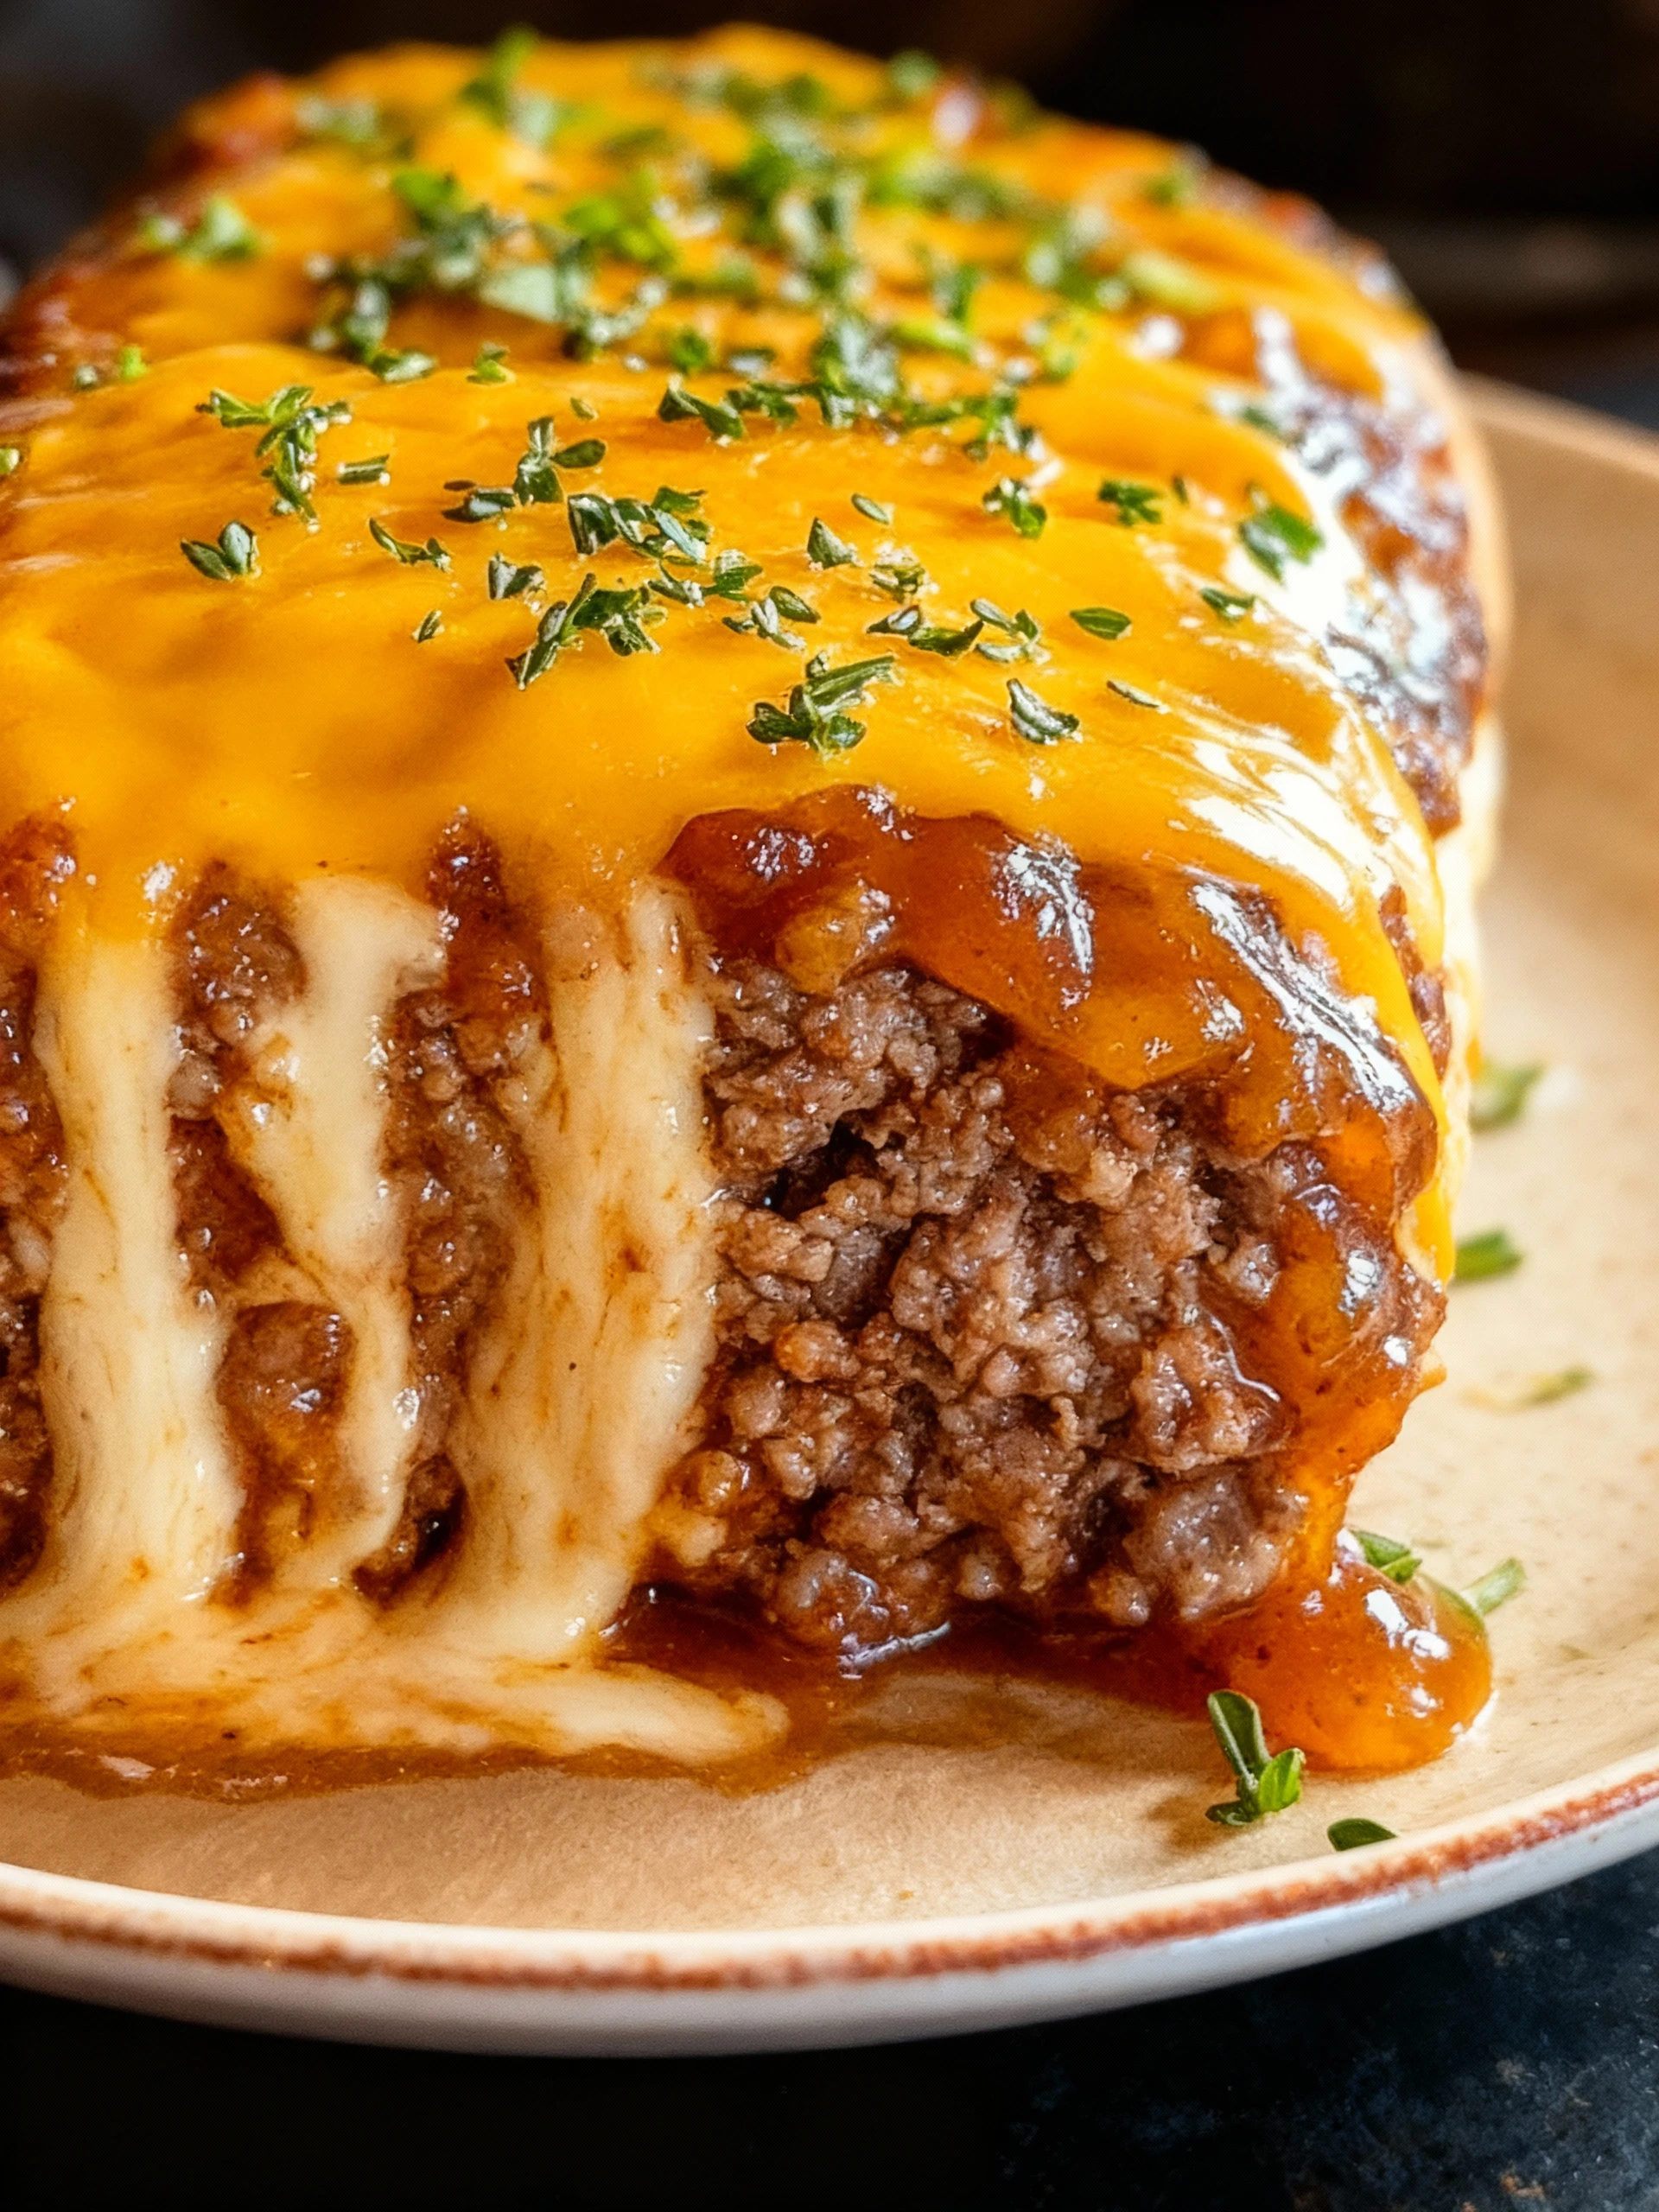
This Easy Cheeseburger Meatloaf Cheddar Roll is a simple and delicious twist on two classic comfort foods. Ground beef, savory seasonings, and melted cheddar cheese are rolled into a flavorful loaf that bakes up juicy and satisfying. It’s perfect for a family dinner and comes together with minimal effort. For another cheesy beef favorite, try the Beef and Cheese Chimichangas Recipe.
Ingredients
These simple ingredients come together to create juicy, flavorful meatballs with a savory ketchup glaze and cheesy crust that will have everyone asking for seconds.
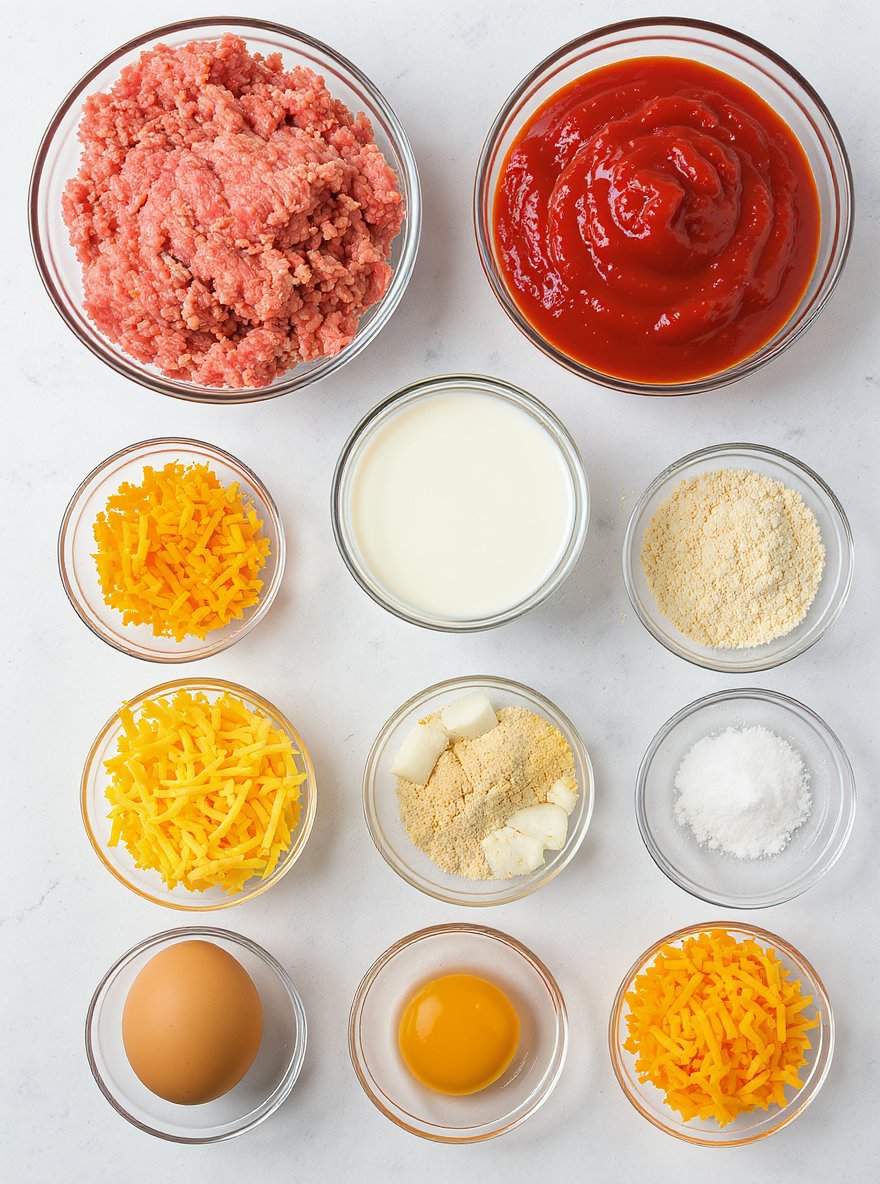
- 1 1/2 pounds ground beef
- 1 cup shredded cheddar cheese
- 1/2 cup bread crumbs
- 1/4 cup milk
- 1/4 cup ketchup
- 1 small onion, finely chopped
- 1 egg
- 1 teaspoon garlic powder
- 1 teaspoon salt
- 1/2 teaspoon black pepper
- 1/2 cup shredded cheddar cheese (for rolling)
- 1/4 cup ketchup (for topping)
Timing
| Prep Time | 10 minutes |
| Cook Time | 20 minutes |
| Total Time | 30 minutes |
Context: This recipe is about 25% faster than similar recipes.
Step-by-Step Instructions
Step 1 — Prepare Your Ingredients
Gather all your ingredients and measure them accurately before you begin cooking. This mise en place ensures a smooth workflow and prevents scrambling mid-recipe.
For proteins, pat them dry with a paper towel to ensure a proper sear. Chop vegetables uniformly so they cook at the same rate.
Step 2 — Preheat Your Cooking Surface
Place your pan, pot, or baking sheet over medium-high heat and allow it to get fully hot before adding any food. A properly preheated surface is key for developing flavor.
For stovetop cooking, a drop of water should sizzle and evaporate immediately. For ovens, preheat to the specified temperature, usually 375–425°F, for at least 15 minutes.
Step 3 — Sauté Aromatics
Add a small amount of oil or butter to the hot pan, followed by your aromatics like onions, garlic, or ginger. Sauté until fragrant and translucent, about 2–3 minutes.
Stir frequently to prevent burning. If the aromatics brown too quickly, reduce the heat slightly.
Step 4 — Cook the Main Ingredients
Add your primary ingredients, such as meat or vegetables, to the pan. Do not overcrowd the pan; cook in batches if necessary to ensure proper browning.
For meats, cook until they reach a safe internal temperature: 165°F for poultry, 145°F for pork, and 125–135°F for beef (for medium-rare to medium).
Step 5 — Incorporate Liquids and Simmer
Pour in any broths, sauces, or other liquids, scraping the bottom of the pan to incorporate the flavorful browned bits. Bring the mixture to a simmer.
Reduce the heat to maintain a gentle simmer, where small bubbles break the surface occasionally. A rapid boil can make proteins tough and sauces separate.
Step 6 — Adjust Seasoning and Thicken
Taste your dish and adjust the seasoning with salt, pepper, or other spices. Remember, you can always add more, but you can’t take it out.
If a thicker consistency is desired, you can create a slurry with cornstarch and cold water, then stir it in and simmer for a minute until thickened.
Step 7 — Check for Doneness
For meats, use a digital thermometer to check the internal temperature. Vegetables should be tender but not mushy when pierced with a fork.
Pasta and grains are done when they are al dente—cooked through but still offering a slight resistance to the bite.
Step 8 — Rest Before Serving
Let cooked meats rest for 5–10 minutes before slicing. This allows the juices to redistribute, resulting in a more moist and flavorful final product.
Step 9 — Plate and Garnish
Transfer your finished dish to a serving platter or individual plates. A final garnish of fresh herbs, a drizzle of oil, or a squeeze of citrus can elevate the presentation and flavor.
Nutritional Information
| Calories | … |
| Protein | … |
| Carbohydrates | … |
| Fat | … |
| Fiber | … |
| Sodium | … |
Note: Estimates based on typical ingredients and serving size.
Healthier Alternatives
- Lean ground turkey or chicken — Lighter protein with savory flavor, perfect for meatballs or sauces.
- Cauliflower rice — Low-carb, neutral base that absorbs seasonings well.
- Coconut milk or unsweetened almond milk — Creamy dairy-free substitute for soups and curries.
- Tamari or coconut aminos — Gluten-free, lower-sodium alternative to soy sauce.
- Zucchini noodles (zoodles) — Fresh, low-carb pasta swap with mild vegetable taste.
- Nutritional yeast — Cheesy, nutty flavor for dairy-free topping or seasoning.
- Avocado oil or olive oil — Heart-healthy fats with clean, light taste for sautéing and dressings.
- Mashed avocado or Greek yogurt — Creamy, protein-rich substitute for mayonnaise or sour cream.
Serving Suggestions
- Pair with a crisp green salad and crusty bread for a complete meal.
- Serve alongside roasted vegetables like asparagus or carrots for a hearty dinner.
- Perfect for casual weeknight dinners or elegant weekend entertaining.
- Ideal for potlucks and family gatherings where it can be made ahead.
- Garnish with fresh herbs and a drizzle of high-quality olive oil for restaurant-style plating.
- Serve in a shallow bowl to showcase the sauce and ingredients beautifully.
These serving ideas help transform your dish into a memorable dining experience suitable for various occasions.
Common Mistakes to Avoid
- Mistake: Using cold eggs straight from the fridge. Fix: Bring eggs to room temperature for better emulsification and a smoother batter.
- Mistake: Overmixing the batter until gluten develops. Fix: Mix just until ingredients are combined to keep your baked goods tender.
- Mistake: Not preheating your oven properly. Fix: Always allow your oven to fully preheat for consistent cooking and proper rise.
- Mistake: Substituting ingredients without understanding their function. Fix: Research the role of each ingredient before making swaps to maintain structure and flavor.
- Mistake: Opening the oven door too early during baking. Fix: Resist peeking until the minimum bake time has passed to prevent temperature drops and collapse.
- Mistake: Incorrectly measuring flour by scooping from the bag. Fix: Use the spoon-and-level method for accurate measurements and to avoid dense results.
- Mistake: Baking in the wrong pan size or material. Fix: Use the pan size specified in the recipe, as material and dimensions directly impact bake time and texture.
- Mistake: Ignoring the importance of salt in sweet recipes. Fix: Always include salt to enhance flavor complexity and balance sweetness.
Storing Tips
- Fridge: Store in an airtight container for up to 3–4 days. Ensure the food cools to room temperature before refrigerating.
- Freezer: Place in a freezer-safe container or heavy-duty freezer bag for up to 3 months. Label with the date for easy tracking.
- Reheat: Warm in the microwave or on the stovetop until the internal temperature reaches 165°F (74°C) for food safety. Stir occasionally for even heating.
Always allow hot food to cool slightly before storing to maintain quality and prevent condensation in your containers.
Conclusion
This easy cheeseburger meatloaf cheddar roll is a delicious family dinner that combines classic flavors in a fun new way. If you enjoyed this recipe, try our Garlic Parmesan Cheeseburger Bombs Recipe next! We love hearing from you—please leave a comment with your results and subscribe for more tasty recipes.
PrintEasy Cheeseburger Meatloaf Cheddar Roll

A simple and delicious meatloaf recipe that combines the flavors of cheeseburgers with a cheddar cheese roll, perfect for a comforting family meal.
- Prep Time: 15 minutes
- Cook Time: 60 minutes
- Total Time: 1 hour 15 minutes
- Yield: 6 1x
- Method: Main Course
- Cuisine: American
Ingredients
- 1 1/2 pounds ground beef
- 1 cup shredded cheddar cheese
- 1/2 cup bread crumbs
- 1/4 cup milk
- 1/4 cup ketchup
- 1 small onion, finely chopped
- 1 egg
- 1 teaspoon garlic powder
- 1 teaspoon salt
- 1/2 teaspoon black pepper
- 1/2 cup shredded cheddar cheese (for rolling)
- 1/4 cup ketchup (for topping)
Instructions
- Preheat oven to 350°F (175°C).
- In a large bowl, combine ground beef, 1 cup shredded cheddar cheese, bread crumbs, milk, 1/4 cup ketchup, chopped onion, egg, garlic powder, salt, and black pepper. Mix well until all ingredients are evenly incorporated.
- On a large piece of parchment paper or foil, spread the meat mixture into a rectangle about 1/2 inch thick.
- Sprinkle the 1/2 cup shredded cheddar cheese evenly over the meat mixture.
- Carefully roll the meat mixture into a log shape, using the parchment paper or foil to help roll it tightly.
- Place the rolled meatloaf seam side down in a baking dish.
- Spread 1/4 cup ketchup evenly over the top of the meatloaf roll.
- Bake in the preheated oven for 60 minutes or until the internal temperature reaches 160°F (71°C).
- Remove from oven and let rest for 10 minutes before slicing and serving.
Notes
For best results, use freshly shredded cheddar cheese and do not overmix the meat to keep the meatloaf tender. Letting the meatloaf rest after baking helps retain juices and makes slicing easier.
Nutrition
- Calories: 350
- Sugar: 5
- Sodium: 600
- Fat: 25
- Saturated Fat: 12
- Unsaturated Fat: 10
- Trans Fat: 0
- Carbohydrates: 10
- Fiber: 1
- Protein: 25
- Cholesterol: 90
FAQs
Can I make this recipe ahead of time?
Yes, this recipe holds up well when prepared in advance. You can assemble it a day ahead and store it covered in the refrigerator. Reheat gently before serving for the best results.
What can I use as a substitute for [ingredient]?
You can substitute [ingredient] with [alternative ingredient] for a similar effect. This swap works well in the recipe and maintains the intended flavor and texture.
How should I store leftovers?
Store any leftovers in an airtight container in the refrigerator for up to 3 days. Reheat individual portions as needed to enjoy this recipe again.


