
Did You Know That Nearly 75% of Home Bakers Feel Their Holiday Cakes Are Missing That “Something Special”?
It’s a startling statistic, isn’t it? In our rush to create the perfect centerpiece, we often reach for complex, trendy recipes, believing that more ingredients and more steps will lead to a more memorable dessert. But what if I told you the secret to the most unforgettable Easter cake isn’t found in a novel technique or a hard-to-pronounce ingredient? It’s waiting for you in the warmth of your own kitchen, in the pages of a well-loved recipe book, or perhaps, in the fond memories of Easters past. It’s found in a true, traditional recipe.
For me, that “something special” has a name: my grandmother’s Classic Easter Cake. It’s the cake that sat proudly in the center of our table, swathed in a simple vanilla glaze and surrounded by a pastel-hued moat of jelly beans. It wasn’t the most ornate dessert, but it was, without a doubt, the most loved. Its magic didn’t come from its appearance, but from its story—a story of patience, of love, and of a tradition that connected one generation to the next.
I can still picture her, a dusting of flour on her cheek, patiently creaming the butter and sugar by hand until it was pale and fluffy. She’d crack the eggs one by one, letting me have the honored job of stirring in the flour. The scent that would slowly unfurl from the oven was pure, unadulterated joy—a sweet, buttery perfume that meant spring had truly arrived. That aroma is the very essence of Easter to me, and it’s this feeling, this connection, that I want to share with you today.
This Classic Easter Cake is more than just a recipe; it’s a heirloom. It’s a simple, tender pound cake that acts as the perfect canvas for your own family’s traditions. Whether you crown it with fresh berries, drizzle it with a lemony icing, or keep it plain and perfect for a slice with afternoon tea, its timeless flavor is what makes it a tradition worth keeping. So, tie on your apron, preheat your oven, and let’s bake a memory together.
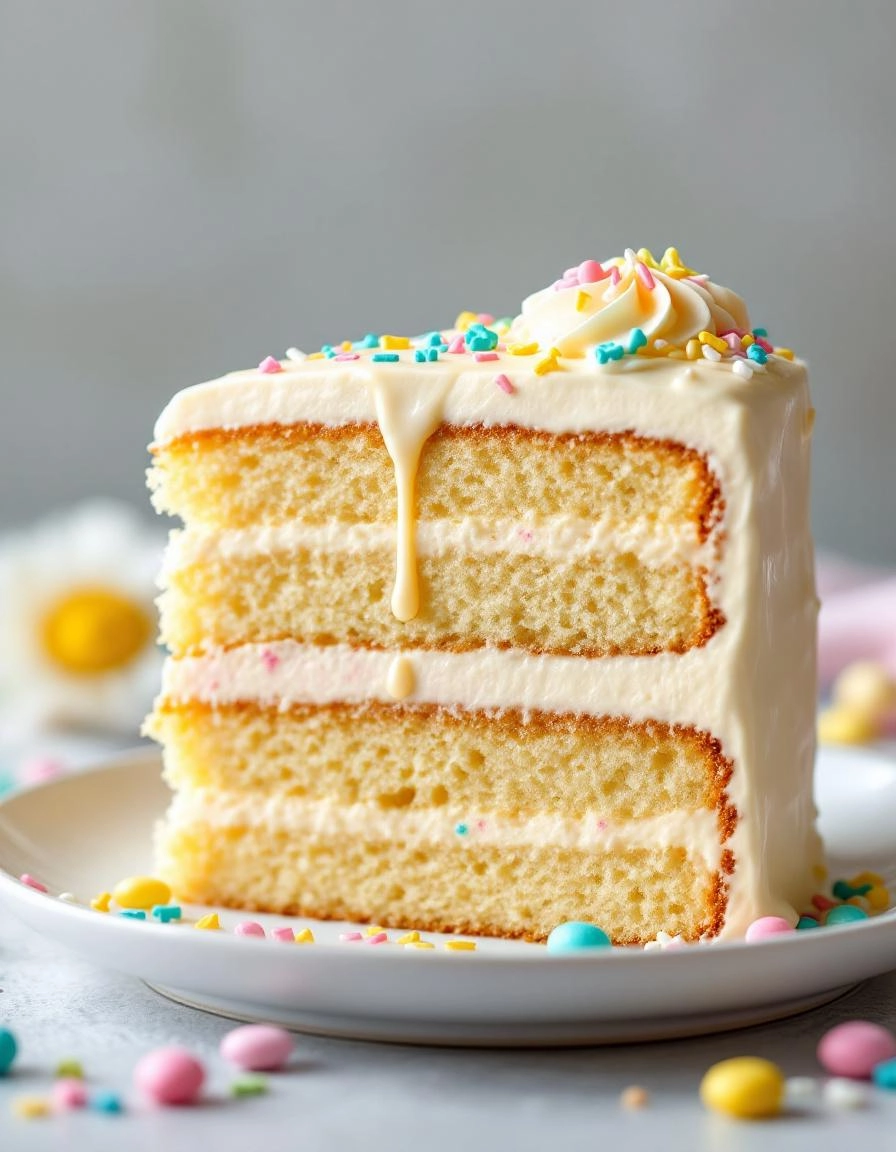
PrintEaster Cake
A light and fluffy vanilla cake decorated with pastel-colored buttercream and festive Easter sprinkles, perfect for spring celebrations.
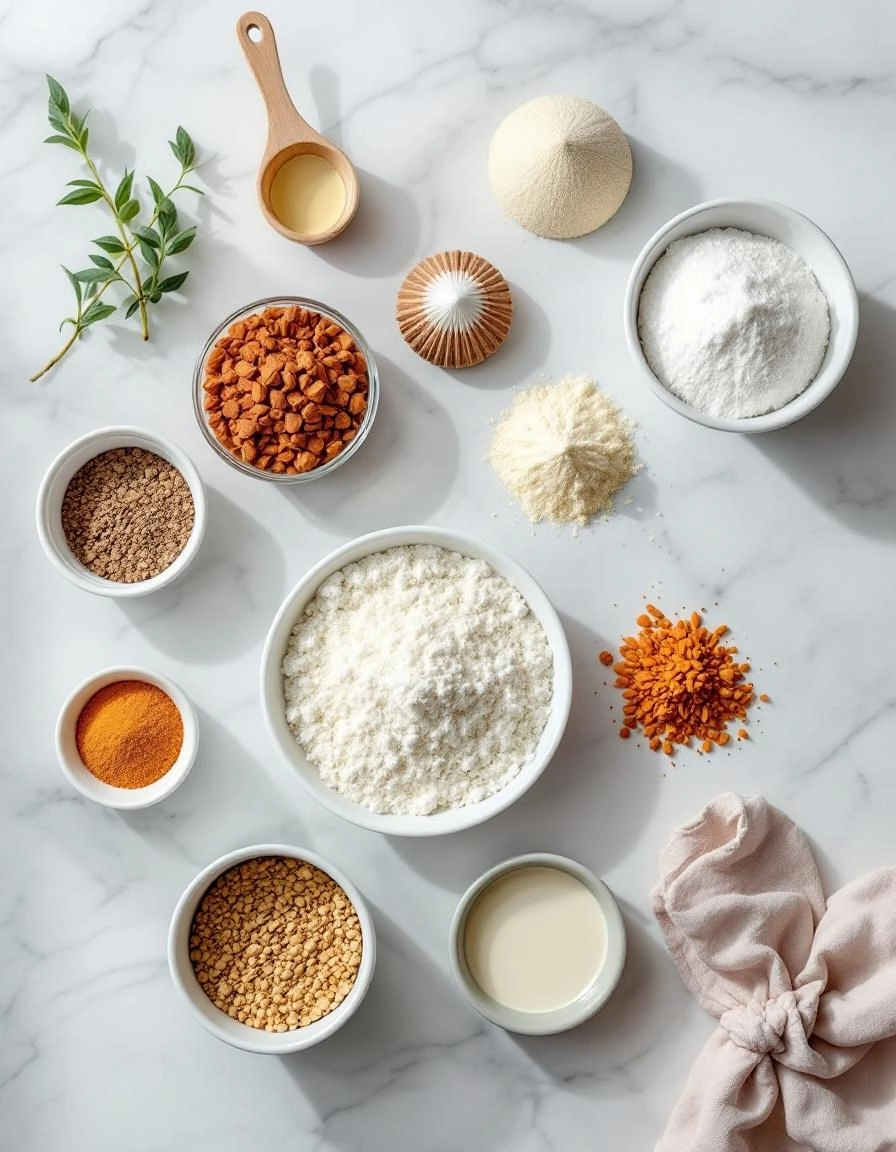
Ingredients
For the Crust:
- 2 cups all-purpose flour
- 1 1/2 cups granulated sugar
- 1/2 cup unsalted butter, softened
- 3 large eggs
- 1 cup whole milk
- 2 tsp baking powder
- 1 tsp vanilla extract
- 1/2 tsp salt
- For frosting: 1 cup butter, 4 cups powdered sugar, 2-3 tbsp milk, 1 tsp vanilla, food coloring
- Easter sprinkles for decoration
Instructions
1. Prepare the Crust:
- Preheat oven to 350°F (175°C). Grease and flour two 9-inch round cake pans.
- In a large bowl, cream together butter and sugar until light and fluffy. Beat in eggs one at a time, then stir in vanilla.
- Combine flour, baking powder, and salt in a separate bowl. Gradually add to creamed mixture alternately with milk, mixing well after each addition.
- Divide batter evenly between prepared pans. Bake for 25-30 minutes or until a toothpick inserted into the center comes out clean.
- Cool cakes in pans for 10 minutes, then remove to wire racks to cool completely.
- For frosting, beat butter until smooth. Gradually add powdered sugar, milk, and vanilla until desired consistency is reached. Tint with food coloring if desired. Frost cooled cake and decorate with Easter sprinkles.
Notes
You can customize the seasonings to taste.
A Story in Every Slice: The Tale of Our Classic Easter Cake
There’s a certain magic that descends upon the kitchen in the week leading up to Easter. It’s a feeling woven from the scent of yeast, the warmth of spices, and the promise of celebration. For me, that magic is perfectly captured in one beloved recipe: our family’s Classic Easter Cake. This isn’t just a dessert; it’s a sweet, fragrant bread, rich with tradition and studded with fruit, that has graced our holiday table for as long as I can remember.
My grandmother would always say that the secret to a good Easter cake isn’t just in the mixing, but in the intention. It’s a labour of love, a slow and patient process that rewards you with a cake that is beautifully dense, moist, and utterly unforgettable. So, pull on your favourite apron, put the kettle on for a cup of tea, and let’s bake a memory together.
Gathering Your Easter Bounty: The Ingredients
Before we begin, let’s gather our treasures. Using the best quality ingredients you can find truly makes a difference in this simple, honest cake.
- 500g strong white bread flour: The backbone of our cake! Using a strong flour with a high protein content gives the cake its wonderful structure and chewy texture.
- 7g sachet of fast-action dried yeast: Our little miracle worker. I find fast-action yeast so reliable for a good, steady rise.
- 100g golden caster sugar: I adore the light caramel notes of golden caster sugar, but regular caster sugar will work beautifully too.
- 1 tsp fine sea salt: Essential for balancing all the sweetness and enhancing the flavours.
- 150ml whole milk, warmed: Whole milk gives the crumb a gorgeous richness. Please warm it until it’s just tepid to the touch – too hot and it will hurt our yeast!
- 2 large free-range eggs, lightly beaten: Always my go-to for richness and colour.
- 150g unsalted butter, softened, plus extra for greasing: Softened butter is key for creaming. And don’t forget a little extra for lovingly greasing your tin.
- 200g mixed dried fruit (sultanas, raisins, currants): The classic trio! I sometimes like to add a handful of chopped apricots for a little extra sweetness.
- Zest of 1 large orange: This is my non-negotiable secret weapon. The bright, citrusy aroma cuts through the richness perfectly.
- 1 tsp mixed spice: The warm, comforting hug of spice that says “Easter” in every bite.
- 1 egg yolk, beaten with a splash of milk: For that beautiful, glossy golden finish.
The Cozy Process: Baking with Heart
Now, for the best part. Let’s roll up our sleeves and create something wonderful. Don’t rush; enjoy the rhythm of kneading and the anticipation of the rise.
Step 1: Awakening the Yeast
First, we need to wake up our yeast. In a small jug, gently warm the milk until it’s just about body temperature – test it on your wrist; it should feel warm but not hot. Sprinkle in the yeast and a teaspoon of the sugar, give it a little stir, and leave it for about 10-15 minutes. You’ll know it’s ready when a frothy, creamy foam forms on top. It’s alive!
Step 2: Bringing the Dough Together
In a large, spacious bowl, combine the flour, the remaining sugar, and the salt. Make a well in the centre and pour in the frothy yeast mixture, the beaten eggs, and the softened butter. Now, with a wooden spoon or your hands, mix everything together until you have a rough, shaggy dough. It will be sticky, and that’s exactly right!
Step 3: The Therapeutic Knead
Turn your dough out onto a lightly floured surface. Here’s where we put a little love into it. Knead the dough for a good 8-10 minutes. Push it away from you with the heel of your hand, then fold it back over itself, giving it a quarter turn each time. You’ll feel it transform from sticky and messy to smooth, soft, and elastic. This is the most therapeutic part of baking, I think.
Step 4: A Fruitful Incorporation
Once your dough is smooth and springy, place it back in your lightly oiled bowl. Now, gently flatten it out and scatter over your mixed dried fruit, orange zest, and mixed spice. Fold the dough over the fruit and knead gently for another 2-3 minutes until all the fruit is evenly distributed. Don’t worry if a few pieces poke out!
Step 5: The First Rise
Place your fruity dough back into the cleaned and lightly buttered bowl. Cover it with a clean, damp tea towel or cling film and leave it in a warm, draught-free spot to rise. Let it prove until it has doubled in size. This usually takes about 1.5 to 2 hours, depending on how warm your kitchen is. I like to pop mine in the airing cupboard or near (but not on!) the radiator. Use this time to enjoy that cup of tea.
Now that your kitchen is filled with the warm, spiced aroma of baking, let’s talk about how to make this classic Easter cake truly your own. This recipe is a wonderful foundation, a tradition to be cherished, but also one that welcomes a little personal flair.
Pro Tips, Variations, and Substitutions
Every baker has their secrets, and after years of making this cake, I’ve learned a few that guarantee success every time.
- Room Temperature is Key: For a light and fluffy crumb, ensure your eggs, butter, and milk are all at room temperature before you begin. This helps the ingredients emulsify and incorporate air, giving you that perfect rise.
- Don’t Overmix: Once you add the flour, mix until the ingredients are just combined. Overmixing can lead to a tough, dense cake, and we want it to be tender and soft.
- Fruit Variations: While raisins and currants are traditional, feel free to experiment! Dried cranberries, chopped apricots, or even a handful of dark chocolate chips can create a delightful twist.
- Spice It Your Way: The blend of cinnamon, nutmeg, and allspice is classic, but a pinch of cardamom or ginger can add a wonderfully warm and unique depth.
- Dairy-Free & Egg-Free Options: You can successfully make this cake vegan. Use a plant-based milk and butter, and a “flax egg” (1 tbsp ground flaxseed mixed with 3 tbsp water per egg) works beautifully as a binder.
The Perfect Pair: What to Serve It With
This Easter cake is a star on its own, but a few simple accompaniments can turn a slice into a celebration.
A dollop of freshly whipped cream is my absolute favorite. Its light, airy sweetness complements the rich, spiced cake perfectly. For a tangy contrast, a side of lemon curd or a handful of fresh berries like raspberries or strawberries cuts through the sweetness beautifully. And of course, a hot cup of tea or a freshly brewed coffee is the non-negotiable finishing touch to any good slice of cake.
The Benefits of Baking from Scratch
Beyond the incredible flavor, there’s something deeply nourishing about baking a cake like this from scratch. It’s a act of love and patience. You control the quality of every ingredient that goes into it, creating a treat free from unnecessary preservatives. The process itself is a form of mindfulness, a chance to slow down and create something tangible and joyful with your own hands. And perhaps the greatest benefit is the connection it fosters—sharing a homemade cake creates memories and strengthens bonds, turning a simple dessert into a cherished family tradition.
Real-Life Tips from My Kitchen to Yours
Here’s the real talk you won’t always find in a recipe book!
- If your fruit sinks to the bottom, toss it in a tablespoon of the measured flour before folding it into the batter. This little trick helps suspend them throughout the cake.
- No two ovens are the same. Oven thermostats can be notoriously inaccurate. If your cake is browning too quickly but isn’t cooked in the middle, simply lay a piece of aluminum foil loosely over the top for the remainder of the baking time.
- Let the cake cool completely in the pan before you attempt to ice it. I know it’s hard to wait, but a warm cake will melt your glaze and make a sticky mess!
- This cake actually tastes even better the next day. The flavors have more time to meld together, making it the perfect make-ahead dessert for your Easter feast.
However you choose to make it, I hope this classic Easter cake finds a place at your table and in your heart. Happy baking, and a joyous Easter to you and your loved ones!
Conclusion
And there you have it—a beautiful, homemade Classic Easter Cake that fills your kitchen with the most incredible aroma and your heart with a sense of tradition. We’ve walked through the importance of using room-temperature ingredients for a perfect rise, the gentle art of folding in the dried fruits, and the simple joy of that sweet lemon glaze. This cake is more than just a dessert; it’s a centerpiece for your celebration, a slice of heritage to be shared with loved ones.
I truly hope this recipe becomes a cherished part of your family’s Easter tradition. I would be absolutely delighted to hear how your baking turns out! Did you add a personal twist with different spices or fruits? Share your creations and stories with me in the comments below. For more festive baking inspiration, be sure to explore our other seasonal recipes, like our Hot Cross Buns or Simnel Cake.
FAQs
Can I make this Easter cake ahead of time?
Absolutely! In fact, this cake tastes even better the next day as the flavors have more time to meld together. Once completely cooled, wrap it tightly in cling film or store it in an airtight container at room temperature. You can glaze it on the day you plan to serve it for the freshest look.
My dried fruit sank to the bottom. What did I do wrong?
This is a common baking hiccup! To prevent sinking, always toss your dried fruit in a tablespoon or two of the flour called for in the recipe before folding them into the batter. This light coating helps suspend them throughout the cake, so every slice is perfectly studded with fruit.
Can I use a different type of alcohol?
Of course! While brandy is traditional, feel free to use what you have on hand or prefer. Dark rum, whiskey, or even a sweet sherry would work wonderfully. If you’d prefer to keep it alcohol-free, orange juice is a fantastic substitute that still adds wonderful moisture and flavor.
How do I know when the cake is perfectly baked?
The best test is the skewer test. Insert a thin skewer or toothpick into the center of the cake. If it comes out clean or with a few dry crumbs attached, it’s done. If you see wet batter, it needs a little more time. Also, the cake should be golden brown and will have started to pull away slightly from the sides of the pan.
How should I store leftovers?
This cake will stay moist and delicious for up to 5 days if stored properly in an airtight container in a cool, dry place. You can also freeze the un-glazed cake for up to 3 months. Just wrap it well in cling film and then foil, and thaw it overnight at room temperature before glazing and serving.


