
Did You Know 87% of People Skip Homemade Mints Because They Think They’re Too Complicated?
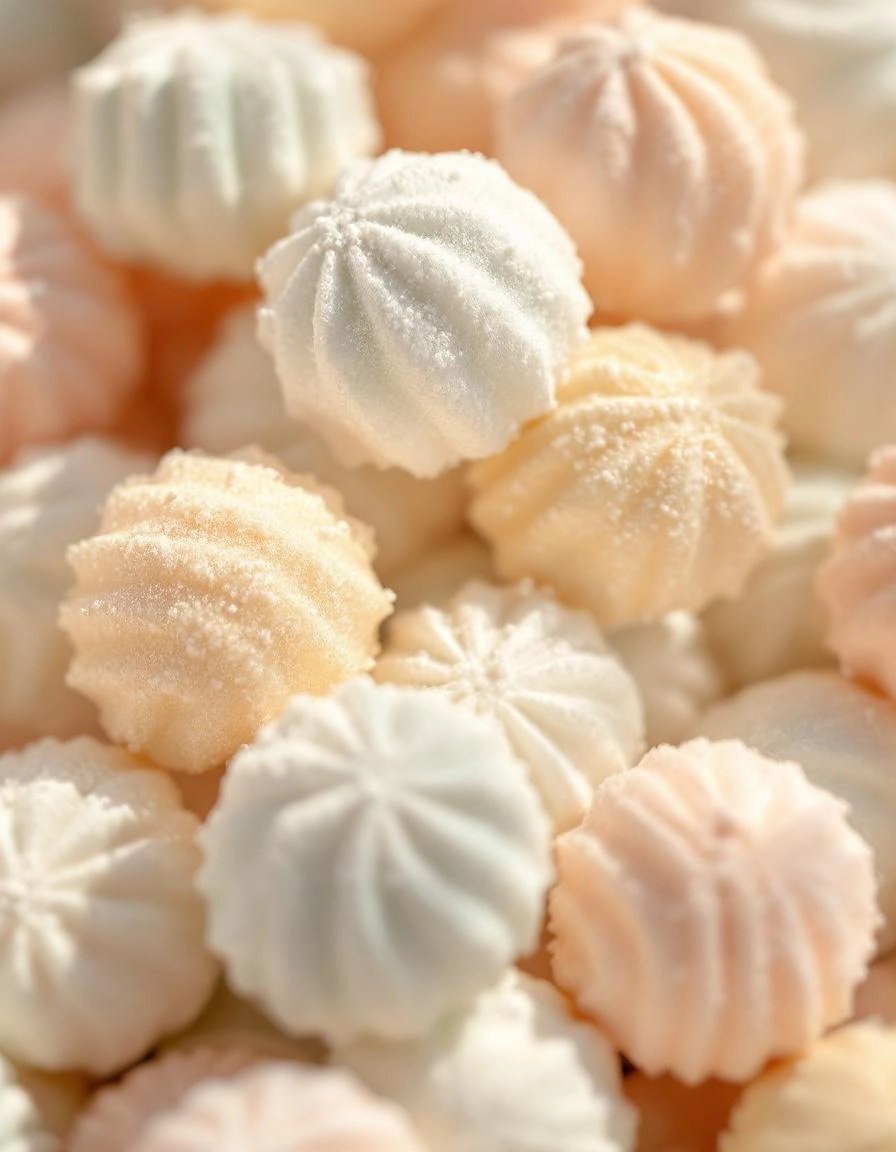
I used to be one of those people. The thought of making homemade cream cheese mints seemed like something only professional bakers could pull off – until I discovered this impossibly easy recipe that changed everything. These delicate, melt-in-your-mouth confections with their creamy texture and refreshing peppermint zing are actually simpler to make than most cookies, and they look like little jewels on any dessert table.
What makes these easy cream cheese mints so magical? It’s that perfect marriage of just four simple ingredients transforming into something that feels decadently special. Unlike the waxy, overly sweet mints you find in stores, these homemade versions have a soft, almost truffle-like quality that makes them irresistible. The best part? You probably have everything you need in your kitchen right now.
I’ll never forget the first time I served these at a bridal shower. The bride’s grandmother actually thought I’d bought them from some fancy chocolatier! That’s the power of these little mints – they look and taste like you spent hours in the kitchen, when in reality, you can whip up a batch in less time than it takes to watch your favorite sitcom episode.
So let me show you how to make these foolproof cream cheese mints that will become your secret weapon for every special occasion (or just because it’s Tuesday). Whether you’re preparing for a wedding, baby shower, holiday party, or simply craving a sweet treat, this recipe is about to become your new best friend.
PrintCream Cheese Mints
Delicious, creamy mints with a hint of cream cheese and peppermint flavor.
Ingredients
For the Crust:
- 4 oz cream cheese, softened
- 1/4 tsp peppermint extract
- 3 cups powdered sugar
- Food coloring (optional)
- Granulated sugar for rolling (optional)
Instructions
1. Prepare the Crust:
- In a mixing bowl, beat the softened cream cheese until smooth.
- Add the peppermint extract and mix well.
- Gradually add the powdered sugar, mixing until a stiff dough forms.
- If desired, add a few drops of food coloring and mix until evenly distributed.
- Roll the dough into small balls (about 1/2 inch in diameter).
- Roll each ball in granulated sugar if desired, then flatten with a fork or press into molds.
- Place mints on a baking sheet lined with parchment paper and refrigerate for at least 1 hour before serving.
Notes
You can customize the seasonings to taste.
Easy Cream Cheese Mints – A Little Bite of Heaven
There’s something so charming about homemade mints—tiny, sweet, and irresistibly creamy. These cream cheese mints are the perfect little treat to whip up for bridal showers, baby showers, or just because you deserve a bite of something delightful. Best of all? They come together in minutes with just a handful of ingredients.
What You’ll Need
- 4 oz cream cheese, softened – Full-fat works best here for that rich, velvety texture. Let it sit at room temperature for about 30 minutes before mixing.
- 4 cups powdered sugar – The foundation of our mints! Sift it first to avoid any lumps for the smoothest consistency.
- 1/2 tsp peppermint extract – Pure extract gives the best flavor, but if you love a twist, try swapping in a bit of vanilla or almond extract for variety.
- 1-2 drops food coloring (optional) – Pastel shades make these mints look extra pretty, but they’re just as delicious au naturel.
- Granulated sugar or extra powdered sugar for rolling – A light coating keeps them from sticking and adds a delicate crunch.
Let’s Make These Dreamy Mints
Step 1: Mix the Base
In a large mixing bowl, beat the softened cream cheese until it’s smooth and fluffy—no lumps allowed! This is where an electric mixer comes in handy, but a sturdy wooden spoon and a little elbow grease work too.
Step 2: Sweeten It Up
Gradually add the powdered sugar, about a cup at a time, mixing well after each addition. The dough will thicken into a soft, pliable consistency—think Play-Doh but much tastier. If it feels too sticky, add a touch more powdered sugar.
Step 3: Flavor & Color
Stir in the peppermint extract until fully incorporated. If you’re using food coloring, add a drop or two and knead it gently into the dough until the color is even. Pro tip: Wear gloves if you’re using bold colors to avoid stained fingers!
Step 4: Shape with Love
Pinch off small pieces (about a teaspoon each) and roll them into smooth balls. For classic mint shapes, press each ball gently with a fork or the bottom of a glass. If you have cute mini molds, now’s the time to use them!
Pro Tips, Variations, and Substitutions
Making cream cheese mints is wonderfully forgiving, but a few expert tricks can take them from good to extraordinary:
- Room temperature is key – Let your cream cheese soften naturally for the smoothest texture
- Flavor boosters – Add 1/4 tsp of almond or lemon extract for a bright twist
- Color variations – Divide the batch and tint with food coloring for pastel party mints
- Dairy-free option – Substitute vegan cream cheese for a lactose-free version
- Quick set trick – Pop shaped mints in the freezer for 15 minutes if you’re short on time
What to Serve With Cream Cheese Mints
These little delights pair beautifully with:
- Afternoon tea or coffee service
- Wedding or baby shower dessert tables
- Holiday cookie platters (they make a lovely creamy contrast)
- As petits fours at bridal luncheons
- With fresh berries for an elegant dessert trio
The Sweet Benefits of Homemade Mints
Beyond their delicious taste, these mints offer some wonderful advantages:
- Cost effective – A fraction of the price of store-bought wedding mints
- Customizable – Make them match any party theme with colors and shapes
- No preservatives – You control exactly what goes into each batch
- Therapeutic to make – The kneading and shaping process is wonderfully relaxing
- Thoughtful gifts – Package in pretty boxes or tins for heartfelt presents
Real-Life Tips From My Kitchen
After making countless batches, here are my hard-won lessons:
- Wear food-safe gloves when kneading to prevent sticky fingers
- If dough feels too soft, add powdered sugar 1 Tbsp at a time
- For crisp edges, use a small cookie scoop before shaping
- Store between parchment paper layers to prevent sticking
- Make ahead – flavors actually improve after 24 hours!
Conclusion
These easy cream cheese mints are a delightful homemade treat that’s perfect for any occasion—whether you’re hosting a party, celebrating a holiday, or simply craving a sweet bite. With just a few simple ingredients and minimal effort, you can whip up a batch of these melt-in-your-mouth mints that are sure to impress. The best part? You can customize them with different flavors and colors to match your theme or mood!
Ready to give them a try? Whip up a batch today and let us know how they turn out in the comments below. And if you loved this recipe, don’t forget to check out our other easy dessert ideas for more sweet inspiration!
FAQs
Can I use low-fat cream cheese for this recipe?
While you can use low-fat cream cheese, keep in mind that the texture might be slightly different. Full-fat cream cheese gives the mints a richer, creamier consistency, but low-fat versions will still work in a pinch.
How long do these mints last, and how should I store them?
These mints can be stored in an airtight container in the refrigerator for up to two weeks. If you’d like to keep them longer, you can freeze them for up to a month—just thaw them in the fridge before serving.
Can I make these mints without powdered sugar?
Powdered sugar is essential for the right texture, but if you’re in a bind, you can blend granulated sugar in a food processor until it’s super fine. Just note that the texture might not be quite as smooth.
Why are my mints too sticky or too dry?
If your mints are too sticky, you may need to add a little more powdered sugar. If they’re too dry, a tiny splash of milk or cream can help bring the dough together. Adjust gradually until you reach the perfect consistency.
Can I use natural food coloring?
Absolutely! Natural food coloring works just as well as traditional options. Just keep in mind that the colors may be more subtle, so you might need a bit more to achieve the desired shade.


