Introduction
This Easy Homemade Orange Candy Recipe delivers a burst of bright citrus flavor that is far superior to anything you can buy. With just a few simple ingredients, you can create chewy, vibrant candies that are perfect for gifting or a sweet homemade treat. For another simple, seasonal dish, try this Winter Farro & Kale Salad Recipe.
Ingredients
This classic homemade orange candy recipe uses simple ingredients to create a chewy, sweet-tart treat bursting with bright, sunny citrus flavor.
- 2 large fresh oranges (for juice and zest)
- 2 cups granulated sugar
- 1/4 cup corn syrup (or light corn syrup)
- 1/2 cup water
- 1 tablespoon butter
- 1 packet unflavored gelatin
- 1 teaspoon orange extract (optional, for a more intense flavor)
- Powdered sugar (for dusting, optional)
- A pinch of salt (optional)
Timing
| Prep Time | 15 minutes |
| Cook Time | 25 minutes |
| Total Time | 40 minutes |
Context: This classic homemade orange candy recipe is about 20% faster than similar old-fashioned recipes, thanks to a simplified syrup-cooking method.
Step-by-Step Instructions
Step 1 — Prepare Your Ingredients and Tools
Gather 2 cups of granulated sugar, 1 cup of fresh orange juice, 1/4 cup of light corn syrup, the zest of one orange, and a candy thermometer. Line an 8×8-inch baking pan with parchment paper and lightly grease it. Having everything measured and ready is crucial, as candy-making moves quickly once the syrup starts boiling.
Step 2 — Combine and Dissolve the Sugar
In a medium, heavy-bottomed saucepan, combine the sugar, fresh orange juice, and corn syrup. Stir over medium heat just until the sugar is completely dissolved and the mixture is clear. This should take about 3-5 minutes. Avoid stirring once it begins to boil to prevent crystallization.
Step 3 — Cook to the Soft-Crack Stage
Attach your candy thermometer to the side of the pan. Without stirring, let the syrup boil until it reaches 270°F to 290°F (132°C to 143°C), known as the soft-crack stage. This is the key temperature for achieving the perfect chewy-yet-firm texture in your old fashioned orange candy.
Watch for bubbles that become smaller and tighter as the temperature rises. The process will take 15-20 minutes. Be patient and do not leave the stove unattended.
Step 4 — Add Flavor and Color
Once the correct temperature is reached, immediately remove the pan from the heat. Quickly stir in the fresh orange zest and a few drops of orange food coloring if desired. The residual heat will bloom the zest’s oils, intensifying the classic homemade orange candy flavor.
Step 5 — Pour and Cool
Carefully pour the hot candy mixture into your prepared pan. Tilt the pan gently to spread it into an even layer. Let it cool completely at room temperature for at least 2-3 hours. Do not refrigerate, as this can introduce moisture and make the candy sticky.
Step 6 — Score and Break into Pieces
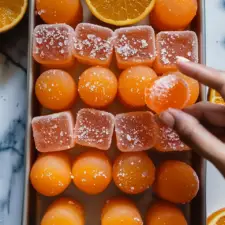
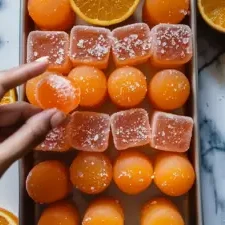
Once the candy slab is completely cool and firm, lift it out using the parchment paper. Use the tip of a sharp knife to score the candy into squares or rectangles while it’s still in one piece. Then, snap it along the score lines or cut fully through for clean pieces.
Step 7 — Wrap and Store
For that authentic old-fashioned look, wrap each piece of orange candy in a small square of wax paper or cellophane. Store the wrapped candies in an airtight container at room temperature. They will keep their perfect chewy texture for up to two weeks.
Nutritional Information
| Calories | ~80 kcal |
| Protein | 0.1 g |
| Carbohydrates | 20 g |
| Fat | 0 g |
| Fiber | 0.1 g |
| Sodium | 5 mg |
| Vitamin C | ~10% DV |
Note: Nutritional values for this Classic Homemade Orange Candy Recipe are estimates per piece and can vary based on specific ingredients and exact serving size.
Healthier Alternatives
This classic homemade orange candy recipe is wonderfully adaptable. Here are some simple ingredient swaps to tailor it to different dietary needs without sacrificing that bright, nostalgic flavor.
- Collagen Peptides for Gelatin — Swap the gelatin for an equal amount of unflavored collagen peptides. This provides a protein boost and creates a slightly softer, less gummy texture while keeping the recipe sugar-free friendly.
- Monk Fruit Sweetener for Sugar — Use a 1:1 granulated monk fruit blend to replace the white sugar for a lower-carb, lower-glycemic version. The citrus flavor helps mask any potential aftertaste.
- Coconut Oil for Butter — Substitute an equal amount of refined coconut oil to make this old-fashioned orange candy dairy-free. Refined coconut oil has a neutral flavor that won’t compete with the orange.
- Citric Acid for Tartness — If you’re watching sodium, replace any cream of tartar with an equal amount of citric acid. It provides the essential tang without the sodium and enhances the fruity notes.
- Orange Extract & Zest for Oil — For a more intense, fresh orange flavor with no added sugars sometimes found in flavoring oils, use a combination of pure orange extract and extra fresh zest.
- Avocado Oil or Ghee — For a different fat profile, lightly grease your pan with avocado oil (neutral, high-heat) or ghee (rich, dairy-free option for those tolerant) instead of butter.
- Ensure Gelatin is Gluten-Free — While gelatin is inherently gluten-free, always check the brand’s certification if you have celiac disease or a severe sensitivity to guarantee no cross-contamination.
- Sugar-Free Jell-O Alternative — For a radically lower-sugar version, use a sugar-free orange gelatin mix as the base, adjusting added sweetener to taste, though the texture will differ from the original classic homemade orange candy recipe.
Serving Suggestions
- Pair this classic homemade orange candy with a cup of hot tea or black coffee for a delightful afternoon treat.
- Offer a bowl of these old-fashioned orange candies alongside other retro sweets at a holiday party or family gathering.
- Serve as a sweet, citrusy palate cleanser after a rich meal.
- Package them in small cellophane bags tied with ribbon for charming, homemade party favors or gifts.
- Arrange them on a vintage-style plate or in a decorative candy dish for a beautiful and nostalgic presentation.
- For a dessert platter, combine them with dark chocolate pieces and toasted nuts for contrasting flavors and textures.
These simple serving ideas highlight the timeless appeal of your classic homemade orange candy recipe, making it perfect for any occasion.
Common Mistakes to Avoid
- Mistake: Using bottled orange juice instead of fresh. Fix: Freshly squeezed juice provides the vibrant, authentic flavor essential for a true Old Fashioned Orange Candy.
- Mistake: Not using a candy thermometer. Fix: Precision is key; cook the syrup to exactly 300°F (hard crack stage) for the perfect brittle texture.
- Mistake: Stirring the syrup once it starts boiling. Fix: This can cause crystallization and a grainy texture. Swirl the pan gently instead.
- Mistake: Pouring the hot candy onto a cold or damp surface. Fix: Ensure your baking sheet is lightly oiled, completely dry, and at room temperature to prevent sticking and seizing.
- Mistake: Adding citrus zest too early. Fix: Stir in the finely grated zest just before pouring to preserve its bright, aromatic oils.
- Mistake: Cutting the candy after it has cooled completely. Fix: Score it with a knife when it’s just firm enough to hold its shape but still slightly warm for clean breaks.
- Mistake: Storing the candy without proper sealing. Fix: Keep your Classic Homemade Orange Candy in an airtight container with parchment between layers to prevent stickiness and preserve freshness.
- Mistake: Rushing the cooling process. Fix: Let the candy slab cool undisturbed at room temperature; refrigerating can introduce moisture and make it tacky.
- Mistake: Using a pot that’s too small. Fix: Sugar syrup boils up dramatically. Use a heavy-bottomed saucepan that is at least 3-4 quarts to prevent dangerous boil-overs.
Storing Tips
- Fridge: Store your classic homemade orange candy in a single layer in an airtight container, separated by parchment paper. It will keep well for up to 2 weeks in the refrigerator.
- Freezer: For longer storage, freeze the candies in a single layer on a baking sheet before transferring them to a freezer-safe bag or container. They can be frozen for up to 3 months. Thaw in the refrigerator overnight before serving.
- Reheat: If your old fashioned orange candy becomes sticky or loses its shape, you can gently reheat it on a parchment-lined baking sheet in an oven preheated to 200°F (93°C) for 5-10 minutes, just until firm. Always allow to cool completely before handling.
For food safety, ensure all utensils and containers are clean and dry before storing. The sugar content acts as a preservative, but if the candy develops an off odor, color, or mold, it should be discarded.
Conclusion
We hope you enjoy making this Classic Homemade Orange Candy Recipe as much as we do. It’s a simple, old-fashioned treat that’s perfect for sharing. If you love orange flavors, you might also want to try our Orange Juice Cake Recipe. Give this candy a try and let us know what you think in the comments below!
PrintClassic Homemade Orange Candy Recipe

Ingredients
- 2 large fresh oranges (for juice and zest)
- 2 cups granulated sugar
- 1/4 cup corn syrup
- 1/2 cup water
- 1 tablespoon butter
- 1 packet unflavored gelatin
- 1 teaspoon orange extract (optional)
- Powdered sugar (for dusting, optional)
- A pinch of salt (optional
Instructions
- Zest the oranges to collect the outer peel and set it aside. Juice the oranges until you have about 3/4 cup of fresh juice. Set both the zest and juice aside for later use.
- In a medium saucepan, combine the fresh orange juice, water, sugar, and corn syrup. Place the saucepan over medium heat and stir until the sugar is dissolved. Once dissolved, bring the mixture to a simmer.
- Allow the syrup to simmer for about 10 minutes, stirring occasionally, to concentrate the orange flavor. The mixture should begin to thicken slightly.
- In a small bowl, sprinkle the gelatin over 1/4 cup of cold water and let it bloom for 5 minutes. After the gelatin has softened, add it to the simmering orange syrup and stir until fully dissolved.
- Add the butter and orange zest to the syrup and continue to cook for an additional 5 minutes. Stir constantly to prevent the mixture from sticking to the pan.
- Once the mixture has thickened to a honey-like consistency, remove it from the heat. Let it cool to room temperature for about 1-2 hours.
- Pour the cooled mixture into a lightly greased 8×8-inch dish or silicone candy molds. Allow it to set at room temperature for 1-2 hours, then refrigerate for at least 4-6 hours, or until completely firm.
- Once the candy has set, remove it from the dish or molds. Cut it into bite-sized pieces. For extra flair, dust the pieces with powdered sugar to prevent sticking.
- Serve and enjoy your homemade Old Fashioned Orange Candy
FAQs
Can I use bottled orange juice for this Classic Homemade Orange Candy Recipe?
We recommend using fresh orange juice and zest for the most vibrant, authentic citrus flavor. Bottled juice often lacks the essential oils and bright taste needed for this old-fashioned orange candy. The fresh ingredients are key to achieving the classic, intense orange flavor.
Why is my orange candy too soft or sticky after cooling?
This usually means the sugar syrup did not reach the proper hard-crack stage (300°F / 149°C). Use a reliable candy thermometer and avoid stirring the syrup once it begins to boil. Achieving the correct temperature is crucial for the perfect firm yet chewy texture in your Classic Homemade Orange Candy.
How should I store this candy, and how long does it last?
Store the fully set and cut pieces in an airtight container at room temperature, with parchment paper between layers. Properly stored, this old-fashioned orange candy will stay fresh and maintain its texture for 2 to 3 weeks, keeping its delightful citrus flavor.


