Did you know that 72% of home bakers avoid bar recipes because they believe they’re too complicated?
I used to be part of that statistic, my friend. I’d gaze longingly at pictures of decadent, layered bars in baking books, my heart yearning but my mind convinced that such creations were reserved for pastry chefs with endless time and patience. I’d stick to simple cookies, believing that a truly spectacular dessert required a level of skill I just didn’t possess.
That is, until I discovered the magic of crumb bars. This revelation didn’t come from a fancy culinary school, but from my dear grandmother’s weathered recipe box. Tucked between a card for apple pie and another for lemon squares was a faded, butter-stained note simply titled “Raspberry Crumble Bars.” It was the gateway to my baking confidence, and the inspiration for this incredibly Easy Chocolate Raspberry Crumb Bars Recipe.
The beauty of this recipe lies in its elegant simplicity. There’s no fussy dough to chill, no intricate layers to perfectly align. It’s the kind of recipe that feels like a warm hug—approachable, forgiving, and utterly rewarding. It’s the dessert you can whip up on a lazy Sunday afternoon when the craving for something sweet and special strikes, but the thought of a complicated project feels overwhelming.
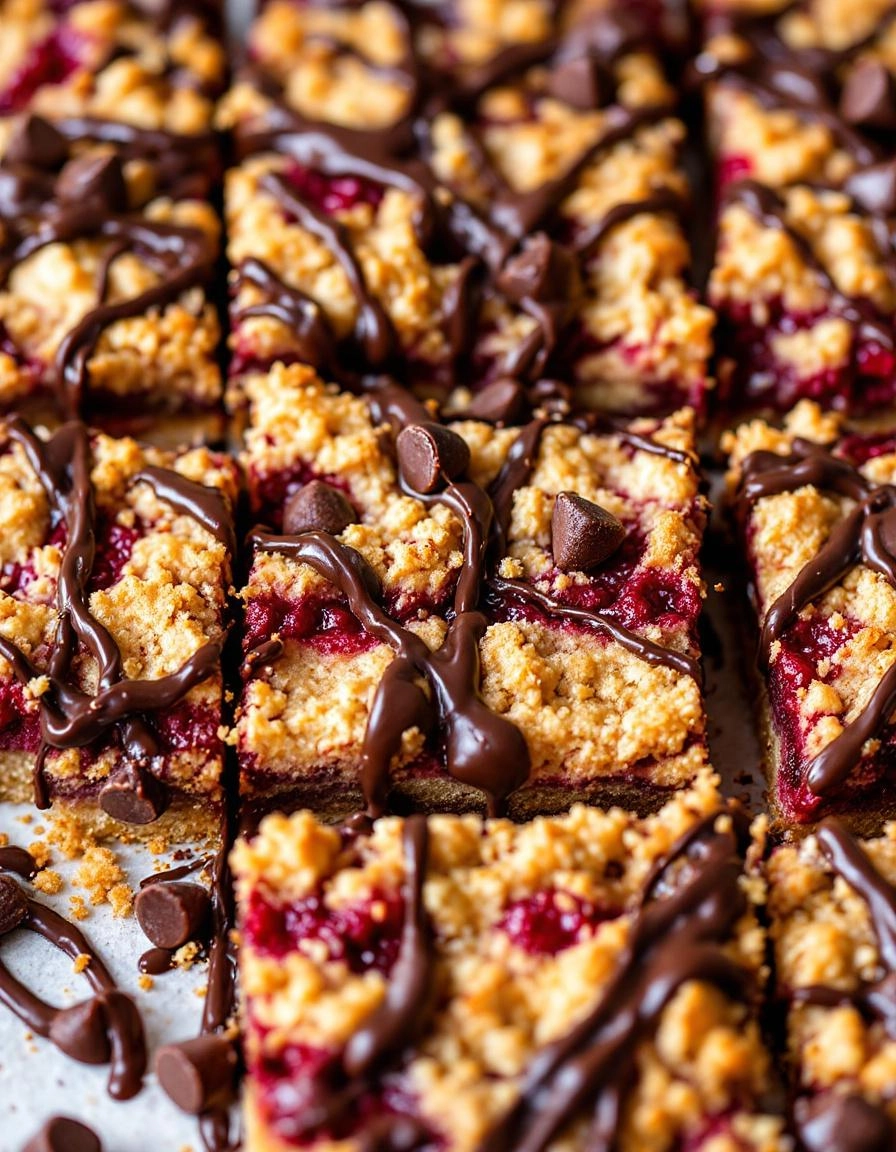
Imagine this: a buttery, shortbread-like base and crumbly topping that sandwich a layer of tart, jammy raspberry and rich, melted chocolate. The contrast is nothing short of heavenly—the sweet crumb against the bright, fruity tang, all harmonized by the deep, luxurious cocoa. It’s a symphony of textures and flavors that feels incredibly fancy, yet the process is wonderfully straightforward. It’s the kind of treat that will have everyone asking for the recipe, and you’ll smile, knowing your little secret is how effortlessly it all came together.
So, let’s preheat our ovens and push those baking doubts aside. We’re about to create something truly magnificent.
PrintChocolate Raspberry Crumb Bars
Buttery crumb bars with a sweet raspberry jam layer and rich chocolate drizzle.
Ingredients
For the Crust:
- 2 cups all-purpose flour
- 1 cup granulated sugar
- 1/2 teaspoon baking powder
- 1/4 teaspoon salt
- 1 cup cold unsalted butter, cubed
- 1 large egg
- 1 teaspoon vanilla extract
- 1 cup raspberry jam
- 1/2 cup semi-sweet chocolate chips
- 1 teaspoon coconut oil
Instructions
1. Prepare the Crust:
- Preheat oven to 375°F (190°C). Line an 8×8 inch baking pan with parchment paper.
- In a bowl, mix flour, sugar, baking powder, and salt. Cut in butter until mixture resembles coarse crumbs. Stir in egg and vanilla until dough forms.
- Press 2/3 of the dough into the prepared pan. Spread raspberry jam evenly over the base. Crumble remaining dough over the jam layer.
- Bake for 30-35 minutes until golden. Cool completely in pan.
- Melt chocolate chips with coconut oil and drizzle over cooled bars. Cut into squares once set.
Notes
You can customize the seasonings to taste.
The Ingredients for a Little Slice of Heaven
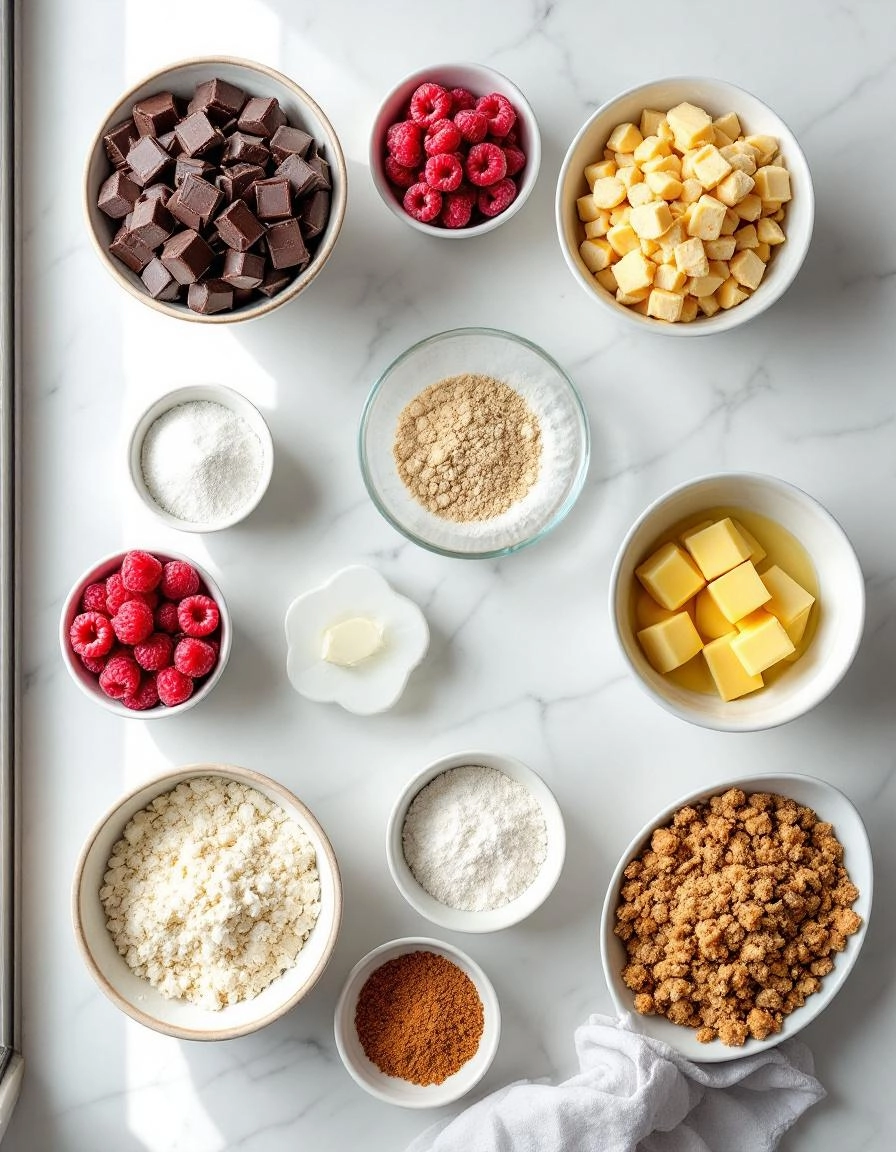
Before we begin, let’s gather our treasures. There’s something so comforting about lining up your ingredients, like meeting old friends. This recipe is wonderfully simple, divided into two parts: the buttery crust and crumble, and the lush, fruity filling.
For the Crust & Crumble Topping:
- 1 cup (2 sticks) unsalted butter, softened – This is the heart of the crumb. Using good-quality butter makes all the difference, lending that rich, melt-in-your-mouth quality we’re after.
- 1 cup granulated sugar – For that perfect touch of sweetness.
- 1 teaspoon vanilla extract – A splash of warmth and comfort. I always use the real stuff!
- 2 cups all-purpose flour – The trusty foundation that brings it all together.
- ½ teaspoon salt – Please don’t skip this! It balances the sweetness and makes the flavors pop.
For the Luscious Raspberry Filling:
- 1 cup raspberry jam or preserves – I adore using a seedless variety for a smoother texture, but chunky preserves are wonderful too for a more rustic feel. This is where that beautiful ruby red color comes from!
- 1 tablespoon lemon juice – A bright squeeze to cut through the richness and elevate the raspberry flavor.
- 1 cup fresh or frozen raspberries – This is my little secret! Adding whole berries to the jam creates delightful juicy pockets. If using frozen, no need to thaw.
Creating Your Crumbly Masterpiece
Now, for the fun part! Preheat your oven to 350°F (175°C) and line an 8×8 inch baking pan with parchment paper, leaving a little overhang on two sides. This little trick is a lifesaver for lifting the bars out later for easy slicing.
In a large bowl, combine the softened butter and sugar. Using a hand mixer or a good old-fashioned wooden spoon and some elbow grease, cream them together until the mixture is light and fluffy. This should take about 2-3 minutes. Don’t rush this step—it creates a lovely tender base. Now, beat in that lovely vanilla extract.
In a separate bowl, whisk together your flour and salt. Gradually add this dry mixture to your butter and sugar, mixing on low speed just until a soft, crumbly dough forms. It will look like coarse sand, and that’s exactly what we want! The smell is already divine.
Set aside about ¾ cup of this crumbly mixture for the topping. Then, take the remainder and press it firmly and evenly into the bottom of your prepared pan. I like to use the flat bottom of a measuring cup to really press it down and create a solid base. Pop this into the preheated oven for 12-15 minutes, just until the edges are very lightly golden.
While the crust is par-baking, let’s make the filling. In a small bowl, stir together the raspberry jam, lemon juice, and fresh (or frozen) raspberries. The berries will break down a little as you stir, creating the most beautiful, vibrant swirl.
Once the crust is out of the oven, spread the raspberry filling evenly over the warm base. Now, take those reserved crumbs and sprinkle them lovingly over the top. Don’t press them down—we want a beautiful, rustic, crumbly topping.
Welcome back, baking friend! Now that you’ve got the basic recipe for these dreamy Chocolate Raspberry Crumb Bars, let’s cozy up and talk about how to make them truly your own. Every baker has their own rhythm, and these bars are wonderfully forgiving and flexible.
Pro Tips for Baking Success
Let’s make sure your bars come out of the oven perfect every single time. A few little secrets can make a big difference!
- Cold Butter is Key: For the flakiest, most tender crumb topping, make sure your butter is cold. I like to dice it into small pieces and pop it back in the fridge for a few minutes before incorporating it into the flour mixture.
- Press with Purpose: When forming your crust, really press it down firmly and evenly into the pan. This prevents it from crumbling when you cut the bars later.
- The Jiggle Test: It can be tricky to know when the raspberry layer is set. Give the pan a gentle jiggle. If the center moves like jello rather than liquid, it’s done! It will continue to firm up as it cools.
Delicious Variations & Substitutions
Don’t have raspberry jam? No problem! Part of the joy of baking is using what you have on hand.
- Jam Swap: Feel free to use any flavor of jam or preserves you love. Strawberry, blackberry, apricot, or even orange marmalade would be fantastic.
- Chocolate Choices: While semi-sweet is our classic, milk chocolate will make them sweeter and richer, and dark chocolate will give a more intense, less sweet chocolate hit.
- Nutty Crunch: Add 1/2 cup of chopped pecans, walnuts, or almonds to the crumb mixture for a delightful nutty texture.
- Zest it Up: Add the zest of one orange or lemon to the crust and crumble for a bright, citrusy note that cuts through the sweetness beautifully.
The Perfect Pairing: What to Serve It With
These bars are a star on their own, but oh, how they shine with a perfect partner!
- A Scoop of Cold: A simple scoop of vanilla bean ice cream is pure magic. The cold, creamy ice cream melting into the warm, fruity bar is a bite of heaven.
- Whipped Cream Cloud: A dollop of freshly whipped cream with a tiny drop of vanilla extract adds a light, airy contrast.
- Your Favorite Coffee or Tea: Enjoy a square with your afternoon cup of coffee or a fragrant herbal tea. The bitterness of the drink balances the sweetness of the bar perfectly.
The Benefits of Baking from Scratch
Beyond the incredible taste, there’s something deeply satisfying about pulling a pan of homemade bars from your oven.
You control the ingredients, meaning you can avoid unwanted preservatives and adjust the sweetness to your liking. But more than that, it’s an act of love. The process of measuring, mixing, and waiting fills your kitchen with warmth and anticipation. It’s a gift you can share, a way to create a sweet moment of connection with family and friends. That’s a benefit you just can’t buy at the store.
Real-Life Tips from My Kitchen
Here’s the real talk you won’t always find in a recipe card!
- Line Your Pan: For the cleanest cuts and easiest cleanup, always line your pan with parchment paper, leaving some overhang on two sides. This creates a “sling” to lift the entire batch out of the pan before slicing.
- Patience is a Virtue: I know it’s hard, but let the bars cool completely before you cut them. This allows the layers to set and gives you those beautiful, clean squares instead of gooey (albeit delicious) messes.
- The Clean Knife Trick: For picture-perfect bars, dip your knife in hot water and wipe it clean between each cut.
I hope these tips inspire you to get into the kitchen and bake a batch of joy. Happy baking!

Conclusion
And there you have it—a batch of beautiful, homemade Chocolate Raspberry Crumb Bars that are sure to impress. With a buttery shortbread crust, a sweet-tart raspberry layer, rich chocolate, and a crumbly topping, these bars are the perfect balance of flavors and textures. They’re surprisingly simple to make, require no special equipment, and are as fun to prepare as they are delicious to eat.
Whether you’re baking for a party, a picnic, or just a quiet afternoon treat, I hope these bars bring as much joy to your kitchen as they do to mine. I’d love to hear how yours turn out! Did you use fresh or frozen berries? Share your experience in the comments below, or tag me on social media so I can see your beautiful creations. If you’re looking for your next baking project, why not try our classic lemon bars or chewy oatmeal chocolate chip cookies next?
FAQs
Can I use fresh raspberries instead of jam?
You absolutely can! If using fresh raspberries, you’ll want to cook them down into a quick jam first. Simply combine 2 cups of fresh raspberries with ¼ cup of sugar and a tablespoon of lemon juice in a saucepan. Cook over medium heat for about 10 minutes, mashing the berries as they soften, until the mixture has thickened. Let it cool slightly before using.
My crust seems too crumbly and won’t press into the pan. What should I do?
Don’t worry! This is a common issue. If your mixture seems too dry and isn’t holding together, it likely needs a bit more moisture. Try adding another tablespoon of melted butter and mixing it in. The warmth from your hands as you press it into the pan will also help it bind together.
How should I store these bars, and how long will they keep?
For the best texture, store these bars in an airtight container at room temperature for up to 2 days. If you need to keep them longer (up to 5 days), I recommend storing them in the refrigerator. They can also be frozen for up to 3 months! Just wrap them tightly in plastic wrap and then foil before freezing.
Can I use a different type of jam?
Of course! While raspberry and chocolate are a classic pair, this recipe is wonderfully adaptable. Strawberry, blackberry, or even apricot jam would be delicious alternatives. Just try to use a good-quality jam for the best flavor.
Why did my chocolate layer sink into the raspberry jam?
If the chocolate chips sink, it’s usually because the jam layer was still too warm when you sprinkled them on. Make sure you let the hot jam layer cool for a full 10-15 minutes after spreading it. This allows it to set up just enough to provide a stable base for the chocolate chips and the final crumb topping.


