Did you know that 70% of people believe a truly decadent cake requires professional-level baking skills?
I used to be one of them, standing nervously in my kitchen, convinced that creating something worthy of a patisserie window was a dream for someone else. But let me tell you, my dear reader, that belief was utterly and deliciously wrong. It all changed the day I developed this Ultimate Chocolate Hazelnut Delight Cake recipe. It’s a testament to the magic that happens when simple, beautiful ingredients are combined with a little bit of heart—no fancy training required.
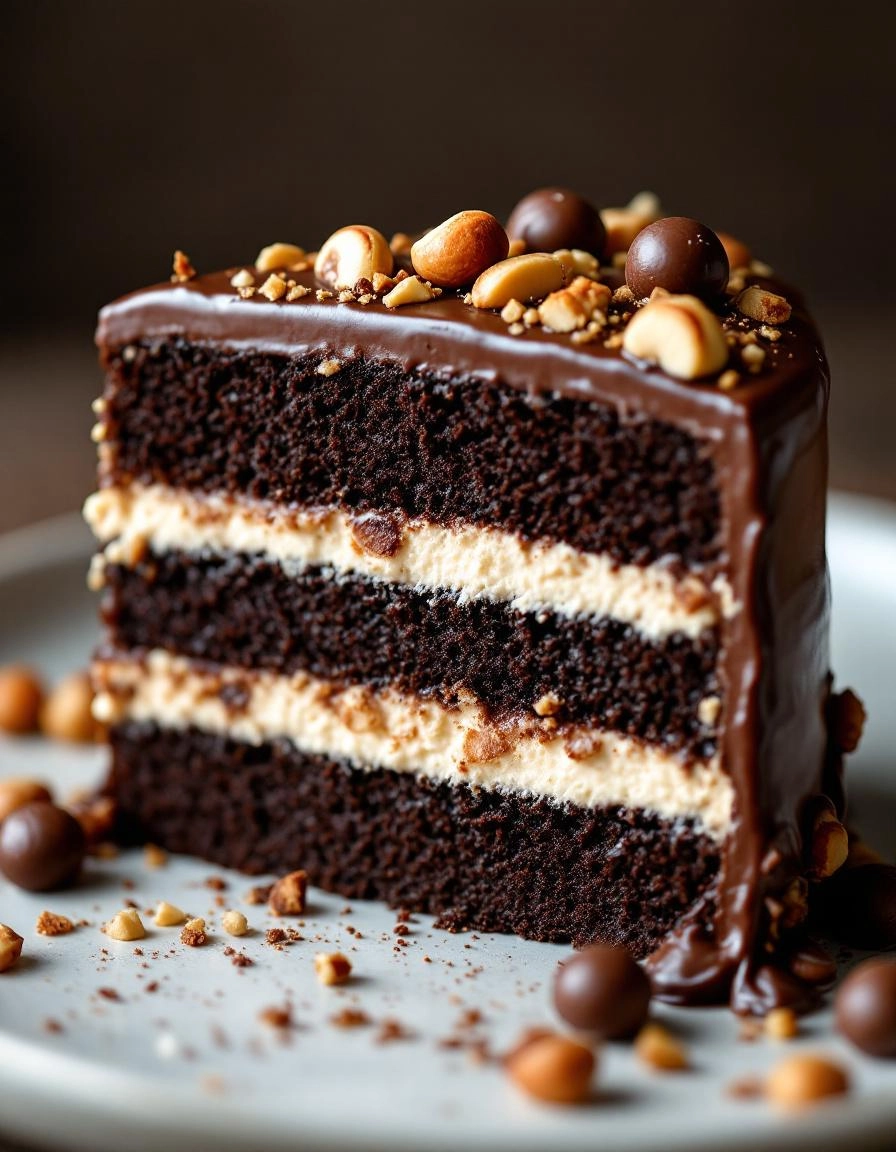
This cake was born on a rainy Sunday, the kind of day that begs for the warm, comforting aroma of chocolate and toasted nuts to fill the house. I was craving something that felt both indulgent and nostalgic, a dessert that whispered of Italian gianduja and childhood chocolate spreads, but with the sophisticated elegance of a grown-up treat. The result is this towering masterpiece, a moist, deeply chocolatey cake layered with the most luscious, silky hazelnut buttercream. It’s the Ultimate Chocolate Hazelnut Delight Cake, and it has become my go-to recipe for birthdays, celebrations, and even those “just because” days that need a little extra sweetness.
The secret, I’ve found, isn’t in complex techniques, but in a few key choices. Using high-quality cocoa powder and patiently toasting the hazelnuts until they’re fragrant makes all the difference in the world. It transforms the entire cake from simply “chocolate” to an experience—a rich, nutty, deeply satisfying journey. It’s the kind of cake that makes people’s eyes light up when you bring it to the table, the kind that sparks conversations and requests for the recipe before the last crumb is even gone.
PrintChocolate Hazelnut Delight Cake
A rich and decadent chocolate cake with a creamy hazelnut filling and smooth chocolate ganache topping.
Ingredients
For the Crust:
- 2 cups all-purpose flour
- 1 3/4 cups granulated sugar
- 3/4 cup unsweetened cocoa powder
- 2 teaspoons baking soda
- 1 teaspoon baking powder
- 1 teaspoon salt
- 2 large eggs
- 1 cup buttermilk
- 1 cup strong black coffee, cooled
- 1/2 cup vegetable oil
- 2 teaspoons vanilla extract
- 1 cup chocolate hazelnut spread
- 1 cup heavy cream
- 1/2 cup chopped hazelnuts, toasted
Instructions
1. Prepare the Crust:
- Preheat oven to 350°F (175°C). Grease and flour two 9-inch round cake pans.
- In large bowl, whisk together flour, sugar, cocoa powder, baking soda, baking powder, and salt.
- Add eggs, buttermilk, coffee, oil, and vanilla. Beat on medium speed for 2 minutes until smooth.
- Divide batter evenly between prepared pans. Bake for 30-35 minutes until toothpick comes out clean.
- Cool cakes in pans for 10 minutes, then remove to wire racks to cool completely.
- Spread chocolate hazelnut spread between cake layers. Whip heavy cream until stiff peaks form and frost sides of cake.
- Garnish with chopped toasted hazelnuts before serving.
Notes
You can customize the seasonings to taste.
The Ultimate Chocolate Hazelnut Delight Cake: A Love Story in Layers
There are cakes, and then there are cakes that feel like a warm, nutty, chocolatey hug. This, my dear friends, is the latter. I first dreamt up this recipe on a blustery autumn afternoon, the kind that begs for something rich and celebratory to be baking in the oven. I wanted to capture the cozy, nostalgic essence of a chocolate hazelnut spread, but transform it into something utterly elegant and worthy of a special occasion. The result is this towering beauty, a true delight in every sense of the word.
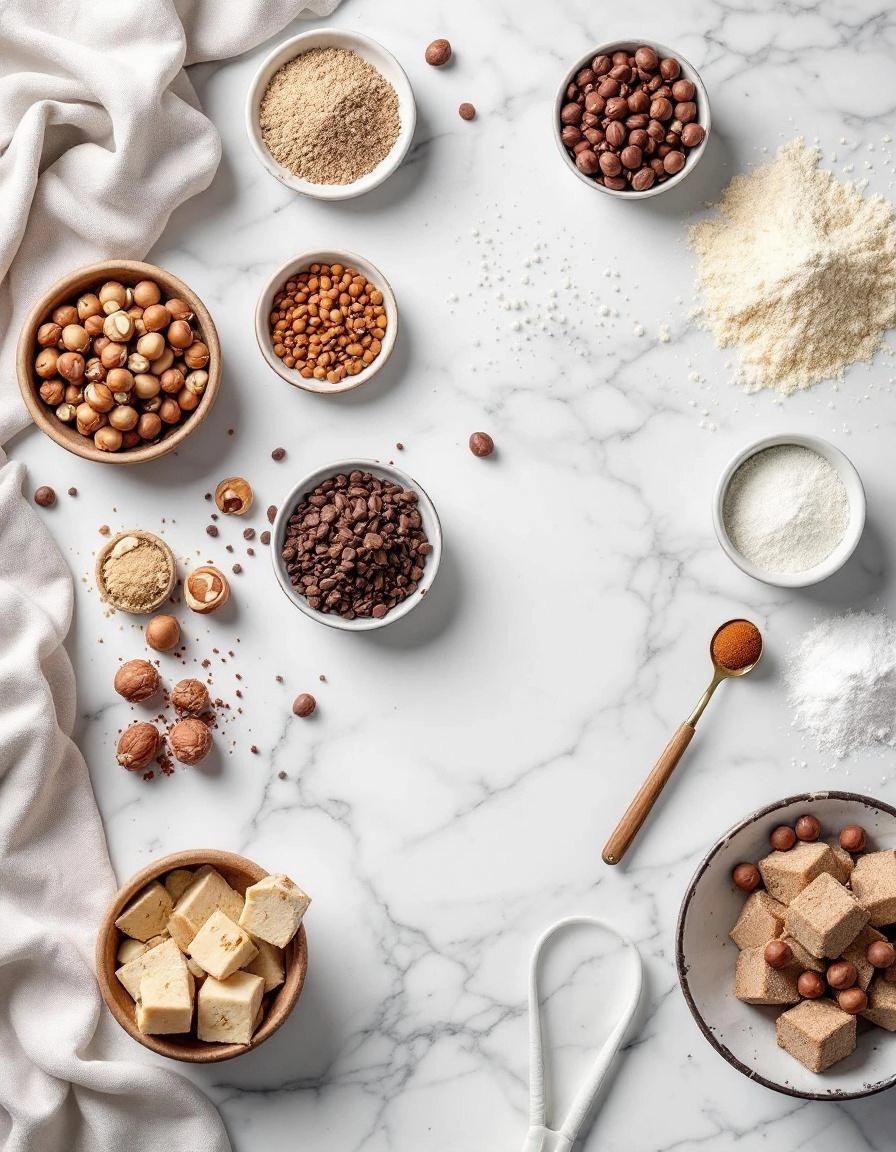
Gathering Your Chocolatey Treasures
Before we begin our baking ballet, let’s gather our cast of characters. Using the best quality ingredients you can find truly makes a difference here, especially with the chocolate and hazelnuts. This is a celebration cake, after all!
For the Chocolate Hazelnut Cake Layers:
- 2 cups all-purpose flour: The trusty foundation of our cake.
- 2 cups granulated sugar: For that perfect, classic sweetness.
- 3/4 cup unsweetened cocoa powder: Go for a dark cocoa powder here for a deep, intense chocolate flavor.
- 2 tsp baking soda: Our leavening agent for a beautifully risen crumb.
- 1 tsp baking powder: A little extra help to make it light and airy.
- 1 tsp fine sea salt: Never underestimate salt! It makes the chocolate sing.
- 2 large eggs, room temperature: Room temp eggs incorporate so much better, promise.
- 1 cup buttermilk, room temperature: The secret to an incredibly moist and tender cake.
- 1 cup strong brewed coffee, cooled: Don’t worry, you won’t taste it! It just amplifies the chocolate flavor magically.
- 1/2 cup vegetable oil: For moisture without heaviness.
- 2 tsp pure vanilla extract: The aromatic soul of any good baked good.
- 1 cup toasted hazelnuts, finely chopped: That glorious nutty crunch in every single bite.
For the Luscious Chocolate Hazelnut Frosting:
- 1 1/2 cups unsalted butter, softened: This is the base of our frosting, so make sure it’s properly softened for a silky texture.
- 1 cup chocolate hazelnut spread: Use your favorite brand here—this is the star of the show!
- 1 cup powdered sugar, sifted: Sifting is non-negotiable for a lump-free, cloud-like frosting.
- 2/3 cup unsweetened cocoa powder, sifted: Double the chocolate, double the fun.
- Pinch of salt: To balance all that sweetness.
- 3-4 tbsp heavy cream, room temperature: This will help you achieve the perfect, spreadable consistency.
Let’s Bake the Layers of Joy
Now, pull on your favorite apron, put on some soothing music, and let’s create some magic. I always find the process of baking a layer cake to be so meditative.
Step 1: First, preheat your oven to 350°F (175°C). Grease and line three 8-inch round cake pans with parchment paper. This little step is your insurance policy for perfect cake release! Trust me.
Step 2: In the bowl of your stand mixer, whisk together all your dry ingredients: the flour, sugar, cocoa powder, baking soda, baking powder, and salt. Give it a good whisk to ensure everything is evenly distributed and there are no hidden pockets of baking soda.
Step 3: In a separate bowl or large measuring jug, combine your wet ingredients: the eggs, buttermilk, cooled coffee, oil, and vanilla. Whisk until it’s a smooth, homogenous mixture.
Step 4: With your mixer on low speed, gradually pour the wet ingredients into the dry ingredients. Mix just until the batter comes together and there are no more streaks of flour. A few small lumps are okay! Overmixing is the enemy of a tender cake. Now, gently fold in those beautifully toasted, chopped hazelnuts with a spatula.
Step 5: Divide the batter evenly among your three prepared pans. I like to use a kitchen scale for absolute precision, but eyeballing it works too! Tap the pans lightly on the counter to release any large air bubbles.
Step 6: Bake for 25-30 minutes, or until a wooden skewer inserted into the center comes out with just a few moist crumbs attached. The cakes should be springy to the touch. Let them cool in their pans for about 10 minutes before turning them out onto a wire rack to cool completely. Patience is key here—you cannot frost a warm cake!
While our gorgeous cake layers are cooling, their rich chocolate scent filling the kitchen, we can move on to the best part: the frosting…
Welcome back, bakers! Now that your kitchen is filled with the incredible aroma of baking chocolate and toasted hazelnuts, let’s dive into the finishing touches and all the little secrets that will make this cake truly unforgettable.
Pro Tips for a Flawless Finish
Every baker has their little secrets, and I’m sharing mine with you! For the silkiest ganache, make sure your heavy cream is hot but not boiling when you pour it over the chocolate. Let it sit for a full three minutes before stirring—this patience rewards you with a glossy, lump-free frosting. When toasting your hazelnuts, keep a watchful eye; they can go from perfectly golden to sadly burnt in mere moments. And here’s my favorite trick: a tiny pinch of flaky sea salt sprinkled over the finished cake just before serving. It cuts through the richness and makes all the flavors sing.
Delicious Variations & Substitutions
This recipe is wonderfully adaptable! If you or a loved one have a nut allergy, you can simply omit the hazelnuts. The cake will still be incredibly moist and chocolatey. For a different nutty flavor, try using toasted almonds or pecans instead. Not a fan of dark chocolate? Milk chocolate works beautifully in the ganache for a sweeter, creamier finish. For a festive twist, fold a handful of orange zest into the batter—chocolate and orange are a match made in heaven.
The Perfect Pairings: What to Serve It With
While this cake is a superstar all on its own, a few accompaniments can turn it into a show-stopping dessert. A dollop of freshly whipped cream or a scoop of vanilla bean ice cream is a classic and perfect choice. For the ultimate indulgence, serve it with a side of warm, salted caramel sauce for drizzling. And of course, a freshly brewed cup of coffee or a glass of cold milk is its best friend.
The Sweet Benefits of Baking from Scratch
Beyond the incredible taste, there’s something deeply satisfying about creating a dessert like this from scratch. You control the quality of every ingredient, from the rich cocoa to the fresh eggs. The process itself is a form of therapy—a chance to slow down, focus, and create something beautiful with your own hands. And perhaps the greatest benefit? The joy of sharing it. This cake is made for gatherings, for celebrating milestones, or for simply saying “I care about you” in the sweetest way possible.
Real-Life Tips from My Kitchen to Yours
Let’s keep it real! Cakes can sometimes stick, no matter how well we grease the pan. To be safe, I always line the bottom of my cake pans with a round of parchment paper. It’s a foolproof insurance policy. If your cake layers dome a bit in the center, don’t panic! Simply use a serrated knife to gently slice off the top to create a flat surface—a baker’s secret and a great excuse for a little pre-frosting snack. Most importantly, remember that even if it isn’t perfect, anything made with this much chocolate and love is guaranteed to be delicious.
I hope you feel inspired to preheat your oven and get baking. Don’t forget to tag me in your photos—I love seeing your creations! Happy baking!

Conclusion
And there you have it, the Ultimate Chocolate Hazelnut Delight Cake! From the rich, fudgy layers to that dreamy, creamy frosting and the satisfying crunch of toasted hazelnuts, this cake is a true labor of love that’s absolutely worth every minute. Remember, the key is in the quality of your chocolate and taking the time to let those layers cool completely for the perfect frosting experience.
I truly hope this recipe brings as much joy to your kitchen as it does to mine. Now, I’d love to hear from you! Did you add a personal twist? How did your family react to that first decadent slice? Share your baking stories and photos in the comments below—there’s nothing I love more than seeing your creations. And if you’re hungry for more, why not browse our collection of decadent dessert recipes for your next baking adventure?
FAQs
Can I make this cake ahead of time?
Absolutely! This cake is actually a fantastic make-ahead dessert. You can bake the cake layers up to two days in advance. Just let them cool completely, wrap them tightly in plastic wrap, and store them at room temperature. The frosting can also be made a day ahead and kept in an airtight container in the refrigerator; just let it come to room temperature and give it a quick whip with your mixer before assembling.
My frosting seems too runny. What did I do wrong?
Don’t worry, this can happen! The most common culprit is that your melted chocolate or your butter was still too warm when you added it to the mixture. The fix is simple: just pop the bowl of frosting into the refrigerator for 15-20 minutes to let it firm up a bit, then whip it again with your mixer until it’s fluffy and spreadable.
I can’t find hazelnut extract. What can I use as a substitute?
No problem at all. If you can’t find hazelnut extract, you can simply omit it. The flavor from the Nutella and the actual toasted hazelnuts will still be wonderfully prominent. For an extra flavor boost, you could add a teaspoon of good-quality vanilla extract or even a tablespoon of Frangelico liqueur to the frosting instead.
How should I store the finished cake?
Because of the creamy frosting, this cake is best stored covered in the refrigerator. Let it sit out at room temperature for about 20-30 minutes before serving to allow the frosting to soften up for the best texture and flavor. It will keep beautifully for up to 3 days.
Can I use a different type of nut?
Of course! While hazelnut and chocolate are a classic pair, you can definitely get creative. Toasted almonds or pecans would be delicious alternatives. Just make sure to toast whichever nut you choose to really bring out its deep, rich flavor.


