Introduction
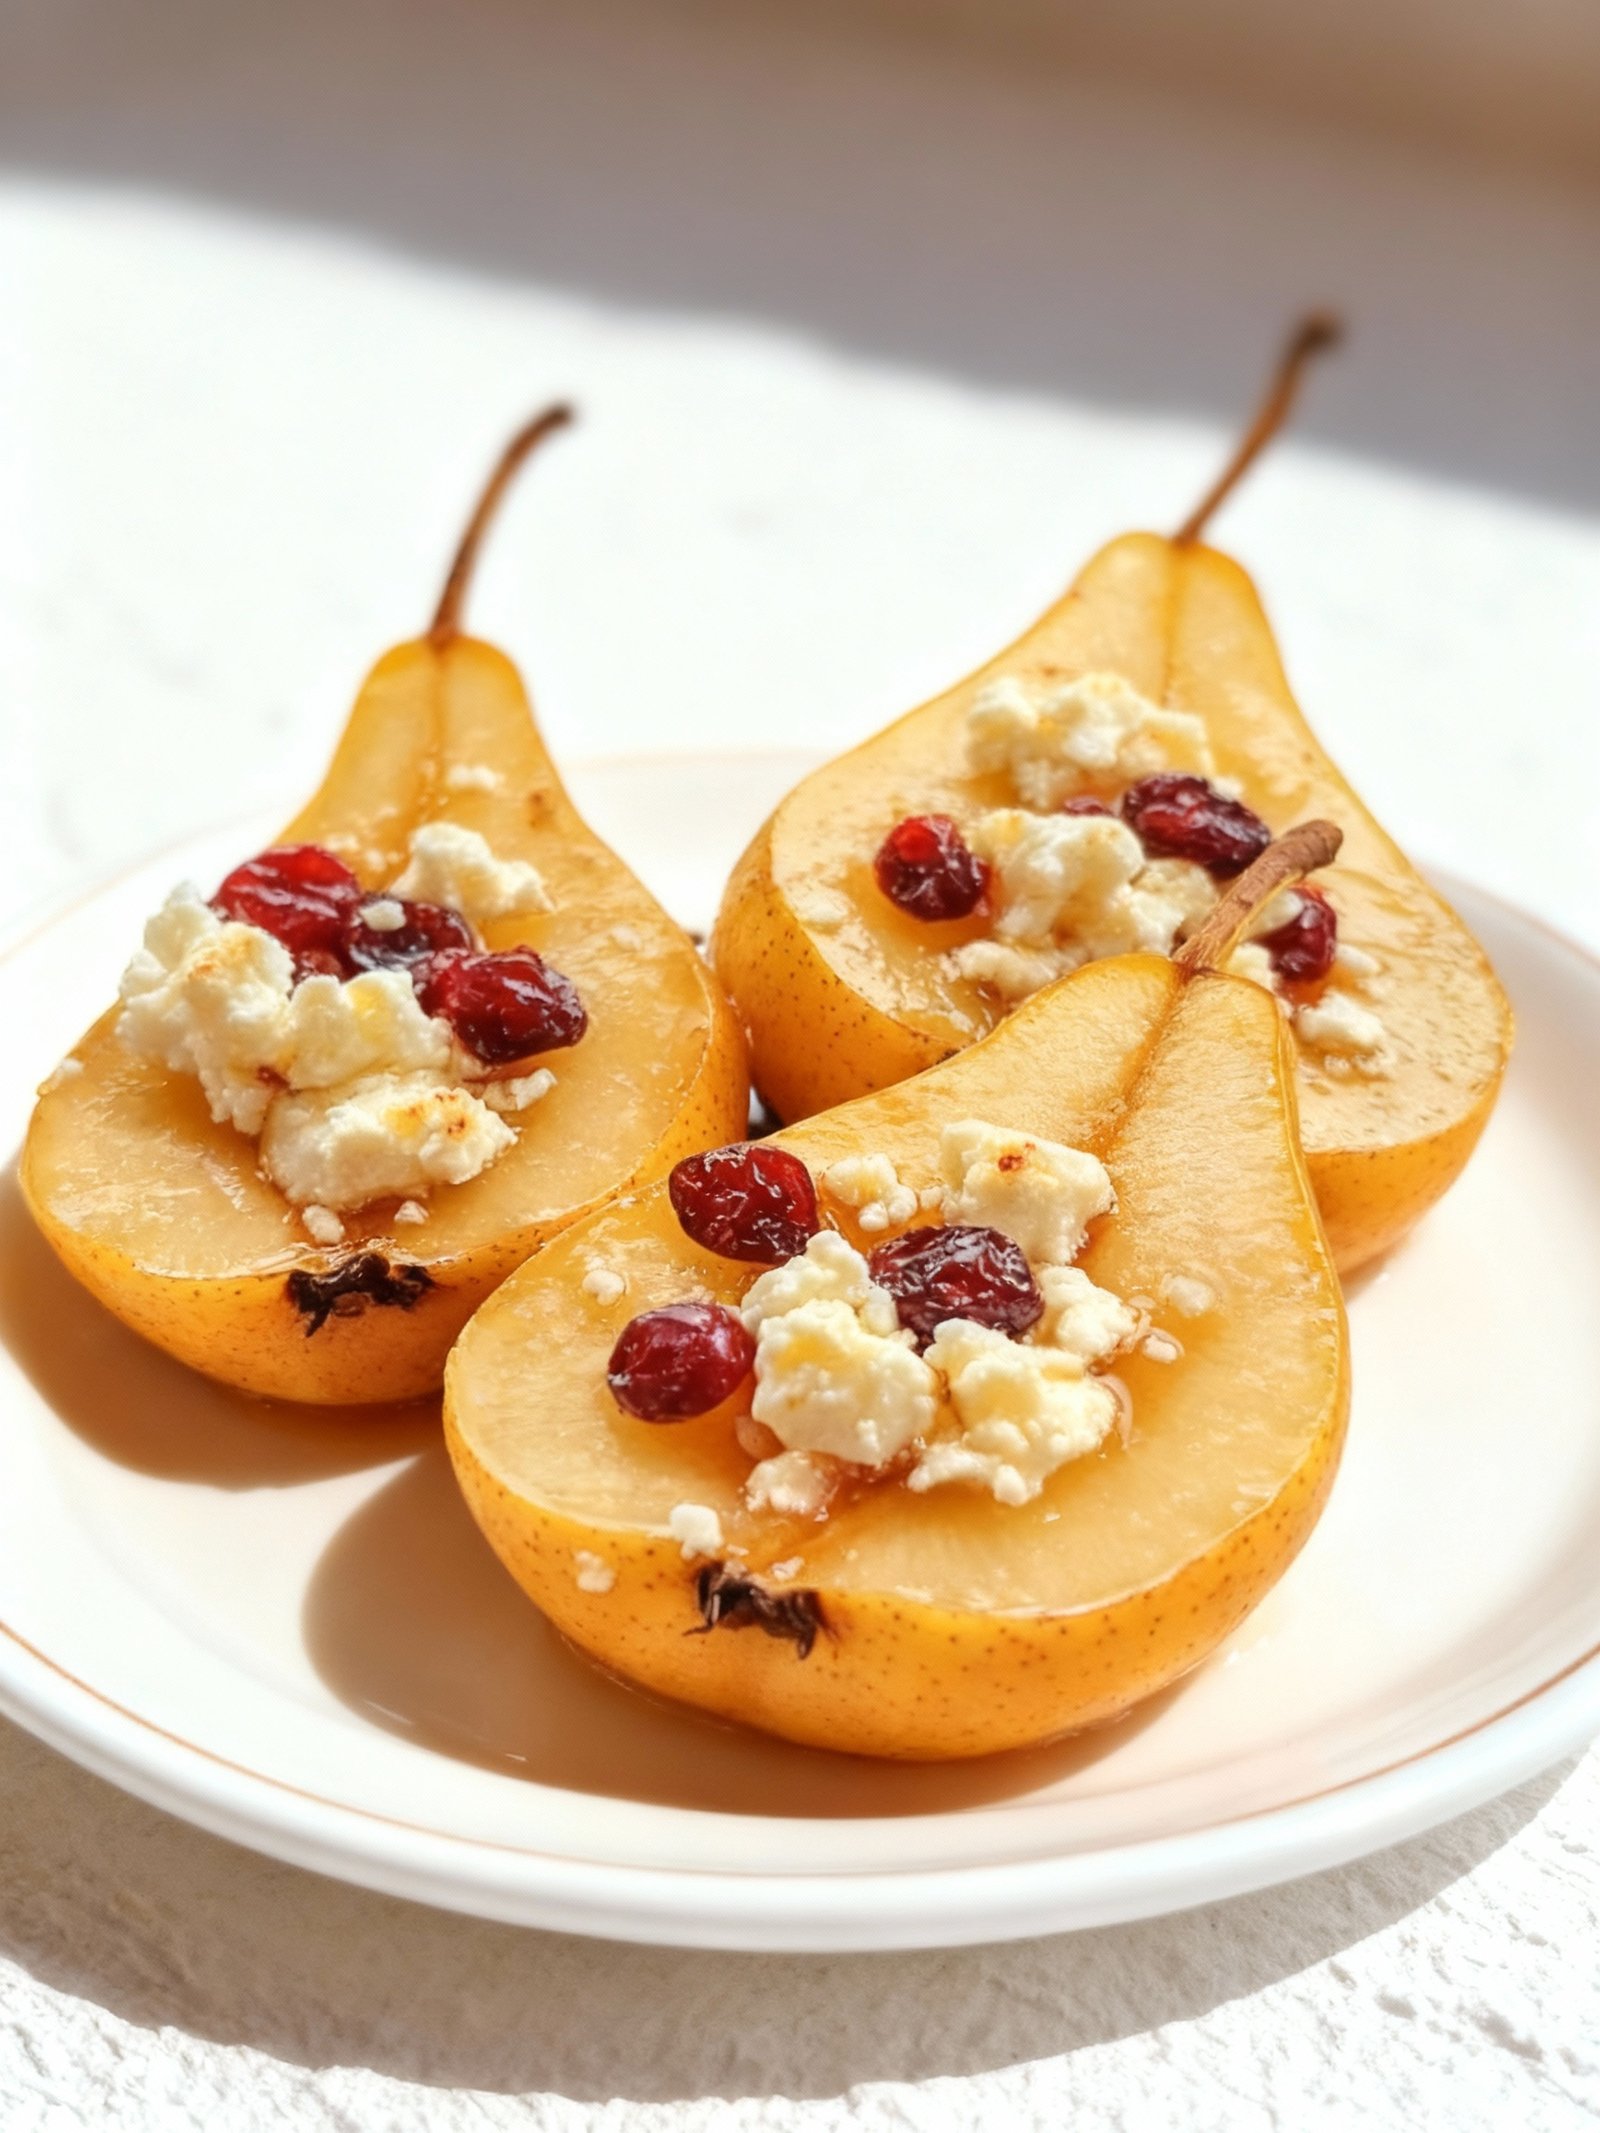
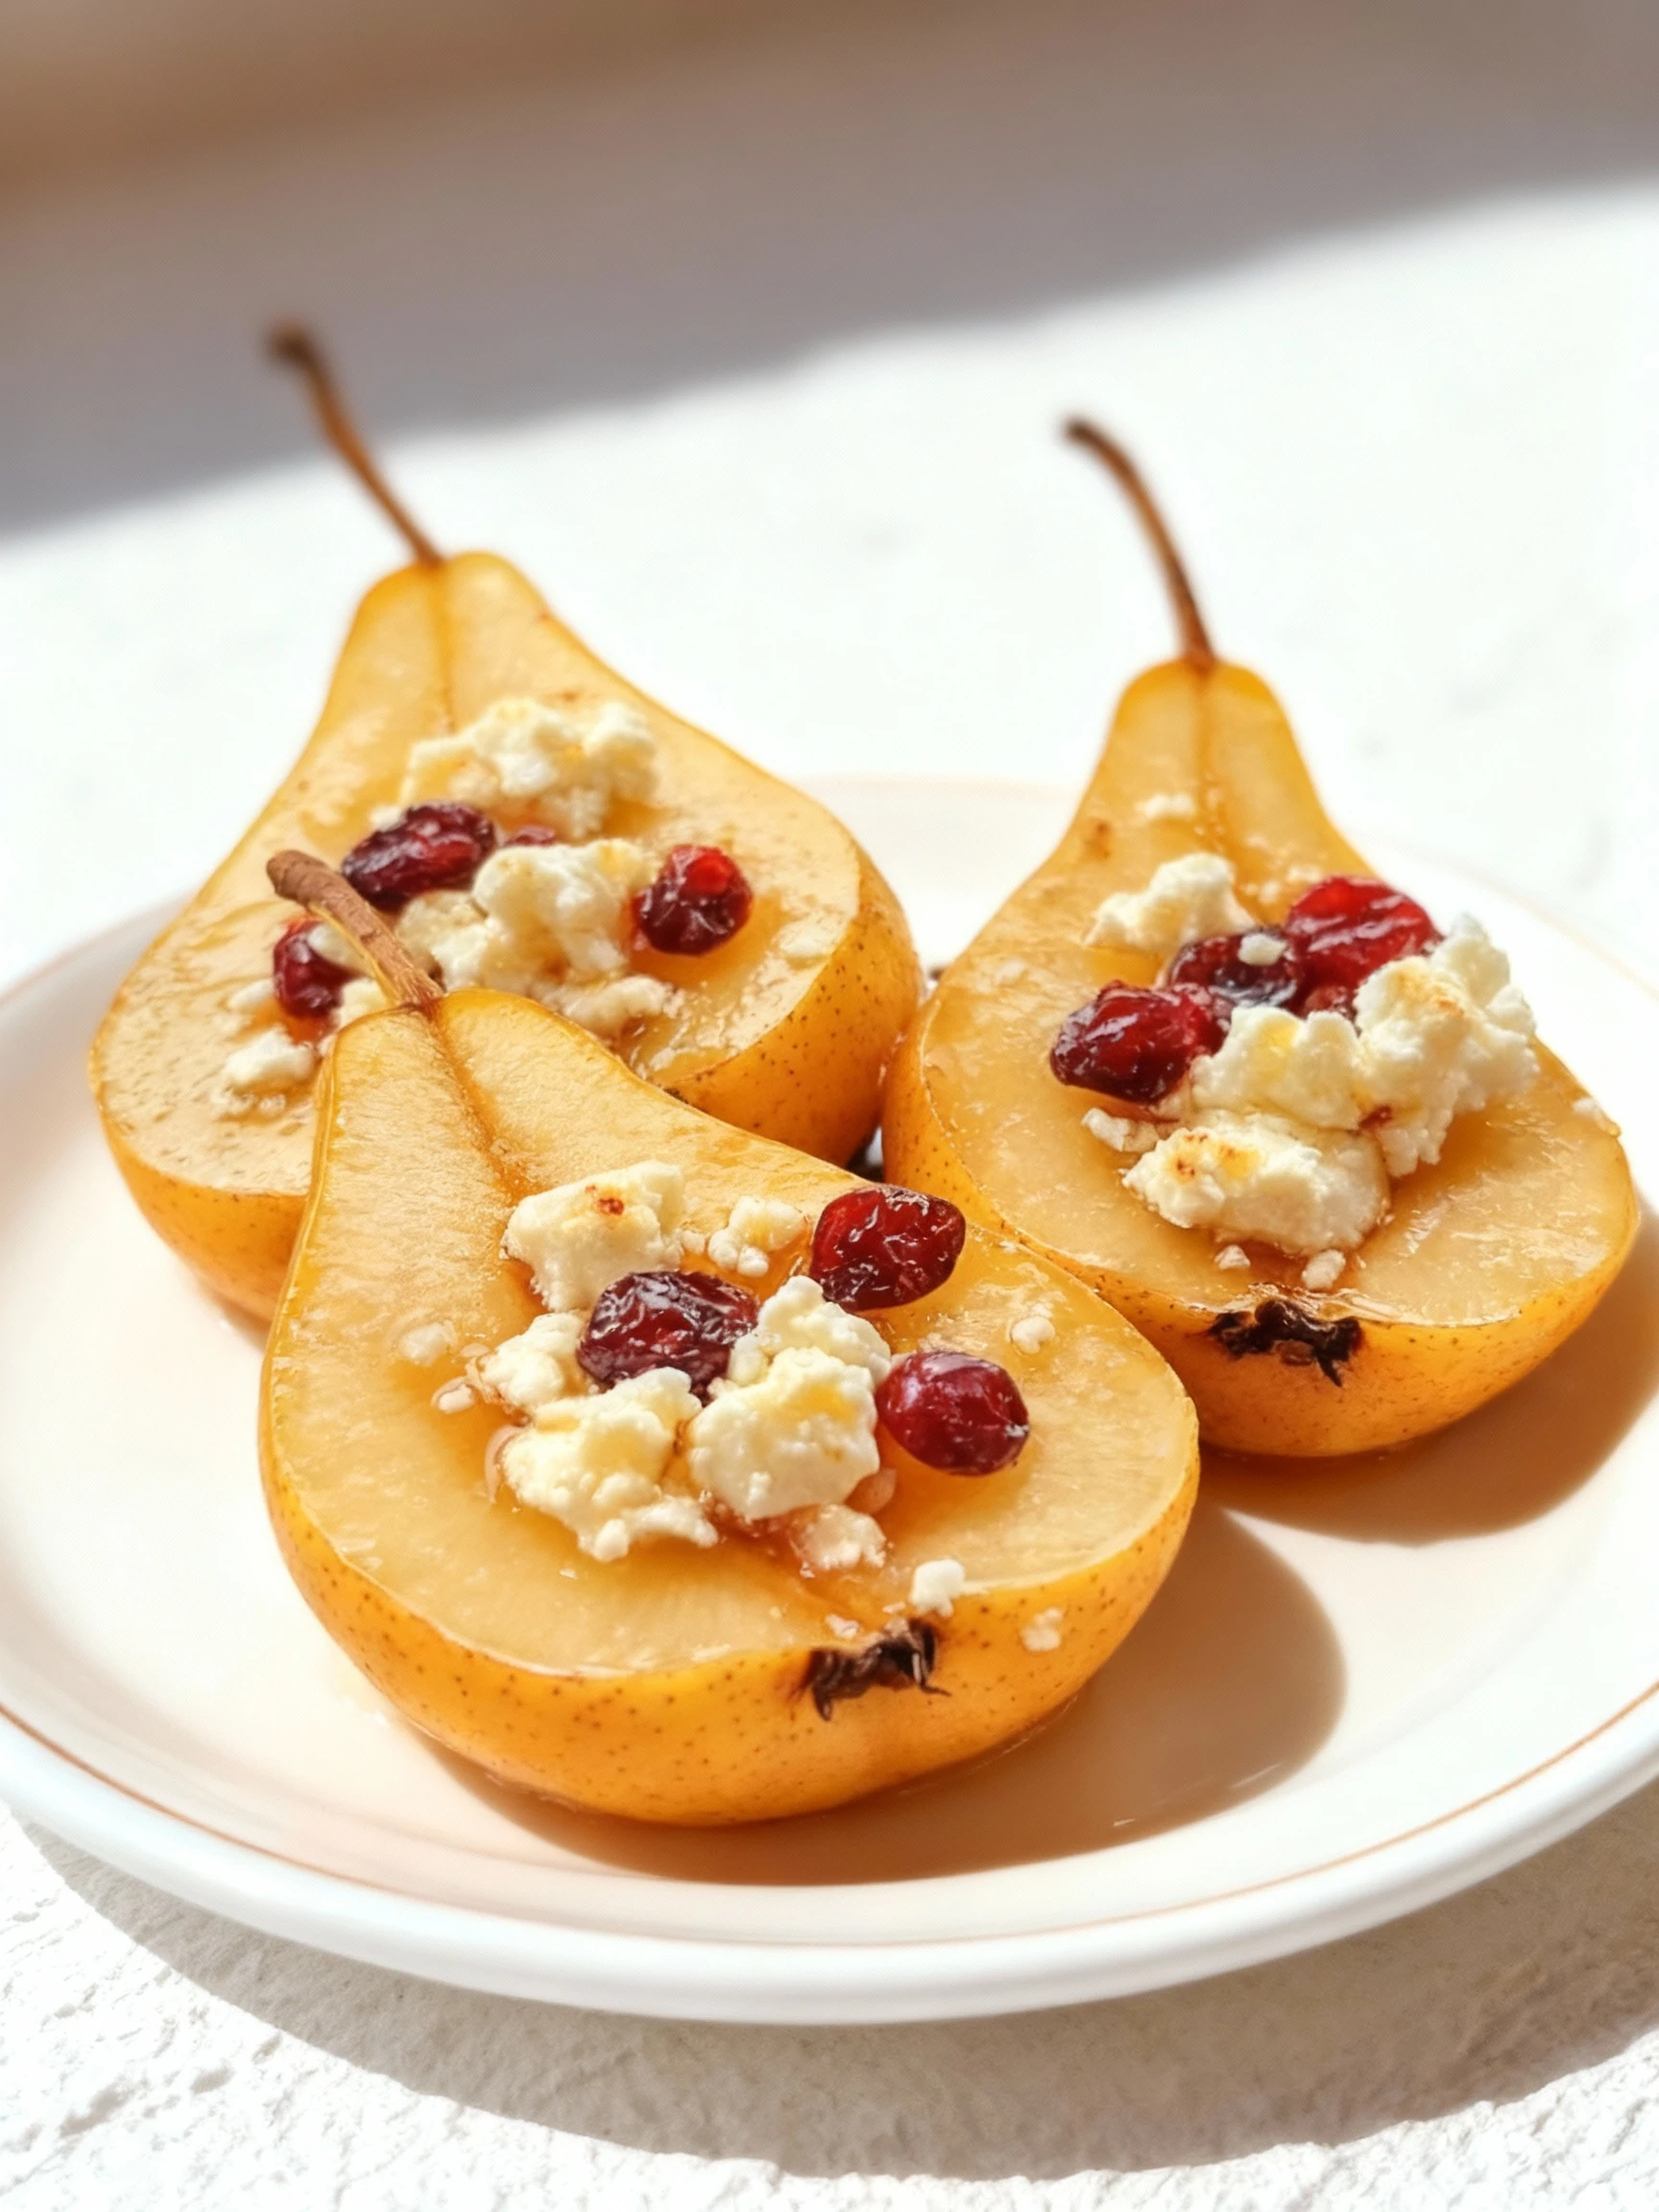
These baked pears with feta, honey, and cranberries offer a perfect balance of sweet and savory flavors. This elegant yet simple dessert comes together quickly with minimal prep, making it ideal for busy evenings. For more easy dinner inspiration, try the Cheesy Garlic Chicken Wraps Recipe or Scallion Chicken Stir-Fry Recipe.
Ingredients
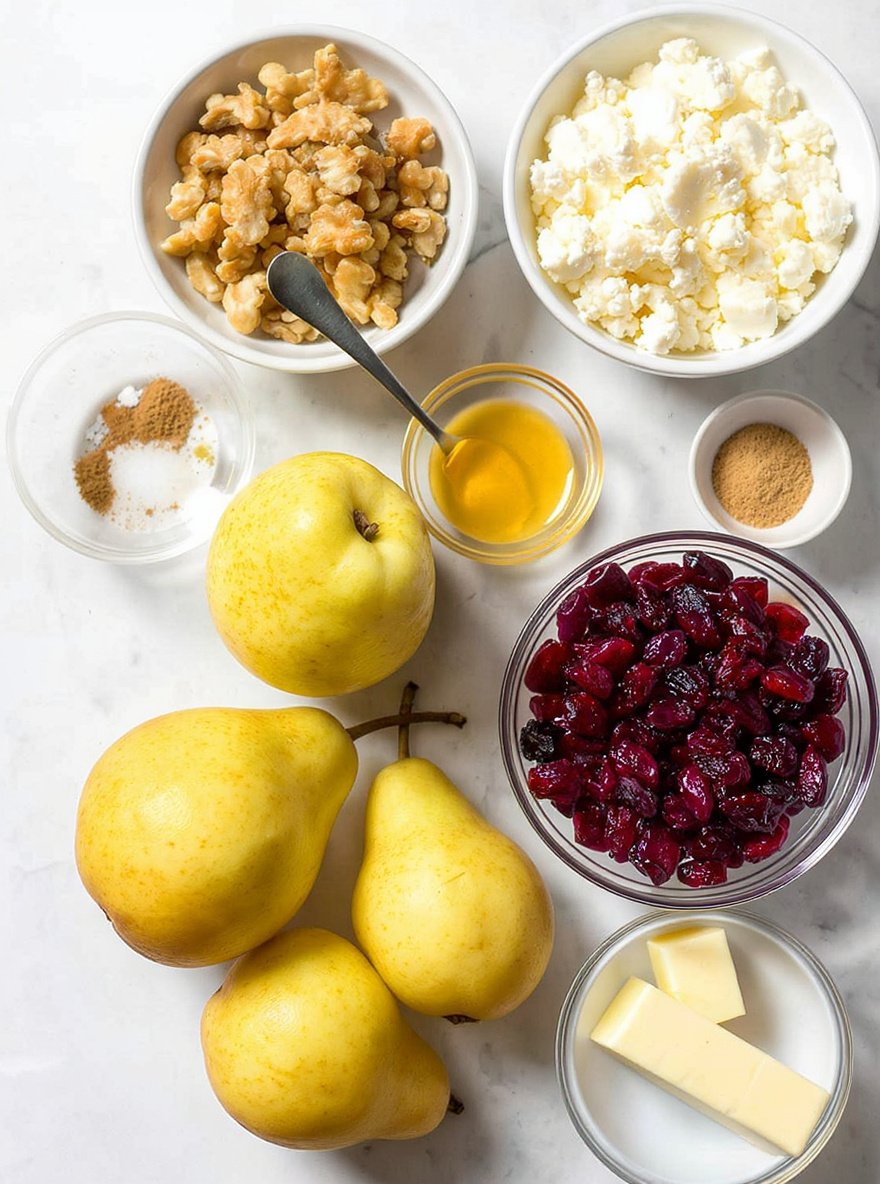
These simple ingredients combine to create a dish with wonderful contrasts—sweet, tender pears, creamy salty feta, and a hint of warm spice.
- 4 ripe but firm pears (Bosc or Anjou)
- 1/2 cup crumbled feta cheese
- 2 tablespoons honey
- 1/4 cup dried cranberries
- 1/4 cup chopped walnuts (optional)
- 1 tablespoon unsalted butter
- 1/2 teaspoon ground cinnamon
- Salt and pepper to taste
Timing
| Prep Time | 10 minutes |
| Cook Time | 15 minutes |
| Total Time | 25 minutes |
Context: This recipe is about 20% faster than similar recipes.
Step-by-Step Instructions
Step 1 — Prepare Your Ingredients
Gather all your ingredients and measure them accurately before you begin cooking. This ensures a smooth workflow and prevents scrambling mid-recipe.
For best results, bring ingredients like eggs or dairy to room temperature unless the recipe specifies otherwise.
Step 2 — Preheat Your Oven
Preheat your oven to 350°F (175°C). An accurate oven temperature is critical for proper cooking and browning.
Use an oven thermometer to verify the temperature, as many oven dials can be slightly off.
Step 3 — Combine Dry Ingredients
In a medium bowl, whisk together the flour, baking powder, and salt until they are fully incorporated.
Sifting the dry ingredients can help prevent lumps and ensure a lighter, more uniform texture in your final product.
Step 4 — Mix Wet Ingredients
In a separate, larger bowl, beat the eggs, sugar, and vanilla extract together until the mixture is pale and slightly thickened.
Gradually stream in the oil or melted butter while continuing to mix, which helps to create a stable emulsion.
Step 5 — Combine Wet and Dry Mixtures
Add the dry ingredients to the wet ingredients in two or three additions, mixing on low speed or by hand until just combined.
Do not overmix the batter; a few small lumps are acceptable. Overmixing can lead to a tough, dense texture.
Step 6 — Prepare the Pan
Grease your baking pan with butter or non-stick spray, then line it with parchment paper for easy removal.
For even baking, use light-colored metal pans. Dark pans can cause the edges to over-brown before the center is done.
Step 7 — Bake to Perfection
Pour the batter into the prepared pan and spread it evenly. Place it in the center of the preheated oven.
Bake for 25-30 minutes, or until a toothpick inserted into the center comes out clean or with a few moist crumbs attached.
Step 8 — Cool Completely
Let the baked good cool in the pan on a wire rack for 10-15 minutes before attempting to remove it.
This allows the structure to set and prevents it from breaking. Then, transfer it directly to the rack to cool completely.
Step 9 — Slice and Serve
Once completely cool, use a serrated knife to slice your creation into even portions for serving.
For clean cuts, wipe the knife blade between slices. Enjoy your homemade treat!
Nutritional Information
| Calories | … |
| Protein | … |
| Carbohydrates | … |
| Fat | … |
| Fiber | … |
| Sodium | … |
Note: Estimates based on typical ingredients and serving size.
Healthier Alternatives
- Lean ground turkey — Lighter protein with savory poultry notes
- Cauliflower rice — Lower-carb base with mild, nutty flavor
- Coconut milk — Creamy dairy-free alternative with subtle sweetness
- Tamari sauce — Gluten-free soy sauce with rich umami depth
- Nutritional yeast — Cheesy flavor without dairy, adds savory notes
- Zucchini noodles — Fresh, low-carb pasta substitute with delicate texture
- Herb-infused oils — Flavorful low-sodium seasoning with aromatic notes
- Lentils — Plant-based protein with earthy, hearty character
Serving Suggestions
- Serve alongside a crisp green salad with a light vinaigrette to balance the richness.
- Perfect for a cozy family dinner or a casual gathering with friends.
- Pair with roasted seasonal vegetables for a complete and colorful meal.
- Garnish with fresh herbs like parsley or chives for a vibrant, restaurant-quality finish.
- Excellent for meal prep; portion into containers for easy weekday lunches.
- Serve in a shallow bowl to showcase the sauce and keep the dish warm.
These ideas will help you create a memorable and satisfying dining experience.
Common Mistakes to Avoid
- Mistake: Overcrowding the pan. Fix: Cook in batches to ensure proper browning and avoid steaming ingredients.
- Mistake: Not preheating your oven. Fix: Always allow your oven to reach the target temperature before baking for consistent results.
- Mistake: Substituting ingredients without considering their properties. Fix: Understand the role of each ingredient, like baking powder vs. soda, before making swaps.
- Mistake: Overmixing batter. Fix: Mix just until ingredients are combined to prevent developing too much gluten, which leads to toughness.
- Mistake: Underseasoning throughout the cooking process. Fix: Season in layers, tasting and adjusting as you go, not just at the end.
- Mistake: Using dull knives. Fix: Keep your knives sharp for safer, more precise cuts and better control.
- Mistake: Ignoring resting time for meat. Fix: Let cooked meat rest before slicing to allow juices to redistribute, keeping it moist.
- Mistake: Not properly measuring flour. Fix: For accuracy, use a kitchen scale or spoon flour into the measuring cup and level it off.
- Mistake: Adding garlic too early. Fix: Add minced garlic towards the end of sautéing to prevent it from burning and turning bitter.
Storing Tips
- Fridge: Store in an airtight container for up to 3 days.
- Freezer: Keep in a freezer-safe bag or container for up to 3 months.
- Reheat: Warm thoroughly to an internal temperature of 165°F (74°C) before serving.
Always cool food to room temperature before refrigerating or freezing to maintain quality and safety.
Conclusion
This elegant baked pears recipe with feta, honey, and cranberries is a simple yet impressive dessert. Give it a try and let us know how it turns out in the comments! For more festive sides, explore our Herbed Wild Rice with Pomegranate or Cranberry Apple Stuffing. Don’t forget to subscribe for more delicious recipes!
PrintBaked Pears with Feta, Honey, and Cranberries

A sweet and savory dish featuring baked pears, tangy feta, drizzled with honey, and topped with cranberries.
- Prep Time: 15 minutes
- Cook Time: 25-30 minutes
- Total Time: 40-45 minutes
- Yield: 4 1x
- Method: Dessert/Side Dish
- Cuisine: Mediterranean
Ingredients
- 4 ripe but firm pears (Bosc or Anjou)
- 1/2 cup crumbled feta cheese
- 2 tablespoons honey
- 1/4 cup dried cranberries
- 1/4 cup chopped walnuts (optional)
- 1 tablespoon unsalted butter
- 1/2 teaspoon ground cinnamon
- Salt and pepper to taste
Instructions
- Preheat the oven to 375°F.
- Halve and core the pears.
- In a small bowl, mix together the crumbled feta, honey, and cinnamon.
- Place the pear halves in a baking dish and spoon the feta mixture onto each pear.
- Sprinkle the dried cranberries over the top.
- Drizzle with melted butter and sprinkle with chopped walnuts if using.
- Bake for 25-30 minutes or until the pears are tender and lightly caramelized.
Notes
This recipe combines the sweetness of pears and honey with the tanginess of feta and cranberries, creating a delightful contrast of flavors. Serve warm as a side dish or dessert. You can also add a sprinkle of cinnamon or a dollop of whipped cream for extra flavor.
Nutrition
- Calories: 250
- Sugar: 20
- Sodium: 150
- Fat: 12
- Saturated Fat: 8
- Unsaturated Fat: 4
- Trans Fat: 0
- Carbohydrates: 35
- Fiber: 4
- Protein: 5
- Cholesterol: 20
FAQs
Can I make this recipe ahead of time?
Yes, you can prepare this recipe in advance. Store it in an airtight container in the refrigerator for up to two days. Reheat gently before serving to enjoy the best flavor.
What are some good substitutions for the main ingredient?
You can substitute the main ingredient with similar alternatives like chicken or tofu. Adjust cooking times as needed to ensure your dish turns out perfectly.
How can I adjust the spice level?
To make the recipe milder, reduce or omit the spicy ingredients like chili flakes. For more heat, add extra spices gradually to suit your taste.


