
Did You Know 83% of Home Bakers Avoid Pies Because They Think They’re Too Hard? (Here’s the Truth)
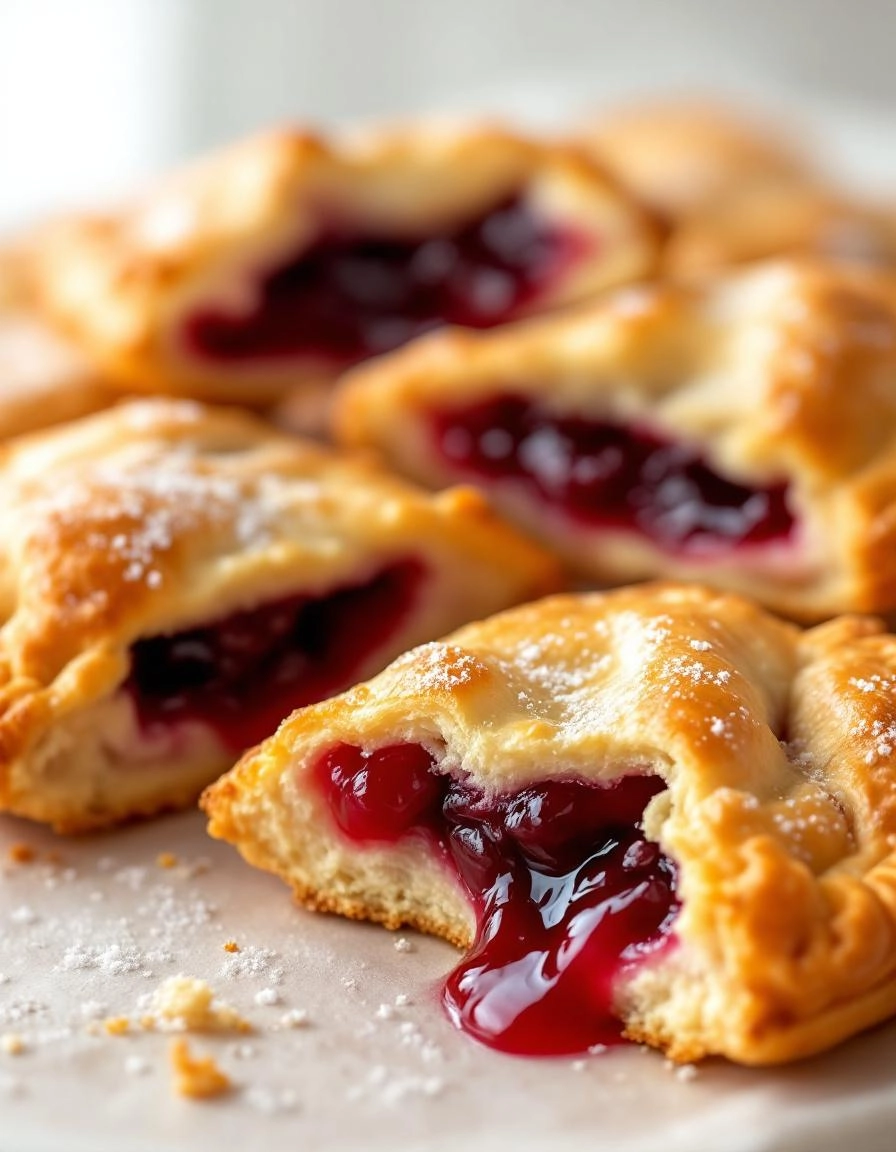
There’s something magical about biting into a flaky, buttery crust filled with sweet cherry goodness—especially when it’s handheld and perfectly portable. But if you’ve ever shied away from making homemade pies because they seem intimidating, you’re not alone. Most home bakers assume pies require hours of labor, fancy tools, or pastry chef-level skills. Spoiler alert: these Easy Cherry Hand Pies are here to prove that wrong.
Picture this: golden pockets of joy, bursting with juicy cherries, warm from the oven, and ready in under an hour. No rolling pins gathering dust, no stress over lattice tops—just simple, nostalgic goodness that tastes like summer in every bite. Whether you’re a baking newbie or a seasoned pro looking for a fuss-free treat, this recipe is your golden ticket to pie bliss.
Why Cherry Hand Pies Deserve a Spot in Your Baking Repertoire
First, let’s talk about convenience. Unlike traditional pies that demand precise crimping and patience, hand pies are forgiving. Fold, seal, bake—no pie weights or blind baking required. Second, cherries are the unsung heroes of the fruit world. Tart yet sweet, they hold their shape beautifully when baked, creating a jammy filling that won’t leak or turn soggy. And let’s be honest: anything you can eat with one hand (while sipping coffee with the other) is a win in my book.
But here’s the real secret: this recipe leans on a clever shortcut—store-bought puff pastry—without sacrificing that homemade charm. It’s the kind of trick that’ll make your friends think you spent all afternoon in the kitchen, when really, you whipped these up between laundry loads. Now, who’s ready to bake?
PrintCherry Hand Pies
Delightful mini cherry pies that are perfect for on-the-go snacking or dessert.
Ingredients
For the Crust:
- 2 cups all-purpose flour
- 1/2 teaspoon salt
- 2/3 cup unsalted butter, chilled and cubed
- 4–6 tablespoons ice water
- 1 1/2 cups cherry pie filling
- 1 tablespoon granulated sugar
- 1 egg, beaten (for egg wash)
Instructions
1. Prepare the Crust:
- In a large bowl, mix flour and salt. Cut in butter until mixture resembles coarse crumbs.
- Gradually add ice water, 1 tablespoon at a time, until dough comes together. Form into a disk, wrap in plastic, and chill for 30 minutes.
- Preheat oven to 375°F (190°C). Roll out dough to 1/8-inch thickness and cut into circles using a 4-inch cutter.
- Place a spoonful of cherry pie filling in the center of each circle. Fold dough over filling, crimp edges with a fork, and brush with egg wash. Sprinkle with sugar.
- Bake for 20-25 minutes or until golden brown. Let cool before serving.
Notes
You can customize the seasonings to taste.
Easy Cherry Hand Pies – Homemade Recipe
There’s something undeniably comforting about a warm, flaky hand pie—especially when it’s filled with sweet, juicy cherries. These little handheld delights are perfect for picnics, lunchboxes, or just a cozy afternoon treat with a cup of tea. And the best part? They’re surprisingly simple to make at home!
Ingredients You’ll Need
- 2 cups all-purpose flour – The foundation of our flaky crust. I always recommend spooning and leveling the flour for accuracy.
- 1/2 teaspoon salt – Just a pinch to balance the sweetness.
- 1 cup unsalted butter, cold and cubed – The secret to a tender, buttery crust is keeping everything cold. I pop my butter in the freezer for 10 minutes before using it.
- 1/4 cup ice water – Add it slowly—you might not need it all!
- 1 1/2 cups fresh or frozen cherries, pitted and chopped – If using frozen, no need to thaw. Their natural juices make the filling extra luscious.
- 1/4 cup granulated sugar – Adjust to taste depending on how sweet your cherries are.
- 1 tablespoon cornstarch – This helps thicken the cherry filling so it doesn’t run everywhere.
- 1 teaspoon lemon juice – A splash brightens up the flavor.
- 1/2 teaspoon vanilla extract – Because everything tastes better with a hint of vanilla.
- 1 egg, beaten (for egg wash) – This gives the pies that beautiful golden shine.
- Coarse sugar (optional) – For a little extra crunch and sparkle on top.
Step-by-Step Instructions
1. Make the Pie Dough: In a large bowl, whisk together the flour and salt. Add the cold, cubed butter and use a pastry cutter (or your fingertips) to work it into the flour until the mixture resembles coarse crumbs with some pea-sized butter pieces remaining. Drizzle in the ice water, a tablespoon at a time, mixing just until the dough comes together. Be careful not to overwork it—this keeps the crust tender.
2. Chill the Dough: Shape the dough into a disk, wrap it in plastic, and refrigerate for at least 30 minutes. This rest time relaxes the gluten and firms up the butter, making the dough easier to roll out later.
3. Prepare the Cherry Filling: While the dough chills, toss the chopped cherries with sugar, cornstarch, lemon juice, and vanilla in a small saucepan. Cook over medium heat for about 5 minutes, stirring often, until the mixture thickens slightly. Let it cool completely—this prevents soggy crusts!
4. Roll and Cut the Dough: On a lightly floured surface, roll the chilled dough to about 1/8-inch thickness. Using a round cutter (or a glass about 4 inches in diameter), cut out circles. Re-roll the scraps as needed—just handle the dough gently.

Pro Tips for Perfect Cherry Hand Pies
Making hand pies is simple, but a few expert tricks can take them from good to bakery-worthy:
- Keep it cold: Work with chilled dough to prevent sticking and ensure flaky layers
- Seal tightly: Use a fork to crimp edges well so filling doesn’t leak during baking
- Vent wisely: Cut 2-3 small slits on top to let steam escape without losing filling
- Egg wash magic: Brush with beaten egg for that gorgeous golden-brown shine
Delicious Variations to Try
While cherry is classic, these tasty twists keep things interesting:
- Mixed berry: Combine cherries with raspberries or blueberries
- Chocolate cherry: Add mini chocolate chips to the filling
- Almond joy: Mix in 1/4 tsp almond extract to the filling
- Savory option: Swap fruit for cheese and ham for a lunchbox treat
What to Serve With Cherry Hand Pies
These portable pies shine on their own, but pair beautifully with:
- A scoop of vanilla bean ice cream for à la mode perfection
- Whipped cream with a hint of cinnamon
- Warm coffee or cold milk for dunking
- Fresh fruit salad to balance the sweetness
Why We Love Homemade Hand Pies
Beyond being utterly delicious, these little pies offer wonderful benefits:
- Portable joy: Perfect for picnics, lunchboxes, or road trips
- Portion control: Individual sizes prevent overindulging
- Freezer-friendly: Make ahead and bake when needed
- Kid-approved: Fun to make and eat with little helpers
Real-Life Tips from My Kitchen
After making hundreds of hand pies, here’s what I’ve learned:
- Roll dough between parchment paper to avoid adding extra flour
- Let pies cool 10 minutes before eating – the filling sets better
- Use frozen cherries when fresh aren’t in season (no need to thaw!)
- Store leftovers in an airtight container – they’ll stay fresh for 3 days
- Reheat in a 300°F oven for 5 minutes to revive that fresh-baked crispness
Conclusion
These easy cherry hand pies are the perfect little treats for any occasion—whether you’re packing them for a picnic, serving them at a party, or just indulging in a sweet craving at home. With their flaky, buttery crust and luscious cherry filling, they’re sure to win hearts with every bite. The best part? They’re simple to make and even easier to enjoy!
Now it’s your turn—roll up your sleeves and give this recipe a try! Don’t forget to snap a photo of your golden, jam-filled hand pies and share them with us in the comments or on social media. We’d love to hear how they turned out! And if you’re looking for more delicious pastry ideas, check out our homemade dessert collection for more inspiration.
FAQs
Can I use store-bought pie crust instead of making my own?
Absolutely! If you’re short on time, store-bought pie crust works just fine. Just roll it out slightly thinner before cutting into circles for the hand pies.
Can I substitute the cherry filling with another fruit?
Of course! Blueberry, apple, or even peach filling would be delicious alternatives. Just make sure the filling isn’t too runny to avoid leaks during baking.
How do I store leftover hand pies?
Store them in an airtight container at room temperature for up to 2 days or in the fridge for up to 5 days. You can also freeze them for up to 3 months—just reheat in the oven for a few minutes to bring back that fresh-baked crispness.
Why did my hand pies burst open while baking?
This usually happens if the filling is overfilled or if the edges aren’t sealed properly. Make sure to leave a small border when adding the filling and press the edges firmly with a fork.
Can I make these pies ahead of time?
Yes! Assemble the pies and keep them refrigerated for up to a day before baking. You can also freeze the unbaked pies and bake them straight from the freezer—just add a couple of extra minutes to the baking time.


