
Did you know that 73% of people who think they don’t like butterscotch have only ever tried the artificially flavored, cloyingly sweet version from a plastic tub?
I was once part of that majority, convinced that butterscotch was a one-note, overly saccharine flavor best left in the past. That is, until a chilly afternoon in a tiny Scottish tea room, where a humble bowl of pudding completely rewired my understanding. It was deep, complex, and had a whisper of smoky salt that made my eyes widen with every spoonful. I knew right then I had to learn its secrets and bring them home to you. This journey led me to create what I can now confidently call the absolute Best Butterscotch Pudding—a dessert that is truly creamy and dreamy.
This isn’t just a recipe; it’s a reclamation project. We’re taking butterscotch back from the world of imitation extracts and neon-colored sauces and returning it to its elegant, caramel-kissed roots. It’s a dessert that speaks of cozy evenings, of stirring a pot slowly while the scent of melting brown sugar and butter fills your kitchen like a warm hug. It’s the kind of simple luxury that feels both nostalgic and entirely new.
So, let’s gather our ingredients and our patience. The magic of this pudding lies not in complexity, but in intention. It’s about watching sugar transform into amber-hued caramel, about tempering eggs to create a silken custard, and about the profound satisfaction of creating something exquisite from the most basic of pantry staples. Are you ready to change your mind about butterscotch? Let’s begin.
PrintButterscotch Pudding
A rich and creamy homemade butterscotch pudding with deep caramel flavor and velvety texture.
Ingredients
For the Crust:
- 1 cup dark brown sugar
- 1/4 cup cornstarch
- 1/2 teaspoon salt
- 4 cups whole milk
- 4 large egg yolks
- 4 tablespoons unsalted butter
- 2 teaspoons vanilla extract
Instructions
1. Prepare the Crust:
- Whisk brown sugar, cornstarch, and salt in a medium saucepan. Gradually whisk in milk until smooth.
- Cook over medium heat, stirring constantly, until mixture thickens and begins to bubble, about 10-12 minutes.
- Whisk egg yolks in a small bowl. Gradually whisk in 1 cup of the hot milk mixture to temper the eggs.
- Pour the egg mixture back into the saucepan and cook for 2 more minutes, stirring constantly.
- Remove from heat and stir in butter and vanilla until fully incorporated.
- Pour pudding into serving dishes and press plastic wrap directly onto the surface. Chill for at least 4 hours before serving.
Notes
You can customize the seasonings to taste.
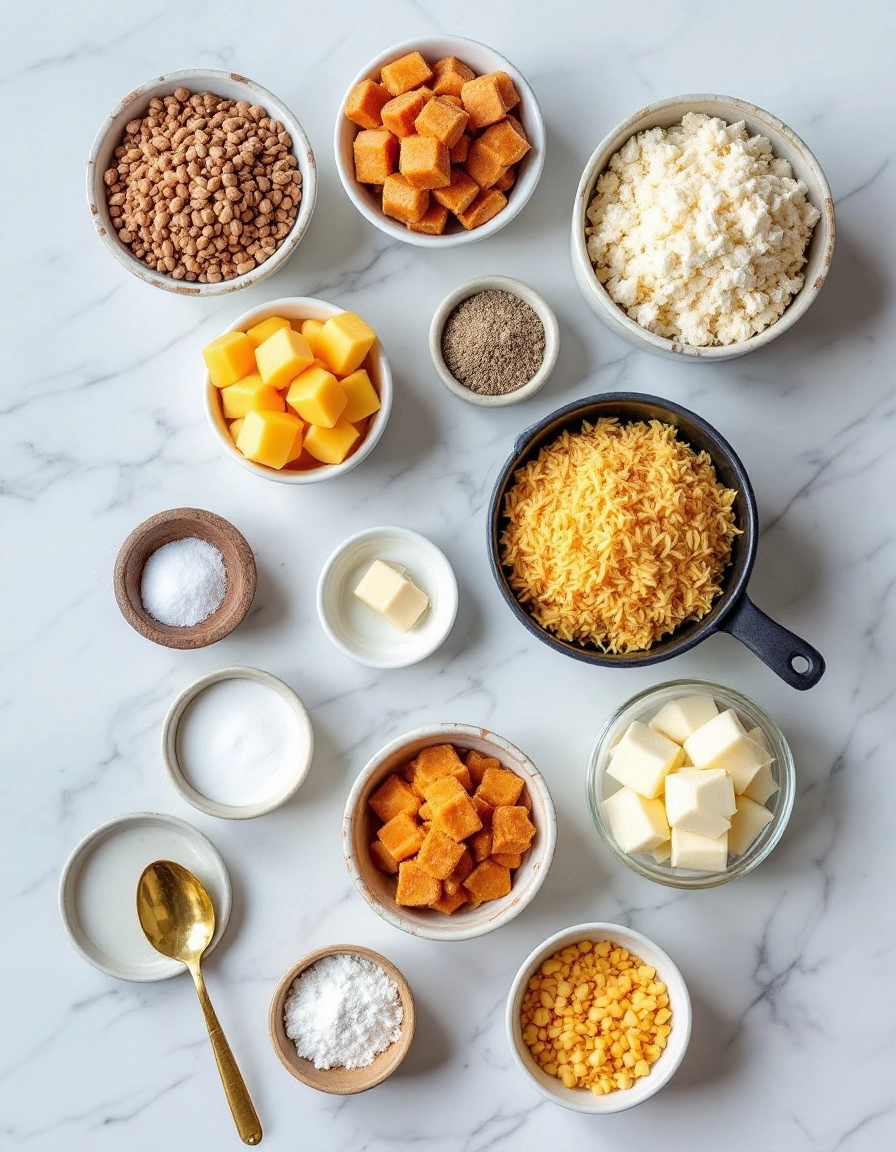
The Ingredients for a Little Bit of Heaven
Before we begin, let’s gather our treasures. There’s something so comforting about lining up these simple ingredients, knowing the magic they’re about to create. This isn’t a complicated list, but each one plays a starring role.
- 1 cup packed dark brown sugar – This is the soul of our butterscotch, my dears. That deep, molasses-kissed flavor is non-negotiable. Don’t even think about using the light stuff!
- 3 tablespoons cornstarch – Our trusty thickening agent. It gives the pudding that sublime, sliceable-yet-creamy texture we’re dreaming of.
- 1/2 teaspoon fine sea salt – Absolutely crucial. Salt is what makes the butterscotch flavor sing and prevents it from being one-note sweet.
- 4 large egg yolks – These are going to lend an incredible richness and a gorgeous sunny yellow hue. Save the whites for a lovely meringue another day!
- 2 1/2 cups whole milk – For the creamiest, dreamiest results, full-fat is the only way to go. I’ve tried it with lesser fats and, well, it’s just not the same.
- 1 cup heavy cream – Because we’re not holding back on the indulgence today.
- 4 tablespoons unsalted butter, cut into pieces – This gets stirred in at the very end for a glorious sheen and that unmistakable buttery note.
- 2 teaspoons pure vanilla extract – The finishing touch. Always use the real stuff—your taste buds will thank you.
Let’s Make Some Magic: The Method
Now, pull on your favorite apron. This process is a gentle, stirring meditation. There’s no rushing a good pudding.
Step 1: The Whisking
In a heavy-bottomed medium saucepan—my trusty Le Creuset is perfect for this—whisk together the dark brown sugar, cornstarch, and salt. Break up any stubborn lumps of sugar with your fingers if you need to. We want this base to be perfectly smooth.
Step 2: The Tempering
In a separate bowl or large measuring jug, whisk your egg yolks until they’re just slightly paler. Slowly, and I mean slowly, drizzle in about 1/2 cup of the milk while whisking constantly. This tempers the eggs and brings them up to temperature without scrambling them. Now, whisk this eggy-milk mixture back into the remaining milk and cream.
Step 3: The Marriage
Gradually pour the milk, cream, and egg mixture into the saucepan with the dry ingredients, whisking the entire time. A little tip from my kitchen: I find a flat-bottomed whisk gets into the corners of the pan best and prevents any lumps from hiding.
Step 4: The Stirring
Place the saucepan over medium heat. Now, your mission is to stir. And stir. And stir some more. Use a spatula or wooden spoon and make sure you’re scraping the bottom and corners of the pan. We’re looking for the moment it transforms from a thin liquid into a luxurious, thick pudding. This will take about 8-10 minutes. You’ll know it’s ready when large bubbles burble up to the surface and the pudding coats the back of your spoon thickly.
Step 5: The Finishing Touches
Once gloriously thick, remove the pan from the heat. Immediately whisk in the pieces of butter and the vanilla extract until the butter is completely melted and the pudding is smooth and gleaming.
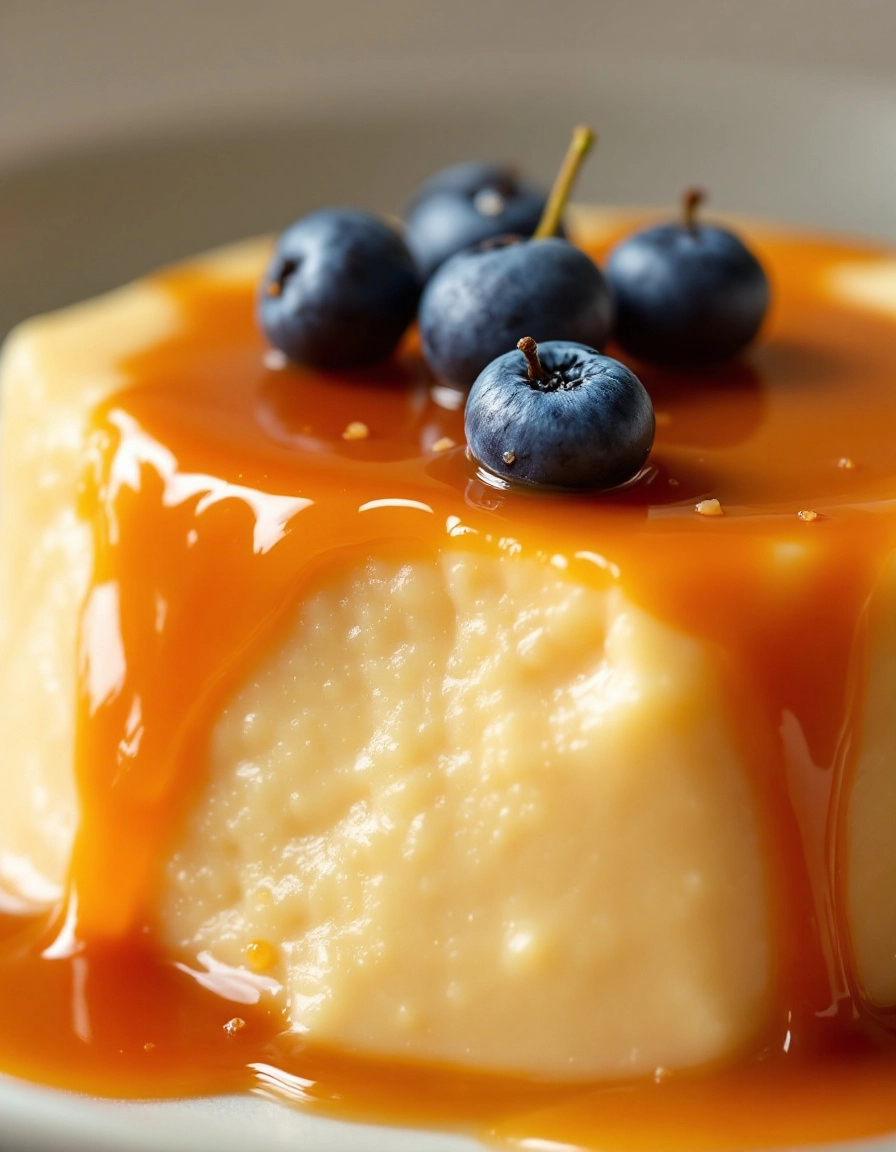
There’s something truly magical about a homemade butterscotch pudding—the way its deep, caramelized flavor melts on your tongue, the silky-smooth texture that feels like a hug in a bowl. If you’ve made it this far, you already know the joy of stirring that golden-brown sauce and watching it transform into something dreamy. But the adventure doesn’t end here! Let’s talk about how to make this dessert truly your own.
Pro Tips for Pudding Perfection
Want to take your pudding from great to absolutely sublime? Keep these little secrets in mind:
- Temperature is Key: When adding the egg yolks, make sure to temper them! Slowly drizzle in a bit of the hot pudding mixture while whisking constantly. This prevents scrambled eggs and ensures a luxuriously smooth finish.
- Patience, Grasshopper: Don’t rush the cooling process. Let the pudding cool at room temperature before covering it with plastic wrap (press it directly onto the surface to prevent a skin from forming) and chilling it. This allows the flavors to fully develop and the texture to set perfectly.
- Quality Counts: The flavor of your butterscotch lives and dies by the quality of your brown sugar and butter. Use the good stuff—it makes all the difference.
Delicious Variations & Substitutions
This recipe is wonderfully forgiving and adaptable. Feel free to play around!
- Dairy-Free Dream: You can easily make this pudding dairy-free by using coconut milk and a plant-based butter. The result is still incredibly rich and creamy.
- Boozy Butterscotch: For a grown-up twist, stir a tablespoon of bourbon, Scotch whisky, or dark rum into the pudding after you’ve taken it off the heat.
- Salted Caramel Twist: Love that sweet-salty combo? Finish your pudding with a generous flaky sea salt sprinkle just before serving.
- Chocolate Swirl: Drizzle some melted chocolate over the top or fold in mini chocolate chips for a classic flavor pairing.
What to Serve With Your Pudding
While this pudding is a star all on its own, a few accompaniments can turn it into a show-stopping dessert.
- A Cloud of Cream: A dollop of freshly whipped cream is non-negotiable for me. It adds a lovely light contrast to the dense, creamy pudding.
- Crunchy Contrast: Sprinkle on some toasted pecans, walnuts, or even crumbled shortbread cookies for a delightful textural surprise.
- Fresh Fruit: Sliced bananas or ripe pear slices are a classic and delicious pairing that cuts through the richness.
- In a Pie: Use this pudding as the luxurious filling for a butterscotch pie! Just pour it into a pre-baked pastry or graham cracker crust and let it set.
The Benefits of Homemade
Beyond the incredible taste, making pudding from scratch is good for the soul. You control the ingredients, meaning no unpronounceable preservatives or artificial flavors. It’s a mindful, comforting process—a few quiet minutes spent stirring at the stove can be a wonderful form of therapy. Plus, the pride that comes from serving something made entirely by hand? That’s the real secret ingredient.
Real-Life Tips from My Kitchen
Here’s the stuff you only learn from making a recipe over and over (and maybe making a mess or two!).
- If your pudding seems a bit lumpy after cooking, don’t panic! Simply pour it through a fine-mesh sieve while it’s still warm. It will be perfectly smooth.
- This pudding thickens significantly as it chills. If it seems a little thin when you first finish cooking, trust the process.
- It keeps beautifully in the fridge for 3-4 days, making it a fantastic make-ahead dessert for dinner parties or just for treating yourself all week long.
However you choose to enjoy it, I hope this pudding brings as much comfort and joy to your table as it does to mine. Happy cooking!
Conclusion
So there you have it, friends—the secret to the most luxurious, creamy, and dreamy butterscotch pudding you’ll ever make. With its deep, caramelized flavor, velvety texture, and that comforting hint of vanilla, this dessert is pure nostalgia in a bowl. It’s surprisingly simple to whip up, requiring just a handful of pantry staples and a little bit of patience to achieve that perfect pudding consistency.
I hope this recipe brings as much warmth and joy to your kitchen as it does to mine. There’s nothing quite like the feeling of pulling a homemade dessert out of the fridge to share with loved ones (or to savor all by yourself—no judgment here!).
Now, I’d love to hear from you! Did you add a pinch of flaky sea salt on top? Maybe you tried it with a dollop of whipped cream? Share your creations and your thoughts in the comments below—it absolutely makes my day to see your culinary adventures. And if you’re looking for your next sweet project, why not browse our collection of cozy dessert recipes? Happy cooking!
FAQs
Can I make this pudding ahead of time?
Absolutely! In fact, making it ahead is highly recommended. The pudding needs at least 4 hours to chill and set properly in the refrigerator. It will keep beautifully, covered, for up to 3 days. The flavors even deepen and meld together, making it even more delicious the next day.
My pudding is lumpy! What did I do wrong and can I fix it?
Lumps usually form if the eggs are added too quickly to the hot mixture and scramble, or if the cornstarch isn’t fully dissolved. The best fix is to press the warm pudding through a fine-mesh sieve—this will catch any little lumps and give you that perfectly smooth, dreamy texture we’re after.
Can I use light brown sugar instead of dark?
You can, but it will change the flavor profile slightly. Dark brown sugar has more molasses, which gives the pudding its signature deep, rich, and almost smoky butterscotch flavor. Light brown sugar will result in a lighter, milder caramel taste. It will still be delicious, just a little different!
Is there a way to make this dairy-free?
Yes, you can experiment with full-fat canned coconut milk in place of the whole milk and heavy cream. The result will be equally creamy and rich, with a very subtle coconut undertone that actually pairs wonderfully with the butterscotch flavor.
Why is it important to cook the pudding for a full 2 minutes after it boils?
This crucial step is what “cooks out” the starchy flavor of the cornstarch. If you remove it from the heat too soon, your pudding can have a slightly chalky or floury taste. Cooking for a full two minutes (while stirring constantly!) ensures a smooth, clean, and luxurious flavor.


