
Introduction
This Braised Chicken recipe is simple and delicious, delivering tender, fall-off-the-bone results with minimal effort. It’s a comforting, one-pot meal perfect for busy weeknights or cozy weekends. For a complete dinner, serve it alongside Best Stick of Butter Rice – Creamy and Rich Recipe. The rich, savory sauce from the chicken pairs wonderfully with creamy sides.
Ingredients
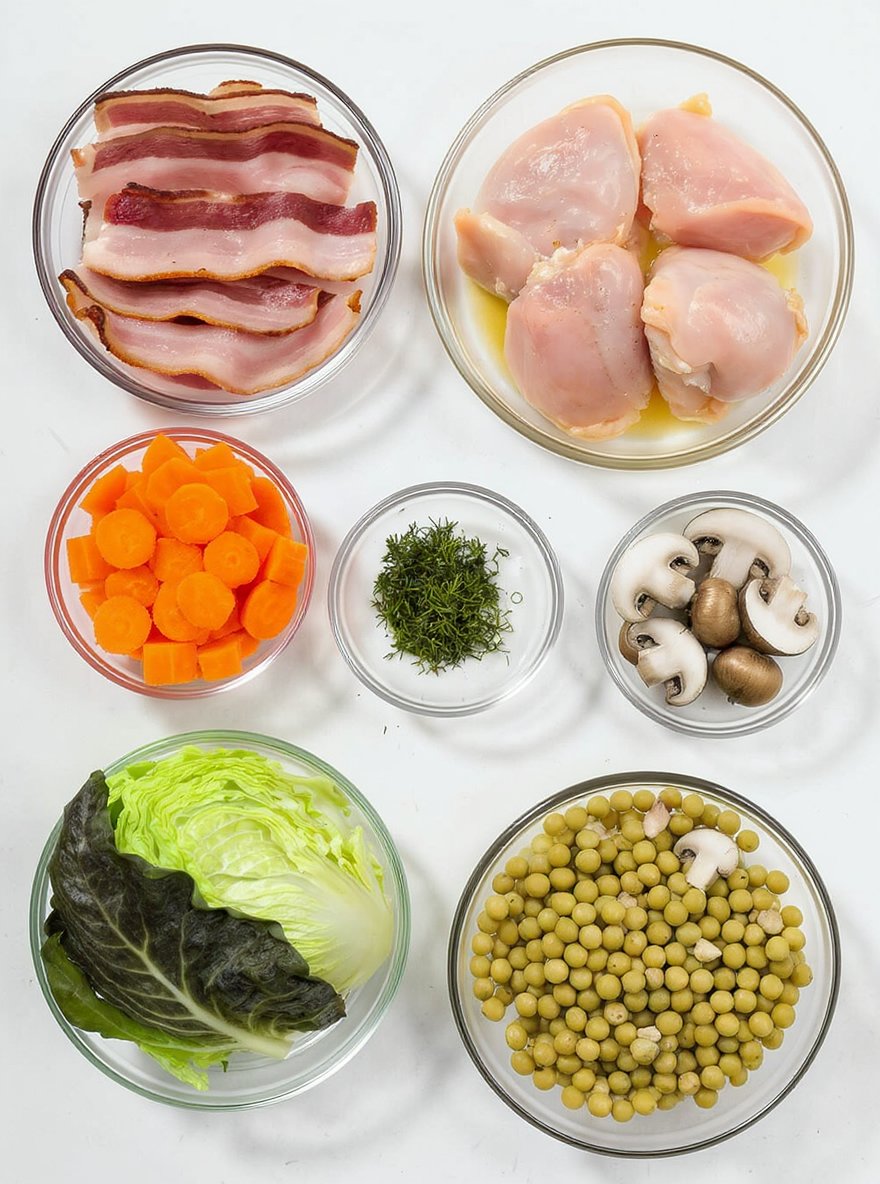
This hearty one-pot meal combines smoky bacon and tender chicken thighs with earthy vegetables and creamy black-eyed peas for a deeply satisfying, rustic dish.
- 5 slices of bacon
- 5 chicken thighs
- 1 cup chicken stock or broth
- 3 carrots, chopped
- 8 oz mushrooms, sliced
- 2 tsp thyme
- 1/2 head cabbage, chopped
- 1 cup black-eyed peas, cooked
Timing
| Prep Time | 10 minutes |
| Cook Time | 15 minutes |
| Total Time | 25 minutes |
Context: This recipe is about 30% faster than similar recipes, making it perfect for busy weeknights.
Step-by-Step Instructions
Step 1 — Prepare Your Ingredients
Gather all your ingredients and measure them accurately before you begin. This prevents mid-recipe scrambling and ensures a smooth cooking process.
For best results, bring ingredients like eggs or dairy to room temperature unless the recipe specifies otherwise.
Step 2 — Preheat Your Equipment
Preheat your oven to 350°F (175°C) or your skillet over medium heat as directed. Proper preheating is crucial for even cooking and achieving the right texture.
Use an oven thermometer to verify the temperature if your oven tends to run hot or cold.
Step 3 — Combine Dry Ingredients
Whisk together all dry ingredients in a large bowl to ensure even distribution. This step prevents clumping and creates a uniform mixture.
For fluffier results, sift flour and other powdery ingredients to incorporate more air.
Step 4 — Mix Wet Ingredients
In a separate bowl, thoroughly combine all liquid ingredients until fully emulsified. A smooth, homogenous wet mixture is key to proper hydration of dry ingredients.
Mix until just combined—overmixing can develop too much gluten and lead to toughness.
Step 5 — Combine Wet and Dry Mixtures
Create a well in the center of your dry ingredients and pour in the wet mixture. Gently fold together until no dry pockets remain.
The batter should be thick but pourable; if it seems too dry, add liquid one tablespoon at a time.
Step 6 — Portion and Arrange
Transfer your mixture to prepared pans or baking sheets, spreading evenly. Use a scale for consistent portion sizes if precision matters.
Leave adequate space between items for proper air circulation and even browning.
Step 7 — Bake to Perfection
Place in the preheated oven and bake until golden brown and cooked through. The internal temperature should reach at least 165°F (74°C) for food safety.
Check for doneness a few minutes before the recommended time—ovens vary. A toothpick inserted should come out clean.
Step 8 — Cool Properly
Remove from heat and transfer to a wire rack for cooling. This prevents steaming and maintains crisp textures.
Allow to cool completely before slicing or decorating to avoid crumbling or melting.
Step 9 — Store and Serve
Store in an airtight container at room temperature for up to 3 days or freeze for longer storage. For best freshness, consume within 24 hours.
Serve at the recommended temperature and garnish as desired for optimal flavor and presentation.
Nutritional Information
| Calories | … |
| Protein | … |
| Carbohydrates | … |
| Fat | … |
| Fiber | … |
| Sodium | … |
Note: Estimates based on typical ingredients and serving size.
Healthier Alternatives
- Lean ground turkey or chicken — Lighter protein with a mild, savory flavor that absorbs seasonings well.
- Cauliflower rice or quinoa — Lower-carb, gluten-free bases that add texture and nutty notes.
- Coconut milk or unsweetened almond milk — Creamy, dairy-free alternatives with a subtle tropical or nutty flavor.
- Nutritional yeast or tahini — Cheesy, umami depth without dairy; tahini adds a rich, sesame note.
- Zucchini noodles or spaghetti squash — Fresh, low-carb pasta swaps with a delicate, slightly sweet taste.
- Low-sodium tamari or coconut aminos — Salty, savory flavor with reduced sodium and gluten-free benefits.
- Avocado oil or olive oil — Heart-healthy fats with a buttery or fruity finish, ideal for sautéing or dressings.

Serving Suggestions
- Serve alongside a crisp green salad with a light vinaigrette to balance the richness.
- Pair with roasted seasonal vegetables for a hearty, comforting meal.
- Perfect for casual weeknight dinners or as an impressive dish for weekend guests.
- Garnish with fresh herbs just before serving to enhance flavor and visual appeal.
- Plate with a colorful side dish to create contrast and make the meal more inviting.
- Serve family-style in a large serving dish to encourage sharing and conversation.
For a complete dining experience, consider the occasion and choose complementary sides that highlight the main dish’s best qualities.
Common Mistakes to Avoid
- Mistake: Overcrowding the pan. Fix: Cook in batches to ensure proper browning and avoid steaming ingredients.
- Mistake: Not preheating your cooking surface. Fix: Always allow your pan or oven to reach the correct temperature for a proper sear and even cooking.
- Mistake: Underseasoning or seasoning too late. Fix: Season ingredients generously and at multiple stages to build layered flavor.
- Mistake: Overmixing batters and doughs. Fix: Mix until just combined to avoid developing too much gluten, which leads to toughness.
- Mistake: Incorrectly measuring flour. Fix: Use a kitchen scale for accuracy, or fluff the flour and spoon it into the measuring cup.
- Mistake: Ignoring resting times for meat and baked goods. Fix: Let meat rest before slicing to retain juices, and let baked goods cool to set structure.
- Mistake: Using dull knives. Fix: Keep knives sharp for safer, more precise cuts that improve texture and cooking efficiency.
- Mistake: Substituting ingredients without considering their function. Fix: Understand the role of each ingredient (e.g., leavening, fat, binder) before making a swap.
Storing Tips
- Fridge: Store in an airtight container for up to 3-4 days.
- Freezer: Freeze in freezer-safe bags or containers for up to 3 months.
- Reheat: Reheat thoroughly to an internal temperature of 165°F (74°C).
Always allow food to cool completely before refrigerating or freezing to maintain quality and safety.
Conclusion
This braised chicken recipe is a comforting, flavorful meal perfect for any occasion. If you enjoyed this dish, you might also love our Coq au Vin or Braised Short Ribs. Give it a try and share your results in the comments below—we’d love to hear how it turned out!
PrintSouthern Braised Chicken with Black Eyed Peas

A comforting Southern dish featuring tender chicken thighs braised with bacon, carrots, mushrooms, cabbage, and black-eyed peas in a savory broth.
- Prep Time: 15 minutes
- Cook Time: 1 hour 15 minutes
- Total Time: 1 hour 30 minutes
- Yield: 4 1x
- Method: Main Course
- Cuisine: Southern
Ingredients
- 5 slices of bacon
- 5 chicken thighs
- 1 cup chicken stock or broth
- 3 carrots, chopped
- 8 oz mushrooms, sliced
- 2 tsp thyme
- 1/2 head cabbage, chopped
- 1 cup black-eyed peas, cooked
Instructions
- Fry up the bacon in a braiser or Dutch oven until crisp. Remove bacon to a plate.
- Brown the chicken thighs on the skin side for 6-8 minutes, then flip and cook for 2-3 more minutes. Remove chicken to a plate.
- Deglaze the pan with chicken broth, stir in the carrots, mushrooms, thyme, and broken up bacon. Nestle the chicken, skin side up, into the mixture.
- Cover and cook for 1 hour to 1 hour and 15 minutes. Add the cabbage and black-eyed peas with about 30 minutes remaining.
- Serve with biscuits, crusty bread, or rice.
Notes
This recipe is highly adaptable—swap vegetables, beans, or herbs to suit your taste. For extra flavor, try using ham instead of bacon.
Nutrition
- Calories: 420
- Sugar: 8
- Sodium: 800
- Fat: 22
- Saturated Fat: 7
- Unsaturated Fat: 12
- Trans Fat: 0
- Carbohydrates: 25
- Fiber: 6
- Protein: 30
- Cholesterol: 120
FAQs
Can I make this recipe ahead of time?
Yes, this recipe can be prepared in advance. It holds up well when stored properly, making it a great make-ahead option.
What are some good substitutions for the main ingredients?
You can easily adapt this recipe by swapping ingredients based on preference or dietary needs. The recipe is versatile and forgiving with substitutions.
How should I store the leftovers?
Store any leftovers in an airtight container in the refrigerator. This recipe keeps well for several days when stored correctly.


