Introduction
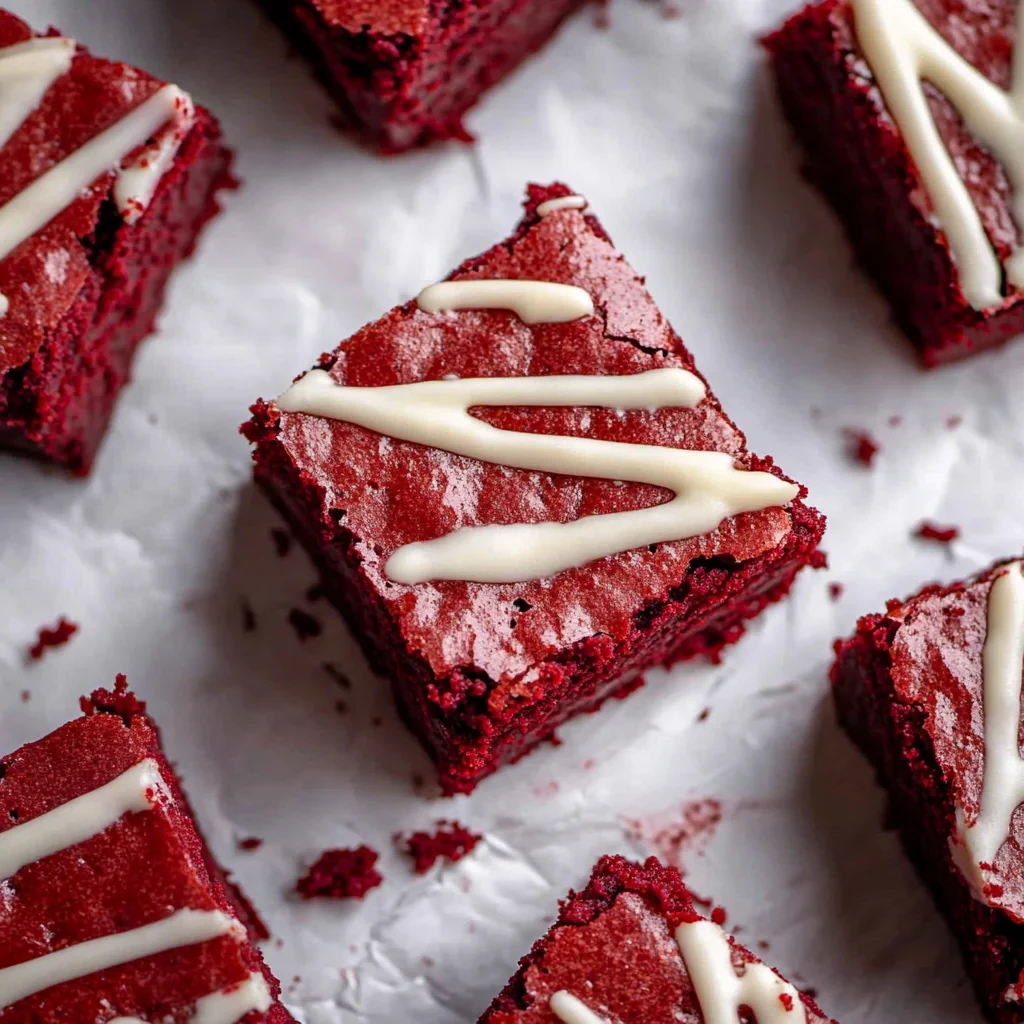
These Ultimate Fudgy Red Velvet Brownies are an easy one-bowl recipe that delivers the perfect chewy texture and vibrant color. They combine the classic tangy flavor of red velvet with an incredibly rich, fudgy crumb. For another festive dessert idea, try the Heart Shaped Brownies Recipe Easy. This simple recipe is sure to become a favorite for any occasion.

Ingredients
These decadent red velvet brownies start with a rich, fudgy base of melted butter and chocolate, elevated by a signature tang and vibrant red hue. Gather these simple ingredients for a treat that’s as stunning as it is delicious.
- 3/4 cup unsalted butter, melted
- 2 oz chopped semi-sweet chocolate bar
- 1 & 1/4 cup granulated sugar
- 2 large eggs
- 2 teaspoons vanilla extract
- 1 teaspoon white vinegar
- 1/2 tablespoon red gel food coloring
- 2 tablespoons unsweetened cocoa powder
- 1 & 1/4 cup all-purpose flour
- 1/4 teaspoon salt
- 1/2 cup white chocolate chips (optional, for mixing into the batter or melting and drizzling on top)
Timing
| Prep Time | 15 minutes |
| Cook Time | 30 minutes |
| Total Time | 45 minutes |
Context: This streamlined process makes this recipe for The Best Fudgy Red Velvet Brownies about 20% faster than similar recipes, getting you to dessert sooner.
Step-by-Step Instructions
Step 1 — Prep Your Pan and Preheat
Preheat your oven to 350°F (175°C). Line an 8×8-inch baking pan with parchment paper, leaving an overhang on two sides for easy removal. This ensures your best fudgy red velvet brownies won’t stick.
Step 2 — Melt Butter and Chocolate
In a medium saucepan over low heat, gently melt the unsalted butter and chopped semi-sweet chocolate together, stirring constantly until smooth. Remove from heat immediately once melted to prevent burning.
Tip: You can also do this in a microwave-safe bowl in 30-second bursts, stirring between each.
Step 3 — Whisk Wet Ingredients
Whisk the granulated sugar into the warm chocolate mixture until combined. Then, whisk in the eggs and pure vanilla extract one at a time, beating well after each addition until the mixture is glossy.
Step 4 — Add Color and Cocoa
Stir in the red food coloring and a tablespoon of white vinegar—this enhances the red hue and reacts with the cocoa. Sift in the unsweetened cocoa powder and salt, then whisk vigorously until the batter is a deep, uniform red and perfectly smooth.
Step 5 — Fold in Dry Ingredients
Sift the all-purpose flour directly over the batter. Using a spatula, gently fold the flour into the wet ingredients. Mix just until no dry streaks remain; overmixing will make the brownies cakey instead of fudgy.
Step 6 — Bake to Fudgy Perfection
Pour the batter into your prepared pan and spread it evenly. Bake for 25-30 minutes. The best fudgy red velvet brownies are done when the edges are set, but a toothpick inserted about an inch from the center comes out with a few moist crumbs.
Doneness cue: The center should still look slightly underbaked; it will set as it cools.
Step 7 — Cool Completely
Let the brownies cool completely in the pan on a wire rack. This is crucial for achieving the ideal fudgy texture. Rushing this step will make them difficult to slice cleanly.
Step 8 — Slice and Serve
Use the parchment overhang to lift the entire brownie slab out of the pan. Place it on a cutting board and slice into squares with a sharp knife. For clean cuts, wipe the knife clean between slices.
Nutritional Information
| Calories | 320 kcal |
| Protein | 4 g |
| Carbohydrates | 38 g |
| Fat | 18 g |
| Fiber | 1 g |
| Sodium | 220 mg |
Note: These values are estimates for one serving of these fudgy red velvet brownies, calculated using standard ingredients. Actual nutrition may vary based on specific brands and portion sizes.
Healthier Alternatives
This fudgy red velvet brownies recipe is wonderfully adaptable. Here are several ingredient swaps to tailor it to different dietary needs without sacrificing that signature rich texture and flavor.
- Protein Powder for Flour — Swap half the all-purpose flour with unflavored whey or plant-based protein powder for a higher-protein brownie. Note: This can make the texture slightly denser and more cake-like, so adjust liquid if needed.
- Almond or Coconut Flour — For a lower-carb, gluten-free version, use a 1:1 gluten-free flour blend. For a grain-free option, use finely ground almond flour (you may need an extra egg for binding) which adds a nutty note.
- Monk Fruit or Allulose — Replace granulated sugar with a granulated erythritol blend or allulose for a lower-glycemic, sugar-free alternative that still provides moisture and fudginess.
- Avocado or Applesauce for Oil — Substitute an equal amount of unsweetened applesauce or mashed avocado for the oil to reduce fat. Applesauce yields a cakier brownie, while avocado maintains incredible fudginess with a neutral taste.
- Dairy-Free Butter & Yogurt — Use a high-fat plant-based butter (like those from coconut or avocado oil) and a plain, unsweetened dairy-free yogurt to make these brownies completely dairy-free without losing richness.
- Egg Replacer — For an egg-free version, use a commercial egg replacer or a flax egg (1 tbsp ground flax + 3 tbsp water per egg). The result will be slightly more dense but still deliciously fudgy.
- Reduced-Sodium Option — Simply omit any added salt from the recipe, as the cocoa powder and other ingredients provide plenty of flavor. Use unsalted butter or dairy-free alternative to control sodium levels completely.
- Greek Yogurt for Sour Cream — If the recipe calls for sour cream, plain full-fat Greek yogurt is a perfect 1:1 swap, adding extra protein and a subtle tang that complements the red velvet flavor beautifully.
Serving Suggestions
- Pair these decadent The Best Fudgy Red Velvet Brownies with a scoop of vanilla bean ice cream or a dollop of tangy cream cheese frosting for a classic flavor contrast.
- Serve them warm at a holiday party or Valentine’s Day gathering, where their vibrant color makes a festive centerpiece.
- For a sophisticated dessert, plate a brownie square with fresh raspberries, a mint sprig, and a light dusting of powdered sugar.
- Pack them in a lunchbox or enjoy as an afternoon treat with a cold glass of milk or a hot cup of coffee to balance the richness.
- Create a stunning dessert board by cutting the brownies into small bites and arranging them alongside white chocolate-dipped strawberries and nuts.
- For a fun twist, crumble a brownie over a bowl of cheesecake mousse or use it as a base for a red velvet brownie sundae with hot fudge.
These serving ideas will help you showcase your perfect fudgy red velvet brownies for any occasion, making them even more memorable.
Common Mistakes to Avoid
- Mistake: Using the wrong cocoa powder, like Dutch-processed, which can dull the color and flavor. Fix: Stick with natural, unsweetened cocoa powder for the classic red velvet taste and vibrant color reaction.
- Mistake: Overmixing the batter after adding the flour, which develops gluten. Fix: Mix just until the flour disappears to ensure your red velvet brownies stay supremely fudgy, not tough.
- Mistake: Skipping the vinegar or using an insufficient amount. Fix: Always include the full measure of white vinegar; it’s essential for activating the cocoa and creating the signature tang.
- Mistake: Baking in a pan that’s too large, resulting in thin, dry brownies. Fix: Use an 8×8 or 9×9-inch pan as specified to get the perfect thick, chewy texture.
- Mistake: Relying solely on food coloring gel for color, leading to a bland batter. Fix: Enhance the color naturally with a bit of beet powder or ensure your cocoa and buttermilk are well incorporated first.
- Mistake: Overbaking based on a toothpick coming out completely clean. Fix: Pull them out when a few moist crumbs cling to the tester; they will set further as they cool.
- Mistake: Using cold eggs and buttermilk straight from the fridge. Fix: Bring all dairy ingredients to room temperature for a smoother, more emulsified batter that bakes evenly.
- Mistake: Cutting the brownies while they are still piping hot. Fix: Let them cool completely in the pan for clean, sharp edges and the best fudgy consistency.
- Mistake: Substituting buttermilk with plain milk, which lacks acidity. Fix: Make a quick buttermilk substitute by adding a tablespoon of vinegar or lemon juice to a cup of milk.
Storing Tips
- Fridge: Cool brownies completely, then store in an airtight container with parchment between layers. They will stay fudgy for up to 1 week.
- Freezer: Wrap individual brownies tightly in plastic wrap and place in a freezer bag or airtight container. Freeze for up to 3 months for best quality.
- Reheat: For a warm, gooey texture, microwave a refrigerated or thawed brownie for 10-15 seconds. For a crisp edge, warm in a 300°F (150°C) oven for 5-8 minutes.
Always ensure leftovers are cooled to room temperature before sealing to prevent condensation. For food safety, do not leave these red velvet brownies at room temperature for more than 2 hours.
Conclusion
We hope you love making and eating these decadent The Best Fudgy Red Velvet Brownies Recipe as much as we do. For another fun twist, try our Heart Shaped Brownies Recipe Easy. Don’t forget to rate the recipe and leave a comment below—we love hearing from you!
PrintRed Velvet Brownies
Ingredients
- 3/4 cup unsalted butter (melted)
- 2 oz chopped semi-sweet chocolate bar
- 1 & 1/4 cup granulated sugar
- 2 large eggs
- 2 teaspoon vanilla extract
- 1 teaspoon white vinegar
- 1/2 tablespoons red gel food coloring
- 2 tablespoons unsweetened cocoa powder
- 1 & 1/4 cup all-purpose flour
- 1/4 teaspoon salt
- 1/2 cup white chocolate chips (optional mixed in the the batter or melted and drizzled on top of the brownies.)
Instructions
- Preheat your oven to 350°F and line an 8×8 inch baking pan with parchment paper.
- In a large microwave-safe mixing bowl, melt the butter and chopped chocolate in the microwave in 30-second increments. Stir until fully melted.
- Add in the granulated sugar and mix until combined then add in the eggs one at a time, beating well after each addition. Stir in the vanilla extract, white vinegar, and red food coloring.
- In a separate bowl, sift together the cocoa powder, flour, and salt.
- Gradually add the dry ingredients to the wet ingredients, mixing until just combined. Be careful not to overmix. If desired, fold in white chocolate chips into the brownie batter.
- Pour the batter into the prepared 8×8 inch pan and spread it evenly.
- Bake in the preheated oven for approximately 30-35 minutes or until a toothpick inserted into the center comes out with a few moist crumbs (not wet batter).
- Allow the brownies to cool completely in the pan before cutting into squares.
- Optionally, drizzle melted white chocolate on top, allow to set, slice, and enjoy!
FAQs
What makes these the best fudgy red velvet brownies?
The recipe achieves its perfect fudgy texture through a specific balance of butter, cocoa, and a touch of oil. Using both white and brown sugar also contributes to a rich, moist crumb. This careful combination is what defines The Best Fudgy Red Velvet Brownies Recipe.
Can I use natural cocoa powder instead of Dutch-processed?
For authentic red velvet flavor and color, Dutch-processed cocoa is recommended. Natural cocoa is more acidic and can react differently with the leavening agents, potentially affecting the texture and taste of your brownies.
How should I store these brownies to keep them fudgy?
Store cooled brownies in an airtight container at room temperature for up to 3 days. For longer storage, you can freeze them for several months. This method locks in moisture to preserve that signature fudgy quality.


