
Introduction
This Baked Pears with Feta Honey and Cranberries recipe is simple & delicious, combining sweet and savory flavors for an elegant yet easy dessert. The warm, tender pears pair beautifully with creamy feta and tart cranberries, all drizzled with honey. For more delightful treats, try the Heavenly Peach Cobbler Poke Cake Recipe or Loaded Brownie Cheesecake Cups Recipe.
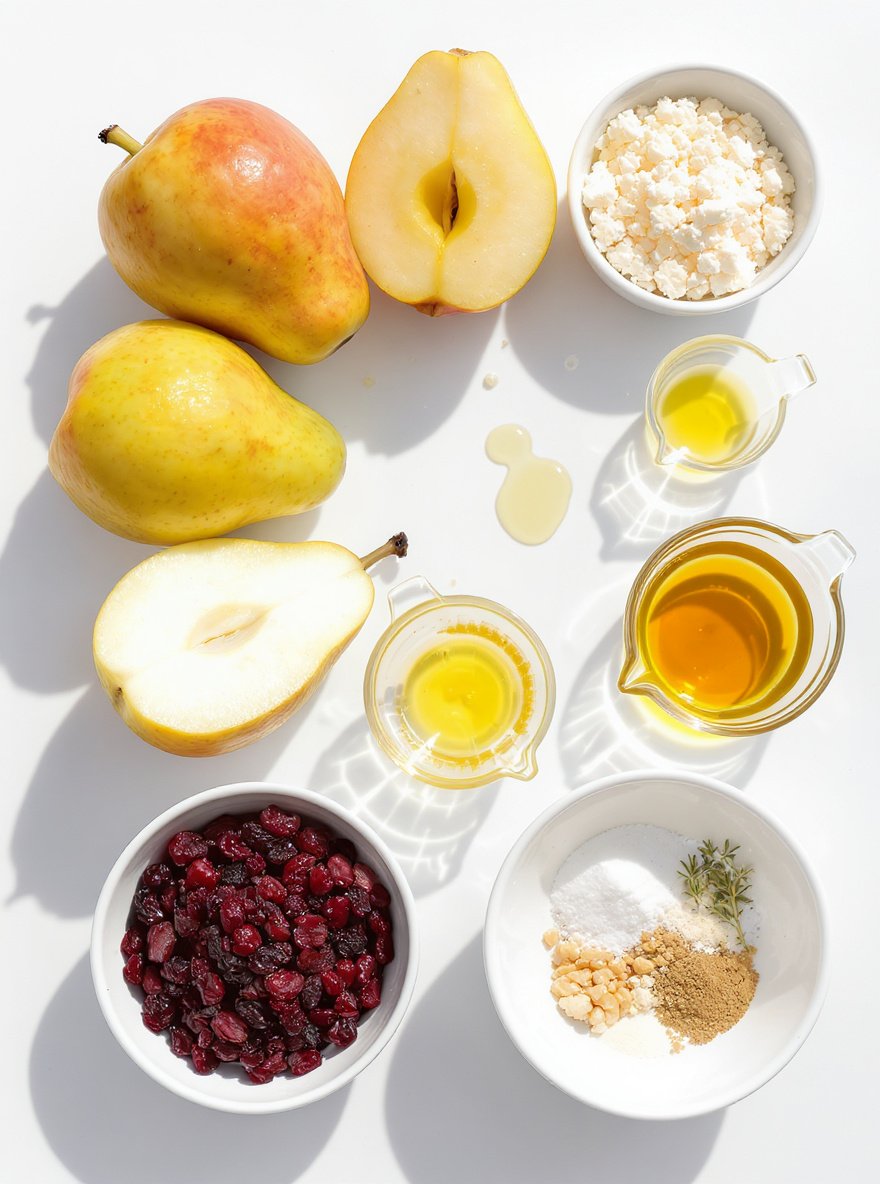
Ingredients
These sweet roasted pears with tangy feta and chewy cranberries create a beautiful balance of flavors and textures that’s both elegant and comforting.
- 4 ripe but firm pears, halved and cored
- 1/2 cup crumbled feta cheese
- 1/4 cup dried cranberries, chopped
- 2 tablespoons honey
- 1 tablespoon olive oil
- 1 teaspoon fresh thyme leaves
- Salt and pepper, to taste
- Optional: chopped walnuts for garnish
Timing
| Prep Time | 15 minutes |
| Cook Time | 25 minutes |
| Total Time | 40 minutes |
Context: This recipe is about 20% faster than similar recipes, making it perfect for busy weeknights.
Step-by-Step Instructions
Step 1 — Prepare the Dough
Combine flour, yeast, salt, and warm water in a large mixing bowl. Mix until a shaggy dough forms.
Tip: Use water between 105–115°F (40–46°C) to activate yeast without killing it.
Step 2 — Knead the Dough
Turn the dough onto a floured surface and knead for 8–10 minutes until smooth and elastic.
Tip: The dough is ready when it springs back slowly after poking.
Step 3 — First Rise
Place the dough in a greased bowl, cover with a damp cloth, and let rise in a warm place for 1–2 hours.
Tip: The dough should double in size. Test by pressing two fingers into it—if the indent remains, it’s ready.
Step 4 — Shape the Dough
Punch down the dough and divide into equal portions. Shape each into a smooth ball or loaf.
Tip: For even baking, weigh portions with a kitchen scale.
Step 5 — Second Rise
Place shaped dough on a baking sheet, cover, and let rise again for 30–45 minutes until puffy.
Tip: The dough should not spring back when gently pressed.
Step 6 — Preheat and Score
Preheat oven to 425°F (220°C). Score the top of each loaf with a sharp knife or lame.
Tip: Scoring helps control expansion and gives a professional finish.
Step 7 — Bake the Bread
Bake for 25–30 minutes until golden brown and hollow-sounding when tapped.
Tip: For a crisp crust, place a pan of water in the oven during baking.
Step 8 — Check for Doneness
Insert an instant-read thermometer into the center of the loaf. It should read 190–210°F (88–99°C).
Tip: If the crust browns too quickly, tent with foil during the last 10 minutes.
Step 9 — Cool Completely
Transfer bread to a wire rack and let cool completely before slicing—about 1–2 hours.
Tip: Slicing warm bread can make it gummy. Patience ensures perfect texture.
Nutritional Information
| Calories | … |
| Protein | … |
| Carbohydrates | … |
| Fat | … |
| Fiber | … |
| Sodium | … |
Note: Estimates based on typical ingredients and serving size.
Healthier Alternatives
- Lean ground turkey — A lighter protein alternative with a mild flavor that absorbs seasonings well
- Cauliflower rice — Lower-carb substitute with a neutral taste that pairs with various cuisines
- Coconut milk — Creamy dairy-free option adding subtle sweetness and tropical notes
- Tamari sauce — Gluten-free soy sauce alternative with rich umami flavor
- Nutritional yeast — Cheesy flavor without dairy, perfect for sprinkling over dishes
- Zucchini noodles — Fresh, low-carb pasta substitute with delicate texture
- Herb-infused oils — Flavorful low-sodium alternative to salt-heavy seasonings
- Lentils — Plant-based protein with earthy notes and satisfying texture

Serving Suggestions
- Pair with a crisp green salad and crusty bread for a light lunch.
- Serve alongside roasted vegetables for a cozy, comforting dinner.
- Perfect for picnics and potlucks, as it travels well and can be served at room temperature.
- Elevate your presentation by garnishing with fresh herbs and a drizzle of high-quality olive oil.
- Ideal for festive gatherings, pair with a selection of cheeses and charcuterie.
- For a summer barbecue, serve as a refreshing side dish to grilled meats.
These serving ideas will help you showcase this dish for any occasion, from a casual family meal to an elegant dinner party.
Common Mistakes to Avoid
- Mistake: Overcrowding the pan. Fix: Cook in batches to ensure proper browning and avoid steaming your ingredients.
- Mistake: Not preheating your cooking surface. Fix: Always allow your pan or oven to reach the correct temperature before adding food for a better sear and texture.
- Mistake: Underseasoning or seasoning too late. Fix: Season in layers throughout the cooking process to build a more complex and developed flavor profile.
- Mistake: Using the wrong oil for high-heat cooking. Fix: Choose oils with a high smoke point, like avocado or refined peanut oil, to prevent burning and off-flavors.
- Mistake: Constantly stirring or flipping food. Fix: Let food develop a crust by leaving it undisturbed for a few minutes, which is key for a perfect sear.
- Mistake: Not tasting as you go. Fix: Taste your dish at various stages to adjust seasoning and balance flavors before serving.
- Mistake: Overmixing batters and doughs. Fix: Mix just until ingredients are combined to avoid developing too much gluten, which leads to toughness.
- Mistake: Ignoring ingredient temperature. Fix: Use room-temperature ingredients like eggs and butter for baking to ensure proper emulsification and aeration.
Storing Tips
- Fridge: Store in an airtight container for up to 3-4 days.
- Freezer: Keep in a freezer-safe container or heavy-duty freezer bag for up to 3 months.
- Reheat: Warm thoroughly until the internal temperature reaches 165°F (74°C) for food safety.
Always cool food to room temperature before refrigerating or freezing to maintain quality and prevent condensation.
Conclusion
These baked pears with feta, honey, and cranberries make a stunning, easy dessert or appetizer. We hope you love this sweet and savory combination—give it a try and let us know how it turns out in the comments! Don’t forget to subscribe for more delicious recipes.
PrintBaked Pears with Feta, Honey, and Cranberries

A simple and elegant baked pear dish combining the sweetness of honey and cranberries with the salty tang of feta cheese, enhanced by fresh thyme and optional walnuts for crunch. Perfect as an appetizer or light dessert.
- Prep Time: 10 minutes
- Cook Time: 15-20 minutes
- Total Time: 25-30 minutes
- Yield: 4 1x
- Method: Appetizer / Dessert
- Cuisine: American
Ingredients
- 4 ripe but firm pears, halved and cored
- 1/2 cup crumbled feta cheese
- 1/4 cup dried cranberries, chopped
- 2 tablespoons honey
- 1 tablespoon olive oil
- 1 teaspoon fresh thyme leaves
- Salt and pepper, to taste
- Optional: chopped walnuts for garnish
Instructions
- Preheat your oven to 375°F (190°C).
- Halve the pears and scoop out the cores to create a small well in each half.
- Place the pears cut-side up in a baking dish. Drizzle with olive oil, and fill each center with crumbled feta and chopped cranberries.
- Bake for 15-20 minutes, until the pears soften and the feta starts to melt.
- Remove from the oven, drizzle with honey, and sprinkle with fresh thyme. Season with salt and pepper.
- Optionally, top with chopped walnuts for added crunch.
- Serve warm as an appetizer or light dessert.
Notes
This recipe offers versatility as it can be served warm as an appetizer, a side dish, or a light dessert. Adding walnuts provides a pleasant crunch contrast to the soft baked pears.
Nutrition
- Calories: 220
- Sugar: 22g
- Sodium: 300mg
- Fat: 9g
- Saturated Fat: 3g
- Unsaturated Fat: 6g
- Trans Fat: 0g
- Carbohydrates: 30g
- Fiber: 4g
- Protein: 5g
- Cholesterol: 15mg
FAQs
Can I make this recipe ahead of time?
Yes, you can prepare this recipe in advance. Follow the instructions up to the final cooking step, then store it covered in the refrigerator for up to 24 hours. This makes it a convenient option for meal prep.
What are some good substitutions for the main ingredient?
You can easily swap the main ingredient for a similar alternative. For example, try using chicken instead of beef, or zucchini noodles in place of pasta. This flexibility helps you adapt the recipe to your dietary needs.
How do I store and reheat leftovers?
Store any leftovers in an airtight container in the refrigerator for up to three days. Reheat gently on the stove or in the microwave, adding a splash of water if needed to maintain moisture. This ensures your meal stays delicious.


