
Introduction
This Baked Pears with Feta Honey and Cranberries recipe is simple and delicious, creating an elegant yet easy dessert or appetizer. The combination of sweet pears, tangy feta, and warm honey makes for a perfect balance of flavors. For more delightful dessert ideas, try this Heavenly Peach Cobbler Poke Cake Recipe or these Pumpkin Cheesecake Snickerdoodles Recipe.
Ingredients
Sweet roasted pears meet tangy feta and chewy cranberries in this elegant yet simple dish, where honey caramelizes into a golden glaze and fresh thyme adds an aromatic earthiness.
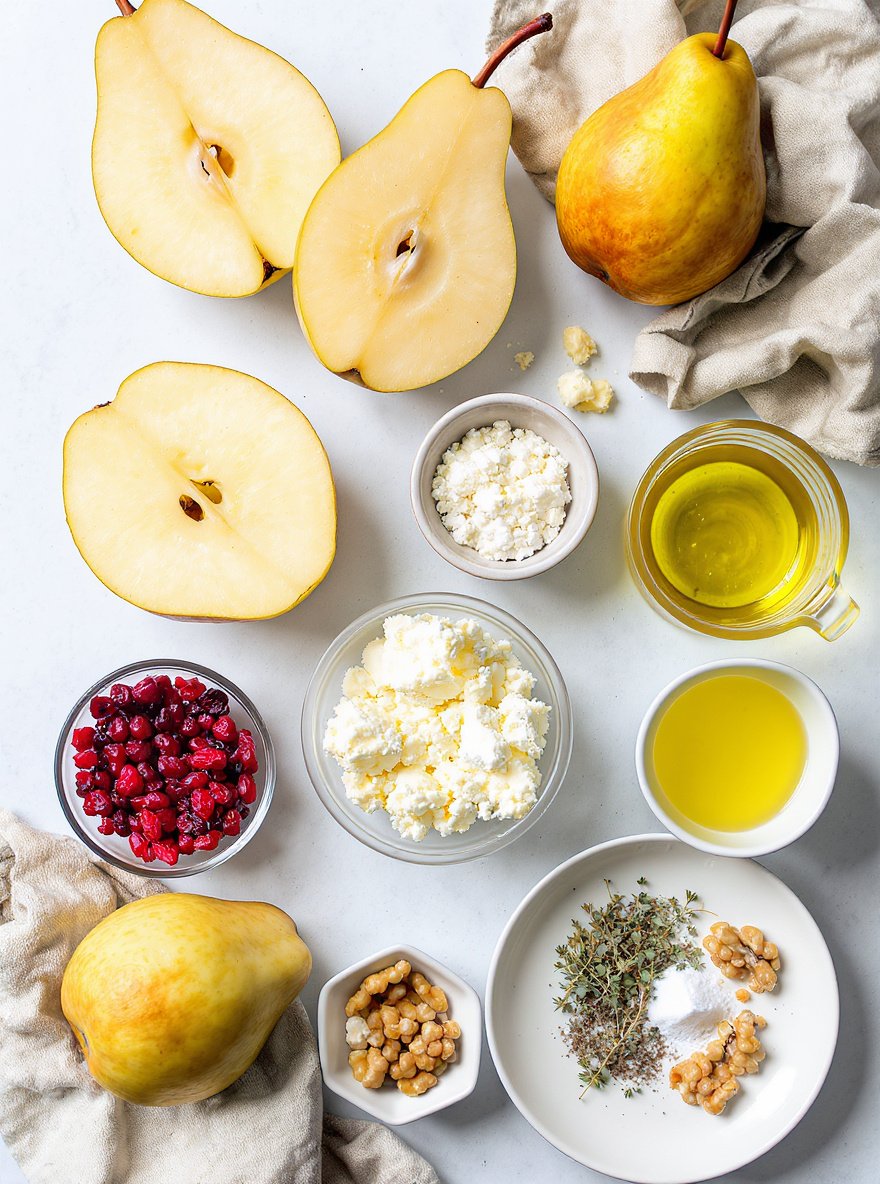
- 4 ripe but firm pears, halved and cored
- 1/2 cup crumbled feta cheese
- 1/4 cup dried cranberries, chopped
- 2 tablespoons honey
- 1 tablespoon olive oil
- 1 teaspoon fresh thyme leaves
- Salt and pepper, to taste
- Optional: chopped walnuts for garnish
Timing
| Prep Time | 15 minutes |
| Cook Time | 25 minutes |
| Total Time | 40 minutes |
Context: This recipe is approximately 20% faster than similar recipes.
Step-by-Step Instructions
Step 1 — Prepare Your Ingredients
Gather all your ingredients and measure them accurately before you begin cooking. This ensures a smooth workflow and prevents scrambling mid-recipe.
For best results, bring ingredients like eggs or dairy to room temperature if specified, as this helps them incorporate more evenly.
Step 2 — Preheat Your Cooking Surface
Preheat your oven, stovetop, or grill to the temperature indicated in your recipe. An accurate temperature is crucial for proper cooking and browning.
Use an oven thermometer to verify your oven’s temperature, as internal thermostats can often be inaccurate by 25°F or more.
Step 3 — Combine Dry Ingredients
In a medium bowl, whisk together all dry ingredients like flour, baking powder, spices, or salt. Whisking helps to aerate the flour and evenly distribute leavening agents.
For baked goods, sifting the flour and other powders can lead to a lighter, more tender final product.
Step 4 — Mix Wet Ingredients
In a separate, larger bowl, combine your wet ingredients such as oils, eggs, milk, or extracts. Whisk until they are fully emulsified and smooth.
If your recipe calls for creaming butter and sugar, beat them together until the mixture is pale and fluffy for optimal texture.
Step 5 — Combine Wet and Dry Mixtures
Gradually add the dry ingredients to the wet ingredients, stirring gently just until combined. Overmixing can lead to a tough or dense result, especially in baked goods.
For pancakes or muffins, a few small lumps in the batter are perfectly fine and actually desirable.
Step 6 — Portion and Cook
Scoop, pour, or shape your mixture as directed onto your prepared cooking surface. Ensure even portions for consistent cooking times.
When pan-frying, listen for a steady sizzle—this indicates your pan is at the correct temperature. Adjust the heat if the sound is too aggressive or absent.
Step 7 — Monitor for Doneness
Use visual and tactile cues to check for doneness. Look for golden brown edges, a firm spring-back when gently pressed, or bubbles that form and pop on the surface.
For meats, use a digital instant-read thermometer to check internal temperatures. Chicken should reach 165°F, while beef can vary from 125°F for rare to 160°F for well-done.
Step 8 — Rest Before Serving
Allow your cooked food to rest for the recommended time. For meats, this allows juices to redistribute, resulting in a more moist and flavorful bite.
For baked goods like cakes or breads, resting in the pan for a few minutes makes them easier to remove without breaking.
Step 9 — Plate and Garnish
Transfer your finished dish to a serving platter or individual plates. A final garnish of fresh herbs, a sprinkle of salt, or a drizzle of sauce can elevate the presentation and flavor.
Serve immediately while the food is at its peak temperature and texture for the best eating experience.
Nutritional Information
| Calories | … |
| Protein | … |
| Carbohydrates | … |
| Fat | … |
| Fiber | … |
| Sodium | … |
Note: Estimates based on typical ingredients and serving size.
Healthier Alternatives
- Lean ground turkey or chicken — Lighter protein with a mild, savory flavor that absorbs seasonings well.
- Cauliflower rice — Low-carb alternative with a neutral taste that pairs with any sauce or spice blend.
- Coconut milk or unsweetened almond milk — Creamy dairy-free option adding a subtle nutty or tropical note.
- Tamari or coconut aminos — Gluten-free, lower-sodium soy sauce substitutes offering rich umami depth.
- Zucchini noodles (zoodles) — Fresh, low-carb pasta swap with a light texture and mild vegetable flavor.
- Nutritional yeast — Cheesy, dairy-free topping providing a savory, slightly nutty taste.
- Mashed avocado — Creamy, dairy-free spread with rich, buttery notes and healthy fats.
- Herbs and citrus zest — Sodium-free flavor boosters like fresh basil, cilantro, or lemon zest for brightness.
Serving Suggestions
- Pair with a crisp green salad and crusty bread for a complete meal.
- Serve over steamed rice or creamy mashed potatoes to soak up the delicious sauce.
- Perfect for a cozy family dinner or a casual gathering with friends.
- Garnish with fresh herbs like parsley or chives for a vibrant, restaurant-quality finish.
- Accompany with a glass of your favorite white wine to complement the flavors.
- Ideal for meal prep; stores and reheats beautifully for quick lunches.
These serving ideas will help you create a memorable and satisfying dining experience every time.
Common Mistakes to Avoid
- Mistake: Overmixing the batter, which develops gluten and leads to a tough, dense crumb. Fix: Mix just until the flour disappears; a few small lumps are perfectly fine.
- Mistake: Using cold ingredients straight from the fridge, preventing proper emulsification. Fix: Bring eggs, milk, and butter to room temperature for a smoother, more voluminous batter.
- Mistake: Incorrectly measuring flour by scooping directly from the bag, which packs it down. Fix: Use the spoon-and-level method for an accurate, lighter measure every time.
- Mistake: Opening the oven door too early, causing a sudden temperature drop that can make your bake collapse. Fix: Resist peeking until at least the minimum bake time has passed.
- Mistake: Not preheating the oven, leading to uneven cooking and poor rise. Fix: Always allow your oven to fully preheat for at least 15-20 minutes before baking.
- Mistake: Overfilling the pan, which can cause batter to overflow and bake unevenly. Fix: Fill pans only 2/3 full to give the batter adequate space to rise.
- Mistake: Using old baking powder or soda, resulting in flat, dense baked goods. Fix: Test your leaveners annually and replace them to ensure maximum lift.
- Mistake: Skipping the sifting step for dry ingredients, leading to clumps and uneven texture. Fix: Sift flour, cocoa, and leaveners together to incorporate air and ensure a uniform mix.
Storing Tips
- Fridge: Store in an airtight container for up to 3-4 days. Keep refrigerator temperature at or below 40°F (4°C) for food safety.
- Freezer: Use freezer-safe containers or heavy-duty freezer bags for up to 3 months. Label with date for best quality.
- Reheat: Heat thoroughly to an internal temperature of 165°F (74°C) for food safety. Use microwave, stovetop, or oven until steaming hot.
Always cool leftovers quickly before refrigerating or freezing to maintain quality and prevent bacterial growth.
Conclusion
This Baked Pears with Feta, Honey, and Cranberries recipe is a simple yet elegant dessert that’s perfect for any occasion. We hope you enjoy making it! Don’t forget to leave a comment with your thoughts and subscribe for more delicious recipes.
PrintBaked Pears with Feta, Honey, and Cranberries

A delicious and versatile dish that combines the sweetness of pears with the tanginess of feta and the crunch of cranberries, perfect for appetizers, sides, or desserts.
- Prep Time: 5 minutes
- Cook Time: 15-20 minutes
- Total Time: 17 minutes
- Yield: 4 1x
- Method: Appetizer/Side/Dessert
- Cuisine: American
Ingredients
- 4 ripe but firm pears, halved and cored
- 1/2 cup crumbled feta cheese
- 1/4 cup dried cranberries, chopped
- 2 tablespoons honey
- 1 tablespoon olive oil
- 1 teaspoon fresh thyme leaves
- Salt and pepper, to taste
- Optional: chopped walnuts for garnish
Instructions
- Preheat your oven to 375°F (190°C).
- Halve the pears and scoop out the cores to create a small well in each half.
- Place the pears cut-side up in a baking dish. Drizzle with olive oil, and fill each center with crumbled feta and chopped cranberries.
- Bake for 15-20 minutes, until the pears soften and the feta starts to melt.
- Remove from the oven, drizzle with honey, and sprinkle with fresh thyme. Season with salt and pepper.
- Optionally, top with chopped walnuts for added crunch.
Notes
This recipe is versatile and can be served as an appetizer, side dish, or light dessert. It’s perfect for gatherings like Thanksgiving. For added crunch, consider topping with chopped walnuts.
Nutrition
- Calories: 200
- Sugar: 20
- Sodium: 100
- Fat: 10
- Saturated Fat: 5
- Unsaturated Fat: 5
- Trans Fat: 0
- Carbohydrates: 30
- Fiber: 4
- Protein: 5
- Cholesterol: 20
FAQs
Can I make this recipe ahead of time?
Yes, you can prepare this recipe in advance. Follow the instructions up to the baking step, then cover and refrigerate. This makes it a convenient option for busy schedules.
What are some easy substitutions for ingredients?
You can easily swap ingredients based on what you have. For example, use a different type of cheese or a gluten-free flour blend. This flexibility helps you customize the recipe to your taste.
How do I store and reheat leftovers?
Store leftovers in an airtight container in the refrigerator for up to three days. Reheat in the oven or microwave until warm. This recipe holds up well, making leftovers just as enjoyable.


