What If I Told You The World’s Most Beloved Dessert Is Also The Easiest To Make?
It’s a bold statement, I know. But consider this: a recent survey of home bakers revealed that over 75% cite pie crust as their number one baking fear. The anxiety of a soggy bottom or a tough, overworked dough keeps so many from experiencing the pure joy of a fruit dessert fresh from the oven. But what if you could capture that same cozy, cinnamon-spiced magic without ever touching a rolling pin?
That’s the beautiful secret of this Easy Apple Crumble Recipe. It’s the classic homemade dessert that delivers all the warmth and nostalgia of a pie, but with a fraction of the effort and a whole lot more forgiving, buttery crunch. It’s the dessert that says “I made this with love” without requiring a full afternoon and a degree in pastry arts.
For me, the scent of apples and cinnamon bubbling away in the oven is the very essence of autumn. It’s the smell of coming home, of pulling on a chunky knit sweater, and of gathering around the table with people you love. This recipe is my go-to for impromptu gatherings, for soothing a long day, or for simply celebrating the glorious abundance of apple season. It’s unpretentious, deeply satisfying, and truly, blissfully simple. Let’s gather our ingredients and create some of that magic together.
PrintClassic Apple Crumble
A warm and comforting dessert featuring sweet spiced apples topped with a buttery crumble topping.
Ingredients
For the Crust:
- 6 medium apples, peeled and sliced
- 1/2 cup granulated sugar
- 1 tsp ground cinnamon
- 1/4 tsp ground nutmeg
- 1 cup all-purpose flour
- 1/2 cup rolled oats
- 3/4 cup brown sugar
- 1/2 cup cold butter, cubed
- 1/4 tsp salt
Instructions
1. Prepare the Crust:
- Preheat oven to 375°F (190°C). Grease a 9-inch baking dish.
- In a large bowl, combine apples, granulated sugar, cinnamon, and nutmeg. Transfer to prepared baking dish.
- In another bowl, mix flour, oats, brown sugar, and salt. Cut in butter until mixture resembles coarse crumbs.
- Sprinkle crumble mixture evenly over apples.
- Bake for 30-35 minutes until topping is golden and apples are tender. Serve warm.
Notes
You can customize the seasonings to taste.
The Ingredients for a Little Slice of Comfort
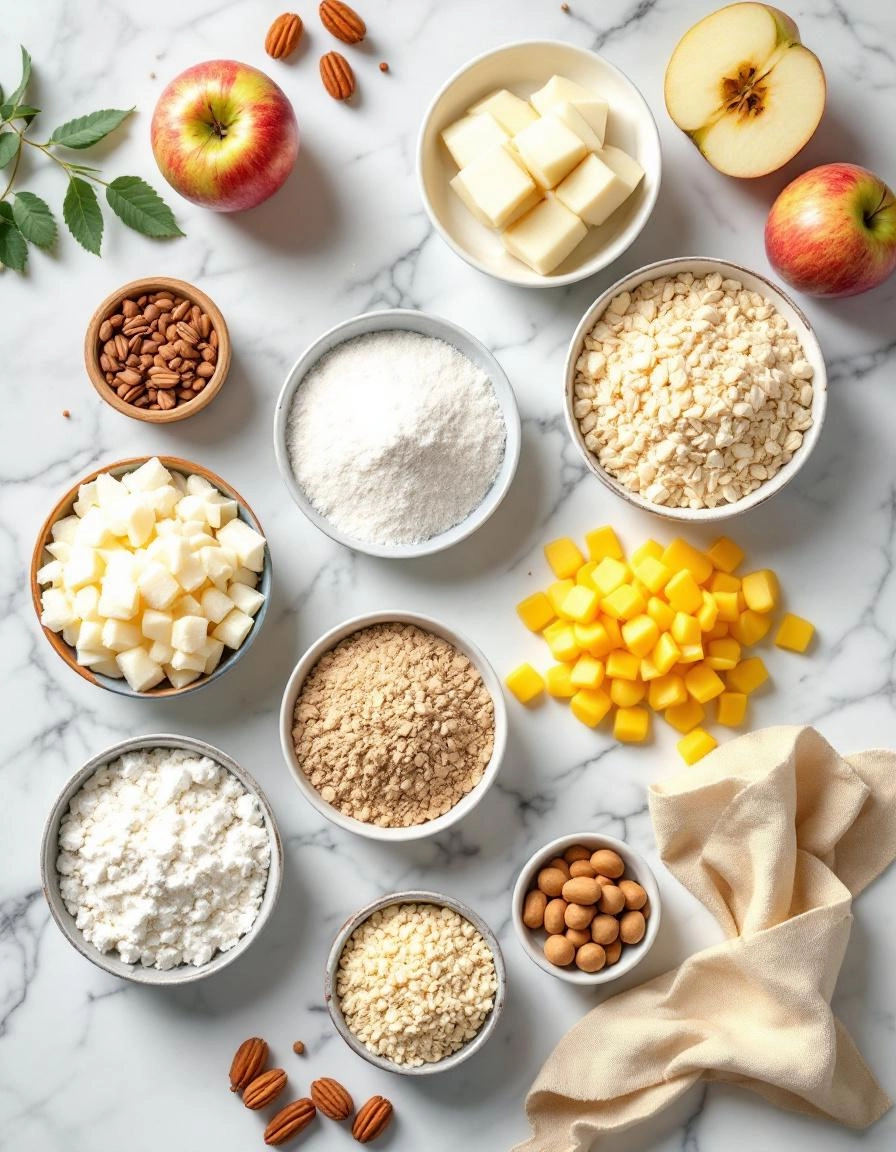
There’s something so wonderfully simple about the ingredients for an apple crumble. It’s the kind of recipe where you can peek into your pantry and fruit bowl and feel a wave of reassurance. You likely have most of this on hand already. Let’s gather our cozy-making supplies.
For the Apple Filling:
- 6-7 medium apples – I’m a firm believer in using a mix for the best flavor and texture. I love the tartness of Granny Smith paired with the honeyed sweetness of a Fuji or Honeycrisp. It creates a perfect balance that isn’t too sugary.
- 1/3 cup granulated sugar – This is just enough to coax out the natural juices of the apples and create that glorious syrupy base.
- 1 tablespoon all-purpose flour – Our little secret thickener! This ensures the filling isn’t runny and clings beautifully to every apple slice.
- 1 teaspoon ground cinnamon – Is there any scent more welcoming than cinnamon and apples warming together? It’s the very soul of this dessert.
- A pinch of fine sea salt – Never, ever skip the salt. It makes all the other flavors pop and sing.
- 1 tablespoon fresh lemon juice – A quick squeeze over the sliced apples keeps them from browning and adds a tiny, bright note that cuts through the richness.
For the Crumble Topping:
- 1 cup old-fashioned rolled oats – This is what gives our topping that fabulous, nubby, chewy-crisp texture. It’s a non-negotiable for me!
- 3/4 cup all-purpose flour – The foundation of our crumble, holding all the buttery goodness together.
- 3/4 cup packed light brown sugar – This is where the deep, caramel-like flavor comes from. Pack it firmly into your measuring cup for the perfect amount.
- 1/2 teaspoon ground cinnamon – Because a little more cinnamon is always a good idea.
- 1/2 cup (1 stick) cold unsalted butter, cubed – Cold is the key word here, my dear! Straight from the fridge. This is what creates those perfect, pebbly crumbs rather than a pasty dough.
Let’s Make Some Magic
Now for the fun part—the part that fills your kitchen with the most incredible aroma. This is less about precision and more about feeling. Put on some soft music, and let’s begin.
Step 1: Preheat your oven to a toasty 375°F (190°C). Grab a 9-inch pie dish or an 8×8 baking dish. There’s no need to grease it; the butter in the topping will take care of that beautifully.
Step 2: Let’s prepare the apples. Peel, core, and slice them into pieces about 1/4-inch thick. I find a bit of thickness gives a lovely substantial bite. As you slice, toss them into a large bowl and drizzle with the lemon juice, giving them a gentle stir to coat. This little trick keeps them looking fresh and pretty.
Step 3: Sprinkle the granulated sugar, 1 tablespoon of flour, teaspoon of cinnamon, and that all-important pinch of salt over the apples. Now, use your hands or a spoon to toss everything together until every single apple slice is glistening and coated in the spiced sugar. Pour this fragrant mixture into your waiting baking dish and spread it into a somewhat even layer. Don’t press it down too much; we want little pockets for the steam to escape.
Step 4: Time for the crowning glory—the crumble! In a medium bowl, whisk together the oats, flour, brown sugar, and remaining 1/2 teaspoon of cinnamon. Take your cold, cubed butter and scatter it over the top.
Now, here’s my favorite tip: use your fingertips to rub the butter into the dry ingredients. Work quickly so the butter doesn’t warm up. You want to press and fluff the mixture between your fingers until it starts to clump together in various sizes—from sandy grains to lovely pea-sized nuggets. Those bigger clumps are pure gold; they’ll bake up into crispy, buttery bits. You can also use a pastry cutter, but I find fingers work best for that rustic texture.
Sprinkle this glorious crumble mixture evenly over the apples, covering them right to the edges. Don’t pack it down! We want it loose and craggy.
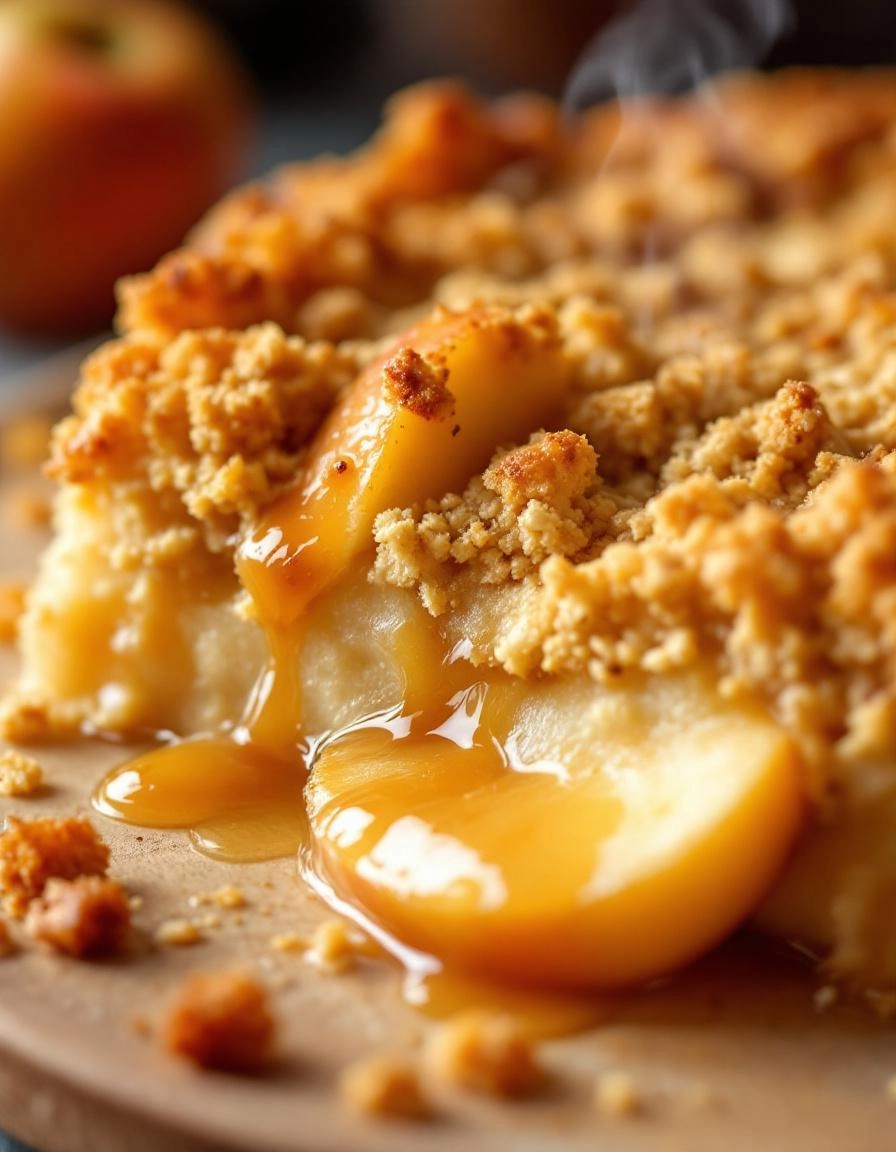
There’s something truly magical about pulling a bubbling, golden-brown apple crumble from the oven. The sweet, cinnamon-spiced aroma fills your kitchen, promising a cozy and comforting end to any meal. Now that you’ve got the basic recipe down, let’s talk about how to make it truly your own.
Pro Tips for the Perfect Crumble Every Time
A great crumble is about texture and balance. Here are a few secrets I’ve learned along the way:
- Cold Butter is Key: For the most irresistible, crunchy topping, make sure your butter is very cold. I even pop my cubed butter into the freezer for 10 minutes before rubbing it into the flour.
- Let it Rest: I know it’s hard, but let your crumble sit for 15-20 minutes after it comes out of the oven. This allows the juicy filling to thicken up just enough so it doesn’t run all over your plate.
- Mix Your Apples: Using a combination of tart (like Granny Smith) and sweet (like Honeycrisp or Fuji) apples creates a much more complex and delicious flavor.
Delicious Variations & Substitutions
Don’t be afraid to play with this recipe! It’s wonderfully adaptable.
- Gluten-Free: Simply swap the all-purpose flour for a 1:1 gluten-free baking blend. The result is just as delicious.
- Vegan: Use a plant-based butter or solid coconut oil and maple syrup instead of brown sugar to keep it vegan-friendly.
- Fruit Swaps: Try this with pears, peaches, or a mix of berries. If using very juicy fruit like berries, toss them with an extra tablespoon of flour to prevent a soupy filling.
- Spice It Up: A pinch of nutmeg, cardamom, or even a dash of black pepper can add a wonderful warm depth to the filling.
- Oat Lover’s Topping: Add ½ cup of rolled oats to your crumble topping mixture for an extra chewy, hearty texture.
What to Serve With Your Warm Apple Crumble
While this dessert is sublime all on its own, a little accompaniment takes it to another level. My absolute favorite is a generous scoop of vanilla bean ice cream. The way the cold, creamy ice cream melts into the warm, spiced apples is pure heaven. For a lighter option, a dollop of softly whipped cream or a drizzle of thick custard is equally wonderful. For a special breakfast treat, I’ve even been known to enjoy a small portion with a spoonful of Greek yogurt!
The Benefits of Baking from Scratch
Beyond the incredible taste, baking a homemade apple crumble feeds the soul. It’s a simple act of creating something with your own hands to share with people you love. There are no mysterious preservatives—just honest, wholesome ingredients. It fills your home with a welcoming scent that says, “You are home.” And perhaps best of all, it teaches a beautiful lesson in simplicity; some of life’s greatest pleasures come from the humblest of ingredients.
Real-Life Tips from My Kitchen to Yours
- If your crumble topping is browning too quickly, just lay a loose piece of aluminum foil over the top for the remainder of the baking time.
- No lemon for the apples? A tablespoon of orange juice will work in a pinch to prevent browning and add a bright note.
- This is the perfect dessert to make with kids. They love mixing the crumble topping with their hands and arranging the apple slices.
- Don’t have a fancy baking dish? Any oven-safe skillet, pie plate, or even a 8×8 square pan will work perfectly.
I hope this recipe becomes a cherished part of your family’s tradition, just as it is in mine. Happy baking!

Conclusion
And there you have it—the ultimate guide to creating a warm, comforting, and utterly delicious classic apple crumble. This recipe is all about celebrating simple ingredients, embracing a little bit of rustic charm, and filling your home with the most incredible aroma. The sweet, tender apples paired with that buttery, crunchy topping is a combination that never fails to delight. It’s the perfect dessert for a cozy night in, a family gathering, or whenever you need a little taste of homemade comfort.
I truly hope this recipe becomes a cherished favorite in your home, just like it is in mine. I’d love to hear how your crumble turns out! Did you add a secret spice? Serve it with a giant scoop of vanilla ice cream? Share your creations and feedback with me in the comments below. And if you’re looking for more easy, heartwarming desserts, be sure to explore our other recipes like our Simple Vanilla Pound Cake or Mixed Berry Cobbler. Happy baking!
FAQs
Can I use a different type of apple?
Absolutely! While Granny Smith apples are my go-to for their tartness and firm texture, you can use a mix for more complex flavor. Try combining Granny Smith with a sweeter, softer apple like Honeycrisp or Braeburn. Just avoid very mushy varieties like Red Delicious, as they can become too soft during baking.
Can I make this apple crumble ahead of time?
Yes, you can prepare it in advance for stress-free entertaining. Assemble the entire crumble in your baking dish, cover it tightly with plastic wrap, and refrigerate for up to 24 hours before baking. You might need to add a few extra minutes to the baking time since it will be going into the oven cold.
My crumble topping isn’t crispy. What did I do wrong?
The most common culprit is not using cold enough butter. For the perfect crunchy, crumbly texture, your butter must be very cold when you mix it into the flour. If your kitchen is particularly warm, you can even pop the mixed topping in the fridge for 15 minutes before sprinkling it over the apples to help keep the butter firm.
How should I store leftovers?
Leftovers (if you have any!) can be covered with foil or transferred to an airtight container and kept in the refrigerator for up to 3 days. Reheat it in the oven at 350°F (175°C) for about 10-15 minutes to help the topping crisp back up. The microwave will work in a pinch, but it will soften the topping.
Can I freeze apple crumble?
You can! The baked crumble freezes beautifully. Let it cool completely, then wrap the entire dish tightly in a layer of plastic wrap followed by a layer of foil. Freeze for up to 3 months. Thaw overnight in the refrigerator and reheat in a 350°F (175°C) oven until warmed through.
Is this recipe easily adaptable for dietary restrictions?
It certainly is! For a gluten-free version, simply substitute the all-purpose flour in the topping with your favorite 1:1 gluten-free flour blend. To make it dairy-free, use a plant-based butter alternative and ensure your sugar is certified vegan. The results are just as delicious!


