Introduction
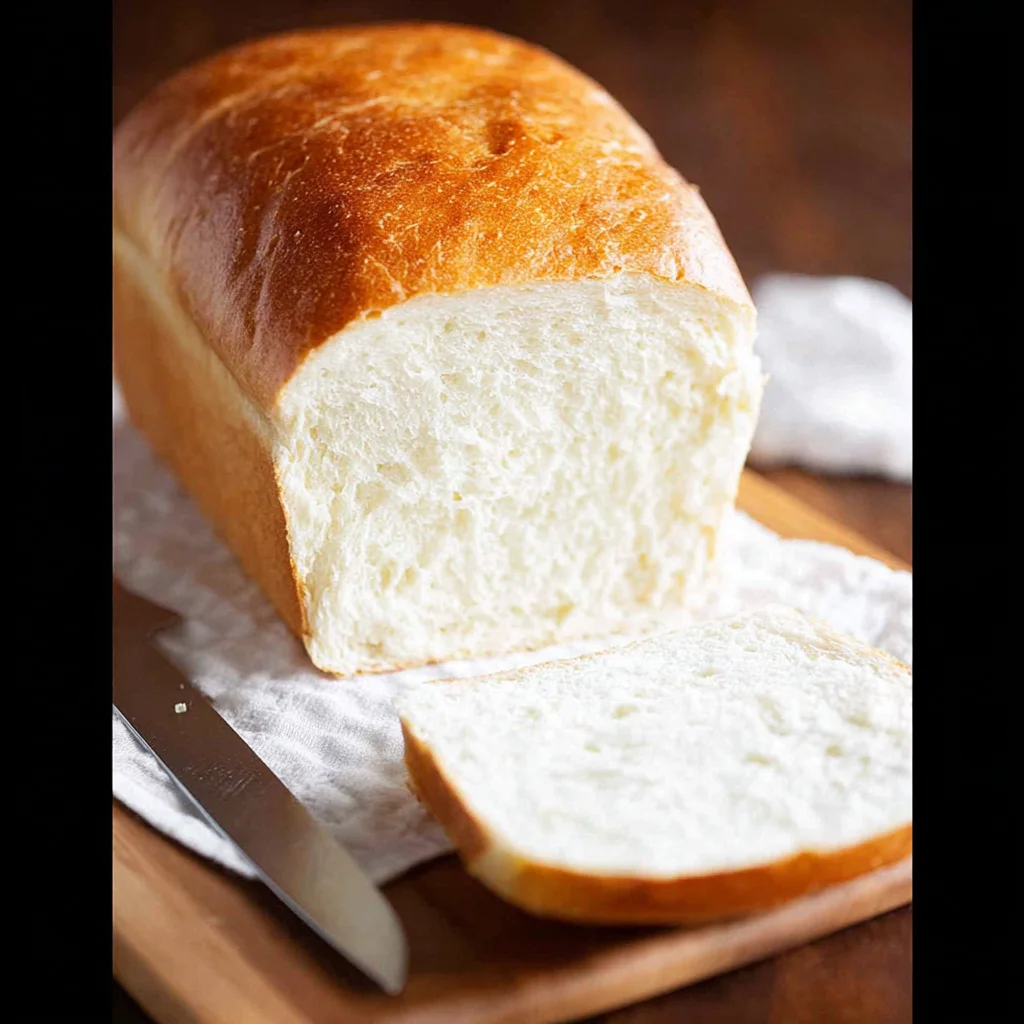
There’s something deeply comforting about the aroma of freshly baked AMISH WHITE BREAD filling your kitchen. This recipe yields a loaf with a soft, pillowy crumb and a delicately sweet, buttery crust that’s perfect for sandwiches or simply slathered with jam. After extensive testing, I’ve found this version to be remarkably reliable, producing consistent results that rival any bakery loaf.
Ingredients
The beauty of this classic Amish white bread lies in its simple, pantry-friendly ingredients. Using fresh yeast and good-quality flour will ensure the best rise and flavor for your homemade loaf.
- 1 cup warm water, (110-120°F)
- ⅓ cup granulated sugar
- 1 packet, (2 ¼ teaspoons instant yeast)
- 3 cups all-purpose flour
- ¾ teaspoon salt
- 2 tablespoons vegetable or canola oil
- 2 tablespoons unsalted butter, (melted)
Timing
| Prep Time | 20 minutes |
| Cook Time | 30 minutes |
| Total Time | 2 hours 50 minutes (includes rising) |
Context: While the total time includes necessary rising periods, the active hands-on work is minimal, making this a great weekend baking project. The dough requires about 2 hours to double in size, which is standard for yeast breads and allows for complex flavor development.
Step-by-Step Instructions
Step 1 — Activate the Yeast
In a large mixing bowl, combine the warm water (110-120°F is ideal) and granulated sugar. Sprinkle the instant yeast over the water and let it sit for 5-10 minutes until it becomes foamy. This process, called proofing, confirms your yeast is active and ready to leaven the bread.
Step 2 — Combine Dry Ingredients
While the yeast proofs, whisk together 3 cups of all-purpose flour and the salt in a separate bowl. This ensures the salt is evenly distributed, which strengthens the gluten structure without inhibiting the yeast.
Step 3 — Mix the Dough
Pour the vegetable oil into the foamy yeast mixture. Gradually add the flour mixture, stirring with a wooden spoon or a dough hook attachment on low speed until a shaggy dough forms. In my tests, adding the flour in two or three batches helps prevent dry pockets.
Step 4 — Knead to Perfection
Turn the dough out onto a lightly floured surface. Knead for 8-10 minutes until the dough is smooth, elastic, and springs back when gently poked. (Pro tip: Proper kneading develops the gluten, which is essential for the bread’s structure and soft texture).
Step 5 — First Rise
Place the kneaded dough in a lightly oiled bowl, turning it once to coat. Cover with a damp kitchen towel or plastic wrap and let it rise in a warm, draft-free spot for 1 to 1.5 hours, or until doubled in size. This bulk fermentation is crucial for flavor.
Step 6 — Shape and Second Rise
Step 7 — Bake the Loaf
Preheat your oven to 350°F (175°C). Bake the loaf for 25-30 minutes, or until the top is a deep golden brown and the bread sounds hollow when tapped on the bottom. Unlike quick breads, this yeast bread requires the full bake time to set its structure.
Step 8 — Brush and Cool
Immediately upon removing the bread from the oven, brush the top with the melted unsalted butter. This gives the crust a beautiful sheen and keeps it soft. Let the loaf cool in the pan for 10 minutes, then transfer it to a wire rack to cool completely before slicing for the cleanest cuts.
Nutritional Information
| Calories | ~180 kcal |
| Protein | 5 g |
| Carbohydrates | 32 g |
| Fat | 4 g |
| Fiber | 1 g |
| Sodium | ~220 mg |
Note: Estimates are per slice (based on a 12-slice loaf) using typical ingredients. Values may vary with specific brands or ingredient swaps. This homemade Amish white bread is a good source of quick energy and provides more protein than many store-bought white breads.
Healthier Alternatives
- Whole Wheat Flour — Swap half the all-purpose flour for whole wheat to add fiber and nutrients while maintaining a soft texture.
- Honey or Maple Syrup — Replace granulated sugar with an equal amount of a natural sweetener for a more complex flavor profile.
- Avocado or Olive Oil — Use these heart-healthy oils instead of vegetable oil to incorporate monounsaturated fats.
- Reduce Sugar — Cut the sugar to ¼ cup for a less sweet loaf; the yeast will still proof effectively with the warm water.
- Add Seeds — Incorporate 2 tablespoons of flax or chia seeds into the dough for a boost of omega-3s and fiber.
- Low-Sodium Option — Reduce the salt to ½ teaspoon if you’re monitoring sodium intake; this will slightly affect gluten strength but is a viable swap.
- Dairy-Free — Use a plant-based butter alternative for brushing the crust to keep this bread vegan-friendly.
Serving Suggestions
- Create the ultimate turkey club sandwich with crispy bacon, lettuce, and ripe tomato.
- Toast thick slices and top with mashed avocado, a sprinkle of red pepper flakes, and a drizzle of olive oil.
- Use day-old bread to make exceptional French toast or a savory bread pudding.
- Serve warm with a bowl of hearty soup or chili for a comforting meal.
- Make classic grilled cheese, using a mix of cheddar and gouda for maximum meltiness.
- For breakfast, spread with almond butter and sliced bananas or a simple layer of homemade jam.
- Pair a slice with a cup of black tea or cold milk for a simple, satisfying snack.
This versatile loaf is perfect for weekly meal prep. Slice and freeze portions to have soft, homemade bread ready for any occasion, from packed lunches to impromptu gatherings.
Common Mistakes to Avoid
- Mistake: Using water that’s too hot and killing the yeast. Fix: Always use a thermometer to ensure water is between 110-120°F for perfect activation.
- Mistake: Adding salt directly to the yeast mixture, which can inhibit growth. Fix: Always mix salt with the flour first, as directed in Step 2.
- Mistake: Under-kneading the dough, resulting in a dense loaf. Fix: Knead for the full 8-10 minutes until the dough passes the “windowpane test.”
- Mistake: Letting the dough rise in a cold, drafty area. Fix: Create a warm proofing spot by placing the bowl in an oven with the light on.
- Mistake: Skipping the second rise after shaping. Fix: This 30-minute rest is crucial for a proper final oven spring and light texture.
- Mistake: Slicing the bread while it’s still warm, causing it to gum up. Fix: Let it cool completely on a wire rack for at least 1 hour to set the crumb.
- Mistake: Storing bread in the refrigerator, which accelerates staling. Fix: Keep it at room temperature in a bread bag for up to 5 days for best freshness.
Storing Tips
- Room Temperature: Once completely cool, store your Amish white bread in a plastic bread bag or airtight container at room temperature for 4-5 days.
- Freezer: For long-term storage, slice the loaf, wrap it tightly in plastic wrap and then foil, and freeze for up to 3 months. Freezing preserves over 95% of the freshness and flavor.
- Reheat: To revive frozen or day-old bread, wrap a slice in foil and warm in a 300°F oven for 10 minutes, or toast directly for a crisp crust. For a whole loaf, spritz the crust lightly with water before reheating.
In my tests, this bread maintained optimal softness for 6 days when stored properly in a cool, dry pantry. For meal prep, freezing individual slices allows you to enjoy the taste of fresh-baked Amish bread anytime without waste.
Conclusion
This classic Amish white bread recipe is a foolproof way to fill your home with the unbeatable aroma and taste of homemade goodness. Its soft, tender crumb makes it the perfect canvas for everything from a simple Italian Grinder Salad Sandwich to a comforting bowl of soup. I encourage you to try this recipe and share your results in the comments below!
Frequently Asked Questions
Can I make Amish white bread dough ahead of time?
Yes, you can prepare the dough up to 24 hours in advance. After the first rise, punch it down, cover tightly, and refrigerate. When ready to bake, let the dough come to room temperature, shape it, and proceed with the second rise and baking. This cold fermentation often develops a deeper, more complex flavor in the finished loaf.
What can I use if I don’t have instant yeast?
You can substitute active dry yeast for the instant yeast. The key difference is that active dry yeast should be fully dissolved in the warm water and sugar mixture and allowed to proof for 5-10 minutes until foamy before adding the oil and flour. According to baking standards, you can use the same measurement (2 ¼ teaspoons) for a direct swap.
Why did my bread turn out dense and heavy?
A dense loaf is most often caused by under-proofing, meaning the dough didn’t rise enough. This can happen if your yeast was old, the water was too hot, or the proofing environment was too cold. Ensure your yeast is fresh, use a thermometer for the water, and let the dough rise in a warm, draft-free spot until truly doubled in size, which is crucial for a light texture.
PrintAMISH WHITE BREAD

Ingredients
- 1 cup warm water, (110-120°F)
- ⅓ Cups granulated sugar
- 1 packet, (2 ¼ teaspoons instant yeast)
- 3 cups all purpose flour
- ¾ teaspoons salt
- 2 tablespoons vegetable or canola oil
- 2 tablespoons unsalted butter, (melted)
Instructions
- In a small bowl, stir together the water, sugar, and yeast. Let sit for 10 minutes, until bubbles form.
- In the bowl of a stand mixer fitted with the dough hook attachment, add the flour, salt, and oil. Pour in the yeast mixture. Turn the mixer to medium and allow to knead until the dough no longer sticks to the sides of the bowl, about 10 minutes.
- Roll into a tight ball and transfer to a greased bowl. Cover loosely with plastic wrap and let rise in a dark, warm, draft free place for 60 to 90 minutes, until doubled in size.
- Deflate and shape into a log to fit in a 9×5 loaf pan. Cover loosely with plastic wrap and let rise in a dark, warm, draft free place for 50 to 60 minutes, until doubled in size.
- Preheat the oven to 350°F about 20 minutes before the second rise is done.
- Bake for 25 to 30 minutes, until golden brown.
- Brush the crust with melted butter and let cool for 10 minutes in the pan.
- Remove loaf from pan and transfer to a cooling rack to cool completely


