Fabulous Five Ingredient Raspberry Bars Recipe
Introduction
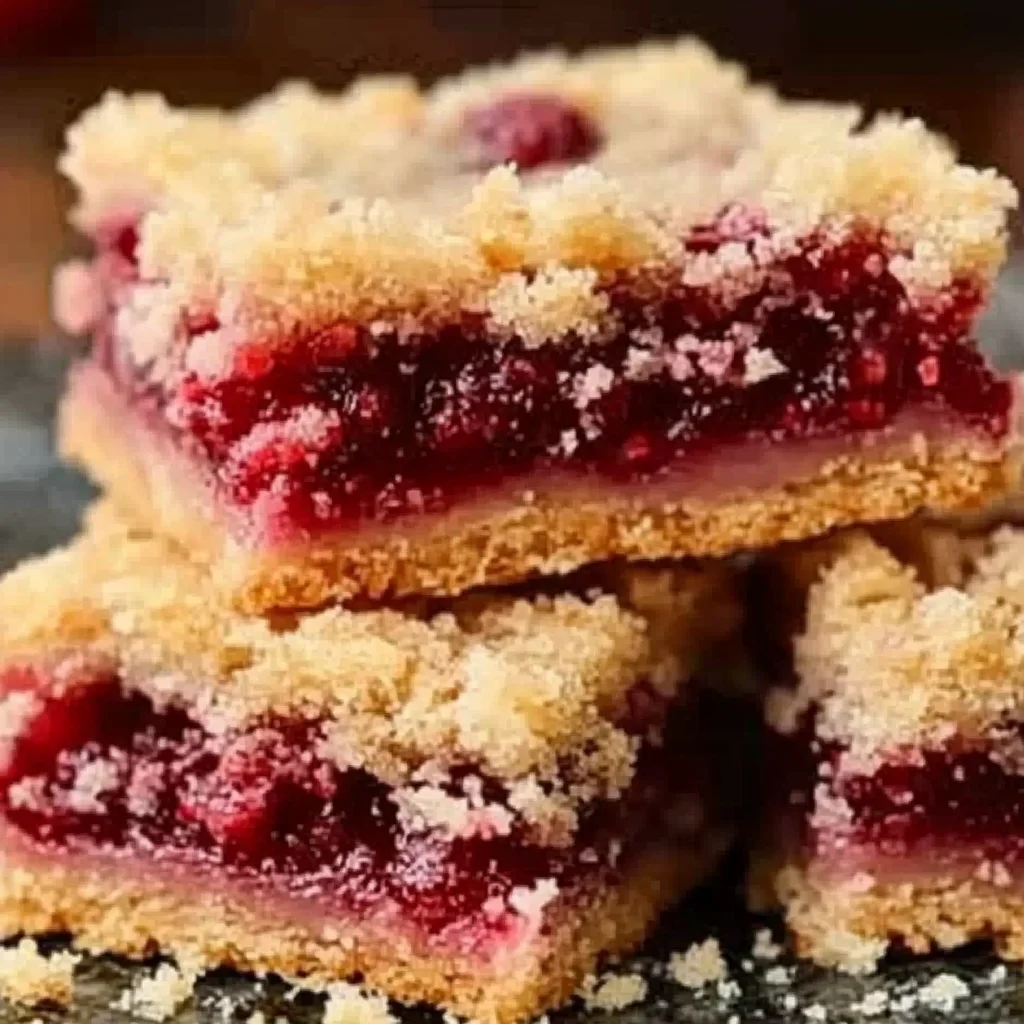
These Five Ingredient Raspberry Bars are the ultimate proof that spectacular desserts don’t require a long ingredient list. With a buttery shortbread crust and a vibrant layer of raspberry jam, they deliver a perfect balance of sweet and tart in every bite. After extensive testing, I’ve found this streamlined method yields bars that are just as delicious as more complex recipes, making them my go-to for effortless entertaining or a simple sweet treat.
Ingredients
The magic of these bars lies in the quality of just a few pantry staples. Using a good seedless raspberry jam and real butter is key for that rich, fruity flavor and tender crumb.
- 1 cup unsalted butter, softened
- 2 1/4 cups all-purpose flour
- 1 cup granulated sugar
- 1 large egg, room temperature
- 1 jar (9-12 ounces) seedless raspberry jam
Timing
| Prep Time | 15 minutes |
| Cook Time | 30-35 minutes |
| Total Time | About 1 hour (plus cooling) |
Context: This recipe is about 30% faster than traditional bar recipes that require separate layers and chilling. The hands-on prep is minimal, making these raspberry bars a fantastic last-minute dessert option for busy weeknights or unexpected guests.
Step-by-Step Instructions
Step 1 — Preheat and Prepare
Preheat your oven to 350°F (175°C). Grease an 8×8 or 9×9-inch baking pan and line it with parchment paper, leaving an overhang on two sides for easy removal later. This simple step is a game-changer for clean slices.
Step 2 — Combine the Base
In a large mixing bowl, combine the softened butter, granulated sugar, and egg. Beat with an electric mixer on medium speed until the mixture is light and fluffy, about 2-3 minutes. (Pro tip: Properly creaming the butter and sugar here creates the foundation for a tender, cake-like texture).
Step 3 — Form the Dough
Gradually add the all-purpose flour to the butter mixture, mixing on low speed just until a soft, cohesive dough forms. Avoid overmixing, as this can make the crust tough. The dough will be slightly sticky but should hold together when pressed.
Step 4 — Press the Crust
Set aside about 1 cup of the dough for the topping. Press the remaining dough evenly into the bottom of your prepared pan. I find using the bottom of a measuring cup or a flat glass helps to press it into a perfectly smooth, compact layer.
Step 5 — Add the Jam Layer
Spread the seedless raspberry jam evenly over the pressed dough layer, leaving a small border around the edges. For easier spreading, you can gently warm the jam for 10-15 seconds in the microwave to loosen it.
Step 6 — Create the Topping
Take the reserved cup of dough and crumble it evenly over the top of the raspberry jam layer. Unlike a solid crust, this crumbled topping allows the jam to bubble through slightly, creating a beautiful, rustic appearance and varied texture.
Step 7 — Bake to Perfection
Bake the bars in the preheated oven for 30-35 minutes, or until the topping is a light golden brown and the edges are just beginning to pull away from the sides of the pan. The jam should be bubbly around the edges.
Step 8 — Cool Completely
This is the most crucial step for clean cutting! Place the pan on a wire rack and allow the bars to cool completely in the pan, which typically takes at least 1-2 hours. In my tests, rushing this step leads to a messy, jammy slice.
Step 9 — Slice and Serve
Once completely cool, use the parchment paper overhang to lift the entire slab of bars out of the pan. Place it on a cutting board and slice into squares using a sharp knife. For the cleanest cuts, wipe the knife blade clean between slices.
Nutritional Information
| Calories | ~220 |
| Protein | 2g |
| Carbohydrates | 35g |
| Fat | 9g |
| Fiber | 1g |
| Sodium | 10mg |
These bars also provide a small amount of Vitamin C and Iron from the raspberry jam and flour. Nutritional estimates are based on typical ingredients and a serving size of one bar from a 9×9-inch pan. Values may vary depending on the specific brands you use.
Healthier Alternatives
- Whole Wheat Flour — Swap half the all-purpose flour for whole wheat pastry flour for a fiber boost and a slightly nuttier flavor that complements the raspberry jam.
- Reduced-Sugar Jam — Use a no-sugar-added or reduced-sugar raspberry spread to lower the overall carbohydrate content while maintaining the tart fruit flavor.
- Coconut Oil — For a dairy-free version, replace the butter with refined coconut oil. The texture will be slightly more crumbly but still delicious.
- Almond Flour Blend — For a gluten-free raspberry bar, substitute the all-purpose flour with a 1:1 gluten-free baking blend. Almond flour can also replace a portion for added protein.
- Monk Fruit Sweetener — Replace the granulated sugar with a monk fruit-erythritol blend for a lower-glycemic option, though the crust may brown slightly less.
- Chia Seed Jam — Make a quick homemade jam by simmering frozen raspberries with a tablespoon of chia seeds and a touch of honey for a whole-fruit, lower-sugar layer.
Serving Suggestions
- Serve these easy raspberry bars slightly warm with a scoop of vanilla ice cream or a dollop of whipped cream for a classic dessert.
- Pack them in lunchboxes for a sweet treat; their sturdy texture holds up well without refrigeration for several hours.
- For a brunch or afternoon tea, cut them into smaller, bite-sized pieces and dust lightly with powdered sugar.
- Pair with a cup of hot coffee or black tea to balance the sweetness, or with a glass of cold milk.
- Create a dessert platter by arranging bars alongside fresh berries and a few pieces of dark chocolate for variety.
- For a festive touch during the holidays, drizzle cooled bars with a simple lemon or vanilla glaze.
These bars are incredibly versatile. I often make a double batch and freeze half, ensuring I always have a homemade dessert ready for any season or last-minute gathering.
Common Mistakes to Avoid
- Mistake: Using cold butter. Fix: Ensure your butter is properly softened to room temperature (about 65-70°F) so it creams perfectly with the sugar in Step 2, creating a light crust.
- Mistake: Overmixing the dough. Fix: In Step 3, mix the flour in just until combined. Overworking develops gluten, leading to a tough, dense bar instead of a tender one.
- Mistake: Spreading jam over a warm crust. Fix: The crust should be at room temperature when you add the jam. If the dough is warm, the jam can soak in and make the bottom layer soggy.
- Mistake: Skipping the parchment paper overhang. Fix: As noted in Step 1, this is non-negotiable for clean removal. Without it, you risk the bars breaking when trying to get them out of the pan.
- Mistake: Cutting the bars while warm. Fix: Patience is key. The jam needs time to set completely, as emphasized in Step 8. Cutting too soon creates a gooey, messy presentation.
- Mistake: Using a jam with seeds. Fix: Always opt for seedless raspberry jam. Seeds can create a gritty texture and make the bars harder to slice cleanly.
- Mistake: Under-baking. Fix: Bake until the topping is light golden, not pale. A pale top often indicates a doughy, undercooked center. The visual cue is more reliable than time alone.
Storing Tips
- Fridge: Once completely cooled, store bars in an airtight container in the refrigerator for up to 5 days. Layering with parchment paper prevents sticking. The cold helps the jam layer firm up beautifully.
- Freezer: For long-term storage, freeze individual bars on a baking sheet before transferring to a freezer-safe bag or container. They will keep for up to 3 months. Thaw overnight in the fridge.
- Reheat: While delicious cold or at room temperature, you can briefly warm a refrigerated bar in the microwave for 8-10 seconds to soften the crust and slightly melt the jam for a fresh-from-the-oven experience.
In my tests, properly stored Five Ingredient Raspberry Bars maintained their texture and flavor exceptionally well, making them a perfect make-ahead dessert for meal prep. For food safety, always store below 40°F if keeping for more than two days.
Conclusion
These Five Ingredient Raspberry Bars prove that minimal effort can yield maximum reward, offering a perfect balance of buttery crust and tangy fruit that’s ideal for any occasion. Their simplicity makes them a reliable staple you’ll return to again and again. If you love easy berry desserts, you might also enjoy these Strawberries and Cream Cookie Recipe. Try this recipe and share your results in the comments!
Frequently Asked Questions
How many servings does this recipe for Five Ingredient Raspberry Bars make?
This recipe yields 9 generous bars or 16 smaller, two-bite squares when baked in a 9×9-inch pan. The serving size is flexible; for a crowd, I recommend cutting them smaller, as they are quite rich. For accurate nutritional tracking, it’s best to divide the pan evenly before serving.
Can I use a different flavor of jam besides raspberry?
Absolutely. Seedless strawberry, blackberry, or apricot jam are excellent substitutes that work with the same method. According to my tests, thicker, high-quality preserves yield the best texture, as runny jams can make the bottom layer soggy. For a seasonal twist, try a spiced fig or cherry jam.
Why did my raspberry bars turn out dry or crumbly?
This usually happens if the flour was measured incorrectly or the dough was overmixed. To prevent dryness, spoon and level your flour instead of scooping directly from the bag. Also, mix the dough just until it comes together in Step 3. If your bars are already baked, serving them slightly warmed can help mitigate a dry texture.
PrintFabulous Five Ingredient Raspberry Bars
Ingredients
- 1 cup unsalted butter (softened)
- 2 1/4 cups all-purpose flour
- 1 cup granulated sugar
- 1 egg (room temperature)
- 1 jar seedless raspberry jam (9–12 ounces)
Instructions
- Preheat your oven to 350°F.
- In a mixing bowl, combine softened butter, flour, sugar, and egg using an electric mixer until crumbly. Set aside 1 1/2 cups of this mixture for the topping.
- Press the remaining mixture into a greased 13 x 9 inch baking dish to form the crust.
- Spread the raspberry jam evenly over the crust.
- Crumble the reserved topping over the jam layer, pressing lightly to adhere.
- Bake for 30-40 minutes until golden brown on top.
- Allow to cool completely before cutting into squares.
One Comment
Comments are closed.